Quick Start Guide
Page 1
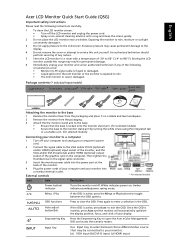
... modes. Once the OSD is active, press Auto to exit the OSD. White indicates power on the signal cable connector. 3 Insert the monitor power cable into a nearby electrical outlet. Auto adjust button/Exit Empowering Key If the OSD is inactive, press Auto and the monitor will automatically optimize the display position, focus, and clock of your monitor into the power port at the back of the monitor. 4 Plug the power cords of the following instructions carefully. 1 To clean the LCD monitor screen: • Turn...
... modes. Once the OSD is active, press Auto to exit the OSD. White indicates power on the signal cable connector. 3 Insert the monitor power cable into a nearby electrical outlet. Auto adjust button/Exit Empowering Key If the OSD is inactive, press Auto and the monitor will automatically optimize the display position, focus, and clock of your monitor into the power port at the back of the monitor. 4 Plug the power cords of the following instructions carefully. 1 To clean the LCD monitor screen: • Turn...
Quick Start Guide
Page 2
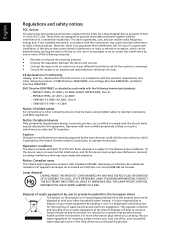
... installation. Operation with the instructions, may cause undesired operation. FOR MORE INFORMATION, CONTACT THE ELECTRONIC INDUSTRIES ALLIANCE AT WWW.EIAE.ORG. This device generates, uses, and can be disposed of the FCC Rules. FOR LAMP SPECIFIC DISPOSAL INFORMATION CHECK WWW.LAMPRECYCLE.ORG. Operation conditions This device complies with Part 15 of with your waste equipment by user...
... installation. Operation with the instructions, may cause undesired operation. FOR MORE INFORMATION, CONTACT THE ELECTRONIC INDUSTRIES ALLIANCE AT WWW.EIAE.ORG. This device generates, uses, and can be disposed of the FCC Rules. FOR LAMP SPECIFIC DISPOSAL INFORMATION CHECK WWW.LAMPRECYCLE.ORG. Operation conditions This device complies with Part 15 of with your waste equipment by user...
User Manual
Page 2
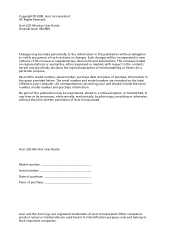
Acer LCD Monitor User Guide Original Issue: 08/2008 Changes may be reproduced, stored in a retrieval system, or transmitted, in this manual or supplementary documents and publications. This company makes no representations or warranties, either expressed or implied, with respect to your unit should include the serial number, model number and purchase information. The serial number and model number are used herein for a particular purpose. All correspondence concerning...
Acer LCD Monitor User Guide Original Issue: 08/2008 Changes may be reproduced, stored in a retrieval system, or transmitted, in this manual or supplementary documents and publications. This company makes no representations or warranties, either expressed or implied, with respect to your unit should include the serial number, model number and purchase information. The serial number and model number are used herein for a particular purpose. All correspondence concerning...
User Manual
Page 3
... Safety instructions Read these guidelines when cleaning the monitor: • Always unplug the monitor before connecting any cable or unplugging the power cord. • If the system has multiple sources of the fluorescent light, the screen may remain after switching the image, when the same image is displayed for hours. Keep this case, the screen is attached to its base before connecting the power cord to the AC power outlet. • Make sure...
... Safety instructions Read these guidelines when cleaning the monitor: • Always unplug the monitor before connecting any cable or unplugging the power cord. • If the system has multiple sources of the fluorescent light, the screen may remain after switching the image, when the same image is displayed for hours. Keep this case, the screen is attached to its base before connecting the power cord to the AC power outlet. • Make sure...
User Manual
Page 4
... your hearing, follow these instructions. • Gradually increase the volume until you can 't hear people speaking near you. Using electrical power • This product should never be blocked or covered. iv Accessibility Be sure that the power outlet you plug the power cord into this product, make sure that could be sure to unplug the power cord from overheating. This product should...
... your hearing, follow these instructions. • Gradually increase the volume until you can 't hear people speaking near you. Using electrical power • This product should never be blocked or covered. iv Accessibility Be sure that the power outlet you plug the power cord into this product, make sure that could be sure to unplug the power cord from overheating. This product should...

User Manual
Page 5
Do not insert the plug into the extension cord does not exceed the extension cord ampere rating. If power strips are used, the load should not exceed 80% of the power strip's input rating. • This product's power cord is equipped with the supplied power supply cord set , make sure that is properly grounded before inserting the power cord plug. Product servicing Do not attempt to qualified service personnel. Unplug this product from...
Do not insert the plug into the extension cord does not exceed the extension cord ampere rating. If power strips are used, the load should not exceed 80% of the power strip's input rating. • This product's power cord is equipped with the supplied power supply cord set , make sure that is properly grounded before inserting the power cord plug. Product servicing Do not attempt to qualified service personnel. Unplug this product from...

User Manual
Page 6
... controls may contain small parts. Switch off the device near gas pumps at Acer are very conscious of the environmental effects of our business and strive to identify and provide the best working procedures to normal condition. Areas with a potentially explosive atmosphere and obey all signs and instructions.... are in progress. or where blasting operations are often, but not always, marked. For more information and help when recycling, please go to turn off your vehicle engine. Disposal instructions Do not throw this website: http://global.acer.com/about /sustainability.htm
... controls may contain small parts. Switch off the device near gas pumps at Acer are very conscious of the environmental effects of our business and strive to identify and provide the best working procedures to normal condition. Areas with a potentially explosive atmosphere and obey all signs and instructions.... are in progress. or where blasting operations are often, but not always, marked. For more information and help when recycling, please go to turn off your vehicle engine. Disposal instructions Do not throw this website: http://global.acer.com/about /sustainability.htm
User Manual
Page 7
... LCD/CRT monitor or display:lamp(s) inside this product meets the ENERGY STAR guidelines for comfortable use Computer users may occasionally misfire or appear as black or red dots. LCD pixel statement The LCD unit is applicable only to local, state or federal laws. This has no effect on the recorded image and does not constitute a malfunction. Products that gives people the power...
... LCD/CRT monitor or display:lamp(s) inside this product meets the ENERGY STAR guidelines for comfortable use Computer users may occasionally misfire or appear as black or red dots. LCD pixel statement The LCD unit is applicable only to local, state or federal laws. This has no effect on the recorded image and does not constitute a malfunction. Products that gives people the power...
User Manual
Page 8
...; refrain from staying too long in one fixed posture • avoid slouching forward and/or leaning backward • stand up and walk around regularly to remove the strain on a distant point. • Blink frequently to keep your company's health and safety department. Eyes...the monitor, using a task light • changing the display's viewing angle Observe the following section provides tips for enhanced text readability and graphics clarity. • Eliminate glare and reflections by looking at the middle of the display. • Adjust the display brightness and/or contrast to ...
...; refrain from staying too long in one fixed posture • avoid slouching forward and/or leaning backward • stand up and walk around regularly to remove the strain on a distant point. • Blink frequently to keep your company's health and safety department. Eyes...the monitor, using a task light • changing the display's viewing angle Observe the following section provides tips for enhanced text readability and graphics clarity. • Eliminate glare and reflections by looking at the middle of the display. • Adjust the display brightness and/or contrast to ...

User Manual
Page 9
... of the following EC directives, and that : Product: LCD Monitor Trade Name: Acer Model Number: H213H SKU Number: H213Hxxx("x" = 0~9, a ~ z, or A ~ Z) or blank Is compliant with the requirements. ix • using a glare-reduction filter • using a display visor, such as a piece of cardboard extended from the display's top front edge • Avoid adjusting your computer use more relaxing and productive: • Take short breaks...
... of the following EC directives, and that : Product: LCD Monitor Trade Name: Acer Model Number: H213H SKU Number: H213Hxxx("x" = 0~9, a ~ z, or A ~ Z) or blank Is compliant with the requirements. ix • using a glare-reduction filter • using a display visor, such as a piece of cardboard extended from the display's top front edge • Avoid adjusting your computer use more relaxing and productive: • Take short breaks...
User Manual
Page 11
... the base (for selected models) 3 Screen position adjustment 4 Connecting the power cord 4 Power saving 4 Connecting the docking device (for selected models) 5 Display Data Channel (DDC) 5 Connector pin assignment 5 15-pin color display signal cable 5 24-pin color display signal cable 6 19-pin color display signal cable* 6 Standard timing table 7 Installation 8 Users controls 9 Front panel controls 9 Acer eColor Management 10 Operation instructions 10 Features and benefits 10 Adjusting the OSD settings 11 Adjusting the picture quality 11 Adjusting the OSD...
... the base (for selected models) 3 Screen position adjustment 4 Connecting the power cord 4 Power saving 4 Connecting the docking device (for selected models) 5 Display Data Channel (DDC) 5 Connector pin assignment 5 15-pin color display signal cable 5 24-pin color display signal cable 6 19-pin color display signal cable* 6 Standard timing table 7 Installation 8 Users controls 9 Front panel controls 9 Acer eColor Management 10 Operation instructions 10 Features and benefits 10 Adjusting the OSD settings 11 Adjusting the picture quality 11 Adjusting the OSD...
User Manual
Page 15
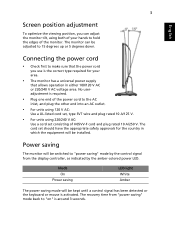
.... Connecting the power cord • Check first to make sure that allows operation in which the equipment will be adjusted to "power saving" mode by the control signal from the display controller, as indicated by the amber-colored power LED. The cord set consisting of the monitor. The monitor can adjust the monitor tilt, using 220/240 V AC: Use a cord set should have the appropriate safety approvals for your hands to hold the edges of H05VV-F cord and plug rated...
.... Connecting the power cord • Check first to make sure that allows operation in which the equipment will be adjusted to "power saving" mode by the control signal from the display controller, as indicated by the amber-colored power LED. The cord set consisting of the monitor. The monitor can adjust the monitor tilt, using 220/240 V AC: Use a cord set should have the appropriate safety approvals for your hands to hold the edges of H05VV-F cord and plug rated...
User Manual
Page 16
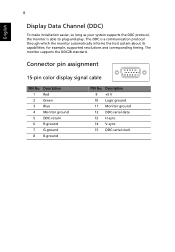
... its capabilities; The monitor supports the DDC2B standard. Connector pin assignment 15-pin color display signal cable 1 5 6 10 11 15 PIN No. Description 1 Red 2 Green 3 Blue 4 Monitor ground 5 DDC-return 6 R-ground 7 G-ground 8 B-ground PIN No. The DDC is able to plug-and-play. Description 9 +5 V 10 Logic ground 11 Monitor ground 12 DDC-serial data 13 H-sync 14 V-sync 15 DDC-serial clock for example, supported resolutions and corresponding timing.
... its capabilities; The monitor supports the DDC2B standard. Connector pin assignment 15-pin color display signal cable 1 5 6 10 11 15 PIN No. Description 1 Red 2 Green 3 Blue 4 Monitor ground 5 DDC-return 6 R-ground 7 G-ground 8 B-ground PIN No. The DDC is able to plug-and-play. Description 9 +5 V 10 Logic ground 11 Monitor ground 12 DDC-serial data 13 H-sync 14 V-sync 15 DDC-serial clock for example, supported resolutions and corresponding timing.

User Manual
Page 17
...) 16 SDA 18 +5V Power * only for +5 V hsync.vsync) 16 Hot-plug detection 17 TMDS data 0- 18 TMDS data 0+ 19 TMDS data 0/5 shield 20 NC 21 NC 22 TMDS clock shield 23 TMDS clock+ 24 DDC TMDS clock- 19-pin color display signal cable* 1917151311 9 7 5 3... 1 1816141210 8 6 4 2 PIN No. Description 2 TMDS Data2 Shield 4 TMDS Data1+ 6 TMDS Data1- 8 TMDS Data0 Shield 10 TMDS Clock+ 12 TMDS Clock- 14 Reserved (N.C. Description 13 NC 14 +5 V power 15 GND (return for certain models 5 24-pin color display signal cable English ...
...) 16 SDA 18 +5V Power * only for +5 V hsync.vsync) 16 Hot-plug detection 17 TMDS data 0- 18 TMDS data 0+ 19 TMDS data 0/5 shield 20 NC 21 NC 22 TMDS clock shield 23 TMDS clock+ 24 DDC TMDS clock- 19-pin color display signal cable* 1917151311 9 7 5 3... 1 1816141210 8 6 4 2 PIN No. Description 2 TMDS Data2 Shield 4 TMDS Data1+ 6 TMDS Data1- 8 TMDS Data0 Shield 10 TMDS Clock+ 12 TMDS Clock- 14 Reserved (N.C. Description 13 NC 14 +5 V power 15 GND (return for certain models 5 24-pin color display signal cable English ...
User Manual
Page 19
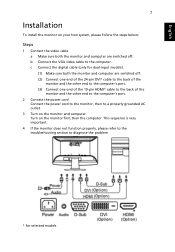
... the problem * for dual-input models). (1) Make sure both the monitor and computer are switched off. (2) Connect one end of the 24-pin DVI* cable to the back of the monitor and the other end to the computer's port. (3) Connect one end of the 19-pin HDMI* cable to the back of the monitor and the other end to the computer's port. 2 Connect the power cord Connect the power cord to the monitor...
... the problem * for dual-input models). (1) Make sure both the monitor and computer are switched off. (2) Connect one end of the 24-pin DVI* cable to the back of the monitor and the other end to the computer's port. (3) Connect one end of the 19-pin HDMI* cable to the back of the monitor and the other end to the computer's port. 2 Connect the power cord Connect the power cord to the monitor...
User Manual
Page 20
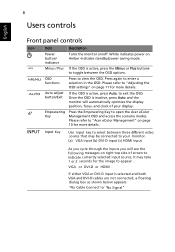
... to open the Acer eColor Management OSD and access the scenario modes. Auto adjust button/Exit If the OSD is selected and both VGA and DVI-D cables are not connected, a floating dialog box as shown below appears: "No Cable Connect"or "No S ignal" Amber indicates standby/power saving mode. / Minus / Plus If the OSD is inactive, press Auto and the monitor will automatically optimize the display position, focus, and clock of your monitor. (a) VGA input (b) DVI-D input (c) HDMI input As...
... to open the Acer eColor Management OSD and access the scenario modes. Auto adjust button/Exit If the OSD is selected and both VGA and DVI-D cables are not connected, a floating dialog box as shown below appears: "No Cable Connect"or "No S ignal" Amber indicates standby/power saving mode. / Minus / Plus If the OSD is inactive, press Auto and the monitor will automatically optimize the display position, focus, and clock of your monitor. (a) VGA input (b) DVI-D input (c) HDMI input As...

User Manual
Page 21
.... English 9 Acer eColor Management Operation instructions 1 Press the Empowering Key to open the Acer eColor Management OSD and access the scenario modes. 2 Press " " or " " to select the mode. 3 Press the Auto-adjust button to read onscreen text. Reflects native display capability. Displays scenes in unsuitably-lit environments. Pictures and photographs appear in vibrant colors with sharp detail. Features and benefits Main menu Sub menu item Description icon User mode User-defined...
.... English 9 Acer eColor Management Operation instructions 1 Press the Empowering Key to open the Acer eColor Management OSD and access the scenario modes. 2 Press " " or " " to select the mode. 3 Press the Auto-adjust button to read onscreen text. Reflects native display capability. Displays scenes in unsuitably-lit environments. Pictures and photographs appear in vibrant colors with sharp detail. Features and benefits Main menu Sub menu item Description icon User mode User-defined...
User Manual
Page 22
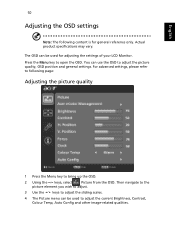
You can use the OSD to open the OSD. Press the Menu key to adjust the picture quality, OSD position and general settings. The OSD can be used to adjust the current Brightness, Contrast, Colour Temp, Auto Config and other image-related qualities. English 10 Adjusting the OSD settings Note: The following page: Adjusting the picture quality 1 Press the Menu key to adjust the sliding scales. 4 The Picture menu can be used for general reference only. For advanced settings, please...
You can use the OSD to open the OSD. Press the Menu key to adjust the picture quality, OSD position and general settings. The OSD can be used to adjust the current Brightness, Contrast, Colour Temp, Auto Config and other image-related qualities. English 10 Adjusting the OSD settings Note: The following page: Adjusting the picture quality 1 Press the Menu key to adjust the sliding scales. 4 The Picture menu can be used for general reference only. For advanced settings, please...
User Manual
Page 26
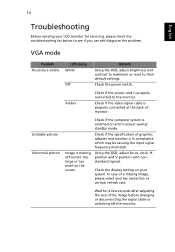
VGA mode Problem No picture visible LED status White Off Remedy Using the OSD, adjust brightness and contrast to maximum or reset to see if you can self-diagnose the problem. Check the power switch. Check if the video signal cable is properly connected to the monitor. Image is missing, off the monitor. Unstable picture Abnormal picture Check if the computer system is in power saving/ standby mode. Check the display setting on the screen. 14 English Troubleshooting Before sending your system. In case of the image before...
VGA mode Problem No picture visible LED status White Off Remedy Using the OSD, adjust brightness and contrast to maximum or reset to see if you can self-diagnose the problem. Check the power switch. Check if the video signal cable is properly connected to the monitor. Image is missing, off the monitor. Unstable picture Abnormal picture Check if the computer system is in power saving/ standby mode. Check the display setting on the screen. 14 English Troubleshooting Before sending your system. In case of the image before...
User Manual
Page 27
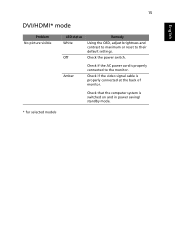
Check that the computer system is properly connected at the back of monitor. Check if the video signal cable is switched on and in power saving/ standby mode. * for selected models Check the power switch. Amber Check if the AC power cord is properly connected to their default settings. 15 English DVI/HDMI* mode Problem No picture visible LED status White Off Remedy Using the OSD, adjust brightness and contrast to maximum or reset to the monitor.
Check that the computer system is properly connected at the back of monitor. Check if the video signal cable is switched on and in power saving/ standby mode. * for selected models Check the power switch. Amber Check if the AC power cord is properly connected to their default settings. 15 English DVI/HDMI* mode Problem No picture visible LED status White Off Remedy Using the OSD, adjust brightness and contrast to maximum or reset to the monitor.


