
User Manual
Page 6
UNPACKING Please check the following items are present when you unpack the box, and save the packing materials in case you will need to ship or transport the monitor in future. • LCD Monitor • HDMI Cable (Optional) • 3D Glasses • AC Power Cord • D-Sub Cable (Optional) • DVI Cable (Optional) • Power adaptor • Audio Cable (Optional) • User Manual • Quick Start Guide LCD monitor EN-5
UNPACKING Please check the following items are present when you unpack the box, and save the packing materials in case you will need to ship or transport the monitor in future. • LCD Monitor • HDMI Cable (Optional) • 3D Glasses • AC Power Cord • D-Sub Cable (Optional) • DVI Cable (Optional) • Power adaptor • Audio Cable (Optional) • User Manual • Quick Start Guide LCD monitor EN-5
User Manual
Page 12
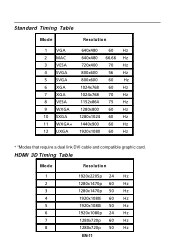
... SXGA 1280x1024 60 Hz 11 WXGA+ 1440x900 60 Hz 12 UXGA 1920x1080 60 Hz * *Modes that require a dual link DVI cable and compatible graphic card. HDMI 3D Timing Table Mode Resolution 1 1920x2205p 24 Hz 2 1280x1470p 60 Hz 3 1280x1470p 50 Hz 4 1920x1080i 60 Hz 5 1920x1080i 50 Hz 6 1920x1080p 24 Hz 7 1280x720p 60...
... SXGA 1280x1024 60 Hz 11 WXGA+ 1440x900 60 Hz 12 UXGA 1920x1080 60 Hz * *Modes that require a dual link DVI cable and compatible graphic card. HDMI 3D Timing Table Mode Resolution 1 1920x2205p 24 Hz 2 1280x1470p 60 Hz 3 1280x1470p 50 Hz 4 1920x1080i 60 Hz 5 1920x1080i 50 Hz 6 1920x1080p 24 Hz 7 1280x720p 60...

User Manual
Page 13
... the problem. Power-ON Monitor and Computer Power-ON the monitor first, then power-ON the computer. EN-12 b. Connect the HDMI cable to the computer's port. 1-3 Connect HDMI Cable (Only HDMI-Input Model) a. This sequence is very important. 5. b. Connect one end of the 24-pin DVI cable to the back of the...
... the problem. Power-ON Monitor and Computer Power-ON the monitor first, then power-ON the computer. EN-12 b. Connect the HDMI cable to the computer's port. 1-3 Connect HDMI Cable (Only HDMI-Input Model) a. This sequence is very important. 5. b. Connect one end of the 24-pin DVI cable to the back of the...

User Manual
Page 14
... to set the HPos, VPos, Clock and Focus. Lights up to indicate the power is used to appear. It may be connected to open the Acer eColor Management OSD and access the scenario modes. Using the Shortcut Menu Press the function button to your monitor. (a) VGA input (b) DVI input... As you cycle through the sources you quickly select the most commonly accessed settings. The Auto Adjustment function is turned ON. VGA or DVI or HDMI If either VGA or DVI input is selected ,but the VGA and DVI cables are not connected, a floating dialog box indicates: "No Cable Connect" or...
... to set the HPos, VPos, Clock and Focus. Lights up to indicate the power is used to appear. It may be connected to open the Acer eColor Management OSD and access the scenario modes. Using the Shortcut Menu Press the function button to your monitor. (a) VGA input (b) DVI input... As you cycle through the sources you quickly select the most commonly accessed settings. The Auto Adjustment function is turned ON. VGA or DVI or HDMI If either VGA or DVI input is selected ,but the VGA and DVI cables are not connected, a floating dialog box indicates: "No Cable Connect" or...

User Manual
Page 21
... system is sufficiently charged. No Picture · Check if AC power cord is properly connected to reconnect the Glasses. · Ensure the battery is ON. (HDMI Mode) Problems Current Status Monitor LED ON No 3D effect After checking the items above Glasses not Monitor LED ON working Remedy · Ensure the...
... system is sufficiently charged. No Picture · Check if AC power cord is properly connected to reconnect the Glasses. · Ensure the battery is ON. (HDMI Mode) Problems Current Status Monitor LED ON No 3D effect After checking the items above Glasses not Monitor LED ON working Remedy · Ensure the...
User Manual
Page 31
Contents Information for your safety and comfort iii Safety requirements iii Warning about Epilepsy iii Warning about seizures iv Tips and information for comfortable use v Introducing 3D technology 1 Wireless glasses 1 Charging the glasses 1 Using the glasses 2 Hardware Installation 3 Setting up 3D Vision (Dual DVI to PC) 3 Connecting the display 3 Setting up HDMI 3D 5 Frequently asked questions 6 3D Vision is not working 6 Excessive flickering 6 Eyestrain/headache 7 3D content isn't shown correctly on the display 7
Contents Information for your safety and comfort iii Safety requirements iii Warning about Epilepsy iii Warning about seizures iv Tips and information for comfortable use v Introducing 3D technology 1 Wireless glasses 1 Charging the glasses 1 Using the glasses 2 Hardware Installation 3 Setting up 3D Vision (Dual DVI to PC) 3 Connecting the display 3 Setting up HDMI 3D 5 Frequently asked questions 6 3D Vision is not working 6 Excessive flickering 6 Eyestrain/headache 7 3D content isn't shown correctly on the display 7

User Manual
Page 36
Note: Compatible graphic cards include: NVIDIA GT300 Series, NVIDIA GTX400 Series, For more information, please visit: http://www.nvidia.com/object/3d-vision-requirements.html 3D LCD PC HDMI HDMI HDMI cable English 5 Setting up HDMI 3D Connect your Acer 3D monitor to your HDMI compatible PC or Blu-ray player.
Note: Compatible graphic cards include: NVIDIA GT300 Series, NVIDIA GTX400 Series, For more information, please visit: http://www.nvidia.com/object/3d-vision-requirements.html 3D LCD PC HDMI HDMI HDMI cable English 5 Setting up HDMI 3D Connect your Acer 3D monitor to your HDMI compatible PC or Blu-ray player.

User Manual
Page 38
Please refer to your source device supports HDMI 1.4a 3D. Warning: If eyestrain and headaches persist, discontinue viewing in North America when lights are on • 110 Hz refresh rate for daytime and ...
Please refer to your source device supports HDMI 1.4a 3D. Warning: If eyestrain and headaches persist, discontinue viewing in North America when lights are on • 110 Hz refresh rate for daytime and ...


