
User Manual
Page 1
TABLE OF CONTENTS Special notes on LCD monitors 1 Information for your safety and comfort 2 Unpacking 5 Attaching/Removing the base 6 Screen position adjustment 6 Connecting the power cord 7 Safety precaution 7 Cleaning your monitor 7 Power saving 8 DDC 8 Power adaptor 8 Connector Pin Assignment 9 Standard/3D Timing Table 11 Installation 12 User controls 13 Troubleshooting 19
TABLE OF CONTENTS Special notes on LCD monitors 1 Information for your safety and comfort 2 Unpacking 5 Attaching/Removing the base 6 Screen position adjustment 6 Connecting the power cord 7 Safety precaution 7 Cleaning your monitor 7 Power saving 8 DDC 8 Power adaptor 8 Connector Pin Assignment 9 Standard/3D Timing Table 11 Installation 12 User controls 13 Troubleshooting 19
User Manual
Page 2
... ON LCD MONITORS The following symptoms are normal with LCD monitor and do not indicate a problem. In this case, the screen is displayed for hours. 3D Experience: • 3D visual effects require 3D compatible software, nVidia® 3D Vision™ glasses and a compatible...
... ON LCD MONITORS The following symptoms are normal with LCD monitor and do not indicate a problem. In this case, the screen is displayed for hours. 3D Experience: • 3D visual effects require 3D compatible software, nVidia® 3D Vision™ glasses and a compatible...

User Manual
Page 6
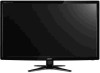
UNPACKING Please check the following items are present when you unpack the box, and save the packing materials in case you will need to ship or transport the monitor in future. • LCD Monitor • HDMI Cable (Optional) • 3D Glasses • AC Power Cord • D-Sub Cable (Optional) • DVI Cable (Optional) • Power adaptor • Audio Cable (Optional) • User Manual • Quick Start Guide LCD monitor EN-5
UNPACKING Please check the following items are present when you unpack the box, and save the packing materials in case you will need to ship or transport the monitor in future. • LCD Monitor • HDMI Cable (Optional) • 3D Glasses • AC Power Cord • D-Sub Cable (Optional) • DVI Cable (Optional) • Power adaptor • Audio Cable (Optional) • User Manual • Quick Start Guide LCD monitor EN-5

User Manual
Page 9
... the following power supplies: Manufacturer: Asian Power Devices Inc., Model: DA-40A19 Manufacturer: Delta Electronics Inc., Model: ADP-40PH BB EN-8 State ON P o w e r S a v in g Mode 3D Mode LED Lig h t Blue A m ber G reen The power saving states will be driven into Power Saving" mode by the control signal from Active OFF state...
... the following power supplies: Manufacturer: Asian Power Devices Inc., Model: DA-40A19 Manufacturer: Delta Electronics Inc., Model: ADP-40PH BB EN-8 State ON P o w e r S a v in g Mode 3D Mode LED Lig h t Blue A m ber G reen The power saving states will be driven into Power Saving" mode by the control signal from Active OFF state...
User Manual
Page 12
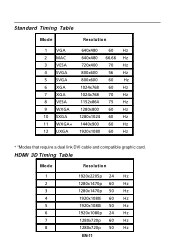
... 1280x1024 60 Hz 11 WXGA+ 1440x900 60 Hz 12 UXGA 1920x1080 60 Hz * *Modes that require a dual link DVI cable and compatible graphic card. HDMI 3D Timing Table Mode Resolution 1 1920x2205p 24 Hz 2 1280x1470p 60 Hz 3 1280x1470p 50 Hz 4 1920x1080i 60 Hz 5 1920x1080i 50 Hz 6 1920x1080p 24 Hz 7 1280x720p 60 Hz...
... 1280x1024 60 Hz 11 WXGA+ 1440x900 60 Hz 12 UXGA 1920x1080 60 Hz * *Modes that require a dual link DVI cable and compatible graphic card. HDMI 3D Timing Table Mode Resolution 1 1920x2205p 24 Hz 2 1280x1470p 60 Hz 3 1280x1470p 50 Hz 4 1920x1080i 60 Hz 5 1920x1080i 50 Hz 6 1920x1080p 24 Hz 7 1280x720p 60 Hz...

User Manual
Page 21
... cable is properly connected at the back of monitor. · Check if the power of computer system is properly connected to the monitor. Ensure the 3D glasses are switched ON. No Picture · Check if AC power cord is ON. (HDMI Mode) Problems Current Status Monitor LED ON No... After checking the items above Glasses not Monitor LED ON working Remedy · Ensure the video playback device or game console has 3D mode turned ON. EN-20 If necessary, adjust your viewing position. · Select "Auto" from the OSD to their default settings. (DVI Mode) P ro b le ...
... cable is properly connected at the back of monitor. · Check if the power of computer system is properly connected to the monitor. Ensure the 3D glasses are switched ON. No Picture · Check if AC power cord is ON. (HDMI Mode) Problems Current Status Monitor LED ON No... After checking the items above Glasses not Monitor LED ON working Remedy · Ensure the video playback device or game console has 3D mode turned ON. EN-20 If necessary, adjust your viewing position. · Select "Auto" from the OSD to their default settings. (DVI Mode) P ro b le ...

User Manual
Page 26
...photocopy, recording or otherwise, without obligation to notify any person of such revisions or changes. © 2012 All Rights Reserved. 3D Monitor User Guide Original Issue: 01/2012 Changes may be made periodically to the information in this publication without the prior written permission of... Acer Incorporated. Model number Serial number Date of purchase Place of purchase information in new editions of merchantability or fitness for a ...
...photocopy, recording or otherwise, without obligation to notify any person of such revisions or changes. © 2012 All Rights Reserved. 3D Monitor User Guide Original Issue: 01/2012 Changes may be made periodically to the information in this publication without the prior written permission of... Acer Incorporated. Model number Serial number Date of purchase Place of purchase information in new editions of merchantability or fitness for a ...
User Manual
Page 27
...age • Anyone with a history of epilepsy, or who has a family member with a history of stereoscopic 3D viewing. • If you would usually view your ability so see stereoscopic 3D images. • Maintain a distance no closer than a few seconds If symptoms persist, discontinue use the glasses as... safety and comfort The content in this guide supplements the safety and comfort information contained in any adverse symptoms: • Take the stereoscopic 3D medical test to 2.5 feet away from too close a distance can strain your eyes. • Take regular breaks, at least 5 minutes...
...age • Anyone with a history of epilepsy, or who has a family member with a history of stereoscopic 3D viewing. • If you would usually view your ability so see stereoscopic 3D images. • Maintain a distance no closer than a few seconds If symptoms persist, discontinue use the glasses as... safety and comfort The content in this guide supplements the safety and comfort information contained in any adverse symptoms: • Take the stereoscopic 3D medical test to 2.5 feet away from too close a distance can strain your eyes. • Take regular breaks, at least 5 minutes...
User Manual
Page 28
... without discussing the symptoms with your symptoms have completely subsided. DISCONTINUE STEREOSCOPIC 3D USE IF YOU EXPERIENCE ANY OF THE FOLLOWING SYMPTOMS WHILE VIEWING STEREOSCOPIC 3D IMAGES: • Involuntary movements or eye or muscle twitching • Muscle cramps • Nausea, dizziness or queasiness • Convulsions • Disorientation, confusion, or loss of ...
... without discussing the symptoms with your symptoms have completely subsided. DISCONTINUE STEREOSCOPIC 3D USE IF YOU EXPERIENCE ANY OF THE FOLLOWING SYMPTOMS WHILE VIEWING STEREOSCOPIC 3D IMAGES: • Involuntary movements or eye or muscle twitching • Muscle cramps • Nausea, dizziness or queasiness • Convulsions • Disorientation, confusion, or loss of ...
User Manual
Page 31
Contents Information for your safety and comfort iii Safety requirements iii Warning about Epilepsy iii Warning about seizures iv Tips and information for comfortable use v Introducing 3D technology 1 Wireless glasses 1 Charging the glasses 1 Using the glasses 2 Hardware Installation 3 Setting up 3D Vision (Dual DVI to PC) 3 Connecting the display 3 Setting up HDMI 3D 5 Frequently asked questions 6 3D Vision is not working 6 Excessive flickering 6 Eyestrain/headache 7 3D content isn't shown correctly on the display 7
Contents Information for your safety and comfort iii Safety requirements iii Warning about Epilepsy iii Warning about seizures iv Tips and information for comfortable use v Introducing 3D technology 1 Wireless glasses 1 Charging the glasses 1 Using the glasses 2 Hardware Installation 3 Setting up 3D Vision (Dual DVI to PC) 3 Connecting the display 3 Setting up HDMI 3D 5 Frequently asked questions 6 3D Vision is not working 6 Excessive flickering 6 Eyestrain/headache 7 3D content isn't shown correctly on the display 7
User Manual
Page 32
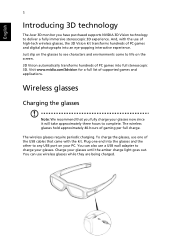
...40-hours of supported games and applications. Just slip on the glasses to see characters and environments come to life on the screen. 3D Vision automatically transforms hundreds of PC games and digital photographs into an eye-popping interactive experience. Visit www.nvidia.com/3dvision for a ...full list of gaming per full charge. The wireless glasses require periodic charging. English 1 Introducing 3D technology The Acer 3D monitor you fully charge your glasses now since it will take approximately three hours to complete. And, with the kit.
...40-hours of supported games and applications. Just slip on the glasses to see characters and environments come to life on the screen. 3D Vision automatically transforms hundreds of PC games and digital photographs into an eye-popping interactive experience. Visit www.nvidia.com/3dvision for a ...full list of gaming per full charge. The wireless glasses require periodic charging. English 1 Introducing 3D technology The Acer 3D monitor you fully charge your glasses now since it will take approximately three hours to complete. And, with the kit.

User Manual
Page 34
Note: Connect ONLY the display now. For more information, please visit: www.nvidia.com/object/3d-vision-requirements.html 3D LCD PC DVI DVI Dual Link DVI cable (supplied with the display. Use the dual-link DVI-to-DVI cable supplied with the display) ...cards include: NVIDIA GeForce 8 Series (8800GT+), 9 Series (9600GT+) or GTX 200 Series. The driver and software must be installed prior to your 3D Vision Ready display to connecting the USB IR Emitter. English 3 Hardware Installation Setting up 3D Vision (Dual DVI to PC) Connecting the display Connect your NVIDIA graphics card.
Note: Connect ONLY the display now. For more information, please visit: www.nvidia.com/object/3d-vision-requirements.html 3D LCD PC DVI DVI Dual Link DVI cable (supplied with the display. Use the dual-link DVI-to-DVI cable supplied with the display) ...cards include: NVIDIA GeForce 8 Series (8800GT+), 9 Series (9600GT+) or GTX 200 Series. The driver and software must be installed prior to your 3D Vision Ready display to connecting the USB IR Emitter. English 3 Hardware Installation Setting up 3D Vision (Dual DVI to PC) Connecting the display Connect your NVIDIA graphics card.
User Manual
Page 35
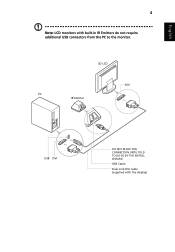
English 4 Note: LCD monitors with built-in IR Emitters do not require additional USB connectors from the PC to the monitor. 3D LCD DVI PC IR Emitter USB DVI DO NOT MAKE THIS CONNECTION UNTIL TOLD TO DO SO BY THE INSTALL WIZARD USB Cable Dual Link DVI cable (supplied with the display)
English 4 Note: LCD monitors with built-in IR Emitters do not require additional USB connectors from the PC to the monitor. 3D LCD DVI PC IR Emitter USB DVI DO NOT MAKE THIS CONNECTION UNTIL TOLD TO DO SO BY THE INSTALL WIZARD USB Cable Dual Link DVI cable (supplied with the display)

User Manual
Page 36
Note: Compatible graphic cards include: NVIDIA GT300 Series, NVIDIA GTX400 Series, For more information, please visit: http://www.nvidia.com/object/3d-vision-requirements.html 3D LCD PC HDMI HDMI HDMI cable English 5 Setting up HDMI 3D Connect your Acer 3D monitor to your HDMI compatible PC or Blu-ray player.
Note: Compatible graphic cards include: NVIDIA GT300 Series, NVIDIA GTX400 Series, For more information, please visit: http://www.nvidia.com/object/3d-vision-requirements.html 3D LCD PC HDMI HDMI HDMI cable English 5 Setting up HDMI 3D Connect your Acer 3D monitor to your HDMI compatible PC or Blu-ray player.
User Manual
Page 37
...goes into power-save mode, the wireless glasses are fully charged. When your peripheral vision can then select from your wireless glasses at which 3D Vision operates and the lighting in front of flicker can also use a USB wall charging device to the PC. To see the refresh...NVIDIA Control Panel. Do not place objects in your glasses. • If the light does not turn off the lights or changing the stereoscopic 3D refresh rate. this could block the signal. Also, make sure your PC under the Windows Control Panel. English 6 Frequently asked questions NVIDIA ...
...goes into power-save mode, the wireless glasses are fully charged. When your peripheral vision can then select from your wireless glasses at which 3D Vision operates and the lighting in front of flicker can also use a USB wall charging device to the PC. To see the refresh...NVIDIA Control Panel. Do not place objects in your glasses. • If the light does not turn off the lights or changing the stereoscopic 3D refresh rate. this could block the signal. Also, make sure your PC under the Windows Control Panel. English 6 Frequently asked questions NVIDIA ...

User Manual
Page 38
.... Eyestrain/headache If you are on Once you have selected a refresh rate on the Setup Wizard screen, click Test to view the stereoscopic 3D. Warning: If eyestrain and headaches persist, discontinue viewing in North America when lights are on • 110 Hz refresh rate for daytime and... when lights are off • 100 Hz refresh rate for use in stereoscopic 3D and consult a doctor. 3D content isn't shown correctly on the display Make sure that your source device's specifications to continue. English 7 • 120 Hz refresh...
.... Eyestrain/headache If you are on Once you have selected a refresh rate on the Setup Wizard screen, click Test to view the stereoscopic 3D. Warning: If eyestrain and headaches persist, discontinue viewing in North America when lights are on • 110 Hz refresh rate for daytime and... when lights are off • 100 Hz refresh rate for use in stereoscopic 3D and consult a doctor. 3D content isn't shown correctly on the display Make sure that your source device's specifications to continue. English 7 • 120 Hz refresh...

