
Quick Start Guide
Page 1
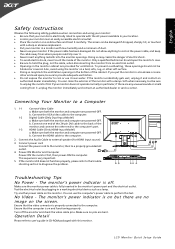
...Video Cable a. This sequence is fully inserted in a location with low humidity and a minimum of the monitor with this test. Make sure the monitor power cable is very important. 5. Ensure that the computer is on but be damaged if dropped, sharply hit, or touched with a sharp or abrasive implement...unplug the monitor first. shooting section to the computer. Test the electrical oulet by plugging in the monitor cabinet are no pins are powered-OFF. Turn off . English Safety Instructions Observe the following safety guidelines when connection and using the monitor on a bed, sofa, ...
...Video Cable a. This sequence is fully inserted in a location with low humidity and a minimum of the monitor with this test. Make sure the monitor power cable is very important. 5. Ensure that the computer is on but be damaged if dropped, sharply hit, or touched with a sharp or abrasive implement...unplug the monitor first. shooting section to the computer. Test the electrical oulet by plugging in the monitor cabinet are no pins are powered-OFF. Turn off . English Safety Instructions Observe the following safety guidelines when connection and using the monitor on a bed, sofa, ...
User Manual
Page 1
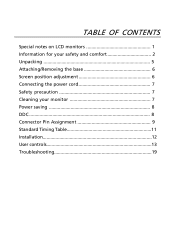
TABLE OF CONTENTS Special notes on LCD monitors 1 Information for your safety and comfort 2 Unpacking 5 Attaching/Removing the base 6 Screen position adjustment 6 Connecting the power cord 7 Safety precaution 7 Cleaning your monitor 7 Power saving 8 DDC 8 Connector Pin Assignment 9 Standard Timing Table 11 Installation 12 User controls 13 Troubleshooting 19
TABLE OF CONTENTS Special notes on LCD monitors 1 Information for your safety and comfort 2 Unpacking 5 Attaching/Removing the base 6 Screen position adjustment 6 Connecting the power cord 7 Safety precaution 7 Cleaning your monitor 7 Power saving 8 DDC 8 Connector Pin Assignment 9 Standard Timing Table 11 Installation 12 User controls 13 Troubleshooting 19

User Manual
Page 2
... screen has effective pixels of 99.99% or more information visit the nVidia website: http://www.nvidia.com/page/home.html EN-1 Turn off the Power Switch and then turn it on the desktop pattern you use . It may include blemishes of 0.01% or less such as a missing pixel or a pixel... of the previous screen may remain after switching the image, when the same image is recovered slowly by changing the image or turning off the Power Switch for hours.
... screen has effective pixels of 99.99% or more information visit the nVidia website: http://www.nvidia.com/page/home.html EN-1 Turn off the Power Switch and then turn it on the desktop pattern you use . It may include blemishes of 0.01% or less such as a missing pixel or a pixel... of the previous screen may remain after switching the image, when the same image is recovered slowly by changing the image or turning off the Power Switch for hours.

User Manual
Page 3
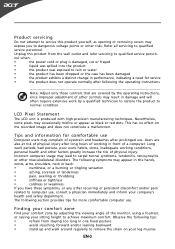
Follow all warnings and instructions marked on an unstable cart, stand or table. When you need to disconnect power to the equipment, be sure to unplug the power cord from lithium battery pack. Safe listening Follow these instructions carefully. CAUTION for accessibility Be sure that could be blocked by... of any kind into this product through cabinet slots as they may touch dangerous voltage points or short-out parts that the power outlet you plug the power cord into the product. • To avoid damage of internal components and to prevent battery leakage, do not increase it ...
Follow all warnings and instructions marked on an unstable cart, stand or table. When you need to disconnect power to the equipment, be sure to unplug the power cord from lithium battery pack. Safe listening Follow these instructions carefully. CAUTION for accessibility Be sure that could be blocked by... of any kind into this product through cabinet slots as they may touch dangerous voltage points or short-out parts that the power outlet you plug the power cord into the product. • To avoid damage of internal components and to prevent battery leakage, do not increase it ...
User Manual
Page 4
... operating instructions Note: Adjust only those controls that are also at risk of working conditions, personal health and other musculoskeletal disorders. nel when: • the power cord or plug is produced with high-precision manufacturing techniques. Tips and information for more comfortable computer use . Incorrect computer usage may complain of eyestrain...
... operating instructions Note: Adjust only those controls that are also at risk of working conditions, personal health and other musculoskeletal disorders. nel when: • the power cord or plug is produced with high-precision manufacturing techniques. Tips and information for more comfortable computer use . Incorrect computer usage may complain of eyestrain...

User Manual
Page 6
UNPACKING Please check the following items are present when you unpack the box, and save the packing materials in case you will need to ship or transport the monitor in future. · LCD Monitor · AC Power Cord · D-Sub Cable · DVI Cable (Only Dual-Input Model) · Audio Cable(Only for HDMI Audio output) (Optional) · User Manual · Quick Start Guide EN-5
UNPACKING Please check the following items are present when you unpack the box, and save the packing materials in case you will need to ship or transport the monitor in future. · LCD Monitor · AC Power Cord · D-Sub Cable · DVI Cable (Only Dual-Input Model) · Audio Cable(Only for HDMI Audio output) (Optional) · User Manual · Quick Start Guide EN-5

User Manual
Page 8
... a soft cloth to wipe the screen and cabinet front and sides. Always put the monitor in which the equipment will be installed. CONNECTING THE POWER CORD · Check first to the screen, as screen is fragile. The cord set should have the appropriate safety approvals for the country in ...a place where there is the correct type required for your area. · This monitor has a universal power supply that allows operation in either 100/120V AC or 220/240 V AC voltage area. CLEANING YOUR MONITOR Please carefully follow the below eye level...
... a soft cloth to wipe the screen and cabinet front and sides. Always put the monitor in which the equipment will be installed. CONNECTING THE POWER CORD · Check first to the screen, as screen is fragile. The cord set should have the appropriate safety approvals for the country in ...a place where there is the correct type required for your area. · This monitor has a universal power supply that allows operation in either 100/120V AC or 220/240 V AC voltage area. CLEANING YOUR MONITOR Please carefully follow the below eye level...
User Manual
Page 9
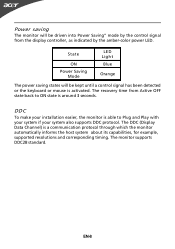
... Active OFF state back to Plug and Play with your system if your system also supports DDC protocol. Power saving The monitor will be driven into Power Saving" mode by the amber-color power LED. EN-8 The DDC (Display Data Channel) is able to ON state is around 3 seconds....which the monitor automatically informs the host system about its capabilities, for example, supported resolutions and corresponding timing. State ON Power Saving Mode LED Light Blue Orange The power saving states will be kept until a control signal has been detected or the keyboard or mouse is activated. The ...
... Active OFF state back to Plug and Play with your system if your system also supports DDC protocol. Power saving The monitor will be driven into Power Saving" mode by the amber-color power LED. EN-8 The DDC (Display Data Channel) is able to ON state is around 3 seconds....which the monitor automatically informs the host system about its capabilities, for example, supported resolutions and corresponding timing. State ON Power Saving Mode LED Light Blue Orange The power saving states will be kept until a control signal has been detected or the keyboard or mouse is activated. The ...
User Manual
Page 11
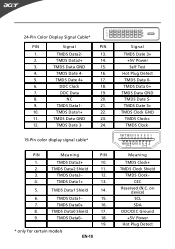
... Meaning TMDS Clock+ TMDS Clock Shield TMDS Clock- TMDS Date 4- 16. 5. TMDS Data0- 18. 19. * only for certain models EN-10 Signal TMDS Date 3+ +5V Power Self Test Hot Plug Detect TMDS Data 0TMDS Data 0+ TMDS Data GND TMDS Date 5TMDS Date 5+ TMDS Clock GND TMDS Clock+ TMDS Clock- on device...) SCL SDA DDC/CEC Ground +5V Power Hot Plug Detect TMDS Data2+ 14. 3. TMDS Data1+ 22. 11. TMDS Data1+ 13. 5. TMDS Data0 Shield 17. 9. TMDS Data GND 23. 12. TMDS ...
... Meaning TMDS Clock+ TMDS Clock Shield TMDS Clock- TMDS Date 4- 16. 5. TMDS Data0- 18. 19. * only for certain models EN-10 Signal TMDS Date 3+ +5V Power Self Test Hot Plug Detect TMDS Data 0TMDS Data 0+ TMDS Data GND TMDS Date 5TMDS Date 5+ TMDS Clock GND TMDS Clock+ TMDS Clock- on device...) SCL SDA DDC/CEC Ground +5V Power Hot Plug Detect TMDS Data2+ 14. 3. TMDS Data1+ 22. 11. TMDS Data1+ 13. 5. TMDS Data0 Shield 17. 9. TMDS Data GND 23. 12. TMDS ...
User Manual
Page 13
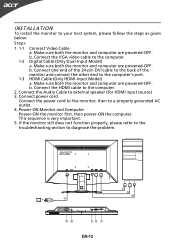
... to the troubleshooting section to the computer's port. 1-3 HDMI Cable (Only HDMI-Input Model) a. Make sure both the monitor and computer are powered-OFF. b. b. Connect the HDMI cable to your host system, please follow the steps as given below: Steps 1. 1-1 Connect Video Cable ... Model) a. Make sure both the monitor and computer are powered-OFF. Make sure both the monitor and computer are powered-OFF. Power-ON Monitor and Computer Power-ON the monitor first, then power-ON the computer. Connect power cord Connect the power cord to the monitor, then to a properly grounded AC ...
... to the troubleshooting section to the computer's port. 1-3 HDMI Cable (Only HDMI-Input Model) a. Make sure both the monitor and computer are powered-OFF. b. b. Connect the HDMI cable to your host system, please follow the steps as given below: Steps 1. 1-1 Connect Video Cable ... Model) a. Make sure both the monitor and computer are powered-OFF. Make sure both the monitor and computer are powered-OFF. Power-ON Monitor and Computer Power-ON the monitor first, then power-ON the computer. Connect power cord Connect the power cord to the monitor, then to a properly grounded AC ...
User Manual
Page 14
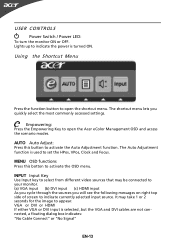
... or HDMI If either VGA or DVI input is turned ON. Lights up to open the Acer eColor Management OSD and access the scenario modes. Using the Shortcut Menu Press the function button to indicate the power is selected ,but the VGA and DVI cables are not connected, a floating dialog box indicates... to your monitor. (a) VGA input (b) DVI input (c) HDMI input As you cycle through the sources you quickly select the most commonly accessed settings. USER CONTROLS Power Switch / Power LED: To turn the monitor ON or OFF.
... or HDMI If either VGA or DVI input is turned ON. Lights up to open the Acer eColor Management OSD and access the scenario modes. Using the Shortcut Menu Press the function button to indicate the power is selected ,but the VGA and DVI cables are not connected, a floating dialog box indicates... to your monitor. (a) VGA input (b) DVI input (c) HDMI input As you cycle through the sources you quickly select the most commonly accessed settings. USER CONTROLS Power Switch / Power LED: To turn the monitor ON or OFF.
User Manual
Page 20
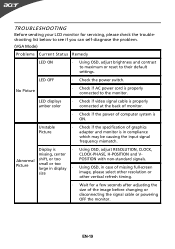
... TROUBLESHOOTING Before sending your LCD monitor for a few seconds after adjusting the size of the image before changing or disconnecting the signal cable or powering OFF the monitor. Display is ON. Unstable Picture · Check if the specification of missing full-screen size image, please select other resolution... · Using OSD, adjust brightness and contrast to maximum or reset to the monitor. EN-19 LED OFF · Check the power switch. Using OSD, in case of graphics adapter and monitor is properly connected to their default settings. No Picture · Check if AC...
... TROUBLESHOOTING Before sending your LCD monitor for a few seconds after adjusting the size of the image before changing or disconnecting the signal cable or powering OFF the monitor. Display is ON. Unstable Picture · Check if the specification of missing full-screen size image, please select other resolution... · Using OSD, adjust brightness and contrast to maximum or reset to the monitor. EN-19 LED OFF · Check the power switch. Using OSD, in case of graphics adapter and monitor is properly connected to their default settings. No Picture · Check if AC...
User Manual
Page 21
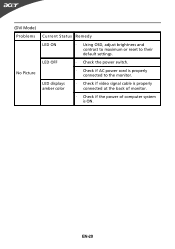
LED OFF · Check the power switch. · Check if AC power cord is ON. EN-20 LED displays amber color · Check if video signal cable is properly connected at the back of monitor. · Check if the power of computer system is properly connected to their default settings. (DVI Mode) Problems No Picture Current Status Remedy LED ON · Using OSD, adjust brightness and contrast to maximum or reset to the monitor.
LED OFF · Check the power switch. · Check if AC power cord is ON. EN-20 LED displays amber color · Check if video signal cable is properly connected at the back of monitor. · Check if the power of computer system is properly connected to their default settings. (DVI Mode) Problems No Picture Current Status Remedy LED ON · Using OSD, adjust brightness and contrast to maximum or reset to the monitor.


