

User Manual
Page 4
...; This product should be used for ventilation to ensure reliable operation of the product and to unplug the power cord from the equipment, be placed near or over a radiator or heat register, or in a built-in installation unless proper ventilation is provided. • Never push... water. • Do not place this product through cabinet slots as they may touch dangerous voltage points or short-out parts that the power outlet you plug the power cord into the product. • To avoid damage of internal components and to prevent battery leakage, do not be operated from overheating. If ...
...; This product should be used for ventilation to ensure reliable operation of the product and to unplug the power cord from the equipment, be placed near or over a radiator or heat register, or in a built-in installation unless proper ventilation is provided. • Never push... water. • Do not place this product through cabinet slots as they may touch dangerous voltage points or short-out parts that the power outlet you plug the power cord into the product. • To avoid damage of internal components and to prevent battery leakage, do not be operated from overheating. If ...

User Manual
Page 5
...Do not locate this product where people will walk on the cord. • If an extension cord is used , the load should not exceed 80% of the power strip's input rating. • This product's power cord is equipped with this product yourself, as opening or removing covers... the product exhibits a distinct change in a grounded power outlet. English power company. • Do not allow anything to replace the power cord set . Also, make sure that may expose you need for details. Using a power outlet that the new power cord meets the following the operating instructions v Unplug this ...
...Do not locate this product where people will walk on the cord. • If an extension cord is used , the load should not exceed 80% of the power strip's input rating. • This product's power cord is equipped with this product yourself, as opening or removing covers... the product exhibits a distinct change in a grounded power outlet. English power company. • Do not allow anything to replace the power cord set . Also, make sure that may expose you need for details. Using a power outlet that the new power cord meets the following the operating instructions v Unplug this ...
User Manual
Page 13
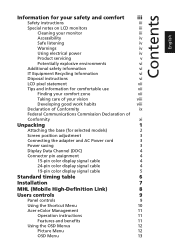
... Commission Declaration of Conformity xi Unpacking 1 Attaching the base (for selected models) 2 Screen position adjustment 3 Connecting the adapter and AC Power cord 3 Power saving 3 Display Data Channel (DDC) 4 Connector pin assignment 4 15-pin color display signal cable 4 24-pin color display signal ...table 6 Installation 7 MHL (Mobile High-Definition Link) 8 Users controls 9 Panel controls 9 Using the Shortcut Menu 10 Acer eColor Management 11 Operation instructions 11 Features and benefits 11 Using the OSD Menus 12 Picture Menu 12 OSD Menu 13
... Commission Declaration of Conformity xi Unpacking 1 Attaching the base (for selected models) 2 Screen position adjustment 3 Connecting the adapter and AC Power cord 3 Power saving 3 Display Data Channel (DDC) 4 Connector pin assignment 4 15-pin color display signal cable 4 24-pin color display signal ...table 6 Installation 7 MHL (Mobile High-Definition Link) 8 Users controls 9 Panel controls 9 Using the Shortcut Menu 10 Acer eColor Management 11 Operation instructions 11 Features and benefits 11 Using the OSD Menus 12 Picture Menu 12 OSD Menu 13

User Manual
Page 15
LCD monitor Quick start guide MHL cable (Optional) D-sub cable HDMI cable (Optional) AC Power cord DVI cable (Optional) AC Adapter Audio cable (Optional) 1 English Unpacking Please check that the following items are present when you unpack the box, and save the packing materials in case you need to ship or transport the monitor in the future.
LCD monitor Quick start guide MHL cable (Optional) D-sub cable HDMI cable (Optional) AC Power cord DVI cable (Optional) AC Adapter Audio cable (Optional) 1 English Unpacking Please check that the following items are present when you unpack the box, and save the packing materials in case you need to ship or transport the monitor in the future.

User Manual
Page 17
...plug the other end into an AC outlet. • For units using 120 V AC: Use a UL-listed cord set consisting of your area. • The monitor has a universal power supply that the power cord you can be adjusted to 15 degrees up or 5 degrees down. 5 15 English Connecting the adapter and AC... Power cord • Check first to make sure that allows operation in which the equipment will be switched to "power saving" mode by the blinking blue light. No user-adjustment is activated. The recovery time ...
...plug the other end into an AC outlet. • For units using 120 V AC: Use a UL-listed cord set consisting of your area. • The monitor has a universal power supply that the power cord you can be adjusted to 15 degrees up or 5 degrees down. 5 15 English Connecting the adapter and AC... Power cord • Check first to make sure that allows operation in which the equipment will be switched to "power saving" mode by the blinking blue light. No user-adjustment is activated. The recovery time ...
User Manual
Page 21
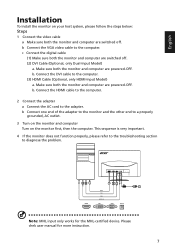
... Connect the HDMI cable to the computer. 2 Connect the adapter a Connect the AC cord to the computer. Please chek user manual for the MHL-certified device. Make sure both the monitor and computer are powered-OFF. This sequence is very important. 4 If the monitor does not function properly, please...only HDMI-Input Model) a. Connect the DVI cable to diagnose the problem. c Connect the digital cable (1) Make sure both the monitor and computer are powered-OFF. b Connect one end of the adapter to the monitor and the other end to a properly grounded, AC outlet. 3 Turn on the monitor...
... Connect the HDMI cable to the computer. 2 Connect the adapter a Connect the AC cord to the computer. Please chek user manual for the MHL-certified device. Make sure both the monitor and computer are powered-OFF. This sequence is very important. 4 If the monitor does not function properly, please...only HDMI-Input Model) a. Connect the DVI cable to diagnose the problem. c Connect the digital cable (1) Make sure both the monitor and computer are powered-OFF. b Connect one end of the adapter to the monitor and the other end to a properly grounded, AC outlet. 3 Turn on the monitor...

User Manual
Page 30
English Troubleshooting Before sending your system. Blinking Blue Check if the power cord is switched on and in compliance which may be causing the input signal frequency mismatch. Wait for servicing, please check the troubleshooting list below to ... image, please select another resolution or vertical refresh rate. Check the display setting on the screen.) Blue Check if the specification of monitor. Check the power switch. VGA Mode Problem No picture visible LED status Blue Off Remedy Using the OSD menu, adjust brightness and contrast to maximum or reset to...
English Troubleshooting Before sending your system. Blinking Blue Check if the power cord is switched on and in compliance which may be causing the input signal frequency mismatch. Wait for servicing, please check the troubleshooting list below to ... image, please select another resolution or vertical refresh rate. Check the display setting on the screen.) Blue Check if the specification of monitor. Check the power switch. VGA Mode Problem No picture visible LED status Blue Off Remedy Using the OSD menu, adjust brightness and contrast to maximum or reset to...

User Manual
Page 31
Blinking Blue Check if the video signal cable is switched on and in power saving/standby mode. 17 English DVI/HDMI Mode (Optional) Problem No picture visible LED status Blue Off Remedy Using the OSD menu, adjust brightness and contrast to maximum or reset to the monitor. Check if the computer system is properly connected at the back of monitor. Check the power switch. Check if the AC power cord is properly connected to their default settings.
Blinking Blue Check if the video signal cable is switched on and in power saving/standby mode. 17 English DVI/HDMI Mode (Optional) Problem No picture visible LED status Blue Off Remedy Using the OSD menu, adjust brightness and contrast to maximum or reset to the monitor. Check if the computer system is properly connected at the back of monitor. Check the power switch. Check if the AC power cord is properly connected to their default settings.


