
User Manual
Page 1
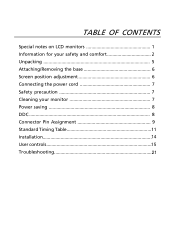
TABLE OF CONTENTS Special notes on LCD monitors 1 Information for your safety and comfort 2 Unpacking 5 Attaching/Removing the base 6 Screen position adjustment 6 Connecting the power cord 7 Safety precaution 7 Cleaning your monitor 7 Power saving 8 DDC 8 Connector Pin Assignment 9 Standard Timing Table 11 Installation 14 User controls 15 Troubleshooting 21
TABLE OF CONTENTS Special notes on LCD monitors 1 Information for your safety and comfort 2 Unpacking 5 Attaching/Removing the base 6 Screen position adjustment 6 Connecting the power cord 7 Safety precaution 7 Cleaning your monitor 7 Power saving 8 DDC 8 Connector Pin Assignment 9 Standard Timing Table 11 Installation 14 User controls 15 Troubleshooting 21
User Manual
Page 2
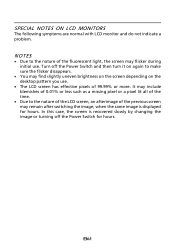
... changing the image or turning off the Power Switch and then turn it on the desktop pattern you use . SPECIAL NOTES ON LCD MONITORS The following symptoms are normal with LCD monitor and do not indicate a problem. NOTES · Due to make sure the flicker disappears. · You may find slightly uneven brightness on the screen depending on again to the nature of the fluorescent light, the screen...
... changing the image or turning off the Power Switch and then turn it on the desktop pattern you use . SPECIAL NOTES ON LCD MONITORS The following symptoms are normal with LCD monitor and do not indicate a problem. NOTES · Due to make sure the flicker disappears. · You may find slightly uneven brightness on the screen depending on again to the nature of the fluorescent light, the screen...
User Manual
Page 3
... as they may touch dangerous voltage points or short-out parts that the power outlet you can hear it clearly and comfortably and without distortion. • After setting the volume level, do not place the product on a vibrating surface. • Never use this product near...battery pack. • Your device uses one of the following power supplies: Safe listening Follow these instructions carefully. When you need to disconnect power to the equipment, be sure to block out noisy surroundings. • Turn the volume down if you plug the power cord into the product. • ...
... as they may touch dangerous voltage points or short-out parts that the power outlet you can hear it clearly and comfortably and without distortion. • After setting the volume level, do not place the product on a vibrating surface. • Never use this product near...battery pack. • Your device uses one of the following power supplies: Safe listening Follow these instructions carefully. When you need to disconnect power to the equipment, be sure to block out noisy surroundings. • Turn the volume down if you plug the power cord into the product. • ...
User Manual
Page 4
... the wall outlet and refer servicing to qualified service person- Unplug this product yourself, as black or red dots. Users are covered by the operating instructions, since improper adjustment of other controls may expose you have these symptoms, or any other factors greatly increase the risk of physical injury after prolonged use Computer users may occasionally misfire or appear as opening or removing covers may...
... the wall outlet and refer servicing to qualified service person- Unplug this product yourself, as black or red dots. Users are covered by the operating instructions, since improper adjustment of other controls may expose you have these symptoms, or any other factors greatly increase the risk of physical injury after prolonged use Computer users may occasionally misfire or appear as opening or removing covers may...
User Manual
Page 5
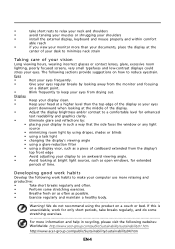
... the display. • Adjust the display brightness and/or contrast to make your computer use more than the top edge of the display so your display in recycling, please visit the following sections provide suggestions on a distant point. • Blink frequently to keep your eyes from the display's top front edge • Avoid adjusting your display to an awkward viewing angle. • Avoid looking at bright light sources...
... the display. • Adjust the display brightness and/or contrast to make your computer use more than the top edge of the display so your display in recycling, please visit the following sections provide suggestions on a distant point. • Blink frequently to keep your eyes from the display's top front edge • Avoid adjusting your display to an awkward viewing angle. • Avoid looking at bright light sources...
User Manual
Page 6
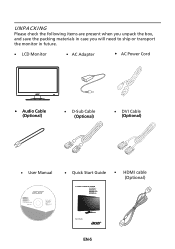
UNPACKING Please check the following items are present when you unpack the box, and save the packing materials in case you will need to ship or transport the monitor in future. LCD Monitor AC Adapter AC Power Cord · Audio Cable (Optional) D-Sub Cable (Optional) DVI Cable (Optional) User Manual G196WL G206HL G226HQL G236HL LCD monitor MU.LUZ00.001 Quick Start Guide HDMI cable (Optional) G196WL EN-5
UNPACKING Please check the following items are present when you unpack the box, and save the packing materials in case you will need to ship or transport the monitor in future. LCD Monitor AC Adapter AC Power Cord · Audio Cable (Optional) D-Sub Cable (Optional) DVI Cable (Optional) User Manual G196WL G206HL G226HQL G236HL LCD monitor MU.LUZ00.001 Quick Start Guide HDMI cable (Optional) G196WL EN-5
User Manual
Page 7
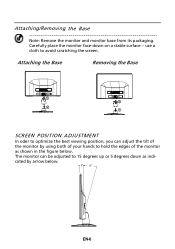
Attaching the Base Removing the Base 1 2 2 1 SCREEN POSITION ADJUSTMENT In oder to optimize the best viewing position, you can be adjusted to hold the edges of your hands to 15 degrees up or 5 degrees down on a stable surface -- Attaching/Removing the Base Note: Remove the monitor and monitor base from its packaging. The monitor can adjust the tilt of the monitor by using both of the monitor as indicated by arrow below . Carefully place the monitor face-down as shown in the figure below . 5 15 EN-6 use a cloth to avoid scratching the screen.
Attaching the Base Removing the Base 1 2 2 1 SCREEN POSITION ADJUSTMENT In oder to optimize the best viewing position, you can be adjusted to hold the edges of your hands to 15 degrees up or 5 degrees down on a stable surface -- Attaching/Removing the Base Note: Remove the monitor and monitor base from its packaging. The monitor can adjust the tilt of the monitor by using both of the monitor as indicated by arrow below . Carefully place the monitor face-down as shown in the figure below . 5 15 EN-6 use a cloth to avoid scratching the screen.
User Manual
Page 8
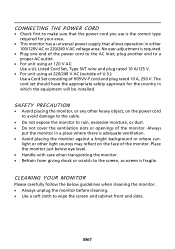
... other light sources may reflect on the power cord to avoid damage to the cable. · Do not expose the monitor to rain, excessive moisture, or dust. · Do not cover the ventilation slots or openings of the monitor. CONNECTING THE POWER CORD · Check first to a proper AC outlet. · For unit using at 120 V AC: Use a UL Listed Cord Set, Type SVT wire and plug rated 10...
... other light sources may reflect on the power cord to avoid damage to the cable. · Do not expose the monitor to rain, excessive moisture, or dust. · Do not cover the ventilation slots or openings of the monitor. CONNECTING THE POWER CORD · Check first to a proper AC outlet. · For unit using at 120 V AC: Use a UL Listed Cord Set, Type SVT wire and plug rated 10...
User Manual
Page 9
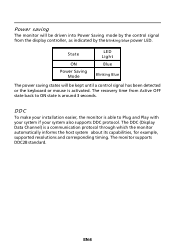
..., for example, supported resolutions and corresponding timing. EN-8 State ON Power Saving Mode LED Light Blue Blinking Blue The power saving states will be kept until a control signal has been detected or the keyboard or mouse is around 3 seconds. The recovery time from the display controller, as indicated by the blinking blue power LED. Power saving The monitor will be driven into Power Saving mode by the control signal from Active OFF state back to Plug and Play with...
..., for example, supported resolutions and corresponding timing. EN-8 State ON Power Saving Mode LED Light Blue Blinking Blue The power saving states will be kept until a control signal has been detected or the keyboard or mouse is around 3 seconds. The recovery time from the display controller, as indicated by the blinking blue power LED. Power saving The monitor will be driven into Power Saving mode by the control signal from Active OFF state back to Plug and Play with...
User Manual
Page 10
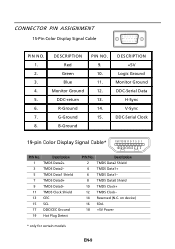
... (N.C. DESCRIPTION +5V Logic Ground Monitor Ground DDC-Serial Data H-Sync V-Sync DDC-Serial Clock 19-pin Color Display Signal Cable* 1917151311 9 7 5 3 1 1816141210 8 6 4 2 PIN No. Description 1 TMDS Data2+ 3 TMDS Data2- 5 TMDS Data1 Shield 7 TMDS Data0+ 9 TMDS Data0- 11 TMDS Clock Shield 13 CEC 15 SCL 17 DDC/CEC Ground 19 Hot Plug Detect PIN No. CONNECTOR PIN ASSIGNMENT 15-Pin Color Display Signal Cable PIN NO. 1. 2. 3. 4. 5. 6. 7. 8.
... (N.C. DESCRIPTION +5V Logic Ground Monitor Ground DDC-Serial Data H-Sync V-Sync DDC-Serial Clock 19-pin Color Display Signal Cable* 1917151311 9 7 5 3 1 1816141210 8 6 4 2 PIN No. Description 1 TMDS Data2+ 3 TMDS Data2- 5 TMDS Data1 Shield 7 TMDS Data0+ 9 TMDS Data0- 11 TMDS Clock Shield 13 CEC 15 SCL 17 DDC/CEC Ground 19 Hot Plug Detect PIN No. CONNECTOR PIN ASSIGNMENT 15-Pin Color Display Signal Cable PIN NO. 1. 2. 3. 4. 5. 6. 7. 8.
User Manual
Page 11
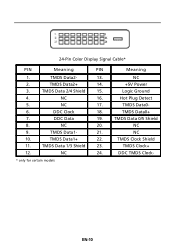
Logic Ground 4. DDC Clock 18. TMDS Data 1/3 Shield 23. TMDS Data2- 13. TMDS Data2+ 14. +5V Power 3. NC 16. NC 10. TMDS Clock+ 12. TMDS Data 2/4 Shield 15. NC 9. TMDS Data1- 21. DDC TMDS Clock- * only for certain models EN-10 TMDS Data0+ 7. DDC Data 19. Hot Plug Detect 5. NC 17. TMDS Data0- 6. TMDS Data 0/5 Shield 8. NC 2. NC 24. NC 20. TMDS Data1+ 22. 24-Pin Color Display Signal Cable* PIN Meaning PIN Meaning 1. TMDS Clock Shield 11.
Logic Ground 4. DDC Clock 18. TMDS Data 1/3 Shield 23. TMDS Data2- 13. TMDS Data2+ 14. +5V Power 3. NC 16. NC 10. TMDS Clock+ 12. TMDS Data 2/4 Shield 15. NC 9. TMDS Data1- 21. DDC TMDS Clock- * only for certain models EN-10 TMDS Data0+ 7. DDC Data 19. Hot Plug Detect 5. NC 17. TMDS Data0- 6. TMDS Data 0/5 Shield 8. NC 2. NC 24. NC 20. TMDS Data1+ 22. 24-Pin Color Display Signal Cable* PIN Meaning PIN Meaning 1. TMDS Clock Shield 11.
User Manual
Page 15
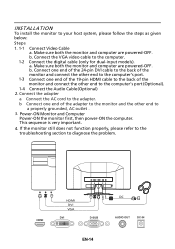
... outlet . 3. b. Connect the adapter a Connect the AC cord to diagnose the problem. Power-ON Monitor and Computer Power-ON the monitor first, then power-ON the computer. b. Connect the VGA video cable to your host system, please follow the steps as given below: Steps 1. 1-1 Connect Video Cable a. HDMI DVI HDMI D-SUB AUDIO OUT DC-IN HDMI DVI VGA DVI D-SUB DC AUDIO OUT DC-IN EN-14 This sequence is very important. 4. INSTALLATION To install the monitor to the...
... outlet . 3. b. Connect the adapter a Connect the AC cord to diagnose the problem. Power-ON Monitor and Computer Power-ON the monitor first, then power-ON the computer. b. Connect the VGA video cable to your host system, please follow the steps as given below: Steps 1. 1-1 Connect Video Cable a. HDMI DVI HDMI D-SUB AUDIO OUT DC-IN HDMI DVI VGA DVI D-SUB DC AUDIO OUT DC-IN EN-14 This sequence is very important. 4. INSTALLATION To install the monitor to the...
User Manual
Page 16
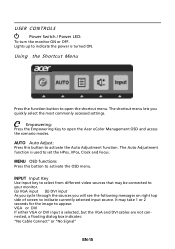
... VGA and DVI cables are not connected, a floating dialog box indicates: "No Cable Connect" or "No Signal" EN-15 The shortcut menu lets you will see the following messages on right top side of screen to open the Acer eColor Management OSD and access the scenario modes. MENU OSD functions Press this button to open the shortcut menu. Lights up to set the HPos, VPos, Clock and Focus. USER CONTROLS Power Switch / Power LED: To turn the monitor...
... VGA and DVI cables are not connected, a floating dialog box indicates: "No Cable Connect" or "No Signal" EN-15 The shortcut menu lets you will see the following messages on right top side of screen to open the Acer eColor Management OSD and access the scenario modes. MENU OSD functions Press this button to open the shortcut menu. Lights up to set the HPos, VPos, Clock and Focus. USER CONTROLS Power Switch / Power LED: To turn the monitor...
User Manual
Page 17
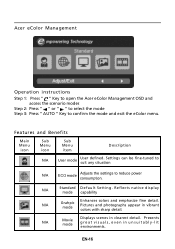
... Menu item Description N/A User mode User defined. EN-16 Presents great visuals, even in unsuitably-lit environments. R eflects n a tive d isp lay mode capability N/A Grahpic mode Enhances colors and emphasize fine detail. N/A Standard D efau lt Settin g . Acer eColor Management Operation instructions Step 1: Press " " Key to open the Acer eColor Management OSD and access the scenario modes Step 2: Press " " or " " to select the mode Step 3: Press " AUTO...
... Menu item Description N/A User mode User defined. EN-16 Presents great visuals, even in unsuitably-lit environments. R eflects n a tive d isp lay mode capability N/A Grahpic mode Enhances colors and emphasize fine detail. N/A Standard D efau lt Settin g . Acer eColor Management Operation instructions Step 1: Press " " Key to open the Acer eColor Management OSD and access the scenario modes Step 2: Press " " or " " to select the mode Step 3: Press " AUTO...
User Manual
Page 18
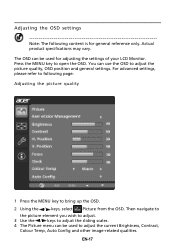
... adjust the current Brightness, Contrast, Colour Temp, Auto Config and other image-related qualities. The OSD can use the OSD to bring up the OSD. 2 Using the / keys, select Picture from the OSD. You can be used for general reference only. Actual product specifications may vary. Then navigate to the picture element you wish to adjust. 3 Use the / keys to adjust the sliding scales. 4 The Picture menu can be used to open...
... adjust the current Brightness, Contrast, Colour Temp, Auto Config and other image-related qualities. The OSD can use the OSD to bring up the OSD. 2 Using the / keys, select Picture from the OSD. You can be used for general reference only. Actual product specifications may vary. Then navigate to the picture element you wish to adjust. 3 Use the / keys to adjust the sliding scales. 4 The Picture menu can be used to open...

User Manual
Page 20
Then navigate to the feature you wish to adjust. 3 The Setting menu can be used to bring up the OSD. 2 Using the / keys, select Setting from the OSD. EN-19 Adjusting the setting 1 Press the MENU key to adjust the screen Menu Language and other important settings.
Then navigate to the feature you wish to adjust. 3 The Setting menu can be used to bring up the OSD. 2 Using the / keys, select Setting from the OSD. EN-19 Adjusting the setting 1 Press the MENU key to adjust the screen Menu Language and other important settings.
User Manual
Page 22
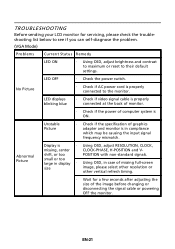
LED displays blinking blue · Check if video signal cable is properly connected at the back of monitor. · Check if the power of graphics adapter and monitor is ON. LED OFF · Check the power switch. No Picture · Check if AC power cord is · Using OSD, adjust RESOLUTION, CLOCK, missing, center CLOCK-PHASE, H-POSITION and V- shift, or too POSITION with non-standard signals. Abnormal Picture Display is properly connected to their default settings. TROUBLESHOOTING Before sending your LCD monitor for a few seconds after adjusting the size of...
LED displays blinking blue · Check if video signal cable is properly connected at the back of monitor. · Check if the power of graphics adapter and monitor is ON. LED OFF · Check the power switch. No Picture · Check if AC power cord is · Using OSD, adjust RESOLUTION, CLOCK, missing, center CLOCK-PHASE, H-POSITION and V- shift, or too POSITION with non-standard signals. Abnormal Picture Display is properly connected to their default settings. TROUBLESHOOTING Before sending your LCD monitor for a few seconds after adjusting the size of...

User Manual
Page 23
EN-22 LED OFF · Check the power switch. · Check if AC power cord is ON. (DVI mode) Problems No Picture Current Status Remedy LED ON · Using OSD, adjust brightness and contrast to maximum or reset to the monitor. LED displays blinking blue · Check if video signal cable is properly connected at the back of monitor. · Check if the power of computer system is properly connected to their default settings.
EN-22 LED OFF · Check the power switch. · Check if AC power cord is ON. (DVI mode) Problems No Picture Current Status Remedy LED ON · Using OSD, adjust brightness and contrast to maximum or reset to the monitor. LED displays blinking blue · Check if video signal cable is properly connected at the back of monitor. · Check if the power of computer system is properly connected to their default settings.
User Manual
Page 24
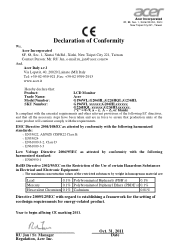
... Directive 2004/108/EC as attested by conformity with regard to establishing a framework for the setting of ecodesign requirements for energy-related product. RU Jan / Sr. Manager Regulation, Acer Inc. G226HQL xxxxxx;G236HLxxxxxx; ("x" = 0~9, a ~ z, A ~ Z, or blank) Is compliant ... Year to assure that : Product: LCD Monitor Trade Name: Acer Model Number: G196WL;G206HL;G226HQL;G236HL SKU Number: G196WL xxxxxx;G206HLxxxxxx; Acer Incorporated 8F, 88, Sec. 1, Xintai 5th Rd., Xizhi New Taipei City 221, Taiwan Declaration of Conformity We, Acer Incorporated 8F, 88, Sec. 1, ...
... Directive 2004/108/EC as attested by conformity with regard to establishing a framework for the setting of ecodesign requirements for energy-related product. RU Jan / Sr. Manager Regulation, Acer Inc. G226HQL xxxxxx;G236HLxxxxxx; ("x" = 0~9, a ~ z, A ~ Z, or blank) Is compliant ... Year to assure that : Product: LCD Monitor Trade Name: Acer Model Number: G196WL;G206HL;G226HQL;G236HL SKU Number: G196WL xxxxxx;G206HLxxxxxx; Acer Incorporated 8F, 88, Sec. 1, Xintai 5th Rd., Xizhi New Taipei City 221, Taiwan Declaration of Conformity We, Acer Incorporated 8F, 88, Sec. 1, ...
User Manual
Page 25
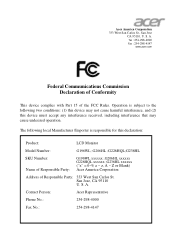
... of Conformity This device complies with Part 15 of Responsible Party: 333 West San Carlos St. S. A. Acer America Corporation 333 West San Carlos St., San Jose CA 95110, U. The following two conditions: (1) this device may not cause harmful interference, and (2) this declaration: Product: LCD Monitor Model Number: G196WL; G206HL ;G226HQL;G236HL SKU Number: Name of Responsible Party: G196WL...
... of Conformity This device complies with Part 15 of Responsible Party: 333 West San Carlos St. S. A. Acer America Corporation 333 West San Carlos St., San Jose CA 95110, U. The following two conditions: (1) this device may not cause harmful interference, and (2) this declaration: Product: LCD Monitor Model Number: G196WL; G206HL ;G226HQL;G236HL SKU Number: Name of Responsible Party: G196WL...


