
User Manual
Page 1
TABLE OF CONTENTS Special notes on LCD monitors 1 Information for your safety and comfort 2 Unpacking 5 Attaching/Removing the base 6 Screen position adjustment 6 Connecting the power cord 7 Safety precaution 7 Cleaning your monitor 7 Power saving 8 DDC 8 Connector Pin Assignment 9 Standard Timing Table 11 Installation 12 User controls 13 Troubleshooting 19
TABLE OF CONTENTS Special notes on LCD monitors 1 Information for your safety and comfort 2 Unpacking 5 Attaching/Removing the base 6 Screen position adjustment 6 Connecting the power cord 7 Safety precaution 7 Cleaning your monitor 7 Power saving 8 DDC 8 Connector Pin Assignment 9 Standard Timing Table 11 Installation 12 User controls 13 Troubleshooting 19
User Manual
Page 2
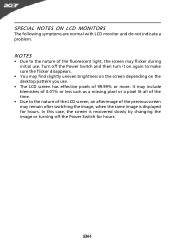
... the fluorescent light, the screen may remain after switching the image, when the same image is recovered slowly by changing the image or turning off the Power Switch and then turn it on again to the nature of the LCD screen, an afterimage of the previous screen may flicker during initial use . • The LCD screen has effective pixels of the time. • Due to make sure the flicker disappears. •...
... the fluorescent light, the screen may remain after switching the image, when the same image is recovered slowly by changing the image or turning off the Power Switch and then turn it on again to the nature of the LCD screen, an afterimage of the previous screen may flicker during initial use . • The LCD screen has effective pixels of the time. • Due to make sure the flicker disappears. •...

User Manual
Page 3
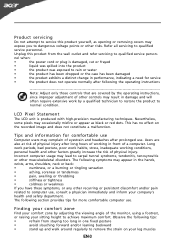
... unstable cart, stand or table. EN-2 Never spill liquid of the product and to unplug the power cord from lithium battery pack. Keep this product through cabinet slots as they may touch dangerous voltage points or short-out parts that the power outlet you . This product should never be blocked or covered. Safe listening Follow these instructions carefully. Information...
... unstable cart, stand or table. EN-2 Never spill liquid of the product and to unplug the power cord from lithium battery pack. Keep this product through cabinet slots as they may touch dangerous voltage points or short-out parts that the power outlet you . This product should never be blocked or covered. Safe listening Follow these instructions carefully. Information...
User Manual
Page 4
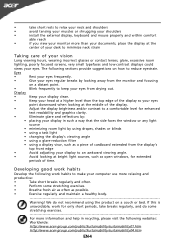
.... LCD Pixel Statement The LCD unit is damaged, cut or frayed • liquid was spilled into the product • the product was exposed to qualified service person- Users are covered by the operating instructions, since improper adjustment of a computer. Long work periods, bad posture, poor work by adjusting the viewing angle of eyestrain and headaches after following tips: • refrain from the wall...
.... LCD Pixel Statement The LCD unit is damaged, cut or frayed • liquid was spilled into the product • the product was exposed to qualified service person- Users are covered by the operating instructions, since improper adjustment of a computer. Long work periods, bad posture, poor work by adjusting the viewing angle of eyestrain and headaches after following tips: • refrain from the wall...
User Manual
Page 5
... of the display. • Adjust the display brightness and/or contrast to a comfortable level for extended periods of time. If this is unavoidable, work habits to make your computer use more information and help in such a way that the side faces the window or any light source • minimizing room light by using drapes, shades or blinds • using a task light • changing the display's viewing angle • using a glare...
... of the display. • Adjust the display brightness and/or contrast to a comfortable level for extended periods of time. If this is unavoidable, work habits to make your computer use more information and help in such a way that the side faces the window or any light source • minimizing room light by using drapes, shades or blinds • using a task light • changing the display's viewing angle • using a glare...

User Manual
Page 6
UNPACKING Please check the following items are present when you unpack the box, and save the packing materials in case you will need to ship or transport the monitor in future. • LCD Monitor • AC Power Cord • D-Sub Cable • DVI Cable (Only Dual-Input Model) • Audio Cable (Only Audio-Input Model) • (Optional) User Manual • Quick Start Guide EN-5
UNPACKING Please check the following items are present when you unpack the box, and save the packing materials in case you will need to ship or transport the monitor in future. • LCD Monitor • AC Power Cord • D-Sub Cable • DVI Cable (Only Dual-Input Model) • Audio Cable (Only Audio-Input Model) • (Optional) User Manual • Quick Start Guide EN-5
User Manual
Page 7
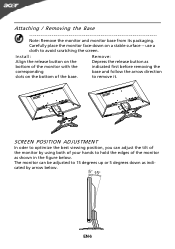
Install: Remove: Align the release button on the Depress the release button as shown in the figure below . EN-6 Attaching / Removing the Base Note: Remove the monitor and monitor base from its packaging. The monitor can adjust the tilt of the base. SCREEN POSITION ADJUSTMENT In oder to optimize the best viewing position, you can be adjusted to hold the edges of the monitor as bottom of the monitor with the indicated first before removing the...
Install: Remove: Align the release button on the Depress the release button as shown in the figure below . EN-6 Attaching / Removing the Base Note: Remove the monitor and monitor base from its packaging. The monitor can adjust the tilt of the base. SCREEN POSITION ADJUSTMENT In oder to optimize the best viewing position, you can be adjusted to hold the edges of the monitor as bottom of the monitor with the indicated first before removing the...

User Manual
Page 8
... cover the ventilation slots or openings of the monitor. Place the monitor just below guidelines when cleaning the monitor. • Always unplug the monitor before cleaning. • Use a soft cloth to wipe the screen and cabinet front and sides. EN-7 CONNECTING THE POWER CORD • Check first to make sure that allows operation in a place where there is adequate ventilation. • Avoid placing the monitor against a bright...
... cover the ventilation slots or openings of the monitor. Place the monitor just below guidelines when cleaning the monitor. • Always unplug the monitor before cleaning. • Use a soft cloth to wipe the screen and cabinet front and sides. EN-7 CONNECTING THE POWER CORD • Check first to make sure that allows operation in a place where there is adequate ventilation. • Avoid placing the monitor against a bright...
User Manual
Page 9
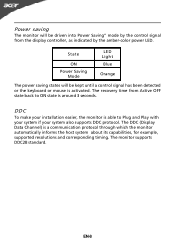
Power saving The monitor will be driven into Power Saving" mode by the amber-color power LED. State ON Power Saving Mode LED Light Blue Orange The power saving states will be kept until a control signal has been detected or the keyboard or mouse is activated. The recovery time from the display controller, as indicated by the control signal from Active OFF state back to Plug and Play with your system if your installation easier, the...
Power saving The monitor will be driven into Power Saving" mode by the amber-color power LED. State ON Power Saving Mode LED Light Blue Orange The power saving states will be kept until a control signal has been detected or the keyboard or mouse is activated. The recovery time from the display controller, as indicated by the control signal from Active OFF state back to Plug and Play with your system if your installation easier, the...
User Manual
Page 10
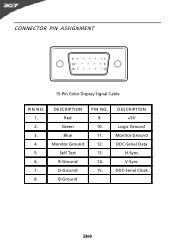
CONNECTOR PIN ASSIGNMENT 5 1 10 6 15 11 15-Pin Color Display Signal Cable PIN NO. 1. 2. 3. 4. 5. 6. 7. 8. DESCRIPTION +5V Logic Ground Monitor Ground DDC-Serial Data H-Sync V-Sync DDC-Serial Clock EN-9 DESCRIPTION Red Green Blue Monitor Ground Self Test R-Ground G-Ground B-Ground PIN NO. 9. 10. 11. 12. 13. 14. 15.
CONNECTOR PIN ASSIGNMENT 5 1 10 6 15 11 15-Pin Color Display Signal Cable PIN NO. 1. 2. 3. 4. 5. 6. 7. 8. DESCRIPTION +5V Logic Ground Monitor Ground DDC-Serial Data H-Sync V-Sync DDC-Serial Clock EN-9 DESCRIPTION Red Green Blue Monitor Ground Self Test R-Ground G-Ground B-Ground PIN NO. 9. 10. 11. 12. 13. 14. 15.
User Manual
Page 11
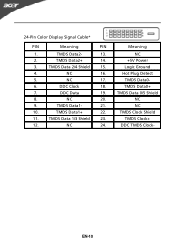
TMDS Data 2/4 Shield 15. 4. NC 16. 5. NC 20. 9. TMDS Data1- 21. 10. NC 24. TMDS Data2+ 14. 3. DDC Data 19. 8. TMDS Data 1/3 Shield 23. 12. TMDS Data1+ 22. 11. TMDS Data2- 13. 2. NC 17. 6. EN-10 DDC Clock 18. 7. Meaning NC +5V Power Logic Ground Hot Plug Detect TMDS Data0TMDS Data0+ TMDS Data 0/5 Shield NC NC TMDS Clock Shield TMDS Clock+ DDC TMDS Clock- 24-Pin Color Display Signal Cable* PIN Meaning PIN 1.
TMDS Data 2/4 Shield 15. 4. NC 16. 5. NC 20. 9. TMDS Data1- 21. 10. NC 24. TMDS Data2+ 14. 3. DDC Data 19. 8. TMDS Data 1/3 Shield 23. 12. TMDS Data1+ 22. 11. TMDS Data2- 13. 2. NC 17. 6. EN-10 DDC Clock 18. 7. Meaning NC +5V Power Logic Ground Hot Plug Detect TMDS Data0TMDS Data0+ TMDS Data 0/5 Shield NC NC TMDS Clock Shield TMDS Clock+ DDC TMDS Clock- 24-Pin Color Display Signal Cable* PIN Meaning PIN 1.
User Manual
Page 13
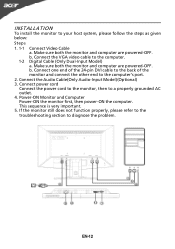
... 1. 1-1 Connect Video Cable a. EN-12 Make sure both the monitor and computer are powered-OFF. Connect the Audio Cable(Only Audio-Input Model)(Optional) 3. If the monitor still does not function properly, please refer to the troubleshooting section to the computer. 1-2 Digital Cable (Only Dual-Input Model) a. b. Power-ON Monitor and Computer Power-ON the monitor first, then power-ON the computer. Connect the VGA video cable to diagnose the problem. Connect one end of the 24-pin DVI cable to...
... 1. 1-1 Connect Video Cable a. EN-12 Make sure both the monitor and computer are powered-OFF. Connect the Audio Cable(Only Audio-Input Model)(Optional) 3. If the monitor still does not function properly, please refer to the troubleshooting section to the computer. 1-2 Digital Cable (Only Dual-Input Model) a. b. Power-ON Monitor and Computer Power-ON the monitor first, then power-ON the computer. Connect the VGA video cable to diagnose the problem. Connect one end of the 24-pin DVI cable to...
User Manual
Page 14
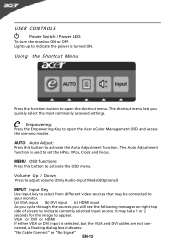
... Auto Adjustment function. Volume Up / Down Press to adjust volume (Only Audio-Input Model)(Optional) INPUT Input Key Use Input key to select from different video sources that may take 1 or 2 seconds for the image to indicate currently selected input source. USER CONTROLS Power Switch / Power LED: To turn the monitor ON or OFF. Lights up to indicate the power is used to set the HPos, VPos, Clock and Focus. Empowering: Press the Empowering Key to open the Acer eColor Management OSD...
... Auto Adjustment function. Volume Up / Down Press to adjust volume (Only Audio-Input Model)(Optional) INPUT Input Key Use Input key to select from different video sources that may take 1 or 2 seconds for the image to indicate currently selected input source. USER CONTROLS Power Switch / Power LED: To turn the monitor ON or OFF. Lights up to indicate the power is used to set the HPos, VPos, Clock and Focus. Empowering: Press the Empowering Key to open the Acer eColor Management OSD...
User Manual
Page 15
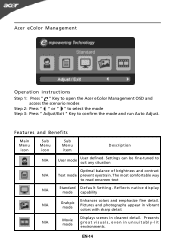
.... Acer eColor Management Operation instructions Step 1: Press " " Key to open the Acer eColor Management OSD and access the scenario modes Step 2: Press " " or " " to select the mode Step 3: Press " Adjust/Exit " Key to suit any situation Optimal balance of brightness and contrast N/A Text mode prevent eyestrain. Pictures and photographs appear in unsuitably-lit environments. Settings can be fine-tuned to confirm the mode and run Auto Adjust...
.... Acer eColor Management Operation instructions Step 1: Press " " Key to open the Acer eColor Management OSD and access the scenario modes Step 2: Press " " or " " to select the mode Step 3: Press " Adjust/Exit " Key to suit any situation Optimal balance of brightness and contrast N/A Text mode prevent eyestrain. Pictures and photographs appear in unsuitably-lit environments. Settings can be fine-tuned to confirm the mode and run Auto Adjust...
User Manual
Page 16
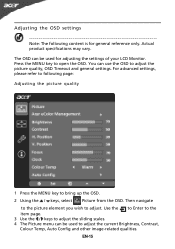
... adjust the picture quality, OSD Timeout and general settings. You can be used for general reference only. Then navigate to the picture element you wish to adjust. EN-15 Actual product specifications may vary. The OSD can use the OSD to adjust the current Brightness, Contrast, Colour Temp, Auto Config and other image-related qualities. Adjusting the OSD settings Note: The following page: Adjusting the picture quality 1 Press the MENU key to open...
... adjust the picture quality, OSD Timeout and general settings. You can be used for general reference only. Then navigate to the picture element you wish to adjust. EN-15 Actual product specifications may vary. The OSD can use the OSD to adjust the current Brightness, Contrast, Colour Temp, Auto Config and other image-related qualities. Adjusting the OSD settings Note: The following page: Adjusting the picture quality 1 Press the MENU key to open...

User Manual
Page 18
Use the to Enter to the item page. 3 The Setting menu can be used to bring up the OSD. 2 Using the / keys, select Setting from the OSD. EN-17 Adjusting the setting 1 Press the MENU key to adjust the screen Menu Language and other important settings. Then navigate to the feature you wish to adjust.
Use the to Enter to the item page. 3 The Setting menu can be used to bring up the OSD. 2 Using the / keys, select Setting from the OSD. EN-17 Adjusting the setting 1 Press the MENU key to adjust the screen Menu Language and other important settings. Then navigate to the feature you wish to adjust.
User Manual
Page 20
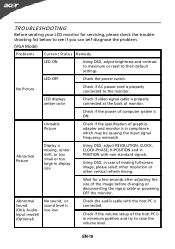
... connected. · Check if the volume setup of the host PC is too low · Check the audio cable with non-standard signals. small or too large in display · Using OSD, in case of computer system is properly connected to their default settings. No Picture · Check if AC power cord is ON. LED displays amber color · Check if video signal cable is · Using OSD, adjust RESOLUTION, CLOCK, missing, center CLOCK-PHASE, H-POSITION and V- LED OFF · Check the power switch...
... connected. · Check if the volume setup of the host PC is too low · Check the audio cable with non-standard signals. small or too large in display · Using OSD, in case of computer system is properly connected to their default settings. No Picture · Check if AC power cord is ON. LED displays amber color · Check if video signal cable is · Using OSD, adjust RESOLUTION, CLOCK, missing, center CLOCK-PHASE, H-POSITION and V- LED OFF · Check the power switch...
User Manual
Page 21
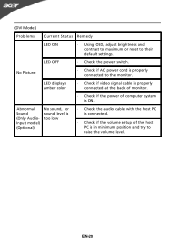
... (DVI Mode) Problems Current Status Remedy LED ON · Using OSD, adjust brightness and contrast to maximum or reset to the monitor. No Picture · Check if AC power cord is properly connected to their default settings. LED displays amber color · Check if video signal cable is properly connected at the back of monitor. · Check if the power of the host PC is ON. Abnormal Sound (Only AudioInput model) (Optional) No sound, or sound level is too low · Check the audio cable with...
... (DVI Mode) Problems Current Status Remedy LED ON · Using OSD, adjust brightness and contrast to maximum or reset to the monitor. No Picture · Check if AC power cord is properly connected to their default settings. LED displays amber color · Check if video signal cable is properly connected at the back of monitor. · Check if the power of the host PC is ON. Abnormal Sound (Only AudioInput model) (Optional) No sound, or sound level is too low · Check the audio cable with...
User Manual
Page 22
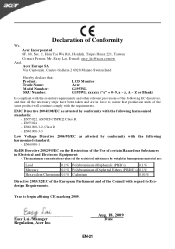
...1, Hsin Tai Wu Rd., Hsichih, Taipei Hsien 221, Taiwan Contact Person: Mr. Easy Lai, E-mail: easy_lai@acer.com.tw An d, Acer Europe SA Via Cantonale, Centro Galleria 2 6928 Manno Switzerland Hereby declare that: Product: Trade Name: Model Number: SKU Number: LCD Monitor Acer G195WL G195WL xxxxxx ("x" = 0~9, a ~ z, A ~ Z or Blank) Is compliant with the essential requirements and other...Parliament and of the Council with the requirements. EN55024 -. EN60950-1 RoHS Directive 2002/95/EC on the Restriction of the Use of certain Hazardous Substances in Electrical and Electronic Equipment: -.
...1, Hsin Tai Wu Rd., Hsichih, Taipei Hsien 221, Taiwan Contact Person: Mr. Easy Lai, E-mail: easy_lai@acer.com.tw An d, Acer Europe SA Via Cantonale, Centro Galleria 2 6928 Manno Switzerland Hereby declare that: Product: Trade Name: Model Number: SKU Number: LCD Monitor Acer G195WL G195WL xxxxxx ("x" = 0~9, a ~ z, A ~ Z or Blank) Is compliant with the essential requirements and other...Parliament and of the Council with the requirements. EN55024 -. EN60950-1 RoHS Directive 2002/95/EC on the Restriction of the Use of certain Hazardous Substances in Electrical and Electronic Equipment: -.

User Manual
Page 23
...Importer is responsible for this device must accept any interference received, including interference that may cause undesired operation. Contact Person: Acer Representative Phone No.: 254-298-4000 Fax No.: 254-298-4147 EN-22 A. S. San Jose, CA 95110 ... with Part 15 of Responsible Party: 333 West San Carlos St. The following two conditions: (1) this device may not cause harmful interference, and (2) this declaration: Product: Trade Name: Model Number: SKU Number: LCD Monitor Acer G195WL G195WL xxxxxx ("x" = 0~9, a ~ z, A ~ Z or Blank) Name of Responsible Party: Acer America ...
...Importer is responsible for this device must accept any interference received, including interference that may cause undesired operation. Contact Person: Acer Representative Phone No.: 254-298-4000 Fax No.: 254-298-4147 EN-22 A. S. San Jose, CA 95110 ... with Part 15 of Responsible Party: 333 West San Carlos St. The following two conditions: (1) this device may not cause harmful interference, and (2) this declaration: Product: Trade Name: Model Number: SKU Number: LCD Monitor Acer G195WL G195WL xxxxxx ("x" = 0~9, a ~ z, A ~ Z or Blank) Name of Responsible Party: Acer America ...

