User Manual
Page 5
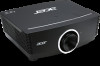
... be inserted tightly, with the screws on Altitude Mode when located in front of the lens of other projector to AUDIO OUT or other projectors The projector generates a massive amount of other ports like BNC, RCA; After the project enters STANDBY MODE status, press the AC power button to avoid damage. The power cord and signal cable should be connected before power on the model used. The shutdown process may be...
... be inserted tightly, with the screws on Altitude Mode when located in front of the lens of other projector to AUDIO OUT or other projectors The projector generates a massive amount of other ports like BNC, RCA; After the project enters STANDBY MODE status, press the AC power button to avoid damage. The power cord and signal cable should be connected before power on the model used. The shutdown process may be...

User Manual
Page 6
... and electronic equipment. Cleaning the Projector Unplug the power cord before cleaning. This product may burn out during normal operation and cause glass dust or shards to be in the way of foot traffic. Remove the batteries from the rear exhaust vent. For lamp specific disposal information check WWW.LAMPRECYCLE.ORG. Regulatory Warnings Before installing and using the projector, read the regulatory...
... and electronic equipment. Cleaning the Projector Unplug the power cord before cleaning. This product may burn out during normal operation and cause glass dust or shards to be in the way of foot traffic. Remove the batteries from the rear exhaust vent. For lamp specific disposal information check WWW.LAMPRECYCLE.ORG. Regulatory Warnings Before installing and using the projector, read the regulatory...
User Manual
Page 7
... to deliver crisp, clear images. Flexible setup allows for front, rear projections. Line-of-vision projections remain square, with all major video standards including NTSC, PAL, and SECAM. A high brightness rating allows for presentations in daylight or in lit rooms. Supports resolutions up to WUXGA at 16.7 million colors to install and operate the DLP projector. Main Features ...
... to deliver crisp, clear images. Flexible setup allows for front, rear projections. Line-of-vision projections remain square, with all major video standards including NTSC, PAL, and SECAM. A high brightness rating allows for presentations in daylight or in lit rooms. Supports resolutions up to WUXGA at 16.7 million colors to install and operate the DLP projector. Main Features ...

User Manual
Page 8
... CONTROL BUTTONS...9 SETUP AND OPERATION...10 INSERTING THE REMOTE CONTROL BATTERIES ...10 INSTALLING OR REMOVING THE OPTIONAL LENS ...11 Removing the Existing Lens From the Projector 11 Installing the New Lens ...12 STARTING AND SHUTTING DOWN THE PROJECTOR...13 SETTING AN ACCESS PASSWORD (SECURITY LOCK) ...15 ADJUSTING THE PROJECTOR LEVEL ...17 ADJUSTING PROJECTED IMAGE POSITION USING SHIFT ...18 Adjusting the vertical image position ...18 Adjusting the horizontal image position ...19 Shift Range Diagram ...19 ADJUSTING THE ZOOM, FOCUS AND KEYSTONE ...20 ON-SCREEN DISPLAY (OSD) MENU SETTINGS...
... CONTROL BUTTONS...9 SETUP AND OPERATION...10 INSERTING THE REMOTE CONTROL BATTERIES ...10 INSTALLING OR REMOVING THE OPTIONAL LENS ...11 Removing the Existing Lens From the Projector 11 Installing the New Lens ...12 STARTING AND SHUTTING DOWN THE PROJECTOR...13 SETTING AN ACCESS PASSWORD (SECURITY LOCK) ...15 ADJUSTING THE PROJECTOR LEVEL ...17 ADJUSTING PROJECTED IMAGE POSITION USING SHIFT ...18 Adjusting the vertical image position ...18 Adjusting the horizontal image position ...19 Shift Range Diagram ...19 ADJUSTING THE ZOOM, FOCUS AND KEYSTONE ...20 ON-SCREEN DISPLAY (OSD) MENU SETTINGS...

User Manual
Page 11
Adjusts the image position vertically. Focuses the projected image. Receives IR signal from remote control. Note: Suggest to replace lamp module. 11 SEE PAGE 3 18 11 19 20 7 15 49 Important: Ventilation openings on the projector allow for good air circulation, which keeps the projector lamp cool. LABEL Function keys Screw Vertical lens shift Lens release button Horizontal lens shift Lens Focus ring Zoom ring IR receiver Height adjuster Lamp cover DESCRIPTION See Top view-On-screen Display (OSD) buttons. For ensure...
Adjusts the image position vertically. Focuses the projected image. Receives IR signal from remote control. Note: Suggest to replace lamp module. 11 SEE PAGE 3 18 11 19 20 7 15 49 Important: Ventilation openings on the projector allow for good air circulation, which keeps the projector lamp cool. LABEL Function keys Screw Vertical lens shift Lens release button Horizontal lens shift Lens Focus ring Zoom ring IR receiver Height adjuster Lamp cover DESCRIPTION See Top view-On-screen Display (OSD) buttons. For ensure...

User Manual
Page 13
...VGA1 only) - 4 - Connect a DISPLAYPORT cable to a DISPLAYPORT source. Turns the projector on or off (main power switch must be turned on , Cooling, Error code (See as LED indicator table) Red Over temperature 56 Flashing Error Code(See as LED indicator table) Red Lamp Fail Flashing Error code (See as LED indicator table) Connect the HDMI cable from a computer or a video enabled device. Connect a RGB cable from an input device. Connect 3D IR glasses receiver unit. Red Standby Green Lamp Lit , System stable Flashing Power on first). Rear view 1 234 12...
...VGA1 only) - 4 - Connect a DISPLAYPORT cable to a DISPLAYPORT source. Turns the projector on or off (main power switch must be turned on , Cooling, Error code (See as LED indicator table) Red Over temperature 56 Flashing Error Code(See as LED indicator table) Red Lamp Fail Flashing Error code (See as LED indicator table) Connect the HDMI cable from a computer or a video enabled device. Connect a RGB cable from an input device. Connect 3D IR glasses receiver unit. Red Standby Green Lamp Lit , System stable Flashing Power on first). Rear view 1 234 12...
User Manual
Page 14
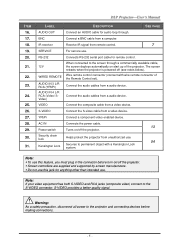
... start up of the Remote Control set). VIDEO Connect the composite cable from a video device. S-VIDEO Connect the S-video cable from a video device. S-VIDEO provides a better quality signal. IR receiver Receive IR signal from a audio device. RS-232 12V WIRED REMOTE AUDIO IN 3 L/R RCA (YPbPr) AUDIO IN 4 L/R RCA (Video/ SVideo) Connects RS-232 serial port cable for anything other than intended use . 54 Kensington Lock Secures to the screen through . The screen retracts when the projector is powered off the projector. When connected...
... start up of the Remote Control set). VIDEO Connect the composite cable from a video device. S-VIDEO Connect the S-video cable from a video device. S-VIDEO provides a better quality signal. IR receiver Receive IR signal from a audio device. RS-232 12V WIRED REMOTE AUDIO IN 3 L/R RCA (YPbPr) AUDIO IN 4 L/R RCA (Video/ SVideo) Connects RS-232 serial port cable for anything other than intended use . 54 Kensington Lock Secures to the screen through . The screen retracts when the projector is powered off the projector. When connected...

User Manual
Page 16
... projector. Remote Control Parts Important: 1. Certain high-frequency fluorescent lights can bounce the signal off certain reflective surfaces such as the corresponding buttons on the projector have the same functions as projector screens. 3. The buttons and keys on the remote control. Avoid using the projector with bright fluorescent lighting turned on the remote control. - 7 - Be sure nothing obstructs the path between the remote control and the projector is obstructed, you can disrupt remote control operation. 2. This user's manual...
... projector. Remote Control Parts Important: 1. Certain high-frequency fluorescent lights can bounce the signal off certain reflective surfaces such as the corresponding buttons on the projector have the same functions as projector screens. 3. The buttons and keys on the remote control. Avoid using the projector with bright fluorescent lighting turned on the remote control. - 7 - Be sure nothing obstructs the path between the remote control and the projector is obstructed, you can disrupt remote control operation. 2. This user's manual...

User Manual
Page 17
... setting used . Laser 22. For Keystone Toggle a preset display mode. 21 Navigates and changes settings in the OSD Opens or closed the OSD Displays the VGA source selection Displays the DisplayPort source selection Menu on : Number for Remote ID or password setting used. Menu on : Number for Remote ID or password setting used . Number for Remote ID or password setting used . Turns the projector off : Press the button to operate the on -screen picture Number for Remote ID or password setting used . - 8 - MENU 28. DO NOT POINT IN EYES. ALL 20. 0/HELP 21. Menu...
... setting used . Laser 22. For Keystone Toggle a preset display mode. 21 Navigates and changes settings in the OSD Opens or closed the OSD Displays the VGA source selection Displays the DisplayPort source selection Menu on : Number for Remote ID or password setting used. Menu on : Number for Remote ID or password setting used . Number for Remote ID or password setting used . Turns the projector off : Press the button to operate the on -screen picture Number for Remote ID or password setting used . - 8 - MENU 28. DO NOT POINT IN EYES. ALL 20. 0/HELP 21. Menu...

User Manual
Page 20
... cover to open as the projector and lens components contain precision parts. Before removing or installing the lens, be disengaged. 5. Push the LENSE RELEASE button to the unlock position. 3. Grasp the lens. 4. The existing lens will be sure to turn off the projector, wait until the cooling fans stop, and turn off the main power switch. Do not touch the lens surface when removing or installing the lens. Keep...
... cover to open as the projector and lens components contain precision parts. Before removing or installing the lens, be disengaged. 5. Push the LENSE RELEASE button to the unlock position. 3. Grasp the lens. 4. The existing lens will be sure to turn off the projector, wait until the cooling fans stop, and turn off the main power switch. Do not touch the lens surface when removing or installing the lens. Keep...

User Manual
Page 22
Turn on the lamp by pressing " " button on the rear of the projector or " " on the remote control. The first time you use the projector, you can select your preferred language from quick menu after the startup screen display. - 13 - Starting and Shutting down the Projector 1. Remove the lens cap. 2. The PWR LED will display in approximately 30 seconds. The startup screen will now flash red. Securely connect the power cord and signal cable. When connected, the power led will turn red. 3.
Turn on the lamp by pressing " " button on the rear of the projector or " " on the remote control. The first time you use the projector, you can select your preferred language from quick menu after the startup screen display. - 13 - Starting and Shutting down the Projector 1. Remove the lens cap. 2. The PWR LED will display in approximately 30 seconds. The startup screen will now flash red. Securely connect the power cord and signal cable. When connected, the power led will turn red. 3.

User Manual
Page 23
If more than one input device is connected, press the SOURCE button and use ▲▼ to remove the lens cap before starting projector. 2. Be sure to scroll among devices. 5. Do not unplug the power cord until the PWR LED stops flashing-indicating the projector has cooled down. - 14 - 4. The projector turns off. DVI: Digital Visual Interface HDMI: High-Definition Multimedia Interface compatible DisplayPort: Digital display interface VGA 1 / 2: Analog RGB 1 / 2 ...
If more than one input device is connected, press the SOURCE button and use ▲▼ to remove the lens cap before starting projector. 2. Be sure to scroll among devices. 5. Do not unplug the power cord until the PWR LED stops flashing-indicating the projector has cooled down. - 14 - 4. The projector turns off. DVI: Digital Visual Interface HDMI: High-Definition Multimedia Interface compatible DisplayPort: Digital display interface VGA 1 / 2: Analog RGB 1 / 2 ...

User Manual
Page 25
... the number buttons in case the Security Lock is enabled. 4. The password confirm menu appears when user presses the power-on the included security card to return normal function to the projector and set Security Lock to exit the dialog box. 7. Note: In case you set the password. Push the MENU button to off or re-setting password. - 16 - You can use the number buttons on IR remote control for password entry...
... the number buttons in case the Security Lock is enabled. 4. The password confirm menu appears when user presses the power-on the included security card to return normal function to the projector and set Security Lock to exit the dialog box. 7. Note: In case you set the password. Push the MENU button to off or re-setting password. - 16 - You can use the number buttons on IR remote control for password entry...

User Manual
Page 34
MAIN MENU SUB MENU SETTINGS Installation II Auto Source Auto Power Off (min.) Auto Power On Fan Speed Lamp Mode Advanced Reset All Status OSD Menu Setting Menu Position Lamp Hour Reset Low Power Mode Test Pattern 3D Translucent Menu Menu Display 3D 3D Sync Invert 3D Format Network Remote Setting Network State DHCP IP Address Subnet Mask Gateway DNS Apply User1 User2 User3 ID Number Active Source Video Information Lamp Hours (Normal, Bright) Software version S/N Off, On 0~180 Off, On Normal, High Normal, Bright Center, Down, Up, Left, Right 0%, 25...
MAIN MENU SUB MENU SETTINGS Installation II Auto Source Auto Power Off (min.) Auto Power On Fan Speed Lamp Mode Advanced Reset All Status OSD Menu Setting Menu Position Lamp Hour Reset Low Power Mode Test Pattern 3D Translucent Menu Menu Display 3D 3D Sync Invert 3D Format Network Remote Setting Network State DHCP IP Address Subnet Mask Gateway DNS Apply User1 User2 User3 ID Number Active Source Video Information Lamp Hours (Normal, Bright) Software version S/N Off, On 0~180 Off, On Normal, High Normal, Bright Center, Down, Up, Left, Right 0%, 25...
User Manual
Page 52
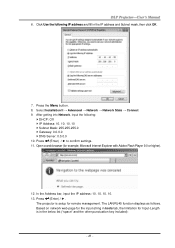
...; to confirm settings. 11. Open a web browser (for Input-Length is setup for remote management. The LAN/RJ45 function displays as follows. After getting into Network, input the following IP address and fill in tools tab, the limitation for example, Microsoft Internet Explorer with Adobe Flash Player 9.0 or higher). 12. Select Installation II → Advanced → Network → Network State → Connect 9. Click Use the following...
...; to confirm settings. 11. Open a web browser (for Input-Length is setup for remote management. The LAN/RJ45 function displays as follows. After getting into Network, input the following IP address and fill in tools tab, the limitation for example, Microsoft Internet Explorer with Adobe Flash Player 9.0 or higher). 12. Select Installation II → Advanced → Network → Network State → Connect 9. Click Use the following...

User Manual
Page 64
... for Troubleshooting In each problem-specific section, try the steps in suspending mode. Ensure a connected notebook computer is configured for an external display. (This is traced to something as simple as a loose connection. Check the following before proceeding to the problem-specific solutions. Use some other electrical device to confirm that the electrical outlet is working. Ensure the projector is turned...
... for Troubleshooting In each problem-specific section, try the steps in suspending mode. Ensure a connected notebook computer is configured for an external display. (This is traced to something as simple as a loose connection. Check the following before proceeding to the problem-specific solutions. Use some other electrical device to confirm that the electrical outlet is working. Ensure the projector is turned...
User Manual
Page 65
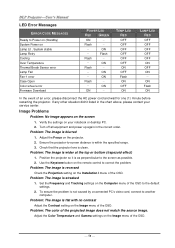
... Image Problems Problem: No image appears on your service center. Ensure the projector-to-screen distance is clean. Verify the settings on the screen 1. Problem: The image is reversed Check the Projection setting on the Installation I menu of the OSD. LED Error Messages ERROR CODE MESSAGES Ready to Power on (Standby) System Power on Lamp Lit , System stable Lamp Retry Cooling Over Temperature Thermal Break Sensor error Lamp Fail Fan-1 error Case Open Color wheel error Firmware Download POWER LED RED GREEN ON - Flash - - ON - Flash Flash -...
... Image Problems Problem: No image appears on your service center. Ensure the projector-to-screen distance is clean. Verify the settings on the screen 1. Problem: The image is reversed Check the Projection setting on the Installation I menu of the OSD. LED Error Messages ERROR CODE MESSAGES Ready to Power on (Standby) System Power on Lamp Lit , System stable Lamp Retry Cooling Over Temperature Thermal Break Sensor error Lamp Fail Fan-1 error Case Open Color wheel error Firmware Download POWER LED RED GREEN ON - Flash - - ON - Flash Flash -...
User Manual
Page 66
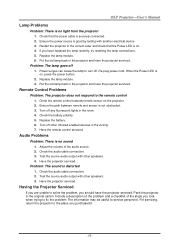
... service personnel. Replace the lamp module. 3. Check the battery polarity. 5. Audio Problems Problem: There is on, press the power button. 2. For servicing, return the projector to the place you took when trying to fix the problem: The information may be useful to turn off 1. Lamp Problems Problem: There is not obstructed. 3. Pack the projector in the room. 4. Ensure the power source is securely connected. 2. Ensure the path between remote and sensor is no sound...
... service personnel. Replace the lamp module. 3. Check the battery polarity. 5. Audio Problems Problem: There is on, press the power button. 2. For servicing, return the projector to the place you took when trying to fix the problem: The information may be useful to turn off 1. Lamp Problems Problem: There is not obstructed. 3. Pack the projector in the room. 4. Ensure the power source is securely connected. 2. Ensure the path between remote and sensor is no sound...

User Manual
Page 68
Specifications Model Display Type Resolution Projection Distance Projection Screen Size Projection Lens Throw Ratio Vertical Keystone Correction Projection Methods Data Compatibility Sdtv/Edtv/ Hdtv Video Compatibility H-Sync V-Sync Safety Certification Operation Temperature Dimensions Ac Input SPECIFICATIONS F7200 0.7" XGA DC3 1024x768 1.5 meters ~ 7 meters 36.9" ~ 215.3" Manual Focus/Manual Zoom 1.6 ~ 2.0 ±40° Front, Rear, Desktop/Ceiling (Rear, Front) VGA, SVGA, XGA, SXGA, SXGA+, UXGA, WUXGA@60hz, Mac 480i, 576i, 480p, 576p, 720p, 1080i, 1080p NTSC (M, 3.58/4.43 MHz), PAL (B, D, ...
Specifications Model Display Type Resolution Projection Distance Projection Screen Size Projection Lens Throw Ratio Vertical Keystone Correction Projection Methods Data Compatibility Sdtv/Edtv/ Hdtv Video Compatibility H-Sync V-Sync Safety Certification Operation Temperature Dimensions Ac Input SPECIFICATIONS F7200 0.7" XGA DC3 1024x768 1.5 meters ~ 7 meters 36.9" ~ 215.3" Manual Focus/Manual Zoom 1.6 ~ 2.0 ±40° Front, Rear, Desktop/Ceiling (Rear, Front) VGA, SVGA, XGA, SXGA, SXGA+, UXGA, WUXGA@60hz, Mac 480i, 576i, 480p, 576p, 720p, 1080i, 1080p NTSC (M, 3.58/4.43 MHz), PAL (B, D, ...

User Manual
Page 75
Function command summary table: Supported baud rates 115200 APPENDIX I No Code (character)...Power On Power On Power Off Keystone Mute Freeze Menu Up Down Right Left Enter Re-Sync Source Analog RGB for D-sub Source Digital RGB(DVI) Source PbPr for DVI Port Hide Source Video: Color saturation adjustment Video: Hue adjustment Video: Sharpness adjustment Query Model name Query Native display resolution Query company name - 66 - Brightness Contrast Color Temperature Source Analog RGB for DVI Port(DVI-A) Source Analog YPbPr for D-sub Source S-Video Source Composite Video Source Component Video...
Function command summary table: Supported baud rates 115200 APPENDIX I No Code (character)...Power On Power On Power Off Keystone Mute Freeze Menu Up Down Right Left Enter Re-Sync Source Analog RGB for D-sub Source Digital RGB(DVI) Source PbPr for DVI Port Hide Source Video: Color saturation adjustment Video: Hue adjustment Video: Sharpness adjustment Query Model name Query Native display resolution Query company name - 66 - Brightness Contrast Color Temperature Source Analog RGB for DVI Port(DVI-A) Source Analog YPbPr for D-sub Source S-Video Source Composite Video Source Component Video...


