User Manual
Page 4
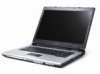
... complete the installation. Follow the instructions on the screen to access it contains warranty information and the general regulations and safety notices for your notebook. The printed User's Guide introduces you use Adobe Acrobat Reader, access the Help and Support menu. In addition it : 1 Click on Start, All Programs, AcerSystem. 2 Click on the computer, simply press and release the power button below the LCD screen beside the...
... complete the installation. Follow the instructions on the screen to access it contains warranty information and the general regulations and safety notices for your notebook. The printed User's Guide introduces you use Adobe Acrobat Reader, access the Help and Support menu. In addition it : 1 Click on Start, All Programs, AcerSystem. 2 Click on the computer, simply press and release the power button below the LCD screen beside the...

User Manual
Page 9
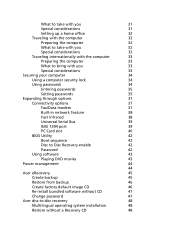
... Special considerations 53 Securing your computer 53 Using a computer security lock 53 Using passwords 53 Entering passwords 54 Setting passwords 54 Expanding through options 55 Connectivity options 55 Fax/data modem 55 Built-in network feature 56 Fast Infrared 56 Universal Serial Bus (USB) 57 IEEE 1394 port 57 PC Card slot 58 BIOS utility 59 Boot sequence 59 Enable disk-to-disk recovery 60 Password 60 Using software 60 Playing DVD movies 60 Power management 61 Acer eRecovery Management 62 Create backup 62
... Special considerations 53 Securing your computer 53 Using a computer security lock 53 Using passwords 53 Entering passwords 54 Setting passwords 54 Expanding through options 55 Connectivity options 55 Fax/data modem 55 Built-in network feature 56 Fast Infrared 56 Universal Serial Bus (USB) 57 IEEE 1394 port 57 PC Card slot 58 BIOS utility 59 Boot sequence 59 Enable disk-to-disk recovery 60 Password 60 Using software 60 Playing DVD movies 60 Power management 61 Acer eRecovery Management 62 Create backup 62
User Manual
Page 15
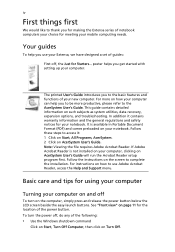
... with the need for recovery disks provided by the manufacturer. Acer eRecovery Management provides you with: • Password protection. • Recovery of applications and drivers. • Image/data backup: • Back up to HDD (set recovery point). • Back up to CD/DVD. • Image/data recovery tools: • Recover from a hidden partition (factory defaults). • Recover from the HDD (most recent user-defined recovery point). • Recover from CD/DVD. The Acer eRecovery Management utility occupies...
... with the need for recovery disks provided by the manufacturer. Acer eRecovery Management provides you with: • Password protection. • Recovery of applications and drivers. • Image/data backup: • Back up to HDD (set recovery point). • Back up to CD/DVD. • Image/data recovery tools: • Recover from a hidden partition (factory defaults). • Recover from the HDD (most recent user-defined recovery point). • Recover from CD/DVD. The Acer eRecovery Management utility occupies...
User Manual
Page 16
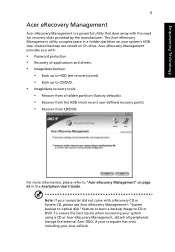
... notebook, or start automatically when you to optimize your Windows operating system, so your PC. Acer eNet Management automatically detects the best settings for power users. • Logs when a hardware component has been removed or replaced. • Permits you the freedom to manually adjust the settings to monitor the system health status. You also have the option to set Acer eNet Management to migrate personal settings. • Keeps a history log of locations...
... notebook, or start automatically when you to optimize your Windows operating system, so your PC. Acer eNet Management automatically detects the best settings for power users. • Logs when a hardware component has been removed or replaced. • Permits you the freedom to manually adjust the settings to monitor the system health status. You also have the option to set Acer eNet Management to migrate personal settings. • Keeps a history log of locations...
User Manual
Page 18
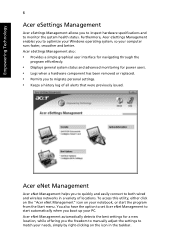
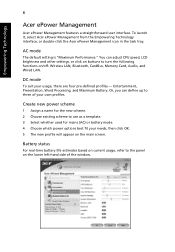
... can adjust CPU speed, LCD brightness and other settings, or click on buttons to the panel on the lower left-hand side of your needs, then click OK. 5 The new profile will appear on /off: Wireless LAN, Bluetooth, CardBus, Memory Card, Audio, and Wired LAN. Create new power scheme 1 Assign a name for mains (AC) or battery mode. 4 Choose which power options best fit your own profiles. To launch it, select Acer ePower Management from the...
... can adjust CPU speed, LCD brightness and other settings, or click on buttons to the panel on the lower left-hand side of your needs, then click OK. 5 The new profile will appear on /off: Wireless LAN, Bluetooth, CardBus, Memory Card, Audio, and Wired LAN. Create new power scheme 1 Assign a name for mains (AC) or battery mode. 4 Choose which power options best fit your own profiles. To launch it, select Acer ePower Management from the...
User Manual
Page 22
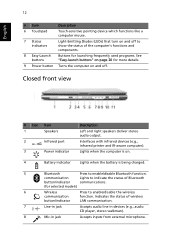
... 2 Infrared port 3 Power indicator Description Left and right speakers deliver stereo audio output. English 12 # Item Description 6 Touchpad Touch-sensitive pointing device which functions like a computer mouse. 7 Status indicators Light-Emitting Diodes (LEDs) that turn on and off to show the status of the computer's functions and components. 8 Easy-Launch buttons Buttons for launching frequently used programs. See "Easy-launch buttons" on page 20 for selected models) 6 Wireless Press to enable/disable Bluetooth function.
... 2 Infrared port 3 Power indicator Description Left and right speakers deliver stereo audio output. English 12 # Item Description 6 Touchpad Touch-sensitive pointing device which functions like a computer mouse. 7 Status indicators Light-Emitting Diodes (LEDs) that turn on and off to show the status of the computer's functions and components. 8 Easy-Launch buttons Buttons for launching frequently used programs. See "Easy-launch buttons" on page 20 for selected models) 6 Wireless Press to enable/disable Bluetooth function.
User Manual
Page 25
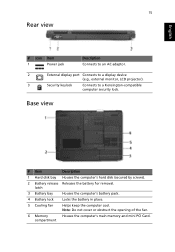
... # Icon Item 1 Power jack Description Connects to an AC adaptor. 2 External display port Connects to a display device (e.g., external monitor, LCD projector). 3 Security keylock Connects to a Kensington-compatible computer security lock. compartment Note: Do not cover or obstruct the opening of the fan. 6 Memory Houses the computer's main memory and mini PCI Card. Base view # Item Description 1 Hard disk bay Houses the computer's hard disk (secured by screws). 2 Battery release Releases the battery for removal. latch 3 Battery bay Houses...
... # Icon Item 1 Power jack Description Connects to an AC adaptor. 2 External display port Connects to a display device (e.g., external monitor, LCD projector). 3 Security keylock Connects to a Kensington-compatible computer security lock. compartment Note: Do not cover or obstruct the opening of the fan. 6 Memory Houses the computer's main memory and mini PCI Card. Base view # Item Description 1 Hard disk bay Houses the computer's hard disk (secured by screws). 2 Battery release Releases the battery for removal. latch 3 Battery bay Houses...
User Manual
Page 34
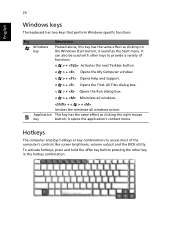
...'s controls like screen brightness, volume output and the BIOS utility. Application key + < > + Undoes the minimize all windows. it launches the Start menu. English 24 Windows keys The keyboard has two keys that perform Windows-specific functions. Key Windows key Description Pressed alone, this key has the same effect as clicking the right mouse button; This key has the same effect as clicking on the Windows Start button; It can also be used with other key in the hotkey combination. To activate hotkeys...
...'s controls like screen brightness, volume output and the BIOS utility. Application key + < > + Undoes the minimize all windows. it launches the Start menu. English 24 Windows keys The keyboard has two keys that perform Windows-specific functions. Key Windows key Description Pressed alone, this key has the same effect as clicking the right mouse button; This key has the same effect as clicking on the Windows Start button; It can also be used with other key in the hotkey combination. To activate hotkeys...
User Manual
Page 35
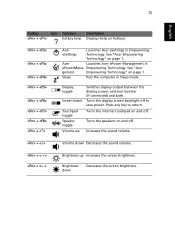
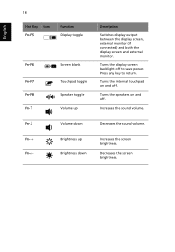
... Sleep mode. Volume up Increases the screen brightness. Empowering Technology. See "Acer gement Empowering Technology" on and off. Press any key to save power. Brightness down Decreases the sound volume. + + Brightness up Increases the sound volume. + Volume down Decreases the screen brightness. Display toggle Screen blank Switches display output between the display screen, external monitor (if connected) and both. Speaker toggle Turns the speakers on page 1. Sleep Puts the computer in ePowerMana- Touchpad toggle Turns the internal touchpad...
... Sleep mode. Volume up Increases the screen brightness. Empowering Technology. See "Acer gement Empowering Technology" on and off. Press any key to save power. Brightness down Decreases the sound volume. + + Brightness up Increases the sound volume. + Volume down Decreases the screen brightness. Display toggle Screen blank Switches display output between the display screen, external monitor (if connected) and both. Speaker toggle Turns the speakers on page 1. Sleep Puts the computer in ePowerMana- Touchpad toggle Turns the internal touchpad...
User Manual
Page 42
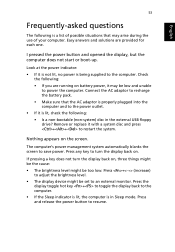
... display. Remove or replace it is in the external USB floppy drive? Press any key to restart the system. Press and release the power button to an external monitor. Check the following: • If you set the resolution lower than the specified resolution are not full-screen on the computer or on . If pressing a key does not turn the display back on an external monitor. Press the display toggle hotkey...
... display. Remove or replace it is in the external USB floppy drive? Press any key to restart the system. Press and release the power button to an external monitor. Check the following: • If you set the resolution lower than the specified resolution are not full-screen on the computer or on . If pressing a key does not turn the display back on an external monitor. Press the display toggle hotkey...
User Manual
Page 55
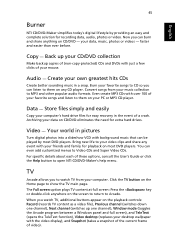
... music collection to them on most DVD players. You can burn and share anything on CD/DVD eliminates the need for easy recovery in the event of these options, consult the User's Guide or click the Help button to open NTI CD/DVD-Maker's help menu. For specific details about each of a crash. Data - Archiving your video clips and share any CD player...
... music collection to them on most DVD players. You can burn and share anything on CD/DVD eliminates the need for easy recovery in the event of these options, consult the User's Guide or click the Help button to open NTI CD/DVD-Maker's help menu. For specific details about each of a crash. Data - Archiving your video clips and share any CD player...
User Manual
Page 57
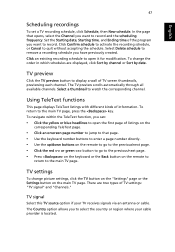
..., Starting time, and Ending time of the program you have previously created. Select Delete schedule to remove a recording schedule you want to open the first page of TV settings: "TV signal" and "Channels." The TV preview scrolls automatically through all available channels. Select a thumbnail to record. TV signal Select this TV source option if your cable provider is located.
..., Starting time, and Ending time of the program you have previously created. Select Delete schedule to remove a recording schedule you want to open the first page of TV settings: "TV signal" and "Channels." The TV preview scrolls automatically through all available channels. Select a thumbnail to record. TV signal Select this TV source option if your cable provider is located.
User Manual
Page 59
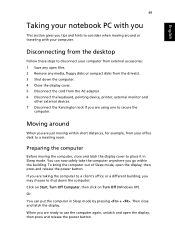
... Close the display cover. 5 Disconnect the cord from the AC adaptor. 6 Disconnect the keyboard, pointing device, printer, external monitor and other external devices. 7 Disconnect the Kensington lock if you are ready to use the computer again, unlatch and open the display; Or: You can now safely take the ..., close and latch the display. English 49 Taking your notebook PC with your computer from external accessories: 1 Save any open files. 2 Remove any media, floppy disks or compact disks from the drive(s). 3 Shut down the computer: Click on Start, Turn Off Computer, then click on...
... Close the display cover. 5 Disconnect the cord from the AC adaptor. 6 Disconnect the keyboard, pointing device, printer, external monitor and other external devices. 7 Disconnect the Kensington lock if you are ready to use the computer again, unlatch and open the display; Or: You can now safely take the ..., close and latch the display. English 49 Taking your notebook PC with your computer from external accessories: 1 Save any open files. 2 Remove any media, floppy disks or compact disks from the drive(s). 3 Shut down the computer: Click on Start, Turn Off Computer, then click on...
User Manual
Page 65
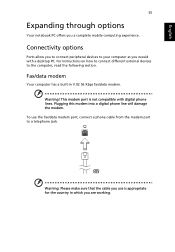
... options Your notebook PC offers you are working. Connectivity options Ports allow you to connect peripheral devices to your computer as you use the fax/data modem port, connect a phone cable from the modem port to the computer, read the following section. This modem port is appropriate for the country in V.92 56 Kbps fax/data modem. For instructions on how to connect different external devices to a telephone jack...
... options Your notebook PC offers you are working. Connectivity options Ports allow you to connect peripheral devices to your computer as you use the fax/data modem port, connect a phone cable from the modem port to the computer, read the following section. This modem port is appropriate for the country in V.92 56 Kbps fax/data modem. For instructions on how to connect different external devices to a telephone jack...
User Manual
Page 70
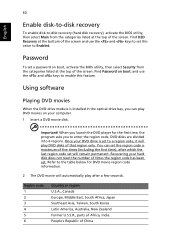
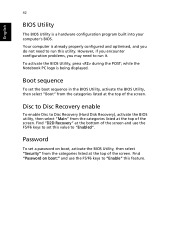
Password To set a password on your computer. 1 Insert a DVD movie disk. English 60 Enable disk-to-disk recovery To enable disk-to-disk recovery (hard disk recovery), activate the BIOS utility, then select Main from the categories listed at the top of the screen. Using software Playing DVD movies When the DVD drive module is set will remain permanent. Region code 1 2 3 4 5 6 Country or region U.S.A., Canada Europe, Middle East, South Africa, Japan Southeast Asia, Taiwan, South Korea Latin America, Australia, New Zealand...
Password To set a password on your computer. 1 Insert a DVD movie disk. English 60 Enable disk-to-disk recovery To enable disk-to-disk recovery (hard disk recovery), activate the BIOS utility, then select Main from the categories listed at the top of the screen. Using software Playing DVD movies When the DVD drive module is set will remain permanent. Region code 1 2 3 4 5 6 Country or region U.S.A., Canada Europe, Middle East, South Africa, Japan Southeast Asia, Taiwan, South Korea Latin America, Australia, New Zealand...
User Manual
Page 71
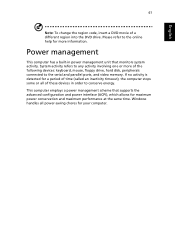
... one or more information. English 61 Note: To change the region code, insert a DVD movie of these devices in power management unit that supports the advanced configuration and power interface (ACPI), which allows for a period of the following devices: keyboard, mouse, floppy drive, hard disk, peripherals connected to the serial and parallel ports, and video memory. Power management This computer has a built-in order to conserve energy. This computer employs a power management scheme that monitors system activity.
... one or more information. English 61 Note: To change the region code, insert a DVD movie of these devices in power management unit that supports the advanced configuration and power interface (ACPI), which allows for a period of the following devices: keyboard, mouse, floppy drive, hard disk, peripherals connected to the serial and parallel ports, and video memory. Power management This computer has a built-in order to conserve energy. This computer employs a power management scheme that monitors system activity.
User Manual
Page 8
... Using a computer security lock 34 Using passwords 34 Entering passwords 35 Setting passwords 35 Expanding through options 37 Connectivity options 37 Fax/Data modem 37 Built-in network feature 38 Fast Infrared 38 Universal Serial Bus 39 IEEE 1394 port 39 PC Card slot 40 BIOS Utility 42 Boot sequence 42 Disc to Disc Recovery enable 42 Password 42 Using software 43 Playing DVD movies 43 Power management 44 44 Acer eRecovery 45 Create backup 45 Restore from backup 46 Create factory default image CD 46 Re-install...
... Using a computer security lock 34 Using passwords 34 Entering passwords 35 Setting passwords 35 Expanding through options 37 Connectivity options 37 Fax/Data modem 37 Built-in network feature 38 Fast Infrared 38 Universal Serial Bus 39 IEEE 1394 port 39 PC Card slot 40 BIOS Utility 42 Boot sequence 42 Disc to Disc Recovery enable 42 Password 42 Using software 43 Playing DVD movies 43 Power management 44 44 Acer eRecovery 45 Create backup 45 Restore from backup 46 Create factory default image CD 46 Re-install...
User Manual
Page 28
... Increases the screen brightness. Turns the internal touchpad on and off to return. Fn-→ Fn-← Brightness up Description Switches display output between the display screen, external monitor (if connected) and both the display screen and external monitor. English 18 Hot Key Icon Fn-F5 Function Display toggle Fn-F6 Fn-F7 Fn-F8 Fn-↑ Screen blank Touchpad toggle Speaker toggle Volume up Brightness down Decreases the sound volume. Decreases the screen brightness. Press any key to save power.
... Increases the screen brightness. Turns the internal touchpad on and off to return. Fn-→ Fn-← Brightness up Description Switches display output between the display screen, external monitor (if connected) and both the display screen and external monitor. English 18 Hot Key Icon Fn-F5 Function Display toggle Fn-F6 Fn-F7 Fn-F8 Fn-↑ Screen blank Touchpad toggle Speaker toggle Volume up Brightness down Decreases the sound volume. Decreases the screen brightness. Press any key to save power.
User Manual
Page 52
... being displayed. while the Notebook PC logo is a hardware configuration program built into your computer's BIOS. Password To set the boot sequence in the BIOS Utility, activate the BIOS Utility, then select "Boot" from the categories listed at the top of the screen. Find "Password on boot, activate the BIOS Utility, then select "Security" from the categories listed at the bottom of the screen and use the F5/F6 keys to "Enable" this value to Disc Recovery (Hard Disk Recovery), activate the BIOS utility...
... being displayed. while the Notebook PC logo is a hardware configuration program built into your computer's BIOS. Password To set the boot sequence in the BIOS Utility, activate the BIOS Utility, then select "Boot" from the categories listed at the top of the screen. Find "Password on boot, activate the BIOS Utility, then select "Security" from the categories listed at the bottom of the screen and use the F5/F6 keys to "Enable" this value to Disc Recovery (Hard Disk Recovery), activate the BIOS utility...
User Manual
Page 63
... adjust the brightness level. • The display device might be too low. If pressing a key does not turn the display back on the screen. Look at the power indicator: • If it with a system disc and press ++ to restart the system. Connect the AC adaptor to recharge the battery pack. • Make sure that may be set to an external monitor. Press the display toggle hot key + to toggle the display...
... adjust the brightness level. • The display device might be too low. If pressing a key does not turn the display back on the screen. Look at the power indicator: • If it with a system disc and press ++ to restart the system. Connect the AC adaptor to recharge the battery pack. • Make sure that may be set to an external monitor. Press the display toggle hot key + to toggle the display...


