User Manual
Page 3
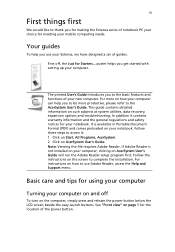
... be more on how your computer can help you get started with setting up your Extensa, we have designed a set of guides: First off To turn on such subjects as system utilities, data recovery, expansion options and troubleshooting. For more productive, please refer to the AcerSystem User's ...Guide. Follow the instructions on the screen to use your computer. iii First things first We would like to thank you for making the Extensa series of notebook PC ...
... be more on how your computer can help you get started with setting up your Extensa, we have designed a set of guides: First off To turn on such subjects as system utilities, data recovery, expansion options and troubleshooting. For more productive, please refer to the AcerSystem User's ...Guide. Follow the instructions on the screen to use your computer. iii First things first We would like to thank you for making the Extensa series of notebook PC ...
User Manual
Page 8
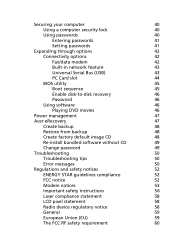
... Serial Bus (USB) 43 PC Card slot 44 BIOS utility 45 Boot sequence 45 Enable disk-to-disk recovery 46 Password 46 Using software 46 Playing DVD movies 46 Power management 47 Acer eRecovery 47 Create backup 48 Restore from backup 48 Create factory default image CD 48 Re-install bundled software...
... Serial Bus (USB) 43 PC Card slot 44 BIOS utility 45 Boot sequence 45 Enable disk-to-disk recovery 46 Password 46 Using software 46 Playing DVD movies 46 Power management 47 Acer eRecovery 47 Create backup 48 Restore from backup 48 Create factory default image CD 48 Re-install bundled software...
User Manual
Page 29
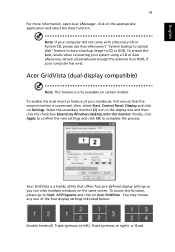
...the best results when recovering your system using a CD or Acer eRecovery, detach all peripherals (except the external Acer ODD, if your computer has one of your computer did not come with a Recovery CD or System CD, please use Acer eRecovery's "System backup to optical disk" feature to burn... dual monitor feature of the four display settings indicated below: Double (vertical), Triple (primary at left), Triple (primary at right), or Quad Acer GridVista (dual-display compatible) Note: This feature is a handy utility that the second monitor is connected, then, select Start, Control Panel, ...
...the best results when recovering your system using a CD or Acer eRecovery, detach all peripherals (except the external Acer ODD, if your computer has one of your computer did not come with a Recovery CD or System CD, please use Acer eRecovery's "System backup to optical disk" feature to burn... dual monitor feature of the four display settings indicated below: Double (vertical), Triple (primary at left), Triple (primary at right), or Quad Acer GridVista (dual-display compatible) Note: This feature is a handy utility that the second monitor is connected, then, select Start, Control Panel, ...
User Manual
Page 34
... using this option. Follow the steps below to perform system recovery. This feature occupies 2 to its original settings without recovery CDs. Before performing a restore operation, please check the BIOS settings. 1 Check to see if Acer disk-to complete the installation of your hard disk. The...BIOS utility and save changes. This recovery process helps you first turn on your Operating System. To start the recovery process: 1 Restart the system. 2 While the Acer logo is not necessary to -disk recovery is enabled or not. 2 Make sure the D2D Recovery setting in a hidden partition on ...
... using this option. Follow the steps below to perform system recovery. This feature occupies 2 to its original settings without recovery CDs. Before performing a restore operation, please check the BIOS settings. 1 Check to see if Acer disk-to complete the installation of your hard disk. The...BIOS utility and save changes. This recovery process helps you first turn on your Operating System. To start the recovery process: 1 Restart the system. 2 While the Acer logo is not necessary to -disk recovery is enabled or not. 2 Make sure the D2D Recovery setting in a hidden partition on ...
User Manual
Page 44
.... Even create MP3 CDs with your computer's hard disk files for extra hard disks. Archiving your data on CD/DVD eliminates the need for easy recovery in the event of your favorite songs to them on most DVD players. Your world in a snap. You can listen to open NTI CD/DVD...
.... Even create MP3 CDs with your computer's hard disk files for extra hard disks. Archiving your data on CD/DVD eliminates the need for easy recovery in the event of your favorite songs to them on most DVD players. Your world in a snap. You can listen to open NTI CD/DVD...

User Manual
Page 56
... disk does not reset the number of the screen. Using software Playing DVD movies When the DVD drive module is set this feature. Find D2D Recovery at the top of that region only. then close the DVD tray. Refer to Enabled. When you launch the DVD player for DVD movie region... DVD disks of the screen. DVD disks are divided into 6 regions. Recovering your DVD drive is installed in the optical drive bay, you to -disk recovery (hard disk recovery), activate the BIOS utility, then select Main from the categories listed at the bottom of China English 46 Enable disk-to-disk...
... disk does not reset the number of the screen. Using software Playing DVD movies When the DVD drive module is set this feature. Find D2D Recovery at the top of that region only. then close the DVD tray. Refer to Enabled. When you launch the DVD player for DVD movie region... DVD disks of the screen. DVD disks are divided into 6 regions. Recovering your DVD drive is installed in the optical drive bay, you to -disk recovery (hard disk recovery), activate the BIOS utility, then select Main from the categories listed at the bottom of China English 46 Enable disk-to-disk...
User Manual
Page 58
... image on the hard disk (D:\). Follow the instructions on drive D:. The default password is six zeros. 4 In the Acer eRecovery window, select Recovery actions and click Next. 5 Select the desired restore action and follow the onscreen instructions to complete the restore process. The... default password is six zeros. 4 In the Acer eRecovery window, select Recovery settings and click Next. 5 In the Recovery settings window, select Backup snapshot image and click Next. 6 Select the backup method. Create factory default...
... image on the hard disk (D:\). Follow the instructions on drive D:. The default password is six zeros. 4 In the Acer eRecovery window, select Recovery actions and click Next. 5 Select the desired restore action and follow the onscreen instructions to complete the restore process. The... default password is six zeros. 4 In the Acer eRecovery window, select Recovery settings and click Next. 5 In the Recovery settings window, select Backup snapshot image and click Next. 6 Select the backup method. Create factory default...
User Manual
Page 59
...steps below to change the password in Acer eRecovery. 1 Boot to Windows XP. 2 Press + to open the Acer eRecovery utility. 3 Enter the password to complete the process. English 49 4 In the Acer eRecovery window, select Recovery settings and click Next. 5 In the Recovery settings window, select Burn image to... and will not boot to restore the factory default image under DOS mode. Change password Acer eRecovery and Acer disk-to-disk recovery are protected by a password that can run Acer disk-to-disk recovery to Windows, you can be changed by the user. The default password is six zeros...
...steps below to change the password in Acer eRecovery. 1 Boot to Windows XP. 2 Press + to open the Acer eRecovery utility. 3 Enter the password to complete the process. English 49 4 In the Acer eRecovery window, select Recovery settings and click Next. 5 In the Recovery settings window, select Burn image to... and will not boot to restore the factory default image under DOS mode. Change password Acer eRecovery and Acer disk-to-disk recovery are protected by a password that can run Acer disk-to-disk recovery to Windows, you can be changed by the user. The default password is six zeros...


