User Manual
Page 2
... immediately register it. Model number Serial number Date of purchase Place of purchase All Rights Reserved. Chromebox for Meetings CXV2 User's Manual This revision: 05/2015 Product Registration When using your country. Select your Acer product, please visit www.acer.com. Please check back regularly to register To register your country, click Register a product and follow the simple instructions. How to...
... immediately register it. Model number Serial number Date of purchase Place of purchase All Rights Reserved. Chromebox for Meetings CXV2 User's Manual This revision: 05/2015 Product Registration When using your country. Select your Acer product, please visit www.acer.com. Please check back regularly to register To register your country, click Register a product and follow the simple instructions. How to...

User Manual
Page 3
... check for updates. Having these items to support your computer's Warranty. Software installation The first time you turn off your computer, it will ensure better and quicker service. This may take some time, please do not turn on your computer; Acer provides several options to hand when contacting us , please write down your proof of purchase and model name on...
... check for updates. Having these items to support your computer's Warranty. Software installation The first time you turn off your computer, it will ensure better and quicker service. This may take some time, please do not turn on your computer; Acer provides several options to hand when contacting us , please write down your proof of purchase and model name on...
User Manual
Page 4
Table of contents English Table of contents Software installation 3 Having trouble 3 Getting started 5 General information 5 Set up your Chromebox for Meetings 5 Making video calls 9 For more information 10 Your Acer Chromebox tour 11 Front view 11 Rear view 12 Environment 13
Table of contents English Table of contents Software installation 3 Having trouble 3 Getting started 5 General information 5 Set up your Chromebox for Meetings 5 Making video calls 9 For more information 10 Your Acer Chromebox tour 11 Front view 11 Rear view 12 Environment 13
User Manual
Page 5
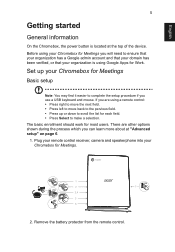
... started General information On the Chromebox, the power button is using your Chromebox for Meetings you will need to complete the setup procedure if you can learn more about at the top of the device. Set up or down to make a selection. Plug your remote control receiver, camera and speakerphone into your Chromebox for each field. • Press Select to scroll the list...
... started General information On the Chromebox, the power button is using your Chromebox for Meetings you will need to complete the setup procedure if you can learn more about at the top of the device. Set up or down to make a selection. Plug your remote control receiver, camera and speakerphone into your Chromebox for each field. • Press Select to scroll the list...
User Manual
Page 6
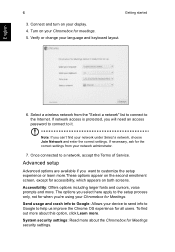
... will need an access password to connect to a network, accept the Terms of Service. Turn on the second enrollment screen, except for meetings. 5. Select a wireless network from your Chromebox for all users. Accessibility: Offers options including larger fonts and cursors, voice prompts and more .These options appear on your network under Select a network, choose Join Network and enter the correct settings. Advanced setup Advanced options are available if you 're using your network...
... will need an access password to connect to a network, accept the Terms of Service. Turn on the second enrollment screen, except for meetings. 5. Select a wireless network from your Chromebox for all users. Accessibility: Offers options including larger fonts and cursors, voice prompts and more .These options appear on your network under Select a network, choose Join Network and enter the correct settings. Advanced setup Advanced options are available if you 're using your network...
User Manual
Page 7
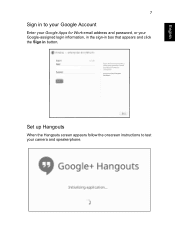
English 7 Sign in button. Set up Hangouts When the Hangouts screen appears follow the onscreen instructions to your Google Account Enter your Google Apps for Work email address and password, or your Google-assigned login information, in the sign-in box that appears and click the Sign in to test your camera and speakerphone.
English 7 Sign in button. Set up Hangouts When the Hangouts screen appears follow the onscreen instructions to your Google Account Enter your Google Apps for Work email address and password, or your Google-assigned login information, in the sign-in box that appears and click the Sign in to test your camera and speakerphone.
User Manual
Page 8
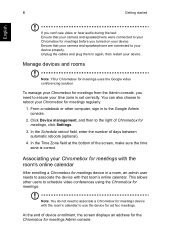
... cables and plug them in to the Google Admin console. 2. Click Device management, and then to the right of days between automatic reboots (optional). 4. 8 Getting started English If you can also choose to reboot your device. Ensure that your camera and speakerphone are connected to schedule video conferences using the Chromebox for meetings uses the Google video conferencing solution. From a notebook or other users to your device. Manage devices...
... cables and plug them in to the Google Admin console. 2. Click Device management, and then to the right of days between automatic reboots (optional). 4. 8 Getting started English If you can also choose to reboot your device. Ensure that your camera and speakerphone are connected to schedule video conferences using the Chromebox for meetings uses the Google video conferencing solution. From a notebook or other users to your device. Manage devices...
User Manual
Page 9
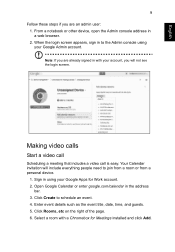
... a personal device. 1. Sign in with a Chromebox for Work account. 2. Enter event details such as the event title, date, time, and guests. 5. Your Calendar invitation will not see the login screen. Note: If you are an admin user: 1. Select a room with your Google Apps for Meetings installed and click Add. Click Create to schedule an event. 4. Making video calls Start a video call...
... a personal device. 1. Sign in with a Chromebox for Work account. 2. Enter event details such as the event title, date, time, and guests. 5. Your Calendar invitation will not see the login screen. Note: If you are an admin user: 1. Select a room with your Google Apps for Meetings installed and click Add. Click Create to schedule an event. 4. Making video calls Start a video call...
User Manual
Page 10
.... 8. English 10 Getting started 7. Once the room has been booked, click Add video call , press the red handset icon on the remote control or speakerphone. It just means that is short and clear. For more information For more information, please consult Google's tutorials, available from: https://support.google.com/chromeboxformeetings/ Give the video call a name that you...
.... 8. English 10 Getting started 7. Once the room has been booked, click Add video call , press the red handset icon on the remote control or speakerphone. It just means that is short and clear. For more information For more information, please consult Google's tutorials, available from: https://support.google.com/chromeboxformeetings/ Give the video call a name that you...
User Manual
Page 11
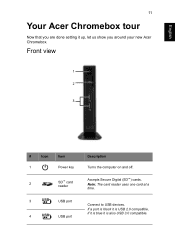
English 11 Your Acer Chromebox tour Now that you are done setting it is also USB 3.0 compatible. Note: The card reader uses one card at a time. Connect to USB devices. Accepts Secure Digital (SD™) cards. Front view # Icon Item 1 Power key 2 SD™ card reader 3 USB port 4 USB port Description Turns the computer on and off. If a port is black it is USB 2.0 compatible, if it is blue it up, let us show you around your new Acer Chromebox.
English 11 Your Acer Chromebox tour Now that you are done setting it is also USB 3.0 compatible. Note: The card reader uses one card at a time. Connect to USB devices. Accepts Secure Digital (SD™) cards. Front view # Icon Item 1 Power key 2 SD™ card reader 3 USB port 4 USB port Description Turns the computer on and off. If a port is black it is USB 2.0 compatible, if it is blue it up, let us show you around your new Acer Chromebox.
User Manual
Page 12
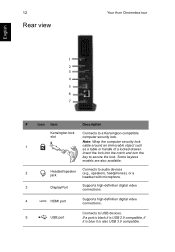
... with microphone. 3 DisplayPort Supports high-definition digital video connections. 4 HDMI port Supports high-definition digital video connections. Some keyless models are also available. 2 Headset/speaker jack Connects to USB devices. 5 USB port If a port is black it is USB 2.0 compatible, if it is blue it is also USB 3.0 compatible. 12 Rear view Your Acer Chromebox tour English # Icon Item Description Kensington lock slot Connects to secure the lock. Insert the lock into the notch and turn the key...
... with microphone. 3 DisplayPort Supports high-definition digital video connections. 4 HDMI port Supports high-definition digital video connections. Some keyless models are also available. 2 Headset/speaker jack Connects to USB devices. 5 USB port If a port is black it is USB 2.0 compatible, if it is blue it is also USB 3.0 compatible. 12 Rear view Your Acer Chromebox tour English # Icon Item Description Kensington lock slot Connects to secure the lock. Insert the lock into the notch and turn the key...

User Manual
Page 13
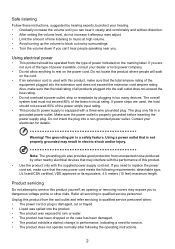
Environment • Temperature: • Operating: 5 °C to 35 °C • Non-operating: -20 °C to 65 °C • Humidity (non-condensing): • Operating: 20% to 80% • Non-operating: 20% to an AC adapter. 13 English # Icon Item Description 6 Ethernet (RJ-45) port Connects to an Ethernet 10/100/1000based network. 7 DC-in jack Connects to 80%
Environment • Temperature: • Operating: 5 °C to 35 °C • Non-operating: -20 °C to 65 °C • Humidity (non-condensing): • Operating: 20% to 80% • Non-operating: 20% to an AC adapter. 13 English # Icon Item Description 6 Ethernet (RJ-45) port Connects to an Ethernet 10/100/1000based network. 7 DC-in jack Connects to 80%

User Manual
Page 14
... when connecting and disconnecting power to the power supply unit: Install the power supply unit before connecting the power cord to the equipment, be blocked or covered. Use a damp cloth for plug as they may touch dangerous voltage points or short-out parts that could be seriously damaged. • Slots and openings are provided for accessibility Be sure that the power outlet you need to disconnect power...
... when connecting and disconnecting power to the power supply unit: Install the power supply unit before connecting the power cord to the equipment, be blocked or covered. Use a damp cloth for plug as they may touch dangerous voltage points or short-out parts that could be seriously damaged. • Slots and openings are provided for accessibility Be sure that the power outlet you need to disconnect power...
User Manual
Page 15
... high volume. • Avoid turning up the volume to replace the power cord set . If power strips are not sure of the type of power indicated on the marking label. Make sure the power outlet is a safety feature. Do not insert the plug into the product. • The product was spilled into a non-grounded power outlet. Using a power outlet that may result in performance, indicating a need to...
... high volume. • Avoid turning up the volume to replace the power cord set . If power strips are not sure of the type of power indicated on the marking label. Make sure the power outlet is a safety feature. Do not insert the plug into the product. • The product was spilled into a non-grounded power outlet. Using a power outlet that may result in performance, indicating a need to...
User Manual
Page 16
... set by a qualified technician to restore the product to the manufacturer's instructions. More information refers to Acer system with an ENERGY STAR sticker. Acer is configured to offer products and services worldwide that help customers save more we reduce greenhouse gases and the risks of explosion if battery is ENERGY STAR? Note: Adjust only those controls that are covered by the operating instructions...
... set by a qualified technician to restore the product to the manufacturer's instructions. More information refers to Acer system with an ENERGY STAR sticker. Acer is configured to offer products and services worldwide that help customers save more we reduce greenhouse gases and the risks of explosion if battery is ENERGY STAR? Note: Adjust only those controls that are covered by the operating instructions...

User Manual
Page 17
... lenses, glare, excessive room lighting, poorly focused screens, very small typefaces and low-contrast displays could stress your company's health and safety department. The following tips: • Refrain from drying out. Eyes • Rest your eyes frequently. • Give your eyes regular breaks by adjusting the viewing angle of the monitor, using a footrest, or raising your...
... lenses, glare, excessive room lighting, poorly focused screens, very small typefaces and low-contrast displays could stress your company's health and safety department. The following tips: • Refrain from drying out. Eyes • Rest your eyes frequently. • Give your eyes regular breaks by adjusting the viewing angle of the monitor, using a footrest, or raising your...

User Manual
Page 18
... body. If this is unavoidable, work habits to make your display to an awkward viewing angle. • Avoid looking at bright light sources, such as open windows, for only short periods, take breaks regularly, and do not recommend using drapes, shades or blinds. • Using a task light. • Changing the display's viewing angle. • Using a glare-reduction filter. • Using a display visor, such as a piece...
... body. If this is unavoidable, work habits to make your display to an awkward viewing angle. • Avoid looking at bright light sources, such as open windows, for only short periods, take breaks regularly, and do not recommend using drapes, shades or blinds. • Using a task light. • Changing the display's viewing angle. • Using a glare-reduction filter. • Using a display visor, such as a piece...

User Manual
Page 19
.... • Increase the separation between the device and receiver. • Connect the device into an outlet on , the user is encouraged to try to correct the interference by the Federal Communications Commission, to this device must be made using shielded cables to maintain compliance with FCC regulations. Operation conditions This device complies with Part 15 of the FCC rules. Remarque...
.... • Increase the separation between the device and receiver. • Connect the device into an outlet on , the user is encouraged to try to correct the interference by the Federal Communications Commission, to this device must be made using shielded cables to maintain compliance with FCC regulations. Operation conditions This device complies with Part 15 of the FCC rules. Remarque...

User Manual
Page 20
... of Telecom's network services. 2 This equipment is designed. Above all, it provides no endorsement of the product by Telecom, nor does it provide any sort of Directive 1999/5/EC. In order to its network. Telecom will work correctly in all operating conditions, of another item of Telepermitted equipment of a different make automatic calls to make or model, nor does...
... of Telecom's network services. 2 This equipment is designed. Above all, it provides no endorsement of the product by Telecom, nor does it provide any sort of Directive 1999/5/EC. In order to its network. Telecom will work correctly in all operating conditions, of another item of Telepermitted equipment of a different make automatic calls to make or model, nor does...
User Manual
Page 21
... country list. Canada - This device must be operated indoors and installation outdoors is subject to the following two conditions: 1. There is no laser or light emitting diode (LED) more than Class I. 6 This device is equipped with wireless LAN and/or Bluetooth only. Please ensure that may not cause interference, and 2. The CD or DVD drive's classification label (shown below) is located on local power...
... country list. Canada - This device must be operated indoors and installation outdoors is subject to the following two conditions: 1. There is no laser or light emitting diode (LED) more than Class I. 6 This device is equipped with wireless LAN and/or Bluetooth only. Please ensure that may not cause interference, and 2. The CD or DVD drive's classification label (shown below) is located on local power...


