User Manual
Page 2
... revisions or changes. All correspondence concerning your computer. The serial number and model number are recorded on the label affixed to notify any means, electronically, mechanically, by any person of Acer Incorporated. English Copyright © 2017. Acer LCD Monitor User Guide Model number Serial number Date of purchase Place of merchantability or fitness for identification purposes only and belong to the contents hereof and specifically disclaims the...
... revisions or changes. All correspondence concerning your computer. The serial number and model number are recorded on the label affixed to notify any means, electronically, mechanically, by any person of Acer Incorporated. English Copyright © 2017. Acer LCD Monitor User Guide Model number Serial number Date of purchase Place of merchantability or fitness for identification purposes only and belong to the contents hereof and specifically disclaims the...
User Manual
Page 3
... the LCD screen, an afterimage of the fluorescent light, the screen may flicker during initial use . • The LCD screen has 99.99% or more effective pixels. Turn off the power switch for a few hours. In this document for future reference. Cleaning your safety and comfort Safety instructions Read these guidelines when cleaning the monitor: • Always unplug the monitor before cleaning. • Use a soft cloth to make sure the flicker...
... the LCD screen, an afterimage of the fluorescent light, the screen may flicker during initial use . • The LCD screen has 99.99% or more effective pixels. Turn off the power switch for a few hours. In this document for future reference. Cleaning your safety and comfort Safety instructions Read these guidelines when cleaning the monitor: • Always unplug the monitor before cleaning. • Use a soft cloth to make sure the flicker...
User Manual
Page 4
..., stand or table. The openings should be sure to unplug the power cord from the electrical outlet. Warnings • Do not use it could result in installation unless proper ventilation is easily accessible and located as close to the equipment operator as they may touch dangerous voltage points or short-out parts that the power outlet you plug the power cord into...
..., stand or table. The openings should be sure to unplug the power cord from the electrical outlet. Warnings • Do not use it could result in installation unless proper ventilation is easily accessible and located as close to the equipment operator as they may touch dangerous voltage points or short-out parts that the power outlet you plug the power cord into...
User Manual
Page 5
... power cord meets the following the operating instructions The grounding pin is properly grounded before inserting the power cord plug. English • If an extension cord is used , the load should not exceed 80% of the power strip's input rating. • This product's power cord is equipped with a three-wire grounded plug. Product servicing Do not attempt to service this product. • Use the product only with the supplied power supply cord set , make...
... power cord meets the following the operating instructions The grounding pin is properly grounded before inserting the power cord plug. English • If an extension cord is used , the load should not exceed 80% of the power strip's input rating. • This product's power cord is equipped with a three-wire grounded plug. Product servicing Do not attempt to service this product. • Use the product only with the supplied power supply cord set , make...

User Manual
Page 6
...'s top priorities in bodily injury or even death. chemical plants; or where blasting operations are in damage and will often require extensive work by a qualified technician to restore the product to reduce the environmental impact of our products. English Note: Adjust only those controls that are covered by the operating instructions, since improper adjustment of other products.
...'s top priorities in bodily injury or even death. chemical plants; or where blasting operations are in damage and will often require extensive work by a qualified technician to restore the product to reduce the environmental impact of our products. English Note: Adjust only those controls that are covered by the operating instructions, since improper adjustment of other products.

User Manual
Page 7
... after prolonged use Computer users may occasionally misfire or appear as below. • Activate display's Sleep mode within 5 minutes of the monitor, using a footrest, or raising your leg muscles Power management statement should be as black or red dots. Long work periods, bad posture, poor work habits, stress, inadequate working in one fixed posture • avoid slouching forward and/or leaning backward • stand up...
... after prolonged use Computer users may occasionally misfire or appear as below. • Activate display's Sleep mode within 5 minutes of the monitor, using a footrest, or raising your leg muscles Power management statement should be as black or red dots. Long work periods, bad posture, poor work habits, stress, inadequate working in one fixed posture • avoid slouching forward and/or leaning backward • stand up...

User Manual
Page 8
... the window or any light source • minimizing room light by looking at bright light sources, such as possible. • Exercise regularly and maintain a healthy body. The following work habits to make your display to keep your eyes. English Taking care of your vision Long viewing hours, wearing incorrect glasses or contact lenses, glare, excessive room lighting, poorly focused screens, very small typefaces and low-contrast displays...
... the window or any light source • minimizing room light by looking at bright light sources, such as possible. • Exercise regularly and maintain a healthy body. The following work habits to make your display to keep your eyes. English Taking care of your vision Long viewing hours, wearing incorrect glasses or contact lenses, glare, excessive room lighting, poorly focused screens, very small typefaces and low-contrast displays...
User Manual
Page 11
...viii Developing good work habits viii Declaration of Conformity ix Federal Communications Commission Declaration of Conformity x Unpacking 1 Attaching the base (for selected models) 2 Screen position adjustment 3 Connecting the adapter and AC Power cord 3 Power saving Display Data Channel (DDC) Connector pin assignment 4 19-pin color display signal cable 4 20-pin color display signal cable 5 Standard timing table 6 Installation 7 Users controls 8 Panel controls 8 Using the Shortcut Menu 9 The Function page 10 Troubleshooting 15 HDMI/DP Mode (Optional) 15
...viii Developing good work habits viii Declaration of Conformity ix Federal Communications Commission Declaration of Conformity x Unpacking 1 Attaching the base (for selected models) 2 Screen position adjustment 3 Connecting the adapter and AC Power cord 3 Power saving Display Data Channel (DDC) Connector pin assignment 4 19-pin color display signal cable 4 20-pin color display signal cable 5 Standard timing table 6 Installation 7 Users controls 8 Panel controls 8 Using the Shortcut Menu 9 The Function page 10 Troubleshooting 15 HDMI/DP Mode (Optional) 15

User Manual
Page 12
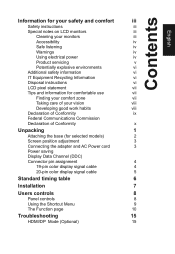
English Unpacking Please check that the following items are present when you unpack the box, and save the packing materials in case you need to ship or transport the monitor in the future. LCD monitor Quick start guide DP Cable (Optional) BE320QK Mini DP Cable (Optional) HDMI cable (Optional) AC Power cord USB cable (Optional) MHL cable (Optional)
English Unpacking Please check that the following items are present when you unpack the box, and save the packing materials in case you need to ship or transport the monitor in the future. LCD monitor Quick start guide DP Cable (Optional) BE320QK Mini DP Cable (Optional) HDMI cable (Optional) AC Power cord USB cable (Optional) MHL cable (Optional)

User Manual
Page 13
Only at the highest point can adjust the height of the monitor. 1 2 115mm • Tilt Please see the illustration below for the angle of the tilt range. English SCREEN POSITION ADJUSTMENT In oder to optimize the best viewing position, you can adjust the height/tilt/swivel/pivot of the monitor. • Height Adjustment After pressing the top of the monitor then you can 20 degrees of recline be offered for an example of elevation. 5o 20o
Only at the highest point can adjust the height of the monitor. 1 2 115mm • Tilt Please see the illustration below for the angle of the tilt range. English SCREEN POSITION ADJUSTMENT In oder to optimize the best viewing position, you can adjust the height/tilt/swivel/pivot of the monitor. • Height Adjustment After pressing the top of the monitor then you can 20 degrees of recline be offered for an example of elevation. 5o 20o
User Manual
Page 15
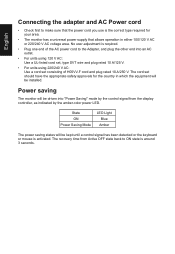
... installed. Power saving The monitor will be driven into an AC outlet. • For units using 120 V AC: Use a UL-listed cord set, type SVT wire and plug rated 10 A/125 V. • For units using 220/240 V AC: Use a cord set consisting of the AC power cord to the Adapter, and plug the other end into "Power Saving" mode by the control signal from Active OFF state back to make sure that the power cord you use...
... installed. Power saving The monitor will be driven into an AC outlet. • For units using 120 V AC: Use a UL-listed cord set, type SVT wire and plug rated 10 A/125 V. • For units using 220/240 V AC: Use a cord set consisting of the AC power cord to the Adapter, and plug the other end into "Power Saving" mode by the control signal from Active OFF state back to make sure that the power cord you use...
User Manual
Page 16
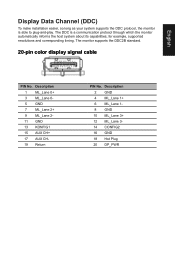
The monitor supports the DDC2B standard. 20-pin color display signal cable PIN No. Description 1 ML_Lane 0+ 3 ML_Lane 05 GND 7 ML_Lane 2+ 9 ML_Lane 211 GND 13 KONFIG1 15 AUX CH+ 17 AUX CH19 Return PIN No. for example, supported resolutions and corresponding timing. English Display Data Channel (DDC) To make installation easier, so long as your system supports the DDC protocol, the monitor is a communication protocol through...
The monitor supports the DDC2B standard. 20-pin color display signal cable PIN No. Description 1 ML_Lane 0+ 3 ML_Lane 05 GND 7 ML_Lane 2+ 9 ML_Lane 211 GND 13 KONFIG1 15 AUX CH+ 17 AUX CH19 Return PIN No. for example, supported resolutions and corresponding timing. English Display Data Channel (DDC) To make installation easier, so long as your system supports the DDC protocol, the monitor is a communication protocol through...

User Manual
Page 19
... of the monitor. 5. English Installation To install the monitor on the signal cable connector. 3. Connect the USB Cable(Optional) Connect the USB 3.0 cable to dynamically adjust display refresh rate based on the computer. Insert the monitor power cable into a nearby electrical outlet. Note: Audio output is only for more instruction. FreeSync (HDMI/DP): It can allow a FreeSync supported graphics source to port for power efficient, virtually stutter free and low-latency display update. Please check user manual for audio output model. Plug the power cords of your computer...
... of the monitor. 5. English Installation To install the monitor on the signal cable connector. 3. Connect the USB Cable(Optional) Connect the USB 3.0 cable to dynamically adjust display refresh rate based on the computer. Insert the monitor power cable into a nearby electrical outlet. Note: Audio output is only for more instruction. FreeSync (HDMI/DP): It can allow a FreeSync supported graphics source to port for power efficient, virtually stutter free and low-latency display update. Please check user manual for audio output model. Plug the power cords of your computer...

User Manual
Page 20
... your monitor and current input or reset the custom color settings to select select scenario mode or game mode . When the Function Menu is active, this button to the factory defaults. a. Amber indicates standby/ power saving mode. b. The single toggle button on . When the Function Menu is active, press this button will quit the OSD. a. Grey indicates inoperable. Green indicates operable. Press to enter Input select function. a. Press to view Main...
... your monitor and current input or reset the custom color settings to select select scenario mode or game mode . When the Function Menu is active, this button to the factory defaults. a. Amber indicates standby/ power saving mode. b. The single toggle button on . When the Function Menu is active, press this button will quit the OSD. a. Grey indicates inoperable. Green indicates operable. Press to enter Input select function. a. Press to view Main...

User Manual
Page 21
... Power 2. Hot Key3 (Input Switch Hot Key) 5. Brightness 80 Adjust OK For advanced settings, please refer to adjust the picture quality, OSD position and general settings. Hot Key2 (Modes, Brightness, Contrast, Volume, Gamma, Blue Light, Over Drive,PIP/PBP) 4. The OSD (onscreen display) can use or scenario mode (User, Standard, ECO, Graphics, Movie) Modes 1 2 3 sRGB Rec.709 HDR User Standard Move ECO OK Graphics Movie Hot key2 (default: Brightness) Open the Brightness control and select your LCD monitor. Hot Key1 (Modes, Brightness, Volume, Gamma, Contrast, Blue Light...
... Power 2. Hot Key3 (Input Switch Hot Key) 5. Brightness 80 Adjust OK For advanced settings, please refer to adjust the picture quality, OSD position and general settings. Hot Key2 (Modes, Brightness, Contrast, Volume, Gamma, Blue Light, Over Drive,PIP/PBP) 4. The OSD (onscreen display) can use or scenario mode (User, Standard, ECO, Graphics, Movie) Modes 1 2 3 sRGB Rec.709 HDR User Standard Move ECO OK Graphics Movie Hot key2 (default: Brightness) Open the Brightness control and select your LCD monitor. Hot Key1 (Modes, Brightness, Volume, Gamma, Contrast, Blue Light...

User Manual
Page 22
... 100 Note: Sets the degree of difference between light and dark shades. 6. Input Auto Source Move Input HDMI(MHL2.1) Enter On Exit The Function page Open the Function page to exit current page and store. Picture Picture Color Audio Gaming OSD System Mode - Toggle to the left or right to go back one level or use X to enter it. 3. Contrast: Adjust the contrast from the OSD.Then toggle to...
... 100 Note: Sets the degree of difference between light and dark shades. 6. Input Auto Source Move Input HDMI(MHL2.1) Enter On Exit The Function page Open the Function page to exit current page and store. Picture Picture Color Audio Gaming OSD System Mode - Toggle to the left or right to go back one level or use X to enter it. 3. Contrast: Adjust the contrast from the OSD.Then toggle to...
User Manual
Page 23
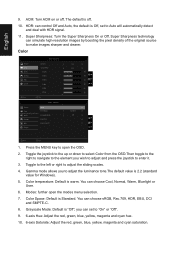
..., Bluelight or User. 6. you wish to adjust and press the joystick to enter it. 3. Modes: further open the OSD. 2. Grayscale Mode: Default is warm. You can choose sRGB, Rec.709, HDR, EBU, DCI and SMPTE-C. 8. Press the MENU key to make images sharper and clearer. Color Picture Color Audio Gaming OSD System Move Picture Color Audio Gaming OSD System Mode - Color temperature: Default is "Off"; Color Space: Default is off . English 9. ACM: Turn ACM on or...
..., Bluelight or User. 6. you wish to adjust and press the joystick to enter it. 3. Modes: further open the OSD. 2. Grayscale Mode: Default is warm. You can choose sRGB, Rec.709, HDR, EBU, DCI and SMPTE-C. 8. Press the MENU key to make images sharper and clearer. Color Picture Color Audio Gaming OSD System Move Picture Color Audio Gaming OSD System Mode - Color temperature: Default is "Off"; Color Space: Default is off . English 9. ACM: Turn ACM on or...
User Manual
Page 24
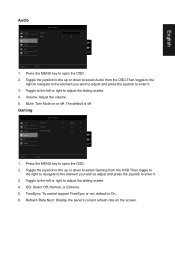
... 1. OD: Select Off, Normal, or Extreme. 5. FreeSync: To control support FreeSync or not, default is off . Refresh Rate Num: Display the panel's current refresh rate on or off . The default is On. 6. Toggle to the left or right to adjust the sliding scales. 4. English Audio Picture Color Audio Gaming OSD System Mode - Gaming Mode - Press the MENU key to enter it . 3. Volume: Adjust the volume 5. Toggle the joystick to the up or down...
... 1. OD: Select Off, Normal, or Extreme. 5. FreeSync: To control support FreeSync or not, default is off . Refresh Rate Num: Display the panel's current refresh rate on or off . The default is On. 6. Toggle to the left or right to adjust the sliding scales. 4. English Audio Picture Color Audio Gaming OSD System Mode - Gaming Mode - Press the MENU key to enter it . 3. Volume: Adjust the volume 5. Toggle the joystick to the up or down...
User Manual
Page 25
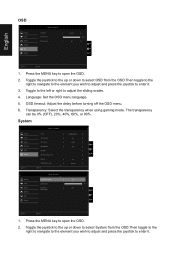
... Quick start mode LED Control Power-off USB Charge Off 10 Off X Move Enter 1. Toggle the joystick to the up or down to select System from the OSD.Then toggle to the right to navigate to the element you wish to adjust and press the joystick to enter it . 3. OSD timeout: Adjust the delay before turning off the OSD menu. 6. Standard Picture Color Audio Gaming OSD System Move Input Auto Source...
... Quick start mode LED Control Power-off USB Charge Off 10 Off X Move Enter 1. Toggle the joystick to the up or down to select System from the OSD.Then toggle to the right to navigate to the element you wish to adjust and press the joystick to enter it . 3. OSD timeout: Adjust the delay before turning off the OSD menu. 6. Standard Picture Color Audio Gaming OSD System Move Input Auto Source...

User Manual
Page 26
.... HDMI Black level setting. 12. Turn on and in order. 6. LED Control: Controls the brightness of monitor. Amber Check if the AC power cord is DP1.2, can select which allows monitor controls to be sent via software. 11. Auto Source:The default is switched on to their default setting. HDMI/DP Mode (Optional) Problem No picture visible LED status Blue Off Remedy Using the OSD menu, adjust brightness and contrast to maximum or reset to speed up boot speed. 13. Check if the video signal cable is properly connected...
.... HDMI Black level setting. 12. Turn on and in order. 6. LED Control: Controls the brightness of monitor. Amber Check if the AC power cord is DP1.2, can select which allows monitor controls to be sent via software. 11. Auto Source:The default is switched on to their default setting. HDMI/DP Mode (Optional) Problem No picture visible LED status Blue Off Remedy Using the OSD menu, adjust brightness and contrast to maximum or reset to speed up boot speed. 13. Check if the video signal cable is properly connected...

