
User Manual
Page 4
... the volume to block out noisy surroundings. • Turn the volume down if you can hear it clearly and comfortably and without distortion. • After setting the volume level, do not place the product on a vibrating surface. • Never use this product near or over a radiator or heat register, or in...
... the volume to block out noisy surroundings. • Turn the volume down if you can hear it clearly and comfortably and without distortion. • After setting the volume level, do not place the product on a vibrating surface. • Never use this product near or over a radiator or heat register, or in...

User Manual
Page 5
...protection from the wall outlet and refer servicing to qualified service personnel. Also, make sure that is equipped with the supplied power supply cord set , make sure that may result in too many devices. Do not insert the plug into the extension cord does not exceed the extension cord..., as opening or removing covers may expose you need for details. The plug only fits in performance, indicating a need to replace the power cord set . If you to rain or water • the product has been dropped or the case has been damaged • the product exhibits a distinct...
...protection from the wall outlet and refer servicing to qualified service personnel. Also, make sure that is equipped with the supplied power supply cord set , make sure that may result in too many devices. Do not insert the plug into the extension cord does not exceed the extension cord..., as opening or removing covers may expose you need for details. The plug only fits in performance, indicating a need to replace the power cord set . If you to rain or water • the product has been dropped or the case has been damaged • the product exhibits a distinct...

User Manual
Page 10
...ith the essential requirem ents and other standardizing documents: EN 55022:2006/A1:2007 Class B; Year to establishing a framework for the setting of EMC Di rective 200 4/108/EC, Low Voltage Directive 2006/95/EC, and RoHS Directive 2011/65/EU and Directive 2009/125/... 40, 20020 Lainate (MI) Italy Tel: +39-02-939-921 ,Fax: +39-02 9399-2913 www.acer.it Declare under our own responsibility that the product: Product: LCD Monitor Trade Name: Acer Model Number: B286HK SKU Number: B286HK xxxxxx; ("x" = 0~9, a ~ z, A ~ Z, or blank) To which this declaration refers conforms to ...
...ith the essential requirem ents and other standardizing documents: EN 55022:2006/A1:2007 Class B; Year to establishing a framework for the setting of EMC Di rective 200 4/108/EC, Low Voltage Directive 2006/95/EC, and RoHS Directive 2011/65/EU and Directive 2009/125/... 40, 20020 Lainate (MI) Italy Tel: +39-02-939-921 ,Fax: +39-02 9399-2913 www.acer.it Declare under our own responsibility that the product: Product: LCD Monitor Trade Name: Acer Model Number: B286HK SKU Number: B286HK xxxxxx; ("x" = 0~9, a ~ z, A ~ Z, or blank) To which this declaration refers conforms to ...
User Manual
Page 12
... Screen position adjustment Connecting the power cord Power saving Display Data Channel (DDC) Connector pin assignment Standard timing table Installation User controls How to adjust a setting Acer eColor Management User Troubleshooting HDMI mode DVI mode DP mode 1 iii iii iii iii iii iv iv iv iv v vi vi vii vii viii xi...
... Screen position adjustment Connecting the power cord Power saving Display Data Channel (DDC) Connector pin assignment Standard timing table Installation User controls How to adjust a setting Acer eColor Management User Troubleshooting HDMI mode DVI mode DP mode 1 iii iii iii iii iii iv iv iv iv v vi vi vii vii viii xi...

User Manual
Page 17
... end of H05VV-F cord and plug rated 10 A/250 V. The cord set consisting of the power cord to the AC inlet, and plug the other end into an AC outlet. • For units using 120 V AC: Use a UL-listed cord set, type SVT wire and plug rated 10 A/125 V. • For units... using 220/240 V AC: Use a cord set should have the appropriate safety approvals for the country in either 100/120 V AC or 220/240...
... end of H05VV-F cord and plug rated 10 A/250 V. The cord set consisting of the power cord to the AC inlet, and plug the other end into an AC outlet. • For units using 120 V AC: Use a UL-listed cord set, type SVT wire and plug rated 10 A/125 V. • For units... using 220/240 V AC: Use a cord set should have the appropriate safety approvals for the country in either 100/120 V AC or 220/240...
User Manual
Page 23
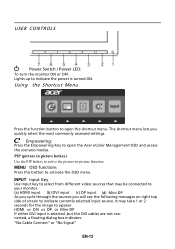
... to indicate currently selected input source. The shortcut menu lets you will see the following messages on right top side of screen to open the Acer eColor Management OSD and access the scenario modes. INPUT Input Key Use Input key to select from different video sources that may take 1 or 2 seconds... image to your monitor. (a) HDMI input (b) DVI input (c) DP input (d) Mini-DP As you cycle through the sources you quickly select the most commonly accessed settings. PIP (picture in -picture function. It may be connected to appear.
... to indicate currently selected input source. The shortcut menu lets you will see the following messages on right top side of screen to open the Acer eColor Management OSD and access the scenario modes. INPUT Input Key Use Input key to select from different video sources that may take 1 or 2 seconds... image to your monitor. (a) HDMI input (b) DVI input (c) DP input (d) Mini-DP As you cycle through the sources you quickly select the most commonly accessed settings. PIP (picture in -picture function. It may be connected to appear.

User Manual
Page 24
... suit any situation N/A ECO mode Adjusts the settings to confirm the mode and exit the eColor menu. EN-14 N/A Standard D efau lt Settin g . N/A Movie mode Displays scenes in vibrant colors with sharp detail. Acer eColor Management Operation instructions Step 1: Press " " Key to open the Acer eColor Management OSD and access the scenario modes...
... suit any situation N/A ECO mode Adjusts the settings to confirm the mode and exit the eColor menu. EN-14 N/A Standard D efau lt Settin g . N/A Movie mode Displays scenes in vibrant colors with sharp detail. Acer eColor Management Operation instructions Step 1: Press " " Key to open the Acer eColor Management OSD and access the scenario modes...

User Manual
Page 25
...pixel density of your LCD Monitor. The OSD can be used for general reference only. For advanced settings, please refer to confirm selection of DP signal setting in B286HK is for adjusting the settings of the original source. User can make the image more sharper and clear. 7 DP mode selection...,the default out of DP1.2 or DP1.1 EN-15 It can follow the setting message to following content is DP1...
...pixel density of your LCD Monitor. The OSD can be used for general reference only. For advanced settings, please refer to confirm selection of DP signal setting in B286HK is for adjusting the settings of the original source. User can make the image more sharper and clear. 7 DP mode selection...,the default out of DP1.2 or DP1.1 EN-15 It can follow the setting message to following content is DP1...

User Manual
Page 27
... display. 7 "Wide mode" is not supported when using PIP, "Wide mode", "ACM" will be used to adjust the screen Menu Language and other important settings. 4 Select Power-off USB charge ON/OFF to enable/disable Power-off USB charge function. 5 Select PIP to bring up the OSD. 2 Using the /... keys, select Setting from the OSD. EN-17 Adjusting the setting 1 Press the MENU key to adjust picture‐in‐picture settings. The PIP signal source needs to be selected manually. 6 When using PBP function.
... display. 7 "Wide mode" is not supported when using PIP, "Wide mode", "ACM" will be used to adjust the screen Menu Language and other important settings. 4 Select Power-off USB charge ON/OFF to enable/disable Power-off USB charge function. 5 Select PIP to bring up the OSD. 2 Using the /... keys, select Setting from the OSD. EN-17 Adjusting the setting 1 Press the MENU key to adjust picture‐in‐picture settings. The PIP signal source needs to be selected manually. 6 When using PBP function.

User Manual
Page 29
... if the video signal cable is switched on and in power saving/ standby mode. Check that the computer system is properly connected to their default settings. Problem No picture visible LED status Blue Off Remedy Using the OSD, adjust brightness and contrast to maximum or reset to their default...
... if the video signal cable is switched on and in power saving/ standby mode. Check that the computer system is properly connected to their default settings. Problem No picture visible LED status Blue Off Remedy Using the OSD, adjust brightness and contrast to maximum or reset to their default...


