User Manual
Page 1
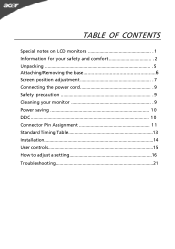
TABLE OF CONTENTS Special notes on LCD monitors 1 Information for your safety and comfort 2 Unpacking 5 Attaching/Removing the base 6 Screen position adjustment 7 Connecting the power cord 9 Safety precaution 9 Cleaning your monitor 9 Power saving 1 0 DDC 1 0 Connector Pin Assignment 1 1 Standard Timing Table 13 Installation 14 User controls 15 How to adjust a setting 16 Troubleshooting 21
TABLE OF CONTENTS Special notes on LCD monitors 1 Information for your safety and comfort 2 Unpacking 5 Attaching/Removing the base 6 Screen position adjustment 7 Connecting the power cord 9 Safety precaution 9 Cleaning your monitor 9 Power saving 1 0 DDC 1 0 Connector Pin Assignment 1 1 Standard Timing Table 13 Installation 14 User controls 15 How to adjust a setting 16 Troubleshooting 21
User Manual
Page 2
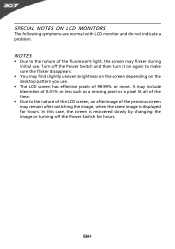
... pixels of the fluorescent light, the screen may remain after switching the image, when the same image is recovered slowly by changing the image or turning off the Power Switch and then turn it on again to the nature of 99.99% or more. SPECIAL NOTES ON LCD MONITORS The following symptoms are normal with LCD monitor and do not indicate a problem. In this case, the screen is displayed...
... pixels of the fluorescent light, the screen may remain after switching the image, when the same image is recovered slowly by changing the image or turning off the Power Switch and then turn it on again to the nature of 99.99% or more. SPECIAL NOTES ON LCD MONITORS The following symptoms are normal with LCD monitor and do not indicate a problem. In this case, the screen is displayed...

User Manual
Page 3
... touch dangerous voltage points or short-out parts that the power outlet you plug the power cord into this product through cabinet slots as disconnecting device Observe the follwing guidelines when connecting and disconnecting power to the power supply unit: Install the power supply unit before removing the power supply unit from the power supplies. Keep this product on the product. Information for your earing. • Gradually increase the volume...
... touch dangerous voltage points or short-out parts that the power outlet you plug the power cord into this product through cabinet slots as disconnecting device Observe the follwing guidelines when connecting and disconnecting power to the power supply unit: Install the power supply unit before removing the power supply unit from the power supplies. Keep this product on the product. Information for your earing. • Gradually increase the volume...
User Manual
Page 4
Unplug this product yourself, as black or red dots. nel when: • the power cord or plug is produced with high-precision manufacturing techniques. Long work periods, bad posture, poor work habits, stress, inadequate working in front of a computer. The following the operating instructions Note: Adjust only those controls that are also at risk of physical injury. Users are covered by a qualified technician to...
Unplug this product yourself, as black or red dots. nel when: • the power cord or plug is produced with high-precision manufacturing techniques. Long work periods, bad posture, poor work habits, stress, inadequate working in front of a computer. The following the operating instructions Note: Adjust only those controls that are also at risk of physical injury. Users are covered by a qualified technician to...
User Manual
Page 5
... this is unavoidable, work habits to an awkward viewing angle. • Avoid looking at bright light sources, such as open windows, for enhanced text readability and graphics clarity. • Eliminate glare and reflections by using drapes, shades or blinds • using a task light • changing the display's viewing angle • using a glare-reduction filter • using the product on how to keep your display in recycling, please...
... this is unavoidable, work habits to an awkward viewing angle. • Avoid looking at bright light sources, such as open windows, for enhanced text readability and graphics clarity. • Eliminate glare and reflections by using drapes, shades or blinds • using a task light • changing the display's viewing angle • using a glare-reduction filter • using the product on how to keep your display in recycling, please...
User Manual
Page 6
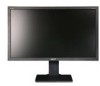
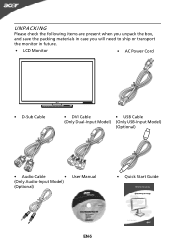
UNPACKING Please check the following items are present when you unpack the box, and save the packing materials in case you will need to ship or transport the monitor in future. • LCD Monitor • AC Power Cord • D-Sub Cable • DVI Cable • USB Cable (Only Dual-Input Model) (Only USB-Input Model) (Optional) • Audio Cable • (Only Audio-Input Model) (Optional) User Manual • Quick Start Guide EN-5
UNPACKING Please check the following items are present when you unpack the box, and save the packing materials in case you will need to ship or transport the monitor in future. • LCD Monitor • AC Power Cord • D-Sub Cable • DVI Cable • USB Cable (Only Dual-Input Model) (Only USB-Input Model) (Optional) • Audio Cable • (Only Audio-Input Model) (Optional) User Manual • Quick Start Guide EN-5
User Manual
Page 8
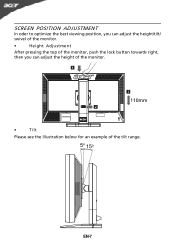
SCREEN POSITION ADJUSTMENT In oder to optimize the best viewing position, you can adjust the height/tilt/ swivel of the monitor. • Height Adjustment After pressing the top of the monitor, push the lock button towards right, then you can adjust the height of the monitor. 110mm • Tilt Please see the illustration below for an example of the tilt range. EN-7
SCREEN POSITION ADJUSTMENT In oder to optimize the best viewing position, you can adjust the height/tilt/ swivel of the monitor. • Height Adjustment After pressing the top of the monitor, push the lock button towards right, then you can adjust the height of the monitor. 110mm • Tilt Please see the illustration below for an example of the tilt range. EN-7

User Manual
Page 10
... will be installed. SAFETY PRECAUTION • Avoid placing the monitor, or any other light sources may reflect on the power cord to avoid damage to the cable. • Do not expose the monitor to rain, excessive moisture, or dust. • Do not cover the ventilation slots or openings of the monitor. No user-adjustment is adequate ventilation. • Avoid placing the monitor against a bright background...
... will be installed. SAFETY PRECAUTION • Avoid placing the monitor, or any other light sources may reflect on the power cord to avoid damage to the cable. • Do not expose the monitor to rain, excessive moisture, or dust. • Do not cover the ventilation slots or openings of the monitor. No user-adjustment is adequate ventilation. • Avoid placing the monitor against a bright background...

User Manual
Page 11
... host system about its capabilities, for example, supported resolutions and corresponding timing. Power saving The monitor will be driven into Power Saving" mode by the control signal from Active OFF state back to Plug and Play with your system if your installation easier, the monitor is able to ON state is around 3 seconds. The recovery time from the display controller, as indicated by the amber-color power LED.
... host system about its capabilities, for example, supported resolutions and corresponding timing. Power saving The monitor will be driven into Power Saving" mode by the control signal from Active OFF state back to Plug and Play with your system if your installation easier, the monitor is able to ON state is around 3 seconds. The recovery time from the display controller, as indicated by the amber-color power LED.
User Manual
Page 12
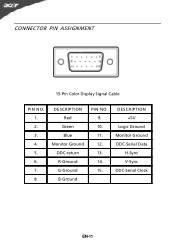
DESCRIPTION +5V Logic Ground Monitor Ground DDC-Serial Data H-Sync V-Sync DDC-Serial Clock EN-11 CONNECTOR PIN ASSIGNMENT 15-Pin Color Display Signal Cable PIN NO. 1. 2. 3. 4. 5. 6. 7. 8. DESCRIPTION Red Green Blue Monitor Ground DDC-return R-Ground G-Ground B-Ground PIN NO. 9. 10. 11. 12. 13. 14. 15.
DESCRIPTION +5V Logic Ground Monitor Ground DDC-Serial Data H-Sync V-Sync DDC-Serial Clock EN-11 CONNECTOR PIN ASSIGNMENT 15-Pin Color Display Signal Cable PIN NO. 1. 2. 3. 4. 5. 6. 7. 8. DESCRIPTION Red Green Blue Monitor Ground DDC-return R-Ground G-Ground B-Ground PIN NO. 9. 10. 11. 12. 13. 14. 15.
User Manual
Page 15
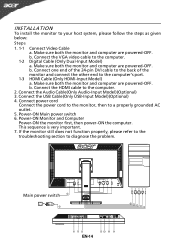
... power switch 6. Make sure both the monitor and computer are powered-OFF. b. Connect power cord Connect the power cord to the monitor, then to the computer. 1-2 Digital Cable (Only Dual-Input Model) a. Connect the Audio Cable(Only Audio-Input Model)(Optional) 3. If the monitor still does not function properly, please refer to the troubleshooting section to your host system, please follow the steps as given below: Steps 1. 1-1 Connect Video Cable a. Main power switch EN-14 b. Connect the USB Cable(Only USB-Input Model)(Optional) 4. Power-ON Monitor...
... power switch 6. Make sure both the monitor and computer are powered-OFF. b. Connect power cord Connect the power cord to the monitor, then to the computer. 1-2 Digital Cable (Only Dual-Input Model) a. Connect the Audio Cable(Only Audio-Input Model)(Optional) 3. If the monitor still does not function properly, please refer to the troubleshooting section to your host system, please follow the steps as given below: Steps 1. 1-1 Connect Video Cable a. Main power switch EN-14 b. Connect the USB Cable(Only USB-Input Model)(Optional) 4. Power-ON Monitor...
User Manual
Page 16
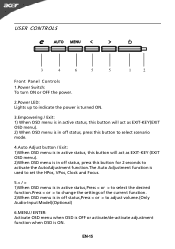
USER CONTROLS 3 4 6 5 5 1 2 Front Panel Controls 1.Power Switch: To turn ON or OFF the power. 2.Power LED: Lights up to indicate the power is turned ON. 3.Empowering / Exit: 1) When OSD menu is in active status, this button will act as EXIT-KEY(EXIT OSD menu). 2) When OSD menu is in off status, press this button to select scenario mode. 4.Auto Adjust button / Exit: 1)When OSD menu is in active status, this button will act as EXIT-KEY (EXIT OSD menu). 2)When OSD menu is...
USER CONTROLS 3 4 6 5 5 1 2 Front Panel Controls 1.Power Switch: To turn ON or OFF the power. 2.Power LED: Lights up to indicate the power is turned ON. 3.Empowering / Exit: 1) When OSD menu is in active status, this button will act as EXIT-KEY(EXIT OSD menu). 2) When OSD menu is in off status, press this button to select scenario mode. 4.Auto Adjust button / Exit: 1)When OSD menu is in active status, this button will act as EXIT-KEY (EXIT OSD menu). 2)When OSD menu is...
User Manual
Page 17
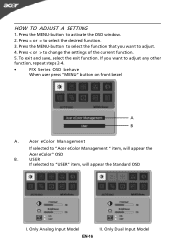
... 2-4. • P/X Series OSD behave When user press "MENU" button on front bezel A B A. If you want to change the settings of the current function. 5. Press the MENU-button to select the function that you want to activate the OSD window. 2. Acer eColor Management If selected to select the desired function. 3. Only Dual Input Model EN-16 Only Analog Input Model II. Press the MENU-button to adjust. 4. To exit and save, select...
... 2-4. • P/X Series OSD behave When user press "MENU" button on front bezel A B A. If you want to change the settings of the current function. 5. Press the MENU-button to select the function that you want to activate the OSD window. 2. Acer eColor Management If selected to select the desired function. 3. Only Dual Input Model EN-16 Only Analog Input Model II. Press the MENU-button to adjust. 4. To exit and save, select...
User Manual
Page 18
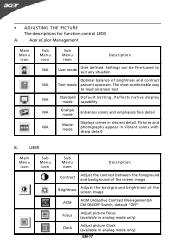
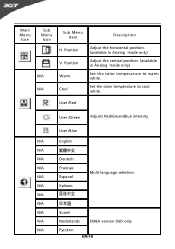
... the screen image ACM ACM (Adaptive Contrast Management)A CM ON/OFF Switch, default "OFF" Focus Adjust picture Focus (available in analog mode only) Clock Adjust picture Clock (available in analog mode only) EN-17 Pictures and photographs appear in clearest detail. • ADJUSTING THE PICTURE The descriptions for function control LEDS A. Acer eColor Management Main Menu icon Sub Menu icon N/A N/A N/A N/A N/A Sub Menu item Description User mode User defined. USER Main Menu icon Sub Menu icon Sub Menu item Description Contrast Adjust the contrast...
... the screen image ACM ACM (Adaptive Contrast Management)A CM ON/OFF Switch, default "OFF" Focus Adjust picture Focus (available in analog mode only) Clock Adjust picture Clock (available in analog mode only) EN-17 Pictures and photographs appear in clearest detail. • ADJUSTING THE PICTURE The descriptions for function control LEDS A. Acer eColor Management Main Menu icon Sub Menu icon N/A N/A N/A N/A N/A Sub Menu item Description User mode User defined. USER Main Menu icon Sub Menu icon Sub Menu item Description Contrast Adjust the contrast...
User Manual
Page 19
Set the color temperature to warm white. N/A Italiano N/A N/A N/A Suomi N/A Nederlands EMEA version OSD only N/A Pyccknn EN-18 Position V. User /Red User /Green Adjusts Red/Green/Blue intensity. Position Warm Cool Description Adjust the horizontal position. (available in Analog mode only) Adjust the vertical position. (available in Analog mode only) Set the color temperature to cool white. User /Blue N/A English N/A N/A Deutsch N/A Francais N/A Espanol Multi-language selection. Main Menu Icon Sub Menu Icon N/A N/A Sub Menu Item H.
Set the color temperature to warm white. N/A Italiano N/A N/A N/A Suomi N/A Nederlands EMEA version OSD only N/A Pyccknn EN-18 Position V. User /Red User /Green Adjusts Red/Green/Blue intensity. Position Warm Cool Description Adjust the horizontal position. (available in Analog mode only) Adjust the vertical position. (available in Analog mode only) Set the color temperature to cool white. User /Blue N/A English N/A N/A Deutsch N/A Francais N/A Espanol Multi-language selection. Main Menu Icon Sub Menu Icon N/A N/A Sub Menu Item H.
User Manual
Page 20
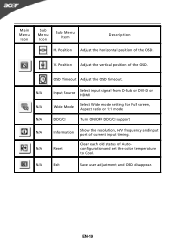
... DVI-D or HDMI N/A Wide Mode Select Wide mode setting for Full screen, Aspect ratio or 1:1 mode N/A DDC/CI Turn ON/OFF DDC/CI support N/A Information Show the resolution, H/V frequency andinput port of the OSD. EN-19 Position Adjust the vertical position of current input timing. configurationand set the color temperature to Cool. Main Menu Icon Sub Menu Icon Sub Menu Item Description H. N/A Reset Clear each old status of the OSD. Position Adjust the horizontal position of Auto- OSD Timeout Adjust the OSD timeout. V. N/A Exit Save user adjustment and OSD...
... DVI-D or HDMI N/A Wide Mode Select Wide mode setting for Full screen, Aspect ratio or 1:1 mode N/A DDC/CI Turn ON/OFF DDC/CI support N/A Information Show the resolution, H/V frequency andinput port of the OSD. EN-19 Position Adjust the vertical position of current input timing. configurationand set the color temperature to Cool. Main Menu Icon Sub Menu Icon Sub Menu Item Description H. N/A Reset Clear each old status of the OSD. Position Adjust the horizontal position of Auto- OSD Timeout Adjust the OSD timeout. V. N/A Exit Save user adjustment and OSD...
User Manual
Page 22
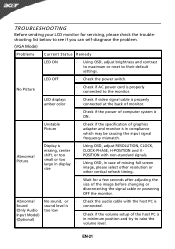
... Picture · Check if the specification of the image before changing or disconnecting the signal cable or powering OFF the monitor. small or too large in display · Using OSD, in case of missing full-screen size image, please select other resolution or other vertical refresh timing. · Wait for servicing, please check the troubleshooting list below to see if you can self-diagnose the problem. (VGA Mode) Problems Current Status Remedy LED ON · Using OSD, adjust brightness and contrast...
... Picture · Check if the specification of the image before changing or disconnecting the signal cable or powering OFF the monitor. small or too large in display · Using OSD, in case of missing full-screen size image, please select other resolution or other vertical refresh timing. · Wait for servicing, please check the troubleshooting list below to see if you can self-diagnose the problem. (VGA Mode) Problems Current Status Remedy LED ON · Using OSD, adjust brightness and contrast...
User Manual
Page 23
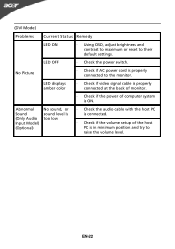
...; Check the power switch. LED displays amber color · Check if video signal cable is properly connected at the back of monitor. · Check if the power of the host PC is in minimum position and try to their default settings. EN-22 No Picture · Check if AC power cord is ON. (DVI Mode) Problems Current Status Remedy LED ON · Using OSD, adjust brightness and contrast to maximum or reset to raise the volume level. Abnormal Sound (Only Audio Input Model) (Optional) No sound, or sound...
...; Check the power switch. LED displays amber color · Check if video signal cable is properly connected at the back of monitor. · Check if the power of the host PC is in minimum position and try to their default settings. EN-22 No Picture · Check if AC power cord is ON. (DVI Mode) Problems Current Status Remedy LED ON · Using OSD, adjust brightness and contrast to maximum or reset to raise the volume level. Abnormal Sound (Only Audio Input Model) (Optional) No sound, or sound...
User Manual
Page 24
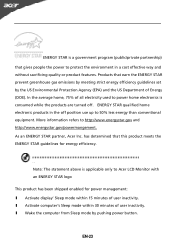
... an ENERGY STAR partner, Acer Inc. l Wake the computer from Sleep mode by the US Environmental Protection Agency (EPA) and the US Department of all electricity used to power home electronics is consumed while the products are turned off position use up to protect the environment in the off . More information refers to Acer LCD Monitor with an ENERGY STAR logo...
... an ENERGY STAR partner, Acer Inc. l Wake the computer from Sleep mode by the US Environmental Protection Agency (EPA) and the US Department of all electricity used to power home electronics is consumed while the products are turned off position use up to protect the environment in the off . More information refers to Acer LCD Monitor with an ENERGY STAR logo...
User Manual
Page 25
..., Taipei Hsien 221, Taiwan Contact Person: Mr. Easy Lai Tel: 886-2-8691-3089 Fax: 886-2-8691-3120 E-mail: easy_lai@acer.com.tw Hereby declare that: Product Name: 27"W LCD Monitor Brand Name: Acer Main Model Number: B273HUxxxx Series Model Number:ADFB Is compliant with the essential requirements and other relevant provisions of the following EC directives, and that all the...
..., Taipei Hsien 221, Taiwan Contact Person: Mr. Easy Lai Tel: 886-2-8691-3089 Fax: 886-2-8691-3120 E-mail: easy_lai@acer.com.tw Hereby declare that: Product Name: 27"W LCD Monitor Brand Name: Acer Main Model Number: B273HUxxxx Series Model Number:ADFB Is compliant with the essential requirements and other relevant provisions of the following EC directives, and that all the...


