

User Manual
Page 1
TABLE OF CONTENTS Special notes on LCD monitors 1 Information for your safety and comfort 2 Unpacking 5 Screen position adjustment 6 Connecting the power cord 8 Safety precaution 8 Cleaning your monitor 8 Power saving 9 DDC 9 Connector Pin Assignment 10 Standard Timing Table 12 Installation 13 User controls 14 Troubleshooting 20
TABLE OF CONTENTS Special notes on LCD monitors 1 Information for your safety and comfort 2 Unpacking 5 Screen position adjustment 6 Connecting the power cord 8 Safety precaution 8 Cleaning your monitor 8 Power saving 9 DDC 9 Connector Pin Assignment 10 Standard Timing Table 12 Installation 13 User controls 14 Troubleshooting 20

User Manual
Page 2
... remain after switching the image, when the same image is recovered slowly by changing the image or turning off the Power Switch and then turn it on the desktop pattern you use . NOTES · Due to make sure the flicker disappears. · You may flicker during initial use . · The LCD screen has effective pixels of the fluorescent light, the screen may find slightly uneven brightness on the screen depending on...
... remain after switching the image, when the same image is recovered slowly by changing the image or turning off the Power Switch and then turn it on the desktop pattern you use . NOTES · Due to make sure the flicker disappears. · You may flicker during initial use . · The LCD screen has effective pixels of the fluorescent light, the screen may find slightly uneven brightness on the screen depending on...
User Manual
Page 3
... device uses one of time listening to music at high volume. • Avoid turning up the volume to unplug the power cord from surrounding light and bright surfaces. EN-2 Follow all warnings and instructions marked on an unstable cart, stand or table. If the product falls, it afteryour ears adjust. • Limit the amount of the following power supplies: Manufacturer: FSP Technology Inc., Model...
... device uses one of time listening to music at high volume. • Avoid turning up the volume to unplug the power cord from surrounding light and bright surfaces. EN-2 Follow all warnings and instructions marked on an unstable cart, stand or table. If the product falls, it afteryour ears adjust. • Limit the amount of the following power supplies: Manufacturer: FSP Technology Inc., Model...
User Manual
Page 4
..., as black or red dots. Nevertheless, some pixels may occasionally misfire or appear as opening or removing covers may complain of eyestrain and headaches after following tips: • refrain from the wall outlet and refer servicing to qualified service person- Incorrect computer usage may result in damage and will often require extensive work habits, stress, inadequate working in front of the monitor, using...
..., as black or red dots. Nevertheless, some pixels may occasionally misfire or appear as opening or removing covers may complain of eyestrain and headaches after following tips: • refrain from the wall outlet and refer servicing to qualified service person- Incorrect computer usage may result in damage and will often require extensive work habits, stress, inadequate working in front of the monitor, using...
User Manual
Page 5
... or blinds • using a task light • changing the display's viewing angle • using a glare-reduction filter • using the product on a distant point. • Blink frequently to keep your eyes from drying out. Display • Keep your display clean. • Keep your head at a higher level than your documents, place the display at the middle of the display. • Adjust the display brightness and/or contrast to a comfortable level...
... or blinds • using a task light • changing the display's viewing angle • using a glare-reduction filter • using the product on a distant point. • Blink frequently to keep your eyes from drying out. Display • Keep your display clean. • Keep your head at a higher level than your documents, place the display at the middle of the display. • Adjust the display brightness and/or contrast to a comfortable level...
User Manual
Page 6
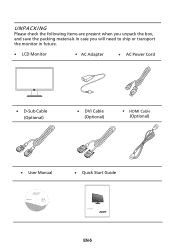
UNPACKING Please check the following items are present when you unpack the box, and save the packing materials in case you will need to ship or transport the monitor in future. · LCD Monitor · AC Adapter · AC Power Cord · D-Sub Cable (Optional) · DVI Cable (Optional) · HDMI Cable (Optional) · User Manual · Quick Start Guide LCD Monitor EN-5
UNPACKING Please check the following items are present when you unpack the box, and save the packing materials in case you will need to ship or transport the monitor in future. · LCD Monitor · AC Adapter · AC Power Cord · D-Sub Cable (Optional) · DVI Cable (Optional) · HDMI Cable (Optional) · User Manual · Quick Start Guide LCD Monitor EN-5
User Manual
Page 7
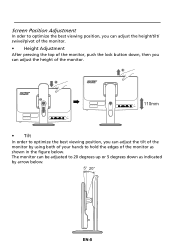
... adjust the height of the monitor. 3 1 2 110mm • Tilt In order to optimize the best viewing position, you can adjust the tilt of the monitor by arrow below . Screen Position Adjustment In oder to hold the edges of the monitor as indicated by using both of your hands to optimize the best viewing position, you can adjust the height/tilt/ swivel/pivot of the monitor. • Height Adjustment After pressing the top of the monitor, push the lock button...
... adjust the height of the monitor. 3 1 2 110mm • Tilt In order to optimize the best viewing position, you can adjust the tilt of the monitor by arrow below . Screen Position Adjustment In oder to hold the edges of the monitor as indicated by using both of your hands to optimize the best viewing position, you can adjust the height/tilt/ swivel/pivot of the monitor. • Height Adjustment After pressing the top of the monitor, push the lock button...

User Manual
Page 9
.... · Do not cover the ventilation slots or openings of the monitor. EN-8 CONNECTING THE POWER CORD · Check first to make sure that the power cord you use is required. · Plug one end of the power cord to the AC Inlet, plug another end to a proper AC outlet. · For unit using at 120 V AC: Use a UL Listed Cord Set, Type SVT wire and plug rated 10 A/125 V. ·...
.... · Do not cover the ventilation slots or openings of the monitor. EN-8 CONNECTING THE POWER CORD · Check first to make sure that the power cord you use is required. · Plug one end of the power cord to the AC Inlet, plug another end to a proper AC outlet. · For unit using at 120 V AC: Use a UL Listed Cord Set, Type SVT wire and plug rated 10 A/125 V. ·...
User Manual
Page 10
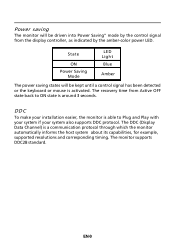
... time from the display controller, as indicated by the control signal from Active OFF state back to Plug and Play with your system if your system also supports DDC protocol. DDC To make your installation easier, the monitor is able to ON state is around 3 seconds. EN-9 State ON Power Saving Mode LED Light Blue Amber The power saving states will be kept until a control signal has been detected...
... time from the display controller, as indicated by the control signal from Active OFF state back to Plug and Play with your system if your system also supports DDC protocol. DDC To make your installation easier, the monitor is able to ON state is around 3 seconds. EN-9 State ON Power Saving Mode LED Light Blue Amber The power saving states will be kept until a control signal has been detected...
User Manual
Page 11
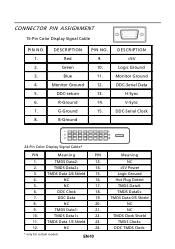
NC 16. 5. DESCRIPTION Red Green Blue Monitor Ground DDC-return R-Ground G-Ground B-Ground PIN NO. 9. 10. 11. 12. 13. 14. 15. DESCRIPTION +5V Logic Ground Monitor Ground DDC-Serial Data H-Sync V-Sync DDC-Serial Clock 24-Pin Color Display Signal Cable* PIN Meaning PIN 1. TMDS Data1- 21. 10. TMDS Data2- 13. 2. NC 20. 9. CONNECTOR PIN ASSIGNMENT 15-Pin Color Display Signal Cable PIN NO. 1. 2. 3. 4. 5. 6. 7. 8. DDC Clock 18. 7. TMDS Data1...
NC 16. 5. DESCRIPTION Red Green Blue Monitor Ground DDC-return R-Ground G-Ground B-Ground PIN NO. 9. 10. 11. 12. 13. 14. 15. DESCRIPTION +5V Logic Ground Monitor Ground DDC-Serial Data H-Sync V-Sync DDC-Serial Clock 24-Pin Color Display Signal Cable* PIN Meaning PIN 1. TMDS Data1- 21. 10. TMDS Data2- 13. 2. NC 20. 9. CONNECTOR PIN ASSIGNMENT 15-Pin Color Display Signal Cable PIN NO. 1. 2. 3. 4. 5. 6. 7. 8. DDC Clock 18. 7. TMDS Data1...
User Manual
Page 12
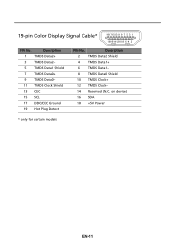
on device) 16 SDA 18 +5V Power * only for certain models EN-11 Description 2 TMDS Data2 Shield 4 TMDS Data1+ 6 TMDS Data1- 8 TMDS Data0 Shield 10 TMDS Clock+ 12 TMDS Clock- 14 Reserved (N.C. Description 1 TMDS Data2+ 3 TMDS Data2- 5 TMDS Data1 Shield 7 TMDS Data0+ 9 TMDS Data0- 11 TMDS Clock Shield 13 CEC 15 SCL 17 DDC/CEC Ground 19 Hot Plug Detect PIN No. 19-pin Color Display Signal Cable* 1917151311 9 7 5 3 1 1816141210 8 6 4 2 PIN No.
on device) 16 SDA 18 +5V Power * only for certain models EN-11 Description 2 TMDS Data2 Shield 4 TMDS Data1+ 6 TMDS Data1- 8 TMDS Data0 Shield 10 TMDS Clock+ 12 TMDS Clock- 14 Reserved (N.C. Description 1 TMDS Data2+ 3 TMDS Data2- 5 TMDS Data1 Shield 7 TMDS Data0+ 9 TMDS Data0- 11 TMDS Clock Shield 13 CEC 15 SCL 17 DDC/CEC Ground 19 Hot Plug Detect PIN No. 19-pin Color Display Signal Cable* 1917151311 9 7 5 3 1 1816141210 8 6 4 2 PIN No.
User Manual
Page 14
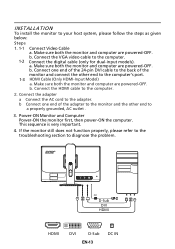
... install the monitor to the computer. 2. Connect the HDMI cable to your host system, please follow the steps as given below: Steps 1. 1-1 Connect Video Cable a. Connect the adapter a Connect the AC cord to the computer's port. 1-3 HDMI Cable (Only HDMI-Input Model) a. b. Make sure both the monitor and computer are powered-OFF. Connect one end of the monitor and connect the other end to a properly grounded, AC outlet . 3. b Connect one end of the 24-pin DVI cable...
... install the monitor to the computer. 2. Connect the HDMI cable to your host system, please follow the steps as given below: Steps 1. 1-1 Connect Video Cable a. Connect the adapter a Connect the AC cord to the computer's port. 1-3 HDMI Cable (Only HDMI-Input Model) a. b. Make sure both the monitor and computer are powered-OFF. Connect one end of the monitor and connect the other end to a properly grounded, AC outlet . 3. b Connect one end of the 24-pin DVI cable...
User Manual
Page 15
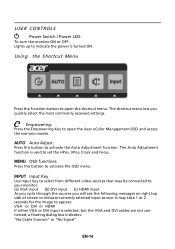
... input source. USER CONTROLS Power Switch / Power LED: To turn the monitor ON or OFF. Empowering: Press the Empowering Key to open the Acer eColor Management OSD and access the scenario modes. MENU OSD functions Press this button to activate the OSD menu. Using the Shortcut Menu Press the function button to open the shortcut menu. The Auto Adjustment function is selected ,but the VGA and DVI cables are not connected, a floating dialog box indicates: "No Cable Connect" or "No Signal" EN-14 INPUT Input...
... input source. USER CONTROLS Power Switch / Power LED: To turn the monitor ON or OFF. Empowering: Press the Empowering Key to open the Acer eColor Management OSD and access the scenario modes. MENU OSD functions Press this button to activate the OSD menu. Using the Shortcut Menu Press the function button to open the shortcut menu. The Auto Adjustment function is selected ,but the VGA and DVI cables are not connected, a floating dialog box indicates: "No Cable Connect" or "No Signal" EN-14 INPUT Input...
User Manual
Page 16
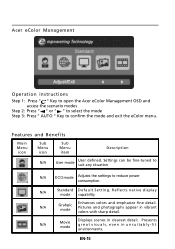
... Acer eColor Management Operation instructions Step 1: Press " " Key to open the Acer eColor Management OSD and access the scenario modes Step 2: Press " " or " " to select the mode Step 3: Press " AUTO " Key to reduce power consumption. Settings can be fine-tuned to suit any situation N/A ECO mode Adjusts the settings to confirm the mode and exit the eColor menu. R eflects n a tive d isp lay mode capability N/A Grahpic mode Enhances colors...
... Acer eColor Management Operation instructions Step 1: Press " " Key to open the Acer eColor Management OSD and access the scenario modes Step 2: Press " " or " " to select the mode Step 3: Press " AUTO " Key to reduce power consumption. Settings can be fine-tuned to suit any situation N/A ECO mode Adjusts the settings to confirm the mode and exit the eColor menu. R eflects n a tive d isp lay mode capability N/A Grahpic mode Enhances colors...

User Manual
Page 17
... Picture menu can be used to adjust the current Brightness, Contrast, Colour Temp, Auto Config and other image-related qualities. You can be used for general reference only. Press the MENU key to adjust the picture quality, OSD position and general settings. Adjusting the OSD settings Note: The following page: Adjusting the picture quality 1 Press the MENU key to bring up the OSD. 2 Using the / keys, select Picture from the OSD. The OSD can use the OSD to open...
... Picture menu can be used to adjust the current Brightness, Contrast, Colour Temp, Auto Config and other image-related qualities. You can be used for general reference only. Press the MENU key to adjust the picture quality, OSD position and general settings. Adjusting the OSD settings Note: The following page: Adjusting the picture quality 1 Press the MENU key to bring up the OSD. 2 Using the / keys, select Picture from the OSD. The OSD can use the OSD to open...
User Manual
Page 19
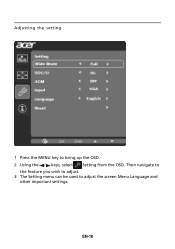
Adjusting the setting 1 Press the MENU key to adjust the screen Menu Language and other important settings. EN-18 Then navigate to the feature you wish to adjust. 3 The Setting menu can be used to bring up the OSD. 2 Using the / keys, select Setting from the OSD.
Adjusting the setting 1 Press the MENU key to adjust the screen Menu Language and other important settings. EN-18 Then navigate to the feature you wish to adjust. 3 The Setting menu can be used to bring up the OSD. 2 Using the / keys, select Setting from the OSD.
User Manual
Page 21
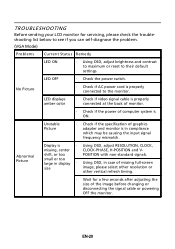
... servicing, please check the troubleshooting list below to see if you can self-diagnose the problem. (VGA Mode) Problems Current Status Remedy LED ON · Using OSD, adjust brightness and contrast to maximum or reset to the monitor. LED displays amber color · Check if video signal cable is properly connected at the back of monitor. · Check if the power of computer system is · Using OSD, adjust RESOLUTION, CLOCK, missing, center CLOCK-PHASE, H-POSITION and V- No Picture · Check if AC power cord...
... servicing, please check the troubleshooting list below to see if you can self-diagnose the problem. (VGA Mode) Problems Current Status Remedy LED ON · Using OSD, adjust brightness and contrast to maximum or reset to the monitor. LED displays amber color · Check if video signal cable is properly connected at the back of monitor. · Check if the power of computer system is · Using OSD, adjust RESOLUTION, CLOCK, missing, center CLOCK-PHASE, H-POSITION and V- No Picture · Check if AC power cord...
User Manual
Page 22
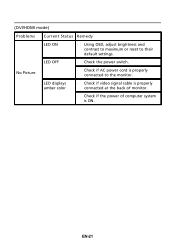
EN-21 No Picture · Check if AC power cord is ON. (DVI/HDMI mode) Problems Current Status Remedy LED ON · Using OSD, adjust brightness and contrast to maximum or reset to the monitor. LED OFF · Check the power switch. LED displays amber color · Check if video signal cable is properly connected at the back of monitor. · Check if the power of computer system is properly connected to their default settings.
EN-21 No Picture · Check if AC power cord is ON. (DVI/HDMI mode) Problems Current Status Remedy LED ON · Using OSD, adjust brightness and contrast to maximum or reset to the monitor. LED OFF · Check the power switch. LED displays amber color · Check if video signal cable is properly connected at the back of monitor. · Check if the power of computer system is properly connected to their default settings.
User Manual
Page 23
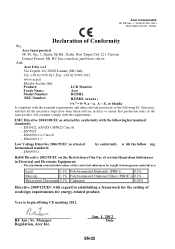
... Via Lepetit, 40, 20020 Lainate (MI) Italy Tel: +39-02-939-921 ,Fax: +39-02 9399-2913 www.acer.it Hereby declare that: Product: Trade Name: Model Number: SKU Number: LCD Monitor Acer B235HL B235HL xxxxxx ; ("x" = 0~9, a ~ z, A ~ Z, or blank) Is compliant with the essential requirements and other relevant .../EC on the Restriction of the Use of the same product will continue comply with the requirements. Year to establishing a framework for the setting of ecodesign requirements for energy-related product. RU Jan / Sr. Manager Regulation, Acer Inc. EN61000-3-2, Class D -. ...
... Via Lepetit, 40, 20020 Lainate (MI) Italy Tel: +39-02-939-921 ,Fax: +39-02 9399-2913 www.acer.it Hereby declare that: Product: Trade Name: Model Number: SKU Number: LCD Monitor Acer B235HL B235HL xxxxxx ; ("x" = 0~9, a ~ z, A ~ Z, or blank) Is compliant with the essential requirements and other relevant .../EC on the Restriction of the Use of the same product will continue comply with the requirements. Year to establishing a framework for the setting of ecodesign requirements for energy-related product. RU Jan / Sr. Manager Regulation, Acer Inc. EN61000-3-2, Class D -. ...
User Manual
Page 25
... the ENERGY STAR mark are ENERGY STAR qualified use less energy and prevent greenhouse gas emissions by meeting strict energy efficiency guidelines set by reducing energy costs and helps protect the environment without sacrificing features or performance. Products that help customers save more than 80% energy at "sleep" mode. Acer is committed to http://www.energystar.gov or...
... the ENERGY STAR mark are ENERGY STAR qualified use less energy and prevent greenhouse gas emissions by meeting strict energy efficiency guidelines set by reducing energy costs and helps protect the environment without sacrificing features or performance. Products that help customers save more than 80% energy at "sleep" mode. Acer is committed to http://www.energystar.gov or...

