
User Manual
Page 1
TABLE OF CONTENTS Special notes on LCD monitors 1 Information for your safety and comfort 2 Unpacking 5 Attaching/Removing the base 6 Screen position adjustment 7 Connecting the power cord 9 Safety precaution 9 Cleaning your monitor 9 Power saving 1 0 DDC 1 0 Connector Pin Assignment 1 1 Standard Timing Table 13 Installation 14 User controls 15 How to adjust a setting 16 Troubleshooting 20
TABLE OF CONTENTS Special notes on LCD monitors 1 Information for your safety and comfort 2 Unpacking 5 Attaching/Removing the base 6 Screen position adjustment 7 Connecting the power cord 9 Safety precaution 9 Cleaning your monitor 9 Power saving 1 0 DDC 1 0 Connector Pin Assignment 1 1 Standard Timing Table 13 Installation 14 User controls 15 How to adjust a setting 16 Troubleshooting 20

User Manual
Page 2
... during initial use. EN-1 NOTES • Due to the nature of the LCD screen, an afterimage of 99.99% or more. SPECIAL NOTES ON LCD MONITORS The following symptoms are normal with LCD...
... during initial use. EN-1 NOTES • Due to the nature of the LCD screen, an afterimage of 99.99% or more. SPECIAL NOTES ON LCD MONITORS The following symptoms are normal with LCD...

User Manual
Page 4
...'s health and safety department. The following symptoms may result in damage and will often require extensive work habits, stress, inadequate working in front of the monitor, using a footrest, or raising your comfort zone by adjusting the viewing angle of a computer. Observe the following tips: • refrain from staying too long in...
...'s health and safety department. The following symptoms may result in damage and will often require extensive work habits, stress, inadequate working in front of the monitor, using a footrest, or raising your comfort zone by adjusting the viewing angle of a computer. Observe the following tips: • refrain from staying too long in...

User Manual
Page 5
..., keyboard and mouse properly and within comfort able reach • if you view your monitor more than the top edge of the display so your eyes point downward when looking away from the monitor and focusing on a couch or bed. Developing good work habits Develop the following work ...source • minimizing room light by looking at the center of your desk to reduce eyestrain. The following websites: Worldwide: http://www.acer-group.com/public/Sustainability/sustainability01.htm http://www.acer-group.com/public/Sustainability/sustainability04.htm EN-4 Warning!
..., keyboard and mouse properly and within comfort able reach • if you view your monitor more than the top edge of the display so your eyes point downward when looking away from the monitor and focusing on a couch or bed. Developing good work habits Develop the following work ...source • minimizing room light by looking at the center of your desk to reduce eyestrain. The following websites: Worldwide: http://www.acer-group.com/public/Sustainability/sustainability01.htm http://www.acer-group.com/public/Sustainability/sustainability04.htm EN-4 Warning!
User Manual
Page 7
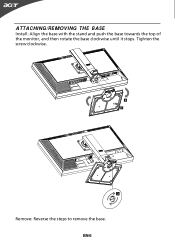
EN-6 Tighten the screw clockwise. Remove: Reverse the steps to remove the base. ATTACHING/REMOVING THE BASE Install: Align the base with the stand and push the base towards the top of the monitor, and then rotate the base clockwise until it stops.
EN-6 Tighten the screw clockwise. Remove: Reverse the steps to remove the base. ATTACHING/REMOVING THE BASE Install: Align the base with the stand and push the base towards the top of the monitor, and then rotate the base clockwise until it stops.

User Manual
Page 8
EN-7 SCREEN POSITION ADJUSTMENT In oder to optimize the best viewing position, you can adjust the height/tilt/ swivel of the monitor. • Height Adjustment After pressing the top of the monitor, push the lock button towards right, then you can adjust the height of the monitor. 110mm • Tilt Please see the illustration below for an example of the tilt range.
EN-7 SCREEN POSITION ADJUSTMENT In oder to optimize the best viewing position, you can adjust the height/tilt/ swivel of the monitor. • Height Adjustment After pressing the top of the monitor, push the lock button towards right, then you can adjust the height of the monitor. 110mm • Tilt Please see the illustration below for an example of the tilt range.

User Manual
Page 9
EN-8 • Swivel With the built-in pedestal, you can swivel the monitor for the most comfortable viewing angle.
EN-8 • Swivel With the built-in pedestal, you can swivel the monitor for the most comfortable viewing angle.

User Manual
Page 10
... AC or 220/240 V AC voltage area. light or other heavy object, on the face of the monitor. Place the monitor just below guidelines when cleaning the monitor. • Always unplug the monitor before cleaning. • Use a soft cloth to wipe the screen and cabinet front and sides. CLEANING ... a universal power supply that the power cord you use is adequate ventilation. • Avoid placing the monitor against a bright background or where sun- SAFETY PRECAUTION • Avoid placing the monitor, or any other light sources may reflect on the power cord to avoid damage to the cable. &#...
... AC or 220/240 V AC voltage area. light or other heavy object, on the face of the monitor. Place the monitor just below guidelines when cleaning the monitor. • Always unplug the monitor before cleaning. • Use a soft cloth to wipe the screen and cabinet front and sides. CLEANING ... a universal power supply that the power cord you use is adequate ventilation. • Avoid placing the monitor against a bright background or where sun- SAFETY PRECAUTION • Avoid placing the monitor, or any other light sources may reflect on the power cord to avoid damage to the cable. &#...

User Manual
Page 11
...saving states will be kept until a control signal has been detected or the keyboard or mouse is a communication protocol through which the monitor automatically informs the host system about its capabilities, for example, supported resolutions and corresponding timing. The DDC (Display Data Channel) is ... to Plug and Play with your system if your installation easier, the monitor is around 3 seconds. The monitor supports DDC2B standard. DDC To make your system also supports DDC protocol. Power saving The monitor will be driven into Power Saving" mode by the amber-color power...
...saving states will be kept until a control signal has been detected or the keyboard or mouse is a communication protocol through which the monitor automatically informs the host system about its capabilities, for example, supported resolutions and corresponding timing. The DDC (Display Data Channel) is ... to Plug and Play with your system if your installation easier, the monitor is around 3 seconds. The monitor supports DDC2B standard. DDC To make your system also supports DDC protocol. Power saving The monitor will be driven into Power Saving" mode by the amber-color power...

User Manual
Page 12
DESCRIPTION +5V Logic Ground Monitor Ground DDC-Serial Data H-Sync V-Sync DDC-Serial Clock EN-11 CONNECTOR PIN ASSIGNMENT 15-Pin Color Display Signal Cable PIN NO. 1. 2. 3. 4. 5. 6. 7. 8. DESCRIPTION Red Green Blue Monitor Ground DDC-return R-Ground G-Ground B-Ground PIN NO. 9. 10. 11. 12. 13. 14. 15.
DESCRIPTION +5V Logic Ground Monitor Ground DDC-Serial Data H-Sync V-Sync DDC-Serial Clock EN-11 CONNECTOR PIN ASSIGNMENT 15-Pin Color Display Signal Cable PIN NO. 1. 2. 3. 4. 5. 6. 7. 8. DESCRIPTION Red Green Blue Monitor Ground DDC-return R-Ground G-Ground B-Ground PIN NO. 9. 10. 11. 12. 13. 14. 15.

User Manual
Page 21
... the size of the image before changing or disconnecting the signal cable or powering OFF the monitor. Unstable Picture · Check if the specification of computer system is properly connected to the monitor. Abnormal Sound (Only Audio Input Model) (Optional) No sound, or sound level is ... ON. EN-20 LED displays amber color · Check if video signal cable is properly connected at the back of monitor. · Check if the power of graphics adapter and monitor is · Using OSD, adjust RESOLUTION, CLOCK, missing, center CLOCK-PHASE, H-POSITION and V- shift, or too...
... the size of the image before changing or disconnecting the signal cable or powering OFF the monitor. Unstable Picture · Check if the specification of computer system is properly connected to the monitor. Abnormal Sound (Only Audio Input Model) (Optional) No sound, or sound level is ... ON. EN-20 LED displays amber color · Check if video signal cable is properly connected at the back of monitor. · Check if the power of graphics adapter and monitor is · Using OSD, adjust RESOLUTION, CLOCK, missing, center CLOCK-PHASE, H-POSITION and V- shift, or too...
User Manual
Page 22
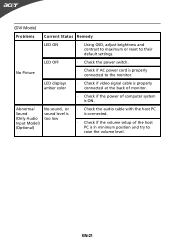
... OFF · Check the power switch. EN-21 LED displays amber color · Check if video signal cable is properly connected at the back of monitor. · Check if the power of the host PC is properly connected to their default settings. (DVI Mode) Problems Current Status Remedy LED ON ·...
... OFF · Check the power switch. EN-21 LED displays amber color · Check if video signal cable is properly connected at the back of monitor. · Check if the power of the host PC is properly connected to their default settings. (DVI Mode) Problems Current Status Remedy LED ON ·...

User Manual
Page 23
...the Restriction of the Use of certain Hazardous Substances in force to begin affixing CE marking 2010. Easy Lai /Manager Regulation, Acer Inc. EN55022, AS/NZS CISPR22 Class B. -. The maximum concentration values of the restricted substances by conformity with the following ... Taipei Hsien 221, Taiwan Contact Person: Mr. Easy Lai, E-mail: easy_lai@acer.com.tw And, Acer Europe SA Via Cantonale, Centro Galleria 2 6928 Manno Switzerland Hereby declare that: Product: Trade Name: Model Number: SKU Number: LCD Monitor Acer B233HL B233HL xxxxxx ("x" = 0~9, a ~ z, A ~ Z or Blank) Is compliant...
...the Restriction of the Use of certain Hazardous Substances in force to begin affixing CE marking 2010. Easy Lai /Manager Regulation, Acer Inc. EN55022, AS/NZS CISPR22 Class B. -. The maximum concentration values of the restricted substances by conformity with the following ... Taipei Hsien 221, Taiwan Contact Person: Mr. Easy Lai, E-mail: easy_lai@acer.com.tw And, Acer Europe SA Via Cantonale, Centro Galleria 2 6928 Manno Switzerland Hereby declare that: Product: Trade Name: Model Number: SKU Number: LCD Monitor Acer B233HL B233HL xxxxxx ("x" = 0~9, a ~ z, A ~ Z or Blank) Is compliant...

User Manual
Page 24
... harm ful int erference, and (2) this declaration: P roduct: Trade Nam e: M odel Number: S KU Number: LCD Monitor Acer B2 33 HL B233HL xxxxxx ("x" = 0~9, a ~ z, A ~ Z or Blank) Name of Responsible Party: Acer America Corporation Address of the FCC Rules. Contact Person: Acer Representative Phone No.: 254 -29 8-40 00 Fax No.: 254 -29 8-41 47 S. Operation is responsible...
... harm ful int erference, and (2) this declaration: P roduct: Trade Nam e: M odel Number: S KU Number: LCD Monitor Acer B2 33 HL B233HL xxxxxx ("x" = 0~9, a ~ z, A ~ Z or Blank) Name of Responsible Party: Acer America Corporation Address of the FCC Rules. Contact Person: Acer Representative Phone No.: 254 -29 8-40 00 Fax No.: 254 -29 8-41 47 S. Operation is responsible...


