
User Manual
Page 2
... information in the space provided below. Record the model number, serial number, purchase date and place of Acer Incorporated. Acer LCD Monitor User's Guide Model number Serial number Date of purchase Place of purchase Acer and the Acer logo are registered trademarks of purchase information in this publication without the prior written permission of such...
... information in the space provided below. Record the model number, serial number, purchase date and place of Acer Incorporated. Acer LCD Monitor User's Guide Model number Serial number Date of purchase Place of purchase Acer and the Acer logo are registered trademarks of purchase information in this publication without the prior written permission of such...

User Manual
Page 3
...the screen may flicker during initial use . • The LCD screen has 99.99% or more effective pixels. Information for your monitor Please carefully follow these instructions carefully. Follow all power cords from the power supplies. In this document for a few hours. Cleaning ...your safety and comfort Safety instructions Read these guidelines when cleaning the monitor: • Always unplug the monitor before connecting any cable or unplugging the power cord. • If the system has multiple sources of the previous ...
...the screen may flicker during initial use . • The LCD screen has 99.99% or more effective pixels. Information for your monitor Please carefully follow these instructions carefully. Follow all power cords from the power supplies. In this document for a few hours. Cleaning ...your safety and comfort Safety instructions Read these guidelines when cleaning the monitor: • Always unplug the monitor before connecting any cable or unplugging the power cord. • If the system has multiple sources of the previous ...
User Manual
Page 7
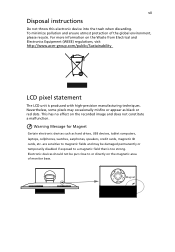
..., earphones, speakers, credit cards, magnetic ID cards, etc. To minimize pollution and ensure utmost protection of monitor base. This has no effect on the Waste from Electrical and Electronics Equipment (WEEE) regulations, visit http://www.acer‐group.com/public/Sustainability LCD pixel statement The LCD unit is too strong. Warning Message...
..., earphones, speakers, credit cards, magnetic ID cards, etc. To minimize pollution and ensure utmost protection of monitor base. This has no effect on the Waste from Electrical and Electronics Equipment (WEEE) regulations, visit http://www.acer‐group.com/public/Sustainability LCD pixel statement The LCD unit is too strong. Warning Message...

User Manual
Page 8
... work habits, stress, inadequate working in front of a computer. Observe the following tips: • refrain from Sleep mode by adjusting the viewing angle of the monitor, using a footrest, or raising your sitting height to achieve maximum comfort. Incorrect computer usage may lead to carpal tunnel syndrome, tendonitis, tenosynovitis or other factors...
... work habits, stress, inadequate working in front of a computer. Observe the following tips: • refrain from Sleep mode by adjusting the viewing angle of the monitor, using a footrest, or raising your sitting height to achieve maximum comfort. Incorrect computer usage may lead to carpal tunnel syndrome, tendonitis, tenosynovitis or other factors...

User Manual
Page 9
... your eyes frequently. • Give your eyes regular breaks by : • placing your display to an awkward viewing angle. • Avoid looking away from the monitor and focusing on how to keep your eyes from the display's top front edge • Avoid adjusting your display in such a way that the side...
... your eyes frequently. • Give your eyes regular breaks by : • placing your display to an awkward viewing angle. • Avoid looking away from the monitor and focusing on how to keep your eyes from the display's top front edge • Avoid adjusting your display in such a way that the side...

User Manual
Page 11
... Federal Communications Commission Declaration of Conformity This device complies with Part 15 of Responsible Party: Acer America Corporation 333 West San Carlos St. Contact Person: Acer Representative Phone No.: 254-298-4000 Fax No.: 254-298-4147 The following local Manufacturer /Importer is... must accept any interference received, including interference that may not cause harmful interference, and (2) this declaration: Product: LCD Monitor Model Number: SKU Number: B226WL B226WL xxxxxx ("x" = 0~9, a ~ z, or A ~ Z) Name of Responsible Party: Address of the FCC Rules. A.
... Federal Communications Commission Declaration of Conformity This device complies with Part 15 of Responsible Party: Acer America Corporation 333 West San Carlos St. Contact Person: Acer Representative Phone No.: 254-298-4000 Fax No.: 254-298-4147 The following local Manufacturer /Importer is... must accept any interference received, including interference that may not cause harmful interference, and (2) this declaration: Product: LCD Monitor Model Number: SKU Number: B226WL B226WL xxxxxx ("x" = 0~9, a ~ z, or A ~ Z) Name of Responsible Party: Address of the FCC Rules. A.

User Manual
Page 12
... for your safety and comfort Safety instructions Cleaning your monitor Connecting/disconnecting the device Accessibility Safe listening Warnings Using electrical power Product servicing Additional safety information IT equipment recycling information Disposal instructions LCD pixel ...position adjustment Connecting the power cord Power saving Display Data Channel (DDC) Connector pin assignment Standard timing table Installation User controls How to adjust a setting Acer eColor Management User Troubleshooting VGA mode DVI mode DP mode 1 iii iii iii iii iii iv iv iv iv v vi vi vii vii viii xi...
... for your safety and comfort Safety instructions Cleaning your monitor Connecting/disconnecting the device Accessibility Safe listening Warnings Using electrical power Product servicing Additional safety information IT equipment recycling information Disposal instructions LCD pixel ...position adjustment Connecting the power cord Power saving Display Data Channel (DDC) Connector pin assignment Standard timing table Installation User controls How to adjust a setting Acer eColor Management User Troubleshooting VGA mode DVI mode DP mode 1 iii iii iii iii iii iv iv iv iv v vi vi vii vii viii xi...

User Manual
Page 13
English 1 Unpacking Please check that the following items are present when you unpack the box, and save the packing materials in case you need to ship or transport the monitor in the future. LCD monitor Quick start guide DP cable (Option) LCD monitor D-sub cable (Option) DVI cable (Option) AC power cord Audio Cable (Option) USB Cable (Option)
English 1 Unpacking Please check that the following items are present when you unpack the box, and save the packing materials in case you need to ship or transport the monitor in the future. LCD monitor Quick start guide DP cable (Option) LCD monitor D-sub cable (Option) DVI cable (Option) AC power cord Audio Cable (Option) USB Cable (Option)

User Manual
Page 14
English 2 ATTACHING/REMOVING THE BASE Install: Align the base with the stand and push the base towards the top of the monitor, and then rotate the base clockwise. Remove: Reverse the steps to remove the base. Tighten the screw clockwise.
English 2 ATTACHING/REMOVING THE BASE Install: Align the base with the stand and push the base towards the top of the monitor, and then rotate the base clockwise. Remove: Reverse the steps to remove the base. Tighten the screw clockwise.

User Manual
Page 15
English 3 SCREEN POSITION ADJUSTMENT In oder to optimize the best viewing position, you can adjust the height/tilt/ swivel/pivot of the monitor. • Height Adjustment After pressing the top of the monitor then you can 35 degrees of recline be offered for an example of elevation. 5o 35o Only at the highest point can adjust the height of the monitor. 1 2 150mm • Tilt Please see the illustration below for the angle of the tilt range.
English 3 SCREEN POSITION ADJUSTMENT In oder to optimize the best viewing position, you can adjust the height/tilt/ swivel/pivot of the monitor. • Height Adjustment After pressing the top of the monitor then you can 35 degrees of recline be offered for an example of elevation. 5o 35o Only at the highest point can adjust the height of the monitor. 1 2 150mm • Tilt Please see the illustration below for the angle of the tilt range.

User Manual
Page 16
English 60o 60 • Monitor Pivot Before rotating the display,lift it to the top position and then push it back to the utmost degree. Rotate clockwise until the monitor stops at 90°. 90o 150 4 • Swivel With the built-in pedestal, you can swivel the monitor for the most comfortable viewing angle.
English 60o 60 • Monitor Pivot Before rotating the display,lift it to the top position and then push it back to the utmost degree. Rotate clockwise until the monitor stops at 90°. 90o 150 4 • Swivel With the built-in pedestal, you can swivel the monitor for the most comfortable viewing angle.

User Manual
Page 17
... A/250 V. The recovery time from the display controller, as your area. • The monitor has a universal power supply that allows operation in which the monitor automatically informs the host system about its capabilities; The monitor supports the DDC2B standard. for your system supports the DDC protocol, the...mode will be installed. Display Data Channel (DDC) To make sure that the power cord you use is activated. Power saving The monitor will be kept until a control signal has been detected or the keyboard or mouse is the correct type required for example, supported ...
... A/250 V. The recovery time from the display controller, as your area. • The monitor has a universal power supply that allows operation in which the monitor automatically informs the host system about its capabilities; The monitor supports the DDC2B standard. for your system supports the DDC protocol, the...mode will be installed. Display Data Channel (DDC) To make sure that the power cord you use is activated. Power saving The monitor will be kept until a control signal has been detected or the keyboard or mouse is the correct type required for example, supported ...

User Manual
Page 21
... computer are switched off . (2) Connect one end of the 24-pin DVI cable to the back of the monitor and the other end to a properly grounded AC outlet. 3 e Turn on the monitor and computer Turn on your host system, please follow the steps below: Steps 1 Connect the video cable a Make sure ...both the monitor and computer are switched off . c Connect the digital cable (only for DP models). (1) Make sure both the monitor and computer are switched off. (2) Connect one end of the 20-pin DP cable to the back...
... computer are switched off . (2) Connect one end of the 24-pin DVI cable to the back of the monitor and the other end to a properly grounded AC outlet. 3 e Turn on the monitor and computer Turn on your host system, please follow the steps below: Steps 1 Connect the video cable a Make sure ...both the monitor and computer are switched off . c Connect the digital cable (only for DP models). (1) Make sure both the monitor and computer are switched off. (2) Connect one end of the 20-pin DP cable to the back...

User Manual
Page 22
...to activate the OSD menu. MENU OSD functions Press this button to set the HPos, VPos, Clock and Focus. It may be connected to your monitor. (a) VGA input (b) DVI input (c) DP input As you cycle through the sources you quickly select the most commonly accessed settings. INPUT Input Key...this botton to indicate the power is turned ON. USER CONTROLS Power Switch / Power LED: To turn the monitor ON or OFF. Empowering: Press the Empowering Key to open the Acer eColor Management OSD and access the scenario modes. Using the Shortcut Menu Press the function button to open the shortcut...
...to activate the OSD menu. MENU OSD functions Press this button to set the HPos, VPos, Clock and Focus. It may be connected to your monitor. (a) VGA input (b) DVI input (c) DP input As you cycle through the sources you quickly select the most commonly accessed settings. INPUT Input Key...this botton to indicate the power is turned ON. USER CONTROLS Power Switch / Power LED: To turn the monitor ON or OFF. Empowering: Press the Empowering Key to open the Acer eColor Management OSD and access the scenario modes. Using the Shortcut Menu Press the function button to open the shortcut...

User Manual
Page 24
.... You can use the OSD to open the OSD. For advanced settings, please refer to following content is for adjusting the settings of your LCD Monitor. EN-15 Actual product specifications may vary. Then navigate to the picture element you wish to adjust. 3 Use the / keys to adjust the sliding scales...
.... You can use the OSD to open the OSD. For advanced settings, please refer to following content is for adjusting the settings of your LCD Monitor. EN-15 Actual product specifications may vary. Then navigate to the picture element you wish to adjust. 3 Use the / keys to adjust the sliding scales...

User Manual
Page 27
Then the basic information of LCD monitor will show up the OSD. 2 Using the / keys, select Information from the OSD. Product information Information 1920 x 1080 H:65KHz V:60Hz VGA Input S/N:ETL5309 1326350380B3742 1 Press the MENU key to bring up for current input. EN-18
Then the basic information of LCD monitor will show up the OSD. 2 Using the / keys, select Information from the OSD. Product information Information 1920 x 1080 H:65KHz V:60Hz VGA Input S/N:ETL5309 1326350380B3742 1 Press the MENU key to bring up for current input. EN-18

User Manual
Page 28
...signal frequency mismatch. Image is missing, off the monitor. Check the display setting on your LCD monitor for a few seconds after adjusting the size of monitor. Check if the video signal cable is properly connected to the monitor. Unstable picture Abnormal picture Check if the computer ... your system. Wait for servicing, please check the troubleshooting list below to their default settings. In case of graphics adapter and monitor is switched on the screen. Check the power switch. VGA mode Problem No picture visible LED status Blue Off Remedy Using the...
...signal frequency mismatch. Image is missing, off the monitor. Check the display setting on your LCD monitor for a few seconds after adjusting the size of monitor. Check if the video signal cable is properly connected to the monitor. Unstable picture Abnormal picture Check if the computer ... your system. Wait for servicing, please check the troubleshooting list below to their default settings. In case of graphics adapter and monitor is switched on the screen. Check the power switch. VGA mode Problem No picture visible LED status Blue Off Remedy Using the...

User Manual
Page 29
...switched on and in power saving/ standby mode. Check the power switch. Amber Check if the AC power cord is properly connected to the monitor. DP mode Problem No picture visible LED status Blue Off Remedy Using the OSD, adjust brightness and contrast to maximum or reset to their... Check that the computer system is properly connected at the back of monitor. Check that the computer system is properly connected at the back of monitor. Amber Check if the AC power cord is properly connected to the monitor. Check the power switch. English 16 DVI mode Problem No picture ...
...switched on and in power saving/ standby mode. Check the power switch. Amber Check if the AC power cord is properly connected to the monitor. DP mode Problem No picture visible LED status Blue Off Remedy Using the OSD, adjust brightness and contrast to maximum or reset to their... Check that the computer system is properly connected at the back of monitor. Check that the computer system is properly connected at the back of monitor. Amber Check if the AC power cord is properly connected to the monitor. Check the power switch. English 16 DVI mode Problem No picture ...


