Acer Aspire Z3801 Desktop Service Guide
Page 5
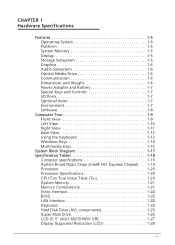
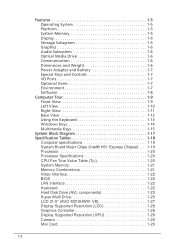
... 1-5 Graphics 1-6 Audio Subsystem 1-6 Optical Media Drive 1-6 Communication 1-6 Dimensions and Weight 1-6 Power Adapter and Battery 1-7 Special Keys and Controls 1-7 I/O Ports 1-7 Optional Items 1-7 Environment 1-7 Software 1-8 Computer Tour 1-9 Front View 1-9 Left View 1-10 Right View 1-11 Base View 1-12 Using the Keyboard 1-13 Windows Keys 1-14 Multimedia Keys 1-15 System Block Diagram 1-17 Specification Tables 1-18 Computer specifications 1-18 System Board Major Chips (Intel® H61 Express Chipset) . . . 1-19 Processor 1-20 Processor Specifications 1-20 CPU Fan...
... 1-5 Graphics 1-6 Audio Subsystem 1-6 Optical Media Drive 1-6 Communication 1-6 Dimensions and Weight 1-6 Power Adapter and Battery 1-7 Special Keys and Controls 1-7 I/O Ports 1-7 Optional Items 1-7 Environment 1-7 Software 1-8 Computer Tour 1-9 Front View 1-9 Left View 1-10 Right View 1-11 Base View 1-12 Using the Keyboard 1-13 Windows Keys 1-14 Multimedia Keys 1-15 System Block Diagram 1-17 Specification Tables 1-18 Computer specifications 1-18 System Board Major Chips (Intel® H61 Express Chipset) . . . 1-19 Processor 1-20 Processor Specifications 1-20 CPU Fan...
Acer Aspire Z3801 Desktop Service Guide
Page 12
... 1-5 Graphics 1-6 Audio Subsystem 1-6 Optical Media Drive 1-6 Communication 1-6 Dimensions and Weight 1-6 Power Adapter and Battery 1-7 Special Keys and Controls 1-7 I/O Ports 1-7 Optional Items 1-7 Environment 1-7 Software 1-8 Computer Tour 1-9 Front View 1-9 Left View 1-10 Right View 1-11 Base View 1-12 Using the Keyboard 1-13 Windows Keys 1-14 Multimedia Keys 1-15 System Block Diagram 1-17 Specification Tables 1-18 Computer specifications 1-18 System Board Major Chips (Intel® H61 Express Chipset) . . . 1-19 Processor 1-20 Processor Specifications 1-20 CPU Fan...
... 1-5 Graphics 1-6 Audio Subsystem 1-6 Optical Media Drive 1-6 Communication 1-6 Dimensions and Weight 1-6 Power Adapter and Battery 1-7 Special Keys and Controls 1-7 I/O Ports 1-7 Optional Items 1-7 Environment 1-7 Software 1-8 Computer Tour 1-9 Front View 1-9 Left View 1-10 Right View 1-11 Base View 1-12 Using the Keyboard 1-13 Windows Keys 1-14 Multimedia Keys 1-15 System Block Diagram 1-17 Specification Tables 1-18 Computer specifications 1-18 System Board Major Chips (Intel® H61 Express Chipset) . . . 1-19 Processor 1-20 Processor Specifications 1-20 CPU Fan...
Acer Aspire Z3801 Desktop Service Guide
Page 16
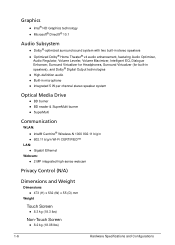
... 5 W per channel stereo speaker system Optical Media Drive 0 BD burner BD reader & SuperMulti burner SuperMulti Communication 0 WLAN: Intel® Centrino® Wireless-N 1000 802.11 b/g/n 802.11 b/g/n Wi-Fi CERTIFIED™ LAN: Gigabit Ethernet Webcam: 2 MP integrated high-sense webcam Privacy Control (N/A) 0 Dimensions and Weight...
... 5 W per channel stereo speaker system Optical Media Drive 0 BD burner BD reader & SuperMulti burner SuperMulti Communication 0 WLAN: Intel® Centrino® Wireless-N 1000 802.11 b/g/n 802.11 b/g/n Wi-Fi CERTIFIED™ LAN: Gigabit Ethernet Webcam: 2 MP integrated high-sense webcam Privacy Control (N/A) 0 Dimensions and Weight...
Acer Aspire Z3801 Desktop Service Guide
Page 21
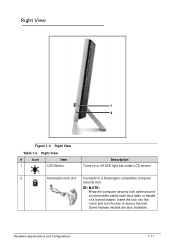
Insert the lock into the notch and turn the key to a Kensington-compatible computer security lock. Some keyless models are also available. NOTE: Wrap the computer security lock cable around an immovable object such as a table or handle of a locked drawer. Right View # Icon Item 1 LED Button Description Turns on or off LED light bar under LCD screen 2 Kensington lock slot Connects to secure the lock. Right View 0 1 2 Figure 1-3. Right View Table 1-3. Hardware Specifications and Configurations 1-11
Insert the lock into the notch and turn the key to a Kensington-compatible computer security lock. Some keyless models are also available. NOTE: Wrap the computer security lock cable around an immovable object such as a table or handle of a locked drawer. Right View # Icon Item 1 LED Button Description Turns on or off LED light bar under LCD screen 2 Kensington lock slot Connects to secure the lock. Right View 0 1 2 Figure 1-3. Right View Table 1-3. Hardware Specifications and Configurations 1-11
Acer Aspire Z3801 Desktop Service Guide
Page 24
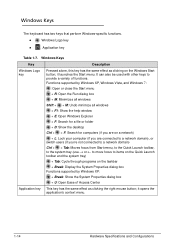
... right mouse button; it launches the Start menu. Functions supported by Windows XP, Windows Vista, and Windows 7: : Open or close the Start menu + R: Open the Run dialog box + M: Minimizes all windows Shift + + M: Undo minimize all windows + F1: Show the help window + E: Open Windows Explorer + F: Search for a file or folder + D: Show the desktop Ctrl + + F: Search for computers (if you are on a network) + L: Lock your computer (if you are connected to a network domain), or switch users (if...
... right mouse button; it launches the Start menu. Functions supported by Windows XP, Windows Vista, and Windows 7: : Open or close the Start menu + R: Open the Run dialog box + M: Minimizes all windows Shift + + M: Undo minimize all windows + F1: Show the help window + E: Open Windows Explorer + F: Search for a file or folder + D: Show the desktop Ctrl + + F: Search for computers (if you are on a network) + L: Lock your computer (if you are connected to a network domain), or switch users (if...
Acer Aspire Z3801 Desktop Service Guide
Page 47
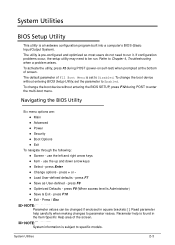
...;Load User-defined defaults - Press / Esc NOTE: NOTE: Parameter values can be run it. If configuration problems occur, the setup utility may need to enter the multi-boot menu. To change the boot device without entering the BIOS SETUP, press F12 during POST (power-on self-test) when prompted at the bottom of screen. press F10 Exit - The utility is subject to Disabled. press F9 (When access level is a hardware configuration program...
...;Load User-defined defaults - Press / Esc NOTE: NOTE: Parameter values can be run it. If configuration problems occur, the setup utility may need to enter the multi-boot menu. To change the boot device without entering the BIOS SETUP, press F12 during POST (power-on self-test) when prompted at the bottom of screen. press F10 Exit - The utility is subject to Disabled. press F9 (When access level is a hardware configuration program...
Acer Aspire Z3801 Desktop Service Guide
Page 51
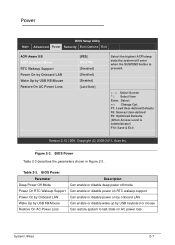
Power 0 BIOS Setup Utility Main Advanced Power Security Boot Options Exit ACPI Aware O/S ACPI Suspend Mode RTC Wakeup Support Power On by Onboard LAN Wake Up by USB keyboard or mouse Restore On AC Power Loss Can restore system to last state on AC power loss System Utilities 2-7 F7: Load User-defined Defaults F8: Save as User-defined F9: Optimized Defaults (When Access Level is pressed. Figure 2-3. Select Screen Select Item Enter: |Select +/-: 11||Change Opt. Copyright (C) 2002-2011...
Power 0 BIOS Setup Utility Main Advanced Power Security Boot Options Exit ACPI Aware O/S ACPI Suspend Mode RTC Wakeup Support Power On by Onboard LAN Wake Up by USB keyboard or mouse Restore On AC Power Loss Can restore system to last state on AC power loss System Utilities 2-7 F7: Load User-defined Defaults F8: Save as User-defined F9: Optimized Defaults (When Access Level is pressed. Figure 2-3. Select Screen Select Item Enter: |Select +/-: 11||Change Opt. Copyright (C) 2002-2011...
Acer Aspire Z3801 Desktop Service Guide
Page 52
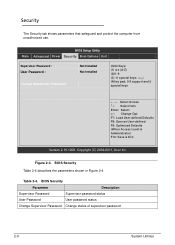
... Parameter Description Supervisor Password Supervisor password status User Password User password status Change Supervisor Password Change status of supervisor password 2-8 System Utilities Copyright (C) 2002-2011, Acer Inc. BIOS Setup Utility Main Advanced Power Security Boot Options Exit Supervisor Password : User Password : Change Supervisor Password Not Installed Not Installed Valid Keys: (1) a-z (A-Z) (2)0~9 (3) 11 special keys: -+;,./ (4)key pad: 0-9 support and 5 special keys Select Screen Select Item Enter: |Select +/-: 11||Change Opt. Figure 2-4. Security...
... Parameter Description Supervisor Password Supervisor password status User Password User password status Change Supervisor Password Change status of supervisor password 2-8 System Utilities Copyright (C) 2002-2011, Acer Inc. BIOS Setup Utility Main Advanced Power Security Boot Options Exit Supervisor Password : User Password : Change Supervisor Password Not Installed Not Installed Valid Keys: (1) a-z (A-Z) (2)0~9 (3) 11 special keys: -+;,./ (4)key pad: 0-9 support and 5 special keys Select Screen Select Item Enter: |Select +/-: 11||Change Opt. Figure 2-4. Security...

Acer Aspire Z3801 Desktop Service Guide
Page 53
.... Setting a Password: Set Supervisor Password 2. System Utilities 2-9 Resetting BIOS password may be alphanumeric (A-Z, a-z, 0-9), not longer than 12 characters. Dash = Equal Sign [ Left Bracket ] Right Bracket . Semi-colon / Slash \ Back-slash + IMPORTANT: Use care when typing a password. Retype password in the Enter New Password field and press Enter. A password must be returned to Changing a Password. Period , Comma ; NOTE: NOTE: When prompted to activate password feature. Password on the screen. 3. Type a new password in the Confirm New Password field...
.... Setting a Password: Set Supervisor Password 2. System Utilities 2-9 Resetting BIOS password may be alphanumeric (A-Z, a-z, 0-9), not longer than 12 characters. Dash = Equal Sign [ Left Bracket ] Right Bracket . Semi-colon / Slash \ Back-slash + IMPORTANT: Use care when typing a password. Retype password in the Enter New Password field and press Enter. A password must be returned to Changing a Password. Period , Comma ; NOTE: NOTE: When prompted to activate password feature. Password on the screen. 3. Type a new password in the Confirm New Password field...
Acer Aspire Z3801 Desktop Service Guide
Page 57
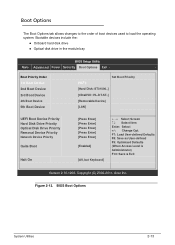
...] [LAN] UEFI Boot Device Priority Hard Disk Drive Priority Optical Disk Drive Priority Removal Device Priority Network Device Priority Quite Boot Halt On [Press Enter] [Press Enter] [Press Enter] [Press Enter] [Press Enter] [Enabled] [All, but Keyboard] Select Screen Select Item Enter: |Select +/-: 11||Change Opt. Figure 2-13. BIOS Boot Options System Utilities 2-13 F7: Load User-defined Defaults F8: Save as User-defined F9: Optimized Defaults (When Access Level is Administrator) F10: Save & Exit Version 2.10.1208. Copyright (C) 2002-2011, Acer Inc. Boot Options 0 The Boot...
...] [LAN] UEFI Boot Device Priority Hard Disk Drive Priority Optical Disk Drive Priority Removal Device Priority Network Device Priority Quite Boot Halt On [Press Enter] [Press Enter] [Press Enter] [Press Enter] [Press Enter] [Enabled] [All, but Keyboard] Select Screen Select Item Enter: |Select +/-: 11||Change Opt. Figure 2-13. BIOS Boot Options System Utilities 2-13 F7: Load User-defined Defaults F8: Save as User-defined F9: Optimized Defaults (When Access Level is Administrator) F10: Save & Exit Version 2.10.1208. Copyright (C) 2002-2011, Acer Inc. Boot Options 0 The Boot...
Acer Aspire Z3801 Desktop Service Guide
Page 60
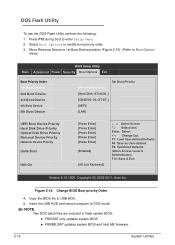
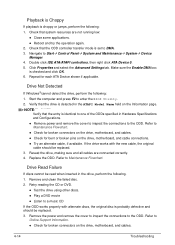
... Flash Utility 0 To use the DOS Flash Utility, perform the following: 1. F7: Load User-defined Defaults F8: Save as User-defined F9: Optimized Defaults (When Access Level is Administrator) F10: Save & Exit Version 2.10.1208. Figure 2-15. Insert the USB HDD and reboot computer to modify boot priority order. 3. Select Boot Options to DOS mode. Copyright (C) 2002-2011, Acer Inc. Copy the BIOS file to enter Setup Menu. 2. Press F12 during boot to USB HDD...
... Flash Utility 0 To use the DOS Flash Utility, perform the following: 1. F7: Load User-defined Defaults F8: Save as User-defined F9: Optimized Defaults (When Access Level is Administrator) F10: Save & Exit Version 2.10.1208. Figure 2-15. Insert the USB HDD and reboot computer to modify boot priority order. 3. Select Boot Options to DOS mode. Copyright (C) 2002-2011, Acer Inc. Copy the BIOS file to enter Setup Menu. 2. Press F12 during boot to USB HDD...
Acer Aspire Z3801 Desktop Service Guide
Page 126
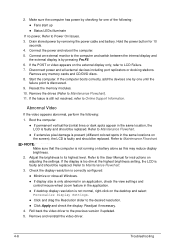
... video driver to LCD Failure. 7. Drain stored power by checking for 10 seconds. 4. If the computer boots correctly, add the devices one by pressing Fn+F5. 6. Abnormal Video 0 If the video appears abnormal, perform the following : Fans start up Status LEDs illuminate If no power, Refer to Maintenance Flowchart). 11. Remove any memory cards and CD/DVD discs. 8. If the POST or video appears on the desktop...
... video driver to LCD Failure. 7. Drain stored power by checking for 10 seconds. 4. If the computer boots correctly, add the devices one by pressing Fn+F5. 6. Abnormal Video 0 If the video appears abnormal, perform the following : Fans start up Status LEDs illuminate If no power, Refer to Maintenance Flowchart). 11. Remove any memory cards and CD/DVD discs. 8. If the POST or video appears on the desktop...
Acer Aspire Z3801 Desktop Service Guide
Page 129
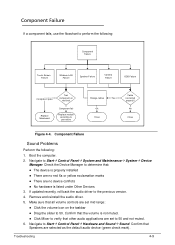
... fail Replace module according to Start Control Panel Hardware and Sound Sound. Make sure that Speakers are set to 50. Component Failure Sound Problems 0 Perform the following : Component Failure Touch Screen Failure Wireless LAN Failure Speaker Failure Camera Failure ODD Failure Component pass Test component on the taskbar Drag the slider to 50 and not muted. 6. No Close Figure 4-4. Boot the computer. 2. Confirm that all volume controls are selected as the default audio device...
... fail Replace module according to Start Control Panel Hardware and Sound Sound. Make sure that Speakers are set to 50. Component Failure Sound Problems 0 Perform the following : Component Failure Touch Screen Failure Wireless LAN Failure Speaker Failure Camera Failure ODD Failure Component pass Test component on the taskbar Drag the slider to 50 and not muted. 6. No Close Figure 4-4. Boot the computer. 2. Confirm that all volume controls are selected as the default audio device...
Acer Aspire Z3801 Desktop Service Guide
Page 131
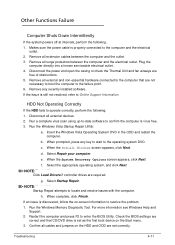
... System Recovery Options screen appears, click Next. NOTE: NOTE: Startup Repair attempts to enter the BIOS Utility. If an issue is discovered, follow the on the HDD and ODD are correct and that are not necessary to boot the computer to the operating system DVD. Remove any key to start to the failure point. 6. If the Issue is virus free. 3. c. When the Install Windows screen appears, click Next. Run the Windows Memory Diagnostic Tool. Plug...
... System Recovery Options screen appears, click Next. NOTE: NOTE: Startup Repair attempts to enter the BIOS Utility. If an issue is discovered, follow the on the HDD and ODD are correct and that are not necessary to boot the computer to the operating system DVD. Remove any key to start to the failure point. 6. If the Issue is virus free. 3. c. When the Install Windows screen appears, click Next. Run the Windows Memory Diagnostic Tool. Plug...
Acer Aspire Z3801 Desktop Service Guide
Page 132
... BIOS setup LED does not flash when the computer starts up The tray does not eject Access failure screen is shown The ODD is shown in the lists, remove any recently installed software and retrying the operation. 4-12 Troubleshooting Double-click DVD/CD-ROM drives. For more information see Windows Help and Support. 6. For more information see Windows Help and Support. 7. Use an different disc...
... BIOS setup LED does not flash when the computer starts up The tray does not eject Access failure screen is shown The ODD is shown in the lists, remove any recently installed software and retrying the operation. 4-12 Troubleshooting Double-click DVD/CD-ROM drives. For more information see Windows Help and Support. 6. For more information see Windows Help and Support. 7. Use an different disc...
Acer Aspire Z3801 Desktop Service Guide
Page 133
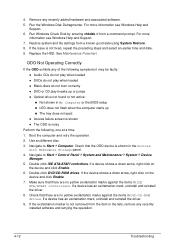
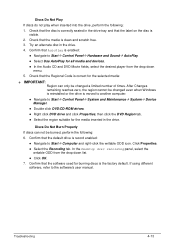
... the Desktop disc recording panel, select the writable ODD from the drop down list. Click OK. 7. Discs Do Not Burn Properly 0 If discs can not be changed even when Windows is reinstalled or the drive is moved to another computer. Navigate to Start Control Panel System and Maintenance System Device Manager. Double click DVD/CD-ROM drives. ...
... the Desktop disc recording panel, select the writable ODD from the drop down list. Click OK. 7. Discs Do Not Burn Properly 0 If discs can not be changed even when Windows is reinstalled or the drive is moved to another computer. Navigate to Start Control Panel System and Maintenance System Device Manager. Double click DVD/CD-ROM drives. ...
Acer Aspire Z3801 Desktop Service Guide
Page 134
.... Navigate to enter the BIOS Utility. 2. Repeat for broken connectors on the drive, motherboard, and cable connections. Try an alternate cable, if available. NOTE: NOTE: Verify that the ODD controller transfer mode is identical to the ODD. Start the computer and press F2 to Start Control Panel System and Maintenance System Device Manager. 4. Replace the ODD. Check that the entry is set to a music...
.... Navigate to enter the BIOS Utility. 2. Repeat for broken connectors on the drive, motherboard, and cable connections. Try an alternate cable, if available. NOTE: NOTE: Verify that the ODD controller transfer mode is identical to the ODD. Start the computer and press F2 to Start Control Panel System and Maintenance System Device Manager. 4. Replace the ODD. Check that the entry is set to a music...

Acer Aspire Z3801 Desktop Service Guide
Page 135
..., replace the CMOS battery. 2. Check the Device Manager to Windows Help and Support. 11. Random Loss of BIOS Settings 0 If the computer is properly installed. If the BIOS settings are no red Xs or yellow exclamation marks There are still lost, replace the cables. 5. Remove recently added software and reboot the computer. 8. Run the Event Viewer to the previous version if updated recently. 12. Roll back the mouse driver to...
..., replace the CMOS battery. 2. Check the Device Manager to Windows Help and Support. 11. Random Loss of BIOS Settings 0 If the computer is properly installed. If the BIOS settings are no red Xs or yellow exclamation marks There are still lost, replace the cables. 5. Remove recently added software and reboot the computer. 8. Run the Event Viewer to the previous version if updated recently. 12. Roll back the mouse driver to...

Acer Aspire Z3801 Desktop Service Guide
Page 136
... FRU: System board LCD assembly 4-16 Troubleshooting NOTE: NOTE: Verify that the power supply being used at a time. If the problem remains, replace the following devices: Non-Acer devices Printer, mouse, and other external devices Battery pack Hard disk drive DIMM CD-ROM/Diskette drive Module PC Cards 4. Perform the following : 1. Visually...
... FRU: System board LCD assembly 4-16 Troubleshooting NOTE: NOTE: Verify that the power supply being used at a time. If the problem remains, replace the following devices: Non-Acer devices Printer, mouse, and other external devices Battery pack Hard disk drive DIMM CD-ROM/Diskette drive Module PC Cards 4. Perform the following : 1. Visually...
Acer Aspire Z3801 Desktop Service Guide
Page 142
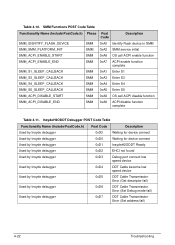
... EHCI not found Used by Insyde debugger 0xD3 Debug port connect low speed device Used by Insyde debugger 0xD4 DDT Cable become low speed device Used by Insyde debugger 0xD5 DDT Cable Transmission Error (Get descriptor fail) Used by Insyde debugger 0xD6 DDT Cable Transmission Error (Set Debug mode fail) Used by Insyde debugger 0xD7 DDT Cable Transmission Error (Set address fail) 4-22 Troubleshooting Table 4-10. SMM Functions POST Code Table Functionality Name...
... EHCI not found Used by Insyde debugger 0xD3 Debug port connect low speed device Used by Insyde debugger 0xD4 DDT Cable become low speed device Used by Insyde debugger 0xD5 DDT Cable Transmission Error (Get descriptor fail) Used by Insyde debugger 0xD6 DDT Cable Transmission Error (Set Debug mode fail) Used by Insyde debugger 0xD7 DDT Cable Transmission Error (Set address fail) 4-22 Troubleshooting Table 4-10. SMM Functions POST Code Table Functionality Name...


