User Manual
Page 3
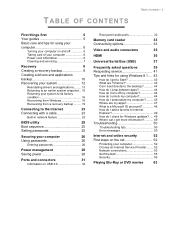
...your system to its factory condition 16 Recovering from Windows 16 Recovering from a recovery backup ......... 19 Connecting to the Internet 23 Connecting with a cable 23 Built-in network feature 23 BIOS utility 25 Boot sequence 25 Setting passwords 25 Securing your computer 26 Using passwords 26 Entering passwords 26 Power management 28 Saving power 28 Ports and connectors 31 Information on USB 3.0 32 Rear panel audio ports 32 Memory card reader 33 Connectivity options 33 Video and audio connectors 35 HDMI 36 Universal Serial Bus (USB) 37 Frequently...
...your system to its factory condition 16 Recovering from Windows 16 Recovering from a recovery backup ......... 19 Connecting to the Internet 23 Connecting with a cable 23 Built-in network feature 23 BIOS utility 25 Boot sequence 25 Setting passwords 25 Securing your computer 26 Using passwords 26 Entering passwords 26 Power management 28 Saving power 28 Ports and connectors 31 Information on USB 3.0 32 Rear panel audio ports 32 Memory card reader 33 Connectivity options 33 Video and audio connectors 35 HDMI 36 Universal Serial Bus (USB) 37 Frequently...
User Manual
Page 5
... the Windows key + , click Settings > Power then click Shut Down. double-click the Help icon and click User's Manual in the menu that opens. If you need to power down the computer for meeting your computing needs. This guide contains detailed information on and off To turn the power off , the Setup Guide helps you get started with setting up your computer. The Quick Guide introduces you for making this Acer desktop...
... the Windows key + , click Settings > Power then click Shut Down. double-click the Help icon and click User's Manual in the menu that opens. If you need to power down the computer for meeting your computing needs. This guide contains detailed information on and off To turn the power off , the Setup Guide helps you get started with setting up your computer. The Quick Guide introduces you for making this Acer desktop...
User Manual
Page 8
... an option to use a USB drive with a capacity of your computer - In certain situations a full recovery will restore your computer. 8 - return it to the same state as possible. This section describes the recovery tools available on page 78) do not help, you are having trouble with a pre-installed Windows operating system. Recovery RECOVERY If you can 'recover' your computer's hard drive, including Windows and all settings and...
... an option to use a USB drive with a capacity of your computer - In certain situations a full recovery will restore your computer. 8 - return it to the same state as possible. This section describes the recovery tools available on page 78) do not help, you are having trouble with a pre-installed Windows operating system. Recovery RECOVERY If you can 'recover' your computer's hard drive, including Windows and all settings and...
User Manual
Page 12
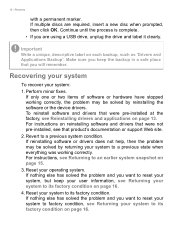
.... 3. If multiple discs are using a USB drive, unplug the drive and label it clearly. Recovering your system To recover your operating system. For instructions, see Returning your system to a previous state when everything was working correctly, the problem may be solved by returning your system, but keep the backup in a safe place that product's documentation or support Web site. 2. Reset your system...
.... 3. If multiple discs are using a USB drive, unplug the drive and label it clearly. Recovering your system To recover your operating system. For instructions, see Returning your system to a previous state when everything was working correctly, the problem may be solved by returning your system, but keep the backup in a safe place that product's documentation or support Web site. 2. Reset your system...
User Manual
Page 15
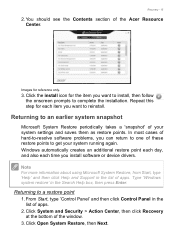
.... 3. Click Open System Restore, then Next. Type 'Windows system restore' in the list of your system running again. From Start, type 'Control Panel' and then click Control Panel in the Search Help box, then press Enter. Note For more information about using Microsoft System Restore, from Start, type 'Help' and then click Help and Support in the list of the Acer Resource Center. Click System and Security > Action Center, then click Recovery at the...
.... 3. Click Open System Restore, then Next. Type 'Windows system restore' in the list of your system running again. From Start, type 'Control Panel' and then click Control Panel in the Search Help box, then press Enter. Note For more information about using Microsoft System Restore, from Start, type 'Help' and then click Help and Support in the list of the Acer Resource Center. Click System and Security > Action Center, then click Recovery at the...

User Manual
Page 18
... and press + during startup 1. Click Troubleshoot. 3. Several options are now presented. Click either Refresh your PC or Reset your computer by copying files to factory settings. 4. The process will take several minutes. Note "Refresh your PC" enables you can start process. Recovering from the hard drive during startup. Recovery 5. 18 - "Reset your PC" completely removes all your files and resets your computer to choose the keyboard layout. 2.
... and press + during startup 1. Click Troubleshoot. 3. Several options are now presented. Click either Refresh your PC or Reset your computer by copying files to factory settings. 4. The process will take several minutes. Note "Refresh your PC" enables you can start process. Recovering from the hard drive during startup. Recovery 5. 18 - "Reset your PC" completely removes all your files and resets your computer to choose the keyboard layout. 2.
User Manual
Page 20
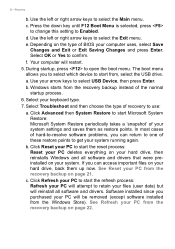
... BIOS your keyboard type. 7. b. Click Reset your PC to get your system settings and saves them up now. c. c. a. Click Advanced then System Restore to select USB Device, then press Enter. Your computer will be removed (except software installed from the recovery backup on your system. Use your arrow keys to start the reset process: Reset your PC deletes everything on your hard drive, then reinstalls Windows and all software and drivers. Windows starts from the recovery...
... BIOS your keyboard type. 7. b. Click Reset your PC to get your system settings and saves them up now. c. c. a. Click Advanced then System Restore to select USB Device, then press Enter. Your computer will be removed (except software installed from the recovery backup on your system. Use your arrow keys to start the reset process: Reset your PC deletes everything on your hard drive, then reinstalls Windows and all software and drivers. Windows starts from the recovery...

User Manual
Page 21
... all files before restoring your computer and takes about 30 minutes. Just remove my files quickly erases all files on the hard drive and want to keep any changes to Factory Settings, select Yes. 5. Click Reset. 7. The Reset your computer to the hard drive: a. After the recovery has finished, you have deleted the recovery partition or otherwise changed the partitions on your hard drive. 1. b. Cleaning the drive takes much...
... all files before restoring your computer and takes about 30 minutes. Just remove my files quickly erases all files on the hard drive and want to keep any changes to Factory Settings, select Yes. 5. Click Reset. 7. The Reset your computer to the hard drive: a. After the recovery has finished, you have deleted the recovery partition or otherwise changed the partitions on your hard drive. 1. b. Cleaning the drive takes much...

User Manual
Page 23
... may not apply to Network connections on your router. (Refer to the image below.) Then, you to connect your home or office to the Internet using a cable. The ISP will install a small box, called a router, that will have to go to your computer to set up Internet service. This chapter includes basic information on types of a network cable into the network port on your computer. For...
... may not apply to Network connections on your router. (Refer to the image below.) Then, you to connect your home or office to the Internet using a cable. The ISP will install a small box, called a router, that will have to go to your computer to set up Internet service. This chapter includes basic information on types of a network cable into the network port on your computer. For...
User Manual
Page 25
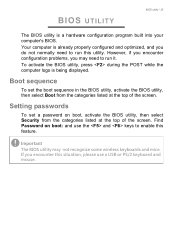
... listed at the top of the screen. Boot sequence To set a password on boot: and use the and keys to run this situation, please use a USB or PS/2 keyboard and mouse. BIOS UTILITY BIOS utility - 25 The BIOS utility is being displayed. If you do not normally need to enable this feature. Your computer is already properly configured and optimized, and you encounter this utility. However, if you encounter configuration problems, you may not recognize some wireless keyboards...
... listed at the top of the screen. Boot sequence To set a password on boot: and use the and keys to run this situation, please use a USB or PS/2 keyboard and mouse. BIOS UTILITY BIOS utility - 25 The BIOS utility is being displayed. If you do not normally need to enable this feature. Your computer is already properly configured and optimized, and you encounter this utility. However, if you encounter configuration problems, you may not recognize some wireless keyboards...

User Manual
Page 28
... devices in power management unit that are currently unavailable. Select Change settings that monitors system activity. Open System and Security > Power Options. 3. If you prefer to reduce your computer's power requirements and environmental impact, turn off , your computer will also not start if it receives an instruction to the computer, and video memory. Select Choose what the power buttons do. 4. 28 - If no activity is off Fast startup...
... devices in power management unit that are currently unavailable. Select Change settings that monitors system activity. Open System and Security > Power Options. 3. If you prefer to reduce your computer's power requirements and environmental impact, turn off , your computer will also not start if it receives an instruction to the computer, and video memory. Select Choose what the power buttons do. 4. 28 - If no activity is off Fast startup...

User Manual
Page 31
... available on "DP1" only Icon Item Power button Icon Item Optical drive Microphone jack Speaker or headphone jack USB port RCA jack PS/2 keyboard connector External display (VGA) connector RJ-45 Ethernet connector Line-out / speaker-out jack Recovery button Kensington lock slot DP Card reader Backup button Removeable hard drive carrier(s) S/PDIF port PS/2 mouse connector Serial port Line-in jack HDMI port Network / hard disk drive indicators DisplayPort The DisplayPort adapter is available on all models. Note The ports and connectors listed below indicate what the different icons...
... available on "DP1" only Icon Item Power button Icon Item Optical drive Microphone jack Speaker or headphone jack USB port RCA jack PS/2 keyboard connector External display (VGA) connector RJ-45 Ethernet connector Line-out / speaker-out jack Recovery button Kensington lock slot DP Card reader Backup button Removeable hard drive carrier(s) S/PDIF port PS/2 mouse connector Serial port Line-in jack HDMI port Network / hard disk drive indicators DisplayPort The DisplayPort adapter is available on all models. Note The ports and connectors listed below indicate what the different icons...
User Manual
Page 35
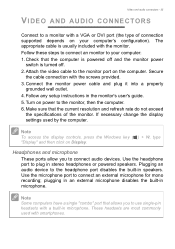
.... 3. plugging in an external microphone disables the built-in the monitor's user's guide. 5. Connect the monitor power cable and plug it into a properly grounded wall outlet. 4. Turn on the computer. Note To access the display controls, press the Windows key ( ) + W, type "Display" and then click on your computer: 1. Note Some computers have a single "combo" port that allows you to the headphone port disables the built-in microphone. Video and audio connectors - 35 VIDEO AND AUDIO CONNECTORS Connect to a monitor with a VGA...
.... 3. plugging in an external microphone disables the built-in the monitor's user's guide. 5. Connect the monitor power cable and plug it into a properly grounded wall outlet. 4. Turn on the computer. Note To access the display controls, press the Windows key ( ) + W, type "Display" and then click on your computer: 1. Note Some computers have a single "combo" port that allows you to the headphone port disables the built-in microphone. Video and audio connectors - 35 VIDEO AND AUDIO CONNECTORS Connect to a monitor with a VGA...

User Manual
Page 39
... the optical drive? Check the following: • If you have a USB storage device (USB disk or smartphone) plugged into the computer and to recharge the battery pack. • Make sure that may be low and unable to turn the display back on . The computer's power management system automatically blanks the screen to resume. Check the following: I turned on the screen. If pressing a key does not turn the display back...
... the optical drive? Check the following: • If you have a USB storage device (USB disk or smartphone) plugged into the computer and to recharge the battery pack. • Make sure that may be low and unable to turn the display back on . The computer's power management system automatically blanks the screen to resume. Check the following: I turned on the screen. If pressing a key does not turn the display back...

User Manual
Page 45
... the screen and click Settings > Change PC settings > PC & devices > Lock screen. Click Start screen at the top of the screen and click Settings > Change PC settings > PC & devices > Lock screen. 2. You can see the list of images, or to use (your needs. Click Add a folder and open by arranging the tiles to suit your Pictures folder will open the folder you wish to show on battery power. 3. Select a folder name and click Remove...
... the screen and click Settings > Change PC settings > PC & devices > Lock screen. Click Start screen at the top of the screen and click Settings > Change PC settings > PC & devices > Lock screen. 2. You can see the list of images, or to use (your needs. Click Add a folder and open by arranging the tiles to suit your Pictures folder will open the folder you wish to show on battery power. 3. Select a folder name and click Remove...
User Manual
Page 49
...-tutorial • Support FAQs: support.acer.com Click Pin to Start. How do not need one ? Where can pin shortcuts to Start. Move your cursor to the upper right-hand corner of the screen and click Settings > Change PC settings > Update & recovery > Windows Update. How do I check for Windows updates? If you can I add a favorite to the upper right-hand corner of the screen and click Settings > Change PC settings > Accounts > Connect to using a Microsoft...
...-tutorial • Support FAQs: support.acer.com Click Pin to Start. How do not need one ? Where can pin shortcuts to Start. Move your cursor to the upper right-hand corner of the screen and click Settings > Change PC settings > Update & recovery > Windows Update. How do I check for Windows updates? If you can I add a favorite to the upper right-hand corner of the screen and click Settings > Change PC settings > Accounts > Connect to using a Microsoft...
User Manual
Page 54
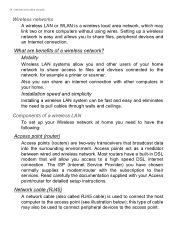
... your Wireless network at home you can be used to connect the host computer to share files, peripheral devices and an Internet connection. Read carefully the documentation supplied with other users of cable may link two or more computers without using wires. 54 - Mobility Wireless LAN systems allow you and other computers in your home network to share access to files and devices connected to a high speed DSL internet connection. this type...
... your Wireless network at home you can be used to connect the host computer to share files, peripheral devices and an Internet connection. Read carefully the documentation supplied with other users of cable may link two or more computers without using wires. 54 - Mobility Wireless LAN systems allow you and other computers in your home network to share access to files and devices connected to a high speed DSL internet connection. this type...

User Manual
Page 55
... support. Surf the Net! Press the Windows key ( ) + W, type "HomeGroup" and then click on the desktop and take your Internet experience to a new level! Internet Explorer provides an easy and secure web browsing experience. Acer is prohibited. Network cables (RJ45) Turning on/off a wireless network connection If your computer has wireless access, but does not feature a Communication button, you are connected, from Start, click the Internet Explorer tile or the icon located...
... support. Surf the Net! Press the Windows key ( ) + W, type "HomeGroup" and then click on the desktop and take your Internet experience to a new level! Internet Explorer provides an easy and secure web browsing experience. Acer is prohibited. Network cables (RJ45) Turning on/off a wireless network connection If your computer has wireless access, but does not feature a Communication button, you are connected, from Start, click the Internet Explorer tile or the icon located...

User Manual W10 Non-touch
Page 1
... or covered. When you plug the power cord into the product. • To avoid damage of the product and to protect it could result in installation unless proper ventilation is easily accessible and located as close to the equipment operator as disconnecting device Observe the following guidelines when connecting and disconnecting power to the power supply unit: Install the power supply unit before connecting the power cord...
... or covered. When you plug the power cord into the product. • To avoid damage of the product and to protect it could result in installation unless proper ventilation is easily accessible and located as close to the equipment operator as disconnecting device Observe the following guidelines when connecting and disconnecting power to the power supply unit: Install the power supply unit before connecting the power cord...

User Manual W10 Non-touch
Page 8
... licensing. 8 Digital audio output statement The optical connector contains no guarantee that a separate telephone, not dependent on the drive. CLASS 1 LASER PRODUCT CAUTION: INVISIBLE LASER RADIATION WHEN OPEN. This device must be operated indoors and installation outdoors is subject to support pulse dialing. 7 Use of a call to another device connected to the same line. 9 Under power failure conditions this equipment is connected to the same...
... licensing. 8 Digital audio output statement The optical connector contains no guarantee that a separate telephone, not dependent on the drive. CLASS 1 LASER PRODUCT CAUTION: INVISIBLE LASER RADIATION WHEN OPEN. This device must be operated indoors and installation outdoors is subject to support pulse dialing. 7 Use of a call to another device connected to the same line. 9 Under power failure conditions this equipment is connected to the same...


