User Manual
Page 26
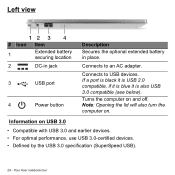
... location 2 DC-in jack 3 USB port 4 Power button Description Secures the optional extended battery in place. Connects to an AC adapter. Information on . Your Acer notebook tour Note: Opening the lid will also turn the computer on USB 3.0 • Compatible with USB 3.0 and earlier devices. • For optimal performance, use ...
... location 2 DC-in jack 3 USB port 4 Power button Description Secures the optional extended battery in place. Connects to an AC adapter. Information on . Your Acer notebook tour Note: Opening the lid will also turn the computer on USB 3.0 • Compatible with USB 3.0 and earlier devices. • For optimal performance, use ...
User Manual
Page 27
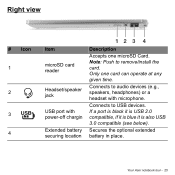
Note: Push to USB devices. Your Acer notebook tour - 25 Right view # Icon 1 2 3 4 Item microSD card reader Headset/speaker jack USB port with microphone. Connects to remove/install the card. Secures the optional extended battery in place. Connects to audio devices (e.g., speakers, headphones) or a headset with power-off chargin Extended battery securing location 12 3 4 Description Accepts one card can operate at any given time. Only one microSD Card. If a port is black it is USB 2.0 compatible, if it is blue it is also USB 3.0 compatible (see below).
Note: Push to USB devices. Your Acer notebook tour - 25 Right view # Icon 1 2 3 4 Item microSD card reader Headset/speaker jack USB port with microphone. Connects to remove/install the card. Secures the optional extended battery in place. Connects to audio devices (e.g., speakers, headphones) or a headset with power-off chargin Extended battery securing location 12 3 4 Description Accepts one card can operate at any given time. Only one microSD Card. If a port is black it is USB 2.0 compatible, if it is blue it is also USB 3.0 compatible (see below).
User Manual
Page 28
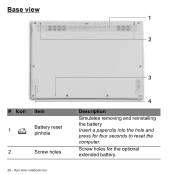
Your Acer notebook tour 4 Description Simulates removing and reinstalling the battery Insert a paperclip into the hole and press for the optional extended battery. Base view 1 2 3 # Icon Item 1 Battery reset pinhole 2 Screw holes 26 - Screw holes for four seconds to reset the computer.
Your Acer notebook tour 4 Description Simulates removing and reinstalling the battery Insert a paperclip into the hole and press for the optional extended battery. Base view 1 2 3 # Icon Item 1 Battery reset pinhole 2 Screw holes 26 - Screw holes for four seconds to reset the computer.


