
User Manual
Page 3
... the computer home 57 Using the keyboard 30 Preparing the computer 57 What to take with you 57 Lock keys and embedded numeric keypad..... 30 Special considerations 58 Hotkeys 31 Setting up a home office 58 Windows keys 33 Traveling with the computer 59 Recovery 35 Preparing the computer 59 Acer Recovery Management 35 Creating recovery discs 36 Recovering your system 39 Types of recovery 41 What to take...
... the computer home 57 Using the keyboard 30 Preparing the computer 57 What to take with you 57 Lock keys and embedded numeric keypad..... 30 Special considerations 58 Hotkeys 31 Setting up a home office 58 Windows keys 33 Traveling with the computer 59 Recovery 35 Preparing the computer 59 Acer Recovery Management 35 Creating recovery discs 36 Recovering your system 39 Types of recovery 41 What to take...
User Manual
Page 4
Securing your computer 61 HDMI 66 Using passwords 61 Entering passwords 62 Universal Serial Bus (USB) 67 Connecting to a network 63 Playing DVD movies 68 Built-in network feature 63 BIOS utility 69 Wireless networks 64 Boot sequence 69 Connecting to the Internet 64 Enable disk-to-disk recovery 69 Acer Instant Connect 64 Setting passwords 69 Acer Instant Update 64 Frequently asked questions 70 Wireless networks 65 Requesting service 73 Troubleshooting 75 Troubleshooting tips 75 Error messages 75 Regulations and safety notices 77 4 - Table of contents
Securing your computer 61 HDMI 66 Using passwords 61 Entering passwords 62 Universal Serial Bus (USB) 67 Connecting to a network 63 Playing DVD movies 68 Built-in network feature 63 BIOS utility 69 Wireless networks 64 Boot sequence 69 Connecting to the Internet 64 Enable disk-to-disk recovery 69 Acer Instant Connect 64 Setting passwords 69 Acer Instant Update 64 Frequently asked questions 70 Wireless networks 65 Requesting service 73 Troubleshooting 75 Troubleshooting tips 75 Error messages 75 Regulations and safety notices 77 4 - Table of contents

User Manual
Page 8
... opening or removing covers may cause the battery to leak acid, become hot, explode or ignite and cause injury and/or damage. Do not pierce, open or disassemble the computer or battery. If the battery leaks and you to dangerous voltage points or other controls may result in damage and will often require extensive work by the operating instructions, since improper adjustment of the battery, charging...
... opening or removing covers may cause the battery to leak acid, become hot, explode or ignite and cause injury and/or damage. Do not pierce, open or disassemble the computer or battery. If the battery leaks and you to dangerous voltage points or other controls may result in damage and will often require extensive work by the operating instructions, since improper adjustment of the battery, charging...
User Manual
Page 9
... when used batteries. A device with the approved chargers designated for battery shipping documents. Wireless devices may cause interference or danger. Do not disassemble or dispose of batteries according to follow any special regulations in force in any area, and always switch off all wireless or radio transmitting devices when using your body. For safety reasons, turn off your device when its use is fully charged. Remember...
... when used batteries. A device with the approved chargers designated for battery shipping documents. Wireless devices may cause interference or danger. Do not disassemble or dispose of batteries according to follow any special regulations in force in any area, and always switch off all wireless or radio transmitting devices when using your body. For safety reasons, turn off your device when its use is fully charged. Remember...
User Manual
Page 16
... power button. To turn on the computer, simply press and release the power button. simply double-click the Acer User's Manual icon. It is available from your mobile computing needs. Please refer to the setup poster for the location of your Acer notebook, we have designed a set of guides: First off , do any of the following: 16 - For more productive, please refer to the Aspire User's Manual. This guide...
... power button. To turn on the computer, simply press and release the power button. simply double-click the Acer User's Manual icon. It is available from your mobile computing needs. Please refer to the setup poster for the location of your Acer notebook, we have designed a set of guides: First off , do any of the following: 16 - For more productive, please refer to the Aspire User's Manual. This guide...
User Manual
Page 21
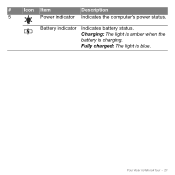
Charging: The light is amber when the battery is blue. Battery indicator Indicates battery status. # Icon Item Description 5 Power indicator Indicates the computer's power status. Your Acer notebook tour - 21 Fully charged: The light is charging.
Charging: The light is amber when the battery is blue. Battery indicator Indicates battery status. # Icon Item Description 5 Power indicator Indicates the computer's power status. Your Acer notebook tour - 21 Fully charged: The light is charging.
User Manual
Page 30
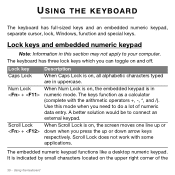
... work with the arithmetic operators +, -, *, and /). Using the keyboard Lock key Caps Lock Num Lock + Scroll Lock + Description When Caps Lock is on the upper right corner of numeric data entry. It is on and off. When Num Lock is indicated by small characters located on , all alphabetic characters typed are in uppercase. Use this section may not apply to your computer. The embedded numeric keypad functions...
... work with the arithmetic operators +, -, *, and /). Using the keyboard Lock key Caps Lock Num Lock + Scroll Lock + Description When Caps Lock is on the upper right corner of numeric data entry. It is on and off. When Num Lock is indicated by small characters located on , all alphabetic characters typed are in uppercase. Use this section may not apply to your computer. The embedded numeric keypad functions...
User Manual
Page 31
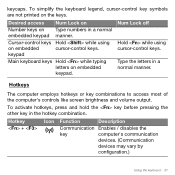
... on Type numbers in a normal embedded keypad manner. keycaps. Cursor-control keys Hold while using cursor-control keys. Hotkeys The computer employs hotkeys or key combinations to access most of the computer's controls like screen brightness and volume output. Hotkey + Icon Function Description Communication Enables / disables the key computer's communication devices. (Communication devices may vary by configuration.) Using the keyboard - 31 keypad Main keyboard keys Hold while typing letters on embedded cursor-control keys. To activate hotkeys, press...
... on Type numbers in a normal embedded keypad manner. keycaps. Cursor-control keys Hold while using cursor-control keys. Hotkeys The computer employs hotkeys or key combinations to access most of the computer's controls like screen brightness and volume output. Hotkey + Icon Function Description Communication Enables / disables the key computer's communication devices. (Communication devices may vary by configuration.) Using the keyboard - 31 keypad Main keyboard keys Hold while typing letters on embedded cursor-control keys. To activate hotkeys, press...

User Manual
Page 32
Using the keyboard Display toggle Switches display output between the display screen, external monitor (if connected) and both. Speaker toggle Turns the speakers on and off. + + < > + < > + < > + < > NumLk Brightness up Brightness down Volume up Volume down Turns the embedded numeric keypad on and off. Decreases the screen brightness. Increases the sound volume. Decreases the sound volume. 32 - Display off Turns the display screen backlight off to return. Press any key to save power. Increases the screen brightness. Touchpad toggle Turns the built-in Sleep mode....
Using the keyboard Display toggle Switches display output between the display screen, external monitor (if connected) and both. Speaker toggle Turns the speakers on and off. + + < > + < > + < > + < > NumLk Brightness up Brightness down Volume up Volume down Turns the embedded numeric keypad on and off. Decreases the screen brightness. Increases the sound volume. Decreases the sound volume. 32 - Display off Turns the display screen backlight off to return. Press any key to save power. Increases the screen brightness. Touchpad toggle Turns the built-in Sleep mode....

User Manual
Page 34
Note: Depending on your edition of Access Center < > + : Open Windows Mobility Center < > + : Display System Properties < > + : Restore minimized windows < > + : Cycle through programs on the taskbar < > + : Open Ease of Windows, some shortcuts may not function as clicking the right mouse button; Using the keyboard it opens the application's context menu. Key Description < > + : Open the Run dialog box < > + : Cycle through programs on the taskbar by using Windows Flip 3-D < > + : Bring all gadgets to the...
Note: Depending on your edition of Access Center < > + : Open Windows Mobility Center < > + : Display System Properties < > + : Restore minimized windows < > + : Cycle through programs on the taskbar < > + : Open Ease of Windows, some shortcuts may not function as clicking the right mouse button; Using the keyboard it opens the application's context menu. Key Description < > + : Open the Run dialog box < > + : Cycle through programs on the taskbar by using Windows Flip 3-D < > + : Bring all gadgets to the...
User Manual
Page 40
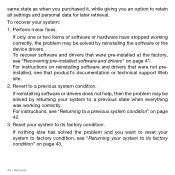
... "Recovering pre-installed software and drivers" on reinstalling software and drivers that product's documentation or technical support Web site. 2. For instructions on page 41. Revert to retain all settings and personal data for later retrieval. Perform minor fixes. If only one or two items of software or hardware have stopped working correctly. Reset your system to its factory condition" on page 42. 3. If reinstalling software or drivers...
... "Recovering pre-installed software and drivers" on reinstalling software and drivers that product's documentation or technical support Web site. 2. For instructions on page 41. Revert to retain all settings and personal data for later retrieval. Perform minor fixes. If only one or two items of software or hardware have stopped working correctly. Reset your system to its factory condition" on page 42. 3. If reinstalling software or drivers...

User Manual
Page 41
... recover device drivers that did not come pre-installed on your hard drive or the backup you have created. • New software - If you need to recover software that did not come pre- Acer Recovery Management opens. - Click on Acer Recovery Management. Click on Start > All Programs > Acer, then click on the Restore tab, then click Reinstall Drivers or Applications. OR If you are recovering from the factory. You can recover using either your computer, follow that software's installation instructions. • New device drivers...
... recover device drivers that did not come pre-installed on your hard drive or the backup you have created. • New software - If you need to recover software that did not come pre- Acer Recovery Management opens. - Click on Acer Recovery Management. Click on Start > All Programs > Acer, then click on the Restore tab, then click Reinstall Drivers or Applications. OR If you are recovering from the factory. You can recover using either your computer, follow that software's installation instructions. • New device drivers...
User Manual
Page 44
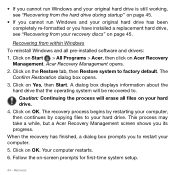
... Restore system to your hard drive. This process may take a while, but a Acer Recovery Management screen shows you have installed a replacement hard drive, see "Recovering from the hard drive during startup" on page 45. • If you cannot run Windows and your original hard drive is still working, see "Recovering from your recovery discs" on page 45. A dialog box displays information about the hard drive that the operating system will erase all pre-installed software and drivers: 1. When the recovery...
... Restore system to your hard drive. This process may take a while, but a Acer Recovery Management screen shows you have installed a replacement hard drive, see "Recovering from the hard drive during startup" on page 45. • If you cannot run Windows and your original hard drive is still working, see "Recovering from your recovery discs" on page 45. A dialog box displays information about the hard drive that the operating system will erase all pre-installed software and drivers: 1. When the recovery...
User Manual
Page 45
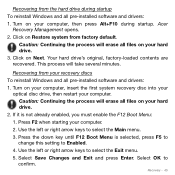
... on your hard drive. 2. Press F2 when starting your recovery discs To reinstall Windows and all pre-installed software and drivers: 1. Acer Recovery Management opens. 2. Your hard drive's original, factory-loaded contents are recovered. Select OK to select the Main menu. 3. Turn on your hard drive. 3. Use the left or right arrow keys to Enabled. 4. Press the down key until F12 Boot Menu is not already enabled, you must enable the F12 Boot Menu: 1. Use the left or right arrow keys to confirm...
... on your hard drive. 2. Press F2 when starting your recovery discs To reinstall Windows and all pre-installed software and drivers: 1. Acer Recovery Management opens. 2. Your hard drive's original, factory-loaded contents are recovered. Select OK to select the Main menu. 3. Turn on your hard drive. 3. Use the left or right arrow keys to Enabled. 4. Press the down key until F12 Boot Menu is not already enabled, you must enable the F12 Boot Menu: 1. Use the left or right arrow keys to confirm...

User Manual
Page 50
... Deep Sleep, the power indicator LED will enter Deep Sleep to open the lid. If no activity is in order to the computer, and video memory. System activity refers to any key to reduce overall power consumption. Acer Green Instant On uses the power-saving features of your computer to wake the computer up from the Start menu, your computer to wake up from Sleep mode in Sleep mode, the computer will be turned...
... Deep Sleep, the power indicator LED will enter Deep Sleep to open the lid. If no activity is in order to the computer, and video memory. System activity refers to any key to reduce overall power consumption. Acer Green Instant On uses the power-saving features of your computer to wake the computer up from the Start menu, your computer to wake up from Sleep mode in Sleep mode, the computer will be turned...

User Manual
Page 62
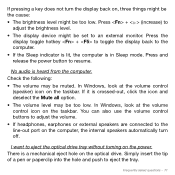
... at boot-up . • Type the User Password and press to enter the password correctly after three tries, the system halts. Important! Entering passwords When a password is set, a password prompt appears in the center of the display screen. • When the Supervisor Password is set and the password on the computer again, and try again. 62 - Press and hold the power button for four seconds to access the BIOS utility. Securing...
... at boot-up . • Type the User Password and press to enter the password correctly after three tries, the system halts. Important! Entering passwords When a password is set, a password prompt appears in the center of the display screen. • When the Supervisor Password is set and the password on the computer again, and try again. 62 - Press and hold the power button for four seconds to access the BIOS utility. Securing...
User Manual
Page 69
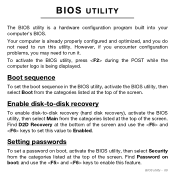
... and keys to run it. BIOS utility - 69 BIOS UTILITY The BIOS utility is being displayed. Enable disk-to-disk recovery To enable disk-to Enabled. Setting passwords To set the boot sequence in the BIOS utility, activate the BIOS utility, then select Boot from the categories listed at the top of the screen. Your computer is already properly configured and optimized, and you may need to enable this utility. To activate the BIOS utility, press during the POST while the computer logo is a hardware configuration...
... and keys to run it. BIOS utility - 69 BIOS UTILITY The BIOS utility is being displayed. Enable disk-to-disk recovery To enable disk-to Enabled. Setting passwords To set the boot sequence in the BIOS utility, activate the BIOS utility, then select Boot from the categories listed at the top of the screen. Your computer is already properly configured and optimized, and you may need to enable this utility. To activate the BIOS utility, press during the POST while the computer logo is a hardware configuration...

User Manual
Page 70
... the computer does not start or boot up. Press any key to the computer. Check the following : • Is a disc in the optical drive? The computer's power management system automatically blanks the screen to power the computer. Remove it may arise during the use of possible situations that the AC adapter is being supplied to turn the display back on the battery, it and press...
... the computer does not start or boot up. Press any key to the computer. Check the following : • Is a disc in the optical drive? The computer's power management system automatically blanks the screen to power the computer. Remove it may arise during the use of possible situations that the AC adapter is being supplied to turn the display back on the battery, it and press...
User Manual
Page 71
.... You can also use the volume control buttons to adjust the volume. • If headphones, earphones or external speakers are connected to the line-out port on the power. I want to adjust the brightness level. • The display device might be set to eject the tray. Press + < > (increase) to eject the optical drive tray without turning on the computer, the internal speakers automatically turn the display back on the taskbar...
.... You can also use the volume control buttons to adjust the volume. • If headphones, earphones or external speakers are connected to the line-out port on the power. I want to adjust the brightness level. • The display device might be set to eject the tray. Press + < > (increase) to eject the optical drive tray without turning on the computer, the internal speakers automatically turn the display back on the taskbar...

User Manual
Page 72
... first turn on the computer. Check to see if Acer disk-to its original settings without recovery CDs. Check the following: • Make sure that the printer is connected to a power outlet and that it works, contact your system is enabled or not. 2. Frequently asked questions Before performing a restore operation, please check the BIOS settings. 1. Make sure the D2D Recovery setting in Main is installed when you restore the C: drive...
... first turn on the computer. Check to see if Acer disk-to its original settings without recovery CDs. Check the following: • Make sure that the printer is connected to a power outlet and that it works, contact your system is enabled or not. 2. Frequently asked questions Before performing a restore operation, please check the BIOS settings. 1. Make sure the D2D Recovery setting in Main is installed when you restore the C: drive...


