Acer Aspire 8935G Notebook Series Start Guide
Page 3
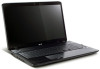
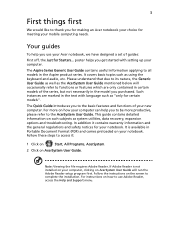
... your Acer notebook, we have designed a set of the series, but not necessarily in Portable Document Format (PDF) and comes preloaded on such subjects as "only for certain models". It covers basic topics such as the AcerSystem User Guide mentioned below will run the Adobe Reader setup program first. It is not installed on your computer, clicking on how to use your notebook. Follow the instructions...
... your Acer notebook, we have designed a set of the series, but not necessarily in Portable Document Format (PDF) and comes preloaded on such subjects as "only for certain models". It covers basic topics such as the AcerSystem User Guide mentioned below will run the Adobe Reader setup program first. It is not installed on your computer, clicking on how to use your notebook. Follow the instructions...
Acer Aspire 8935G Notebook Series Start Guide
Page 5
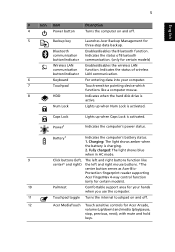
... reader supporting Acer FingerNav 4-way control function (only for certain models). 10 Palmrest Comfortable support area for your computer. 7 Touchpad Touch-sensitive pointing device which functions like center* and right) the left and right buttons function like a computer mouse. 8 HDD Indicates when the hard disk drive is charging. 2. Battery1 Indicates the computer's battery status. 1. Charging: The light shows amber when the battery is active. with mute and hold keys. Indicates the status of Bluetooth communication. (only for certain models) Wireless LAN...
... reader supporting Acer FingerNav 4-way control function (only for certain models). 10 Palmrest Comfortable support area for your computer. 7 Touchpad Touch-sensitive pointing device which functions like center* and right) the left and right buttons function like a computer mouse. 8 HDD Indicates when the hard disk drive is charging. 2. Battery1 Indicates the computer's battery status. 1. Charging: The light shows amber when the battery is active. with mute and hold keys. Indicates the status of Bluetooth communication. (only for certain models) Wireless LAN...

Acer Aspire 8935G Notebook Series Start Guide
Page 6
... stereo audio output. 15 Screen blank Turns the display screen backlight off to save power. Keyboard backlight toggle Brightness up . To activate hotkeys, press and hold the key before pressing the other key in Sleep mode. + + + + + < > Display toggle Screen blank Switches display output between the display screen, external monitor (if connected) and both. Press any key to return. Speaker toggle Turns the speakers on or off to access most of the computer's controls like screen brightness and volume output. Turns the display screen...
... stereo audio output. 15 Screen blank Turns the display screen backlight off to save power. Keyboard backlight toggle Brightness up . To activate hotkeys, press and hold the key before pressing the other key in Sleep mode. + + + + + < > Display toggle Screen blank Switches display output between the display screen, external monitor (if connected) and both. Press any key to return. Speaker toggle Turns the speakers on or off to access most of the computer's controls like screen brightness and volume output. Turns the display screen...
Acer Aspire 8935G Notebook Series Start Guide
Page 8
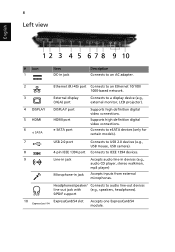
... for certain models). DISPLAY port HDMI port e SATA port Supports high definition digital video connections. Connects to an Ethernet 10/100/ 1000-based network. 8 Left view English # Icon 1 Item DC-in jack Description Connects to an AC adapter. 2 3 4 DISPLAY 5 HDMI 6 7 8 9 10 Ethernet (RJ-45) port Connects to IEEE 1394 devices. USB 2.0 port 4-pin IEEE 1394 port Line-in jack Microphone-in devices (e.g., audio CD player, stereo walkman, mp3 player) Accepts inputs from external microphones. External display (VGA) port Connects to USB 2.0 devices (e.g., USB mouse, USB camera).
... for certain models). DISPLAY port HDMI port e SATA port Supports high definition digital video connections. Connects to an Ethernet 10/100/ 1000-based network. 8 Left view English # Icon 1 Item DC-in jack Description Connects to an AC adapter. 2 3 4 DISPLAY 5 HDMI 6 7 8 9 10 Ethernet (RJ-45) port Connects to IEEE 1394 devices. USB 2.0 port 4-pin IEEE 1394 port Line-in jack Microphone-in devices (e.g., audio CD player, stereo walkman, mp3 player) Accepts inputs from external microphones. External display (VGA) port Connects to USB 2.0 devices (e.g., USB mouse, USB camera).
Acer Aspire 8935G Notebook Series Start Guide
Page 12
...-/107-key keyboard • Touchpad pointing device • ExpressCard®/54 slot • Acer Bio-Protection fingerprint reader* • 5-in-1 card reader (SD/MMC/MS/MS PRO/xD) • USB 2.0 port • IEEE 1394 port • HDMI™ port with HDCP support • DISPLAY port • eSATA port • External display (VGA) port • Consumer infrared (CIR) port • RF-in jack* • Headphones/speaker/line-out jack with S/PDIF support • Microphone-in jack • Line-in jack •...
...-/107-key keyboard • Touchpad pointing device • ExpressCard®/54 slot • Acer Bio-Protection fingerprint reader* • 5-in-1 card reader (SD/MMC/MS/MS PRO/xD) • USB 2.0 port • IEEE 1394 port • HDMI™ port with HDCP support • DISPLAY port • eSATA port • External display (VGA) port • Consumer infrared (CIR) port • RF-in jack* • Headphones/speaker/line-out jack with S/PDIF support • Microphone-in jack • Line-in jack •...

Acer Aspire 8935G Series Service Guide
Page 7
... 10 TouchPad Basics 11 Using the Keyboard 12 Key Types 12 Windows Keys 13 System Hotkeys 14 Using the System Utilities 15 Acer GridVista (dual-display compatible 15 Hardware Specifications and Configurations 16 System Utilities 35 BIOS Setup Utility 35 Navigating the BIOS Utility 35 Information 36 Main 37 Security 38 Boot 41 Exit 42 BIOS Flash Utilities 43 DOS Flash Utility 44 WinFlash Utility 46 Remove HDD/BIOS Password Utilities 47 Machine Disassembly and Replacement 53 Disassembly Requirements 53 General Information 54 Pre-disassembly Instructions 54 Disassembly...
... 10 TouchPad Basics 11 Using the Keyboard 12 Key Types 12 Windows Keys 13 System Hotkeys 14 Using the System Utilities 15 Acer GridVista (dual-display compatible 15 Hardware Specifications and Configurations 16 System Utilities 35 BIOS Setup Utility 35 Navigating the BIOS Utility 35 Information 36 Main 37 Security 38 Boot 41 Exit 42 BIOS Flash Utilities 43 DOS Flash Utility 44 WinFlash Utility 46 Remove HDD/BIOS Password Utilities 47 Machine Disassembly and Replacement 53 Disassembly Requirements 53 General Information 54 Pre-disassembly Instructions 54 Disassembly...
Acer Aspire 8935G Series Service Guide
Page 8
Table of Contents Removing the Power Board 77 Removing the LCD Module 78 Removing the Upper Cover 81 Removing the Launch Board 85 Removing the Volume Control Board 86 Removing the Power Saving Board FFC 88 Removing the Media Board 89 Removing the TouchPad Lock Board 91 Removing the Finger Print Reader Bracket 93 Removing the TouchPad Board 94 Removing the RTC Battery 97 Removing the Bluetooth Board 98 Removing the USB Board 100 Removing the Power Saving Board 102 Removing the Mainboard 103 Removing the Kensington Lock Bracket 105 Removing the TV Tuner Antenna...
Table of Contents Removing the Power Board 77 Removing the LCD Module 78 Removing the Upper Cover 81 Removing the Launch Board 85 Removing the Volume Control Board 86 Removing the Power Saving Board FFC 88 Removing the Media Board 89 Removing the TouchPad Lock Board 91 Removing the Finger Print Reader Bracket 93 Removing the TouchPad Board 94 Removing the RTC Battery 97 Removing the Bluetooth Board 98 Removing the USB Board 100 Removing the Power Saving Board 102 Removing the Mainboard 103 Removing the Kensington Lock Bracket 105 Removing the TV Tuner Antenna...
Acer Aspire 8935G Series Service Guide
Page 9
... Power Board 183 Removing the Switch Cover 184 Replacing the Keyboard 186 External Module Reassembly Instructions 188 Replacing the WLAN Module 188 Replacing the TV Tuner Module 189 Replacing the DIMM Modules 190 Replacing the Hard Disk Drive Module 190 Replacing the ODD Module 191 Replacing the Lower Covers 191 Replacing the SD Dummy Card 193 Replacing the Battery 193 Troubleshooting 195 Common Problems 195 Power On Issue 196 No Display Issue 197 Random Loss of BIOS Settings 198 LCD Failure 199 Built-In Keyboard Failure 200 TouchPad...
... Power Board 183 Removing the Switch Cover 184 Replacing the Keyboard 186 External Module Reassembly Instructions 188 Replacing the WLAN Module 188 Replacing the TV Tuner Module 189 Replacing the DIMM Modules 190 Replacing the Hard Disk Drive Module 190 Replacing the ODD Module 191 Replacing the Lower Covers 191 Replacing the SD Dummy Card 193 Replacing the Battery 193 Troubleshooting 195 Common Problems 195 Power On Issue 196 No Display Issue 197 Random Loss of BIOS Settings 198 LCD Failure 199 Built-In Keyboard Failure 200 TouchPad...
Acer Aspire 8935G Series Service Guide
Page 16
...computer cover is closed up. †The front panel indicators are visible even when the computer cover is active. Press any key to save power. Power* Indicates the computer's power status. Indicates the status of wireless LAN communication. 6 Keyboard For entering data into power-saving mode. 14 Speakers Left and right speakers deliver stereo audio output. 15 Screen blank Turns the display screen backlight off . 12 Acer MediaTouch Touch sensitive controls for certain models) Wireless LAN communication button/indicator Enables/disables the wireless LAN function.
...computer cover is closed up. †The front panel indicators are visible even when the computer cover is active. Press any key to save power. Power* Indicates the computer's power status. Indicates the status of wireless LAN communication. 6 Keyboard For entering data into power-saving mode. 14 Speakers Left and right speakers deliver stereo audio output. 15 Screen blank Turns the display screen backlight off . 12 Acer MediaTouch Touch sensitive controls for certain models) Wireless LAN communication button/indicator Enables/disables the wireless LAN function.
Acer Aspire 8935G Series Service Guide
Page 46
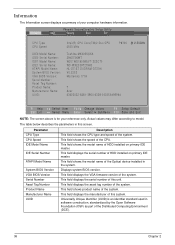
... F5/F6 Change Values F9 Setup Default Select Menu Enter Select SubMenu F10 Save and Exit NOTE: The screen above is an identifier standard used in this screen. This field shows the model name of the system. Information The Information screen displays a summary of your reference only. Parameter CPU Type CPU Speed IDE Model Name IDE Serial Number ATAPI Model Name System BIOS Version VGA BIOS Version Serial Number Asset Tag Number Product...
... F5/F6 Change Values F9 Setup Default Select Menu Enter Select SubMenu F10 Save and Exit NOTE: The screen above is an identifier standard used in this screen. This field shows the model name of the system. Information The Information screen displays a summary of your reference only. Parameter CPU Type CPU Speed IDE Model Name IDE Serial Number ATAPI Model Name System BIOS Version VGA BIOS Version Serial Number Asset Tag Number Product...
Acer Aspire 8935G Series Service Guide
Page 49
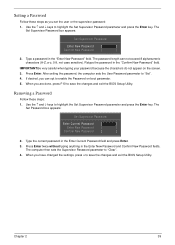
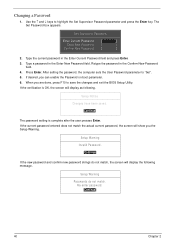
... the changes and exit the BIOS Setup Utility. Use the ↑ and ↓ keys to "Set". 4. Chapter 2 39 Setting a Password Follow these steps: 1. After setting the password, the computer sets the User Password parameter to highlight the Set Supervisor Password parameter and press the Enter key. Press Enter twice without typing anything in the "Confirm New Password" field. The Set Supervisor Password box appears: Set Supervisor Password Enter New Password [ ] Confirm New Password [ ] 2. Retype the password in the Enter New Password and Confirm New Password fields...
... the changes and exit the BIOS Setup Utility. Use the ↑ and ↓ keys to "Set". 4. Chapter 2 39 Setting a Password Follow these steps: 1. After setting the password, the computer sets the User Password parameter to highlight the Set Supervisor Password parameter and press the Enter key. Press Enter twice without typing anything in the "Confirm New Password" field. The Set Supervisor Password box appears: Set Supervisor Password Enter New Password [ ] Confirm New Password [ ] 2. Retype the password in the Enter New Password and Confirm New Password fields...
Acer Aspire 8935G Series Service Guide
Page 50
... current password entered does not match the actual current password, the screen will show you can enable the Password on boot parameter. 6. After setting the password, the computer sets the User Password parameter to save the changes and exit the BIOS Setup Utility. Set Supervisor Password Enter Current Password [ ] Enter New Password [ ] Confirm New Password [ ] 2. Type a password in the Enter Current Password field and press Enter. 3. Press Enter. Use the ↑ and ↓ keys to highlight the Set Supervisor Password parameter and press the Enter key. If...
... current password entered does not match the actual current password, the screen will show you can enable the Password on boot parameter. 6. After setting the password, the computer sets the User Password parameter to save the changes and exit the BIOS Setup Utility. Set Supervisor Password Enter Current Password [ ] Enter New Password [ ] Confirm New Password [ ] 2. Type a password in the Enter Current Password field and press Enter. 3. Press Enter. Use the ↑ and ↓ keys to highlight the Set Supervisor Password parameter and press the Enter key. If...
Acer Aspire 8935G Series Service Guide
Page 52
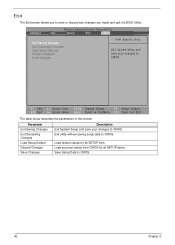
.../F6 Change Values F9 Setup Default Select Menu Enter Select SubMenu F10 Save and Exit The table below describes the parameters in this screen. Load previous values from CMOS for all SETUP items. Save Setup Data to CMOS. Information Phoenix SecureCore(tm) Setup Utility Main Security Boot Exit Exit Saving Changes Exit Discarding Changes Load Setup Defaults Discard Changes Save Changes Item Specific Help Exit System Setup and save your changes to CMOS...
.../F6 Change Values F9 Setup Default Select Menu Enter Select SubMenu F10 Save and Exit The table below describes the parameters in this screen. Load previous values from CMOS for all SETUP items. Save Setup Data to CMOS. Information Phoenix SecureCore(tm) Setup Utility Main Security Boot Exit Exit Saving Changes Exit Discarding Changes Load Setup Defaults Discard Changes Save Changes Item Specific Help Exit System Setup and save your changes to CMOS...
Acer Aspire 8935G Series Service Guide
Page 205
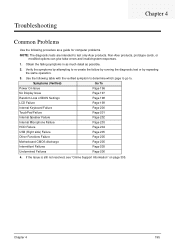
... same operation. 3. Troubleshooting Chapter 4 Common Problems Use the following table with the verified symptom to determine which page to go to. Non-Acer products, prototype cards, or modified options can give false errors and invalid system responses. 1. Symptoms (Verified) Go To Power On Issue Page 196 No Display Issue Page 197 Random Loss of BIOS Settings Page 198 LCD Failure Page 199 Internal Keyboard Failure...
... same operation. 3. Troubleshooting Chapter 4 Common Problems Use the following table with the verified symptom to determine which page to go to. Non-Acer products, prototype cards, or modified options can give false errors and invalid system responses. 1. Symptoms (Verified) Go To Power On Issue Page 196 No Display Issue Page 197 Random Loss of BIOS Settings Page 198 LCD Failure Page 199 Internal Keyboard Failure...
Acer Aspire 8935G Series Service Guide
Page 207
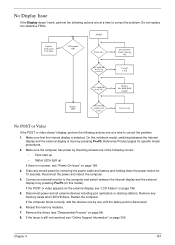
... "Disassembly Process" on this notebook model, switching between the internal display and the external display is discovered. 6. If the Issue is no power No trouble shooting step Ext. Screw it well Replace Ext. On this model). Make sure the computer has power by removing the power cable and battery and holding down the power button for specific model procedures. 2. Reseat the memory modules. 7. Remove the drives (see "Online Support Information" on page 196. 3. Drain any memory cards and CD/DVD discs...
... "Disassembly Process" on this notebook model, switching between the internal display and the external display is discovered. 6. If the Issue is no power No trouble shooting step Ext. Screw it well Replace Ext. On this model). Make sure the computer has power by removing the power cable and battery and holding down the power button for specific model procedures. 2. Reseat the memory modules. 7. Remove the drives (see "Online Support Information" on page 196. 3. Drain any memory cards and CD/DVD discs...
Acer Aspire 8935G Series Service Guide
Page 208
.... • There are still lost, replace the cables. 4. If the computer is listed under Other Devices. 9. See "Disassembly Process" on adjusting settings. If the display is faulty and should be replaced. b. Remove and reinstall the video driver. 8. Check the Device Manager to determine that the computer is not running on the screen), the LCD is too dim at a time to correct the problem. 1. If the computer is...
.... • There are still lost, replace the cables. 4. If the computer is listed under Other Devices. 9. See "Disassembly Process" on adjusting settings. If the display is faulty and should be replaced. b. Remove and reinstall the video driver. 8. Check the Device Manager to determine that the computer is not running on the screen), the LCD is too dim at a time to correct the problem. 1. If the computer is...
Acer Aspire 8935G Series Service Guide
Page 214
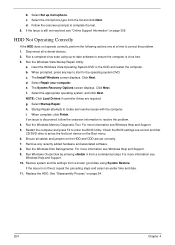
... Set up -to-date software to correct the problem. 1. Select the microphone type from a command prompt. HDD Not Operating Correctly If the HDD does not operate correctly, perform the following actions one at a time to ensure the computer is virus free. 3. Run the Windows Vista Startup Repair Utility: a. b. The Install Windows screen displays. f. NOTE: Click Load Drivers if controller drives are correct and that CD/DVD drive is discovered, follow the onscreen information to locate...
... Set up -to-date software to correct the problem. 1. Select the microphone type from a command prompt. HDD Not Operating Correctly If the HDD does not operate correctly, perform the following actions one at a time to ensure the computer is virus free. 3. Run the Windows Vista Startup Repair Utility: a. b. The Install Windows screen displays. f. NOTE: Click Load Drivers if controller drives are correct and that CD/DVD drive is discovered, follow the onscreen information to locate...
Acer Aspire 8935G Series Service Guide
Page 218
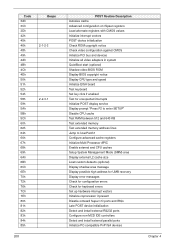
... vectors POST device initialization Check ROM copyright notice Check video configuration against CMOS Initialize PCI bus and devices Initialize all video adapters in system QuietBoot start (optional) Shadow video BIOS ROM Display BIOS copyright notice Display CPU type and speed Initialize EISA board Test keyboard Set key click if enabled Test for unexpected interrupts Initialize POST display service Display prompt "Press F2 to enter SETUP" Disable CPU cache Test RAM between 512 and 640 KB Test extended memory Test extended memory address lines...
... vectors POST device initialization Check ROM copyright notice Check video configuration against CMOS Initialize PCI bus and devices Initialize all video adapters in system QuietBoot start (optional) Shadow video BIOS ROM Display BIOS copyright notice Display CPU type and speed Initialize EISA board Test keyboard Set key click if enabled Test for unexpected interrupts Initialize POST display service Display prompt "Press F2 to enter SETUP" Disable CPU cache Test RAM between 512 and 640 KB Test extended memory Test extended memory address lines...
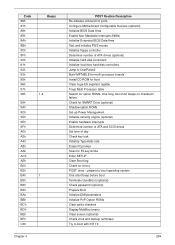
Acer Aspire 8935G Series Service Guide
Page 219
... (optional) Enable hardware interrupts Determine number of ATA and SCSI drives Set time of ATA drives (optional) Initialize hard-disk controllers Initialize local-bus hard-disk controllers Jump to boot with INT 19 209 Configure Motherboard Configurable Devices (optional) Initialize BIOS Data Area Enable Non-Maskable Interrupts (NMIs) Initialize Extended BIOS Data Area Test and initialize PS/2 mouse Initialize floppy controller Determine number of day Check key lock Initialize Typematic rate Erase F2 prompt Scan for F2 key stroke Enter SETUP Clear Boot...
... (optional) Enable hardware interrupts Determine number of ATA and SCSI drives Set time of ATA drives (optional) Initialize hard-disk controllers Initialize local-bus hard-disk controllers Jump to boot with INT 19 209 Configure Motherboard Configurable Devices (optional) Initialize BIOS Data Area Enable Non-Maskable Interrupts (NMIs) Initialize Extended BIOS Data Area Test and initialize PS/2 mouse Initialize floppy controller Determine number of day Check key lock Initialize Typematic rate Erase F2 prompt Scan for F2 key stroke Enter SETUP Clear Boot...
Acer Aspire 8935G Series Service Guide
Page 318
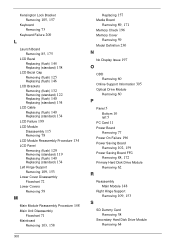
... Lower Covers Removing 59 M Main Module Reassembly Procedure 148 Main Unit Disassembly Flowchart 71 Mainboard Removing 103, 158 308 Replacing 157 Media Board Removing 89, 171 Memory Check 196 Memory Cover Removing 59 Model Definition 230 N No Display Issue 197 O ODD Removing 60 Online Support Information 305 Optical Drive Module Removing 60 P Panel 5 Bottom 10 left 5 PC Card 11 Power Board Removing 77 Power On Failure 196 Power Saving Board Removing 102, 159 Power Saving Board FFC Removing 88, 172 Primary Hard Disk Drive Module Removing 62...
... Lower Covers Removing 59 M Main Module Reassembly Procedure 148 Main Unit Disassembly Flowchart 71 Mainboard Removing 103, 158 308 Replacing 157 Media Board Removing 89, 171 Memory Check 196 Memory Cover Removing 59 Model Definition 230 N No Display Issue 197 O ODD Removing 60 Online Support Information 305 Optical Drive Module Removing 60 P Panel 5 Bottom 10 left 5 PC Card 11 Power Board Removing 77 Power On Failure 196 Power Saving Board Removing 102, 159 Power Saving Board FFC Removing 88, 172 Primary Hard Disk Drive Module Removing 62...


