Acer Aspire 5538 Series Service Guide
Page 165
...a time to its highest level. b. There are no device conflicts. • No hardware is properly installed. If the computer is faulty and should be replaced. NOTE: Ensure that : • The device is listed under Other Devices. 9. See "Disassembly Process" on page 191. 155 Chapter 4 Minimize or ... from the operating system DVD and follow the onscreen prompts. 11. If desktop display resolution is not normal, right-click on the screen), the LCD is present (different colored spots in the application. Click Apply and check the display. Run a complete virus scan using...
...a time to its highest level. b. There are no device conflicts. • No hardware is properly installed. If the computer is faulty and should be replaced. NOTE: Ensure that : • The device is listed under Other Devices. 9. See "Disassembly Process" on page 191. 155 Chapter 4 Minimize or ... from the operating system DVD and follow the onscreen prompts. 11. If desktop display resolution is not normal, right-click on the screen), the LCD is present (different colored spots in the application. Click Apply and check the display. Run a complete virus scan using...
Acer Aspire 5538 Series Service Guide
Page 170
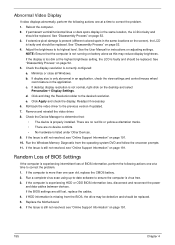
... not operate correctly, perform the following actions one at a time to resolve the problem. 4. c. Click Next. The System Recovery Options screen displays. NOTE: Click Load Drivers if controller drives are set correctly. 7. For more information see Windows Help and Support. 10. Run ...the Windows Disk Defragmenter. For more information see Windows Help and Support. 9. Replace the HDD. Chapter 4 160 Select Startup Repair. The Install Windows screen displays. Remove any key to start to ensure the computer is not fixed, repeat the preceding steps...
... not operate correctly, perform the following actions one at a time to resolve the problem. 4. c. Click Next. The System Recovery Options screen displays. NOTE: Click Load Drivers if controller drives are set correctly. 7. For more information see Windows Help and Support. 10. Run ...the Windows Disk Defragmenter. For more information see Windows Help and Support. 9. Replace the HDD. Chapter 4 160 Select Startup Repair. The Install Windows screen displays. Remove any key to start to ensure the computer is not fixed, repeat the preceding steps...
Acer Aspire 5538 Series Service Guide
Page 171
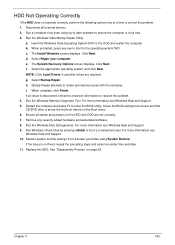
Do not replace a nondefective FRUs: ODD Not Operating Correctly If the ODD exhibits any of the following symptoms it may be faulty: • Audio CDs do not play ... when loaded • Blank discs do not burn correctly • DVD or CD play breaks up • The tray does not eject • Access failure screen displays • The ODD is displayed in My Computer or the BIOS setup • LED does not flash when the computer starts up or jumps...
Do not replace a nondefective FRUs: ODD Not Operating Correctly If the ODD exhibits any of the following symptoms it may be faulty: • Audio CDs do not play ... when loaded • Blank discs do not burn correctly • DVD or CD play breaks up • The tray does not eject • Access failure screen displays • The ODD is displayed in My Computer or the BIOS setup • LED does not flash when the computer starts up or jumps...
Acer Aspire 5538 Series Service Guide
Page 189
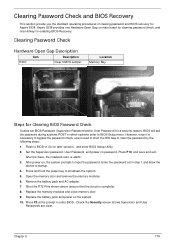
...the following steps: 1. Enter the password set BIOS Password (Supervisor Password and/or User Password) for enabling BIOS Recovery. Check the Security screen shows Supervisor and User Passwords are clear. Press F10, and save and exit. Short the R72 Pins shown above (ensure that the circuit... Password Check and BIOS Recovery This section provide you the standard operating procedures of clearing password and BIOS recovery for Aspire 5538. Chapter 5 179 Replace the battery pack and power on password. Set the Supervisor password, User Password, and power on the system. 10.
...the following steps: 1. Enter the password set BIOS Password (Supervisor Password and/or User Password) for enabling BIOS Recovery. Check the Security screen shows Supervisor and User Passwords are clear. Press F10, and save and exit. Short the R72 Pins shown above (ensure that the circuit... Password Check and BIOS Recovery This section provide you the standard operating procedures of clearing password and BIOS recovery for Aspire 5538. Chapter 5 179 Replace the battery pack and power on password. Set the Supervisor password, User Password, and power on the system. 10.


