Service Guide
Page 7
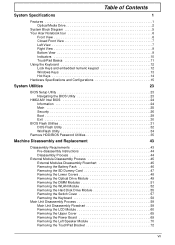
Table of Contents System Specifications 1 Features 1 Optical Media Drive 2 System Block Diagram 5 Your Acer Notebook tour 6 Front View 6 Closed Front View 7 Left View 7 Right View 9 Bottom View 9 Indicators 10 TouchPad Basics 11 Using the Keyboard... and Configurations 15 System Utilities 23 BIOS Setup Utility 23 Navigating the BIOS Utility 23 HM52-MV Intel BIOS 24 Information 24 Main 25 Security 26 Boot 29 Exit 30 BIOS Flash Utilities 31 DOS Flash Utility 32 WinFlash Utility 34 Remove HDD/BIOS Password Utilities 35 Machine Disassembly and Replacement ...
Table of Contents System Specifications 1 Features 1 Optical Media Drive 2 System Block Diagram 5 Your Acer Notebook tour 6 Front View 6 Closed Front View 7 Left View 7 Right View 9 Bottom View 9 Indicators 10 TouchPad Basics 11 Using the Keyboard... and Configurations 15 System Utilities 23 BIOS Setup Utility 23 Navigating the BIOS Utility 23 HM52-MV Intel BIOS 24 Information 24 Main 25 Security 26 Boot 29 Exit 30 BIOS Flash Utilities 31 DOS Flash Utility 32 WinFlash Utility 34 Remove HDD/BIOS Password Utilities 35 Machine Disassembly and Replacement ...
Service Guide
Page 9
... Problems 136 Post Codes 137 Jumper and Connector Locations 145 Top View 145 Bottom View 146 Power Board 147 Clearing Password Check and BIOS Recovery 148 Clearing Password Check 148 Clear CMOS Jumper 149 BIOS Recovery by Crisis Disk 150 FRU (Field Replaceable Unit) List 151 JE50_MV Exploded Diagrams 152 Main Assembly 152 Rear...
... Problems 136 Post Codes 137 Jumper and Connector Locations 145 Top View 145 Bottom View 146 Power Board 147 Clearing Password Check and BIOS Recovery 148 Clearing Password Check 148 Clear CMOS Jumper 149 BIOS Recovery by Crisis Disk 150 FRU (Field Replaceable Unit) List 151 JE50_MV Exploded Diagrams 152 Main Assembly 152 Rear...
Service Guide
Page 12
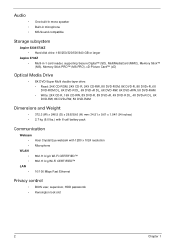
...8226; • • One built-in mono speaker Built-in microphone MS-Sound compatible Storage subsystem Aspire 5334/5734Z • Hard disk drive: 160/250/320/500/640 GB or larger Aspire 5734Z • Multi-in-1 card reader, supporting Secure Digital™ (SD), MultiMediaCard (MMC), Memory... (D) x 26.8/39.6 (H) mm (14.51 x 9.61 x 1.04/1.54 inches) • 2.7 kg (6.0 lbs.) with 6-cell battery pack Communication Webcam • Acer Crystal Eye webcam with 1280 x 1024 resolution • Microphone WLAN • 802.11 b/g/n Wi-Fi CERTIFIED™ • 802.11 b/g Wi-Fi CERTIFIED™ LAN...
...8226; • • One built-in mono speaker Built-in microphone MS-Sound compatible Storage subsystem Aspire 5334/5734Z • Hard disk drive: 160/250/320/500/640 GB or larger Aspire 5734Z • Multi-in-1 card reader, supporting Secure Digital™ (SD), MultiMediaCard (MMC), Memory... (D) x 26.8/39.6 (H) mm (14.51 x 9.61 x 1.04/1.54 inches) • 2.7 kg (6.0 lbs.) with 6-cell battery pack Communication Webcam • Acer Crystal Eye webcam with 1280 x 1024 resolution • Microphone WLAN • 802.11 b/g/n Wi-Fi CERTIFIED™ • 802.11 b/g Wi-Fi CERTIFIED™ LAN...

Service Guide
Page 36
...protect your computer from unauthorized access. Shows the setting of password must be grayed out if the user password was used to set , this password protects the BIOS Setup Utility from unauthorized access. When user password is required or not while the events defined in this screen...The table below describes the parameters in boldface are prompted to set , this password protects the BIOS Setup Utility from unauthorized use. Press Enter to enter setup. Don't forget your password, you are the default and suggested parameter settings. Settings in this group happened....
...protect your computer from unauthorized access. Shows the setting of password must be grayed out if the user password was used to set , this password protects the BIOS Setup Utility from unauthorized access. When user password is required or not while the events defined in this screen...The table below describes the parameters in boldface are prompted to set , this password protects the BIOS Setup Utility from unauthorized use. Press Enter to enter setup. Don't forget your password, you are the default and suggested parameter settings. Settings in this group happened....
Service Guide
Page 37
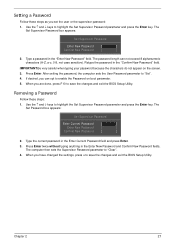
... and exit the BIOS Setup Utility. The computer then sets the Supervisor Password parameter to enable the Password on the screen. 3. Type the current password in the "Enter New Password" field. The Set Password box appears: Set Supervisor Password Enter Current Password [ ] Enter New Password [ ] Confirm New Password [ ] 2. When you set the user or the supervisor password: 1. Setting a Password Follow these steps...
... and exit the BIOS Setup Utility. The computer then sets the Supervisor Password parameter to enable the Password on the screen. 3. Type the current password in the "Enter New Password" field. The Set Password box appears: Set Supervisor Password Enter Current Password [ ] Enter New Password [ ] Confirm New Password [ ] 2. When you set the user or the supervisor password: 1. Setting a Password Follow these steps...
Service Guide
Page 38
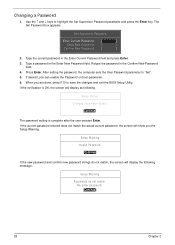
... are done, press F10 to save the changes and exit the BIOS Setup Utility. Retype the password in the Enter Current Password field and press Enter. 3. When you can enable the Password on boot parameter. 6. If the current password entered does not match the actual current password, the screen will show you the Setup Warning. Type...
... are done, press F10 to save the changes and exit the BIOS Setup Utility. Retype the password in the Enter Current Password field and press Enter. 3. When you can enable the Password on boot parameter. 6. If the current password entered does not match the actual current password, the screen will show you the Setup Warning. Type...

Service Guide
Page 45
Remove HDD/BIOS Password Utilities This section provides you key in the wrong HDD password three times, an error is generated. The command generates a password which can be used for unlocking utilities. An Encode key is displayed, select the Enter Unlock Password option on the screen. 2. Chapter 2 35 ... the unlock code in DOS Mode using the format UnlockHD [Encode code] with details about removing HDD/BIOS password: Remove HDD Password: If you with the code noted in the password from the previous step to unlock the HDD as follows: UnlockHD 76943488 4. To reset the HDD...
Remove HDD/BIOS Password Utilities This section provides you key in the wrong HDD password three times, an error is generated. The command generates a password which can be used for unlocking utilities. An Encode key is displayed, select the Enter Unlock Password option on the screen. 2. Chapter 2 35 ... the unlock code in DOS Mode using the format UnlockHD [Encode code] with details about removing HDD/BIOS password: Remove HDD Password: If you with the code noted in the password from the previous step to unlock the HDD as follows: UnlockHD 76943488 4. To reset the HDD...
Service Guide
Page 46
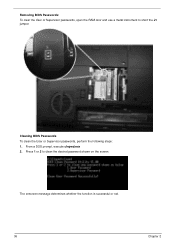
Press 1 or 2 to short the J1 jumper. The onscreen message determines whether the function is successful or not. 36 Chapter 2 Cleaning BIOS Passwords To clean the User or Supervisor passwords, perform the following steps: 1. From a DOS prompt, execute clnpwd.exe 2. Removing BIOS Passwords: To clear the User or Supervisor passwords, open the RAM door and use a metal instrument to clean the desired password shown on the screen.
Press 1 or 2 to short the J1 jumper. The onscreen message determines whether the function is successful or not. 36 Chapter 2 Cleaning BIOS Passwords To clean the User or Supervisor passwords, perform the following steps: 1. From a DOS prompt, execute clnpwd.exe 2. Removing BIOS Passwords: To clear the User or Supervisor passwords, open the RAM door and use a metal instrument to clean the desired password shown on the screen.
Service Guide
Page 158
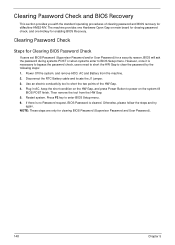
... This section provides you with the standard operating procedures of the HW Gap. 4. Clearing Password Check Steps for Clearing BIOS Password Check If users set BIOS Password (Supervisor Password and/or User Password) for clearing BIOS Password (Supervisor Password and User Password). 148 Chapter 5 Power Off the system, and remove HDD, AC and Battery from the HW Gap. 5. The machine provides...
... This section provides you with the standard operating procedures of the HW Gap. 4. Clearing Password Check Steps for Clearing BIOS Password Check If users set BIOS Password (Supervisor Password and/or User Password) for clearing BIOS Password (Supervisor Password and User Password). 148 Chapter 5 Power Off the system, and remove HDD, AC and Battery from the HW Gap. 5. The machine provides...
Service Guide
Page 243
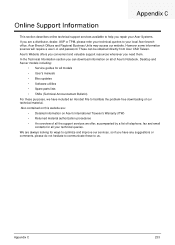
... services we offer, accompanied by a list of telephone, fax and email contacts for all your technical queries. and password. Appendix C 233 Acer Branch Offices and Regional Business Units may access our website. We are : • Detailed information on all of... Acer's Notebook, Desktop and Server models including: • Service guides for all models • User's manuals • Bios updates • Software utilities • Spare parts lists • TABs (Technical Announcement Bulletin...
... services we offer, accompanied by a list of telephone, fax and email contacts for all your technical queries. and password. Appendix C 233 Acer Branch Offices and Regional Business Units may access our website. We are : • Detailed information on all of... Acer's Notebook, Desktop and Server models including: • Service guides for all models • User's manuals • Bios updates • Software utilities • Spare parts lists • TABs (Technical Announcement Bulletin...


