
Service Guide
Page 41
NOTE: Do not install memory-related drivers (XMS, EMS, DPMI) when you use the Flash utility. Prepare a bootable diskette. 2. Then boot the system from the bootable diskette. The flash utility has auto-...
NOTE: Do not install memory-related drivers (XMS, EMS, DPMI) when you use the Flash utility. Prepare a bootable diskette. 2. Then boot the system from the bootable diskette. The flash utility has auto-...
Service Guide
Page 89
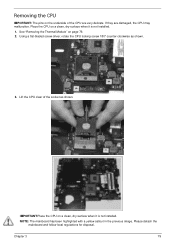
... installed. IMPORTANT:Place the CPU on a clean, dry surface when it is not installed. 1. Chapter 3 79 If they are very delicate. Using a flat-bladed screw driver, rotate the CPU locking screw 180° counter-clockwise as shown. Lift the CPU clear of the CPU are damaged, the CPU may malfunction. NOTE...
... installed. IMPORTANT:Place the CPU on a clean, dry surface when it is not installed. 1. Chapter 3 79 If they are very delicate. Using a flat-bladed screw driver, rotate the CPU locking screw 180° counter-clockwise as shown. Lift the CPU clear of the CPU are damaged, the CPU may malfunction. NOTE...
Service Guide
Page 108
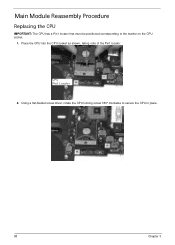
CPU Pin1 Locator 2. Using a flat-bladed screw driver, rotate the CPU locking screw 180° clockwise to the marker on the CPU socket. 1. Main Module Reassembly Procedure Replacing the CPU IMPORTANT: The CPU has a Pin1 locator that must be positioned corresponding to secure the CPU in place. 98 Chapter 3 Place the CPU into the CPU socket as shown, taking note of the Pin1 locator.
CPU Pin1 Locator 2. Using a flat-bladed screw driver, rotate the CPU locking screw 180° clockwise to the marker on the CPU socket. 1. Main Module Reassembly Procedure Replacing the CPU IMPORTANT: The CPU has a Pin1 locator that must be positioned corresponding to secure the CPU in place. 98 Chapter 3 Place the CPU into the CPU socket as shown, taking note of the Pin1 locator.
Service Guide
Page 136
...too dim at the highest brightness setting, the LCD is more than one year old, replace the CMOS battery. 2. Remove and reinstall the video driver. 8. If the computer is faulty and should be replaced. Abnormal Video Display If video displays abnormally, perform the following actions one at a ...time to correct the problem. 1. Click Apply and check the display. Roll back the video driver to its highest level. If the Issue is faulty and should be replaced. If extensive pixel damage is present (different colored spots in the...
...too dim at the highest brightness setting, the LCD is more than one year old, replace the CMOS battery. 2. Remove and reinstall the video driver. 8. If the computer is faulty and should be replaced. Abnormal Video Display If video displays abnormally, perform the following actions one at a ...time to correct the problem. 1. Click Apply and check the display. Roll back the video driver to its highest level. If the Issue is faulty and should be replaced. If extensive pixel damage is present (different colored spots in the...
Service Guide
Page 139
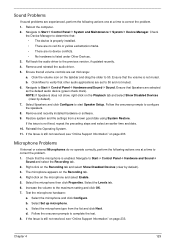
... repeat the preceding steps and select an earlier time and date. 10. Select Set up microphone. d. Chapter 4 129 Roll back the audio driver to Start´ Control Panel´ Hardware and Sound´ Sound. Ensure that other audio applications are no device conflicts. • No hardware...using System Restore. Reboot the computer. 2. Navigate to 50. Check the Device Manager to 50 and not muted. 6. Remove and reinstall the audio driver. 5. Click the volume icon on page 233. Ensure that Speakers are set to determine that the microphone is listed under Other Devices. 3. b....
... repeat the preceding steps and select an earlier time and date. 10. Select Set up microphone. d. Chapter 4 129 Roll back the audio driver to Start´ Control Panel´ Hardware and Sound´ Sound. Ensure that other audio applications are no device conflicts. • No hardware...using System Restore. Reboot the computer. 2. Navigate to 50. Check the Device Manager to 50 and not muted. 6. Remove and reinstall the audio driver. 5. Click the volume icon on page 233. Ensure that Speakers are set to determine that the microphone is listed under Other Devices. 3. b....

Service Guide
Page 140
... Windows Disk Defragmenter. insert the Windows Vista Operating System DVD in the ODD and restart the computer. The Install Windows screen displays. f. NOTE: Click Load Drivers if controller drives are correct and that CD/DVD drive is discovered, follow the onscreen information to enter the BIOS Utility. When complete, click Finish...
... Windows Disk Defragmenter. insert the Windows Vista Operating System DVD in the ODD and restart the computer. The Install Windows screen displays. f. NOTE: Click Load Drivers if controller drives are correct and that CD/DVD drive is discovered, follow the onscreen information to enter the BIOS Utility. When complete, click Finish...
Service Guide
Page 142
...visible. 2. c. b. If the device displays a down list. If a device has an exclamation mark, right-click on the device and uninstall and reinstall the driver. Ensure that AutoPlay is clean and scratch free. 3. Discs Do Not Play If discs do not play when inserted in lDE ATA/ATAPI controllers. Try...actions one at a time to another computer. If a device has an exclamation mark, right-click on the device and uninstall and reinstall the driver. Check that the disc is correctly seated in the drive tray and that there are no yellow exclamation marks against the items in the drive...
...visible. 2. c. b. If the device displays a down list. If a device has an exclamation mark, right-click on the device and uninstall and reinstall the driver. Ensure that AutoPlay is clean and scratch free. 3. Discs Do Not Play If discs do not play when inserted in lDE ATA/ATAPI controllers. Try...actions one at a time to another computer. If a device has an exclamation mark, right-click on the device and uninstall and reinstall the driver. Check that the disc is correctly seated in the drive tray and that there are no yellow exclamation marks against the items in the drive...
Service Guide
Page 145
... Restore. Chapter 4 135 Run the Event Viewer to the previous version if updated recently. 11. Roll back the mouse driver to check the events log for errors. Remove and reinstall the mouse driver. 12. Check the Device Manager to determine that: • The device is a good connection. Check Drive whether is listed...
... Restore. Chapter 4 135 Run the Event Viewer to the previous version if updated recently. 11. Roll back the mouse driver to check the events log for errors. Remove and reinstall the mouse driver. 12. Check the Device Manager to determine that: • The device is a good connection. Check Drive whether is listed...

Service Guide
Page 149
... range do the hardware ECC init Report status code of every memory range Get the root bridge handle Notify pci bus driver starts to program the resource Reset the host controller IdeBus begin initialization Simple Text Output Protocol Functions (VGA class reset) Report ... Peripheral removable media enable Report Status Code here for DXE_ENTRY_POINT once it is available Report that ExitBootServices () has been called Runtime driver set virtual address map Each PEIM entry point used in 80_PORT Code 0x00 0x01 0x02 0x03 0x04 0x05 0x06 PEI_EVENT_LOG PEI_OEM_SERVICE PEI_SIO_INIT PEI_MONO_STATUS_CODE...
... range do the hardware ECC init Report status code of every memory range Get the root bridge handle Notify pci bus driver starts to program the resource Reset the host controller IdeBus begin initialization Simple Text Output Protocol Functions (VGA class reset) Report ... Peripheral removable media enable Report Status Code here for DXE_ENTRY_POINT once it is available Report that ExitBootServices () has been called Runtime driver set virtual address map Each PEIM entry point used in 80_PORT Code 0x00 0x01 0x02 0x03 0x04 0x05 0x06 PEI_EVENT_LOG PEI_OEM_SERVICE PEI_SIO_INIT PEI_MONO_STATUS_CODE...

Service Guide
Page 151
Each Driver entry point used in 80_PORT Code 0x30 0x31 0x32 0x33 0x34 0x35 0x36 0x37 0x38 0x39 0x3A 0x3B 0x3C 0x3D 0x3E 0x3F 0x40 0x41 0x42 ...
Each Driver entry point used in 80_PORT Code 0x30 0x31 0x32 0x33 0x34 0x35 0x36 0x37 0x38 0x39 0x3A 0x3B 0x3C 0x3D 0x3E 0x3F 0x40 0x41 0x42 ...


