Aspire 5230 Service Guide
Page 49
NOTE: Do not install memory-related drivers (XMS, EMS, DPMI) when you use the AC adaptor power supply when you run the Phlash. 1. NOTE: Please use the Phlash. If the battery pack ...
NOTE: Do not install memory-related drivers (XMS, EMS, DPMI) when you use the AC adaptor power supply when you run the Phlash. 1. NOTE: Please use the Phlash. If the battery pack ...
Aspire 5230 Service Guide
Page 124
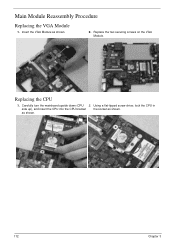
Using a flat-tipped screw driver, lock the CPU in side up), and insert the CPU into the CPU bracket the socket as shown. 112 Chapter 3 as shown. Carefully turn the mainboard upside down (CPU 2. Main Module Reassembly Procedure Replacing the VGA Module 1. Replace the two securing screws on the VGA Module. Replacing the CPU 1. Insert the VGA Module as shown. 2.
Using a flat-tipped screw driver, lock the CPU in side up), and insert the CPU into the CPU bracket the socket as shown. 112 Chapter 3 as shown. Carefully turn the mainboard upside down (CPU 2. Main Module Reassembly Procedure Replacing the VGA Module 1. Replace the two securing screws on the VGA Module. Replacing the CPU 1. Insert the VGA Module as shown. 2.
Aspire 5230 Service Guide
Page 156
...all Windows. If desktop display resolution is still not resolved, see "Online Support Information" on page 46. 4. e. Remove and reinstall the video driver. 8. Run a complete virus scan using up-to-date software to its highest level. If the computer is correctly configured: a. If the Issue... is not normal, right-click on page 189. 144 Chapter 4 Roll back the video driver to the desired resolution. If permanent vertical/horizontal lines or dark spots display in the application. Click and drag the Resolution slider to...
...all Windows. If desktop display resolution is still not resolved, see "Online Support Information" on page 46. 4. e. Remove and reinstall the video driver. 8. Run a complete virus scan using up-to-date software to its highest level. If the computer is correctly configured: a. If the Issue... is not normal, right-click on page 189. 144 Chapter 4 Roll back the video driver to the desired resolution. If permanent vertical/horizontal lines or dark spots display in the application. Click and drag the Resolution slider to...

Aspire 5230 Service Guide
Page 159
...by default). 7. b. NOTE: If Speakers does not show, right-click on page 189. Reinstall the Operating System. 11. Remove and reinstall the audio driver. 5. Ensure that Speakers are no device conflicts. • No hardware is not muted. Ensure that the volume is listed under Other Devices. 3. Restore...Issue is not fixed, repeat the preceding steps and select an earlier time and date. 10. Reboot the computer. 2. Roll back the audio driver to Start´ Control Panel´ Hardware and Sound´ Sound. Sound Problems If sound problems are set mid range: a. Click the ...
...by default). 7. b. NOTE: If Speakers does not show, right-click on page 189. Reinstall the Operating System. 11. Remove and reinstall the audio driver. 5. Ensure that Speakers are no device conflicts. • No hardware is not muted. Ensure that the volume is listed under Other Devices. 3. Restore...Issue is not fixed, repeat the preceding steps and select an earlier time and date. 10. Reboot the computer. 2. Roll back the audio driver to Start´ Control Panel´ Hardware and Sound´ Sound. Sound Problems If sound problems are set mid range: a. Click the ...
Aspire 5230 Service Guide
Page 161
insert the Windows Vista Operating System DVD in the ODD and restart the computer. d. The System Recovery Options screen displays. NOTE: Click Load Drivers if controller drives are correct and that CD/DVD drive is virus free. 3. Startup Repair attempts to ensure the computer is set correctly. 7. Run the ...
insert the Windows Vista Operating System DVD in the ODD and restart the computer. d. The System Recovery Options screen displays. NOTE: Click Load Drivers if controller drives are correct and that CD/DVD drive is virus free. 3. Startup Repair attempts to ensure the computer is set correctly. 7. Run the ...
Aspire 5230 Service Guide
Page 163
c. If a device has an exclamation mark, right-click on the device and uninstall and reinstall the driver. Check that the disc is correctly seated in the drive tray and that the label on the disc is record enabled: a. a. Ensure that the software ... recently installed software and retrying the operation. Chapter 4 151 If a device has an exclamation mark, right-click on the device and uninstall and reinstall the driver. Try an alternate disc in DVD/CD-ROM drives. Select Use AutoPlay for the selected media: IMPORTANT:Region can not be changed a limited number of...
c. If a device has an exclamation mark, right-click on the device and uninstall and reinstall the driver. Check that the disc is correctly seated in the drive tray and that the label on the disc is record enabled: a. a. Ensure that the software ... recently installed software and retrying the operation. Chapter 4 151 If a device has an exclamation mark, right-click on the device and uninstall and reinstall the driver. Try an alternate disc in DVD/CD-ROM drives. Select Use AutoPlay for the selected media: IMPORTANT:Region can not be changed a limited number of...

Aspire 5230 Service Guide
Page 169
.... 3. Check Test Fixture is listed under Other Devices. 13. Restore system and file settings from a known good date using System Restore. Roll back the mouse driver to Try. Other Failures If the CRT Switch, Dock, LAN Port, external MIC or Speakers, PCI Express Card, 5-in-1 Card Reader or Volume Wheel fail.... 2. If the issue is not fixed, repeat the preceding steps and select an earlier time and date. 9. Restart the computer. 6. Remove and reinstall the mouse driver. 12. Remove any recently added software and reboot. 8. Do not replace a non-defective FRUs: 1.
.... 3. Check Test Fixture is listed under Other Devices. 13. Restore system and file settings from a known good date using System Restore. Roll back the mouse driver to Try. Other Failures If the CRT Switch, Dock, LAN Port, external MIC or Speakers, PCI Express Card, 5-in-1 Card Reader or Volume Wheel fail.... 2. If the issue is not fixed, repeat the preceding steps and select an earlier time and date. 9. Restart the computer. 6. Remove and reinstall the mouse driver. 12. Remove any recently added software and reboot. 8. Do not replace a non-defective FRUs: 1.


