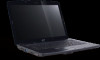
Aspire 5230 Service Guide
Page 7
... 1 Features 1 System Block Diagram 4 Your Acer Notebook tour 5 Front View 5 Closed Front View 6 Left View 7 Right View 8 Rear View 8 Bottom View 9 Indicators 10 Easy-Launch Buttons 10 Touchpad Basics (with fingerprint reader 11 Using the Keyboard 12 Lock Keys and embedded numeric keypad 12 ...Windows Keys 13 Hot Keys 14 Special Key 15 Using the System Utilities 16 Acer GridVista (dual-display compatible 16 Launch Manager 17 Hardware Specifications ...
... 1 Features 1 System Block Diagram 4 Your Acer Notebook tour 5 Front View 5 Closed Front View 6 Left View 7 Right View 8 Rear View 8 Bottom View 9 Indicators 10 Easy-Launch Buttons 10 Touchpad Basics (with fingerprint reader 11 Using the Keyboard 12 Lock Keys and embedded numeric keypad 12 ...Windows Keys 13 Hot Keys 14 Special Key 15 Using the System Utilities 16 Acer GridVista (dual-display compatible 16 Launch Manager 17 Hardware Specifications ...
Aspire 5230 Service Guide
Page 8
... Module 58 Removing the Optical Drive Module 60 Main Unit Disassembly Process 62 Main Unit Disassembly Flowchart 62 Removing the Switch Cover 63 Removing the Keyboard 64 Removing the Antenna 65 Removing the LCD Module 67 Removing the Upper Cover 69 Removing the Finger Print Reader 74 Removing the Upper Right...
... Module 58 Removing the Optical Drive Module 60 Main Unit Disassembly Process 62 Main Unit Disassembly Flowchart 62 Removing the Switch Cover 63 Removing the Keyboard 64 Removing the Antenna 65 Removing the LCD Module 67 Removing the Upper Cover 69 Removing the Finger Print Reader 74 Removing the Upper Right...
Aspire 5230 Service Guide
Page 9
...Replacing the Left Speaker Module 127 Replacing the LCD Module 129 Replacing the Antenna Cables 131 Replacing the Keyboard 132 Replacing the Switch Cover 132 Replacing the TV Tuner Module 132 Replacing the WLAN Module 135 ...On Issue 142 No Display Issue 143 Random Loss of BIOS Settings 144 LCD Failure 145 Built-In Keyboard Failure 145 Touchpad Failure 146 Internal Speaker Failure 146 Internal Microphone Failure 148 HDD Not Operating Correctly 149 ...Recovery by Crisis Disk 166 FRU (Field Replaceable Unit) List 169 Aspire 5530 Exploded Diagram 170 Aspire 5530 FRU List 171 IX
...Replacing the Left Speaker Module 127 Replacing the LCD Module 129 Replacing the Antenna Cables 131 Replacing the Keyboard 132 Replacing the Switch Cover 132 Replacing the TV Tuner Module 132 Replacing the WLAN Module 135 ...On Issue 142 No Display Issue 143 Random Loss of BIOS Settings 144 LCD Failure 145 Built-In Keyboard Failure 145 Touchpad Failure 146 Internal Speaker Failure 146 Internal Microphone Failure 148 HDD Not Operating Correctly 149 ...Recovery by Crisis Disk 166 FRU (Field Replaceable Unit) List 169 Aspire 5530 Exploded Diagram 170 Aspire 5530 FRU List 171 IX
Aspire 5230 Service Guide
Page 12
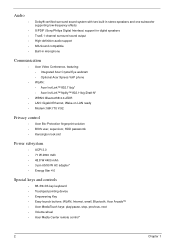
...WPAN: Bluetooth® 2.0+EDR • LAN: Gigabit Ethernet, Wake-on-LAN ready • Modem: 56K ITU V.92 Privacy control • Acer Bio-Protection fingerprint solution • BIOS user, supervisor, HDD passwords • Kensington lock slot Power subsystem • ACPI 3.0 • 71 ...; Energy Star 4.0 Special keys and controls • 88-/89-/93-key keyboard • Touchpad pointing device • Empowering Key • Easy-launch buttons: WLAN, Internet, email, Bluetooth, Acer Arcade™ • Acer MediaTouch keys: play/pause, stop, previous, next • Volume wheel •...
...WPAN: Bluetooth® 2.0+EDR • LAN: Gigabit Ethernet, Wake-on-LAN ready • Modem: 56K ITU V.92 Privacy control • Acer Bio-Protection fingerprint solution • BIOS user, supervisor, HDD passwords • Kensington lock slot Power subsystem • ACPI 3.0 • 71 ...; Energy Star 4.0 Special keys and controls • 88-/89-/93-key keyboard • Touchpad pointing device • Empowering Key • Easy-launch buttons: WLAN, Internet, email, Bluetooth, Acer Arcade™ • Acer MediaTouch keys: play/pause, stop, previous, next • Volume wheel •...
Aspire 5230 Service Guide
Page 15
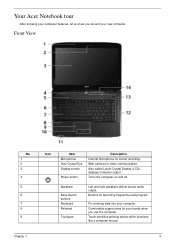
...used program. Touch-sensitive pointing device which functions like a computer mouse. 5 Turns the computer on and off. Speakers Easy-launch buttons Keyboard Palmrest Touchpad Left and right speakers deliver stereo audio output. For entering data into your computer. Front View No. 1 2 3 4 5 6 7... 8 9 Chapter 1 Icon Item Microphone Acer Crystal Eye Display screen Power button Description Internal microphone for video communication. Web camera for sound recording. Buttons for your hands when you ...
...used program. Touch-sensitive pointing device which functions like a computer mouse. 5 Turns the computer on and off. Speakers Easy-launch buttons Keyboard Palmrest Touchpad Left and right speakers deliver stereo audio output. For entering data into your computer. Front View No. 1 2 3 4 5 6 7... 8 9 Chapter 1 Icon Item Microphone Acer Crystal Eye Display screen Power button Description Internal microphone for video communication. Web camera for sound recording. Buttons for your hands when you ...
Aspire 5230 Service Guide
Page 20
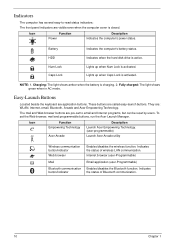
Easy-Launch Buttons Located beside the keyboard are pre-set the Web browser, mail and programmable buttons, run the Acer Launch Manager. The mail and Web browser buttons are application buttons. Indicates the status of .... NOTE: 1. These buttons are : WLAN, Internet, email, Bluetooth, Arcade and Acer Empowering Technology. Icon Function Empowering Technology Acer Arcade Description Launch Acer Empowering Technology. (user-programmable) Launch Acer Arcade utility Wireless communication button/indicator Web browser Mail Bluetooth communication button/indicator Enables/disables ...
Easy-Launch Buttons Located beside the keyboard are pre-set the Web browser, mail and programmable buttons, run the Acer Launch Manager. The mail and Web browser buttons are application buttons. Indicates the status of .... NOTE: 1. These buttons are : WLAN, Internet, email, Bluetooth, Arcade and Acer Empowering Technology. Icon Function Empowering Technology Acer Arcade Description Launch Acer Empowering Technology. (user-programmable) Launch Acer Arcade utility Wireless communication button/indicator Web browser Mail Bluetooth communication button/indicator Enables/disables ...
Aspire 5230 Service Guide
Page 22
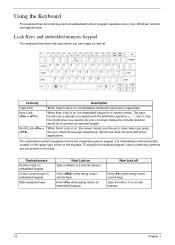
... keypad. The embedded numeric keypad functions like a desktop numeric keypad. Desired access Number keys on embedded keypad Cursor-control keys on embedded keypad Main keyboard keys Num Lock on the upper right corner of numeric data entry. Type the letters in a normal manner. The keys function as a calculator ...sized keys and an embedded numeric keypad, separate cursor, lock, Windows, function and special keys. Lock Keys and embedded numeric keypad The keyboard has three lock keys which you press the up or down when you can toggle on the keys. Scroll Lock does not work with...
... keypad. The embedded numeric keypad functions like a desktop numeric keypad. Desired access Number keys on embedded keypad Cursor-control keys on embedded keypad Main keyboard keys Num Lock on the upper right corner of numeric data entry. Type the letters in a normal manner. The keys function as a calculator ...sized keys and an embedded numeric keypad, separate cursor, lock, Windows, function and special keys. Lock Keys and embedded numeric keypad The keyboard has three lock keys which you press the up or down when you can toggle on the keys. Scroll Lock does not work with...

Aspire 5230 Service Guide
Page 23
... taskbar < > + : Open Ease of Windows Vista, some shortcuts may not function as clicking the right mouse button; it launches the Start menu. Windows Keys The keyboard has two keys that perform Windows-specific functions. Key Description Windows key Pressed alone, this key has the same effect as clicking on your edition...
... taskbar < > + : Open Ease of Windows Vista, some shortcuts may not function as clicking the right mouse button; it launches the Start menu. Windows Keys The keyboard has two keys that perform Windows-specific functions. Key Description Windows key Pressed alone, this key has the same effect as clicking on your edition...
Aspire 5230 Service Guide
Page 25
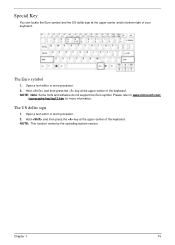
... refer to www.microsoft.com/ typography/faq/faq12.htm for more information. Hold and then press the key at the upper-center of your keyboard. The Euro symbol 1. The US dollar sign 1. NOTE: This function varies by the operating system version. Open a text editor or word processor. 2. NOTE: Note: Some ... word processor. 2. Special Key You can locate the Euro symbol and the US dollar sign at the upper-center and/or bottom-right of the keyboard.
... refer to www.microsoft.com/ typography/faq/faq12.htm for more information. Hold and then press the key at the upper-center of your keyboard. The Euro symbol 1. The US dollar sign 1. NOTE: This function varies by the operating system version. Open a text editor or word processor. 2. NOTE: Note: Some ... word processor. 2. Special Key You can locate the Euro symbol and the US dollar sign at the upper-center and/or bottom-right of the keyboard.

Aspire 5230 Service Guide
Page 27
...drop each display from the task bar. 2. Double (vertical), Triple (primary at left), Triple (primary at right), or Quad Acer Gridvista is dual-display compatible, allowing two displays to be partitioned independently. AcerGridVista is set to set the four easy-launch buttons... located above the keyboard. Run Acer GridVista and select your preferred screen configuration for each window into the appropriate grid. 3. NOTE: Please ensure that the resolution...
...drop each display from the task bar. 2. Double (vertical), Triple (primary at left), Triple (primary at right), or Quad Acer Gridvista is dual-display compatible, allowing two displays to be partitioned independently. AcerGridVista is set to set the four easy-launch buttons... located above the keyboard. Run Acer GridVista and select your preferred screen configuration for each window into the appropriate grid. 3. NOTE: Please ensure that the resolution...
Aspire 5230 Service Guide
Page 28
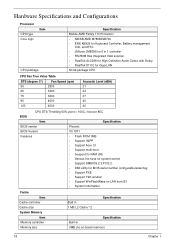
...Processor CPU type Core logic Item CPU package Specification Mobile AMD Family 11h Processor • NB/SB AMD M780M/SB700 • ENE KB926 for Keyboard Controller, Battery management Unit, and RTC. • JMicron JMB385 for 5 in 1 controller • RS780M Has Integrated VGA solution •... = 100C; /recover 85C Item Specification BIOS vendor Phoenix BIOS Version V0.19T1 Features • Flash ROM 1MB • Support ISIPP • Support Acer UI • Support multi-boot • Suspend to RAM (S3) • Various hot-keys for system control • Support SMBIOS 2.3,PCI2.2. ...
...Processor CPU type Core logic Item CPU package Specification Mobile AMD Family 11h Processor • NB/SB AMD M780M/SB700 • ENE KB926 for Keyboard Controller, Battery management Unit, and RTC. • JMicron JMB385 for 5 in 1 controller • RS780M Has Integrated VGA solution •... = 100C; /recover 85C Item Specification BIOS vendor Phoenix BIOS Version V0.19T1 Features • Flash ROM 1MB • Support ISIPP • Support Acer UI • Support multi-boot • Suspend to RAM (S3) • Various hot-keys for system control • Support SMBIOS 2.3,PCI2.2. ...
Aspire 5230 Service Guide
Page 33
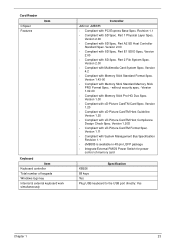
...available in 48-pin LQFP package • Integrate External PMOS Power Switch for power control of keypads Windows logo key Internal & external keyboard work simultaneously Controller JMicron JMB385 • Compliant with xD-Picture CardTM Host Compliance Design Check Spec. Version 2.00 • Compliant with...Spec. Version 1.20D • Compliant with SD Spec. Card Reader Chipset Features Item Keyboard Item Keyboard controller Total number of memory card Specification KB926 88 keys Yes Plug USB keyboard to the USB port directly: Yes Chapter 1 23 Part E1 SDIO Spec. Part A2...
...available in 48-pin LQFP package • Integrate External PMOS Power Switch for power control of keypads Windows logo key Internal & external keyboard work simultaneously Controller JMicron JMB385 • Compliant with xD-Picture CardTM Host Compliance Design Check Spec. Version 2.00 • Compliant with...Spec. Version 1.20D • Compliant with SD Spec. Card Reader Chipset Features Item Keyboard Item Keyboard controller Total number of memory card Specification KB926 88 keys Yes Plug USB keyboard to the USB port directly: Yes Chapter 1 23 Part E1 SDIO Spec. Part A2...
Aspire 5230 Service Guide
Page 58
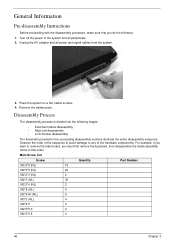
General Information Pre-disassembly Instructions Before proceeding with the disassembly procedure, make sure that you must first remove the keyboard, then disassemble the inside assembly frame in the succeeding disassembly sections illustrate the entire disassembly sequence. Remove the battery pack. Disassembly Process The disassembly process ...
General Information Pre-disassembly Instructions Before proceeding with the disassembly procedure, make sure that you must first remove the keyboard, then disassemble the inside assembly frame in the succeeding disassembly sections illustrate the entire disassembly sequence. Remove the battery pack. Disassembly Process The disassembly process ...
Aspire 5230 Service Guide
Page 59
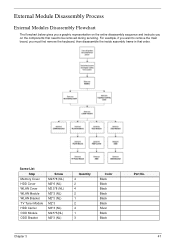
... Disassembly Process External Modules Disassembly Flowchart The flowchart below gives you a graphic representation on the entire disassembly sequence and instructs you must first remove the keyboard, then disassemble the inside assembly frame in that need to remove the main board, you on the components that order.
... Disassembly Process External Modules Disassembly Flowchart The flowchart below gives you a graphic representation on the entire disassembly sequence and instructs you must first remove the keyboard, then disassemble the inside assembly frame in that need to remove the main board, you on the components that order.

Aspire 5230 Service Guide
Page 77
Turn the keyboard over and pull back the securing latch to the upper case. 3. See "Removing the Battery Pack" on the two latches securing the keyboard to release the FFC. Chapter 3 65 Push down on page 48.. 2. Removing the Keyboard 1.
Turn the keyboard over and pull back the securing latch to the upper case. 3. See "Removing the Battery Pack" on the two latches securing the keyboard to release the FFC. Chapter 3 65 Push down on page 48.. 2. Removing the Keyboard 1.
Aspire 5230 Service Guide
Page 102
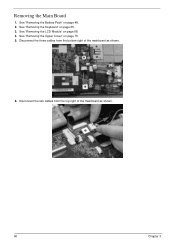
See "Removing the Upper Cover" on page 65. 3. See "Removing the Keyboard" on page 70. 5. Disconnect the two cables from the bottom right of the mainboard as shown. 6. See "Removing the LCD Module" on page 48. 2. Removing the Main Board 1. Disconnect the three cables from the top right of the mainboard as shown. 90 Chapter 3 See "Removing the Battery Pack" on page 68. 4.
See "Removing the Upper Cover" on page 65. 3. See "Removing the Keyboard" on page 70. 5. Disconnect the two cables from the bottom right of the mainboard as shown. 6. See "Removing the LCD Module" on page 48. 2. Removing the Main Board 1. Disconnect the three cables from the top right of the mainboard as shown. 90 Chapter 3 See "Removing the Battery Pack" on page 68. 4.
Aspire 5230 Service Guide
Page 113
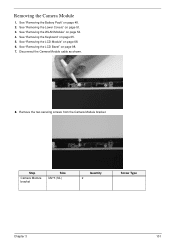
See "Removing the Battery Pack" on page 65. 5. See "Removing the Keyboard" on page 48. 2. Step Camera Module bracket Size M2*3 (NL) Quantity 2 Screw Type Chapter 3 101 Removing the Camera Module 1. See "Removing the Lower Covers" on page 54. 4. Remove the two securing screws from the Camera Module bracket. Disconnect the Camera Module cable as shown. 8. See "Removing the WLAN Module" on page 51. 3. See "Removing the LCD Bezel" on page 68. 6. See "Removing the LCD Module" on page 98. 7.
See "Removing the Battery Pack" on page 65. 5. See "Removing the Keyboard" on page 48. 2. Step Camera Module bracket Size M2*3 (NL) Quantity 2 Screw Type Chapter 3 101 Removing the Camera Module 1. See "Removing the Lower Covers" on page 54. 4. Remove the two securing screws from the Camera Module bracket. Disconnect the Camera Module cable as shown. 8. See "Removing the WLAN Module" on page 51. 3. See "Removing the LCD Bezel" on page 68. 6. See "Removing the LCD Module" on page 98. 7.
Aspire 5230 Service Guide
Page 115
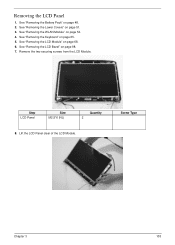
See "Removing the Keyboard" on page 98. 7. See "Removing the LCD Bezel" on page 65. 5. Lift the LCD Panel clear of the LCD Module. See "Removing the Lower Covers" on page 54. 4. See "Removing the WLAN Module" on page 51. 3. Screw Type Chapter 3 103 Remove the two securing screws from the LCD Module. Step LCD Panel Size M2.5*6 (NL) Quantity 2 8. Removing the LCD Panel 1. See "Removing the Battery Pack" on page 68. 6. See "Removing the LCD Module" on page 48. 2.
See "Removing the Keyboard" on page 98. 7. See "Removing the LCD Bezel" on page 65. 5. Lift the LCD Panel clear of the LCD Module. See "Removing the Lower Covers" on page 54. 4. See "Removing the WLAN Module" on page 51. 3. Screw Type Chapter 3 103 Remove the two securing screws from the LCD Module. Step LCD Panel Size M2.5*6 (NL) Quantity 2 8. Removing the LCD Panel 1. See "Removing the Battery Pack" on page 68. 6. See "Removing the LCD Module" on page 48. 2.
Aspire 5230 Service Guide
Page 116
See "Removing the Keyboard" on page 51. 3. Disconnect the cable from the LCD Panel. Screw Type 104 Chapter 3 See "Removing the Lower Covers" on page 65. 5. Remove the LCD ...
See "Removing the Keyboard" on page 51. 3. Disconnect the cable from the LCD Panel. Screw Type 104 Chapter 3 See "Removing the Lower Covers" on page 65. 5. Remove the LCD ...
Aspire 5230 Service Guide
Page 144
Replacing the Keyboard 1. Insert the left , press down to secure. 3. Turn the computer over and press down on the Switch Cover to secure. Starting from the left side of the switch cover and angle down to secure. 2. Replacing the Switch Cover 1. Turn the keyboard over and replace the three securing screws. 132 Chapter 3 Align the FFC with the connector and press the latch down in place. 2.
Replacing the Keyboard 1. Insert the left , press down to secure. 3. Turn the computer over and press down on the Switch Cover to secure. Starting from the left side of the switch cover and angle down to secure. 2. Replacing the Switch Cover 1. Turn the keyboard over and replace the three securing screws. 132 Chapter 3 Align the FFC with the connector and press the latch down in place. 2.


