

Aspire 4560 Service Guide
Page 5
... Memory 1-5 Display 1-5 Graphics 1-5 Storage Subsystem 1-6 Audio Subsystem 1-6 Communication 1-7 Privacy Control 1-7 Power Adapter and Battery 1-7 Keyboard and Pointing Device 1-8 I/O Ports 1-8 Software and Tools 1-8 Optional Items 1-10 Warranty 1-10 Dimensions and Weight 1-10 Environment 1-10 Notebook Tour 1-11 Open Front View 1-11 Close Front View 1-13 Left View 1-14 Right View 1-15 Base View 1-16 Indicators 1-17 Touchpad Basics 1-18 Keyboard 1-18 Hotkeys 1-21 Special Keys 1-22 Specification Tables 1-25 CHAPTER 2 System Utilities BIOS Setup Utility...
... Memory 1-5 Display 1-5 Graphics 1-5 Storage Subsystem 1-6 Audio Subsystem 1-6 Communication 1-7 Privacy Control 1-7 Power Adapter and Battery 1-7 Keyboard and Pointing Device 1-8 I/O Ports 1-8 Software and Tools 1-8 Optional Items 1-10 Warranty 1-10 Dimensions and Weight 1-10 Environment 1-10 Notebook Tour 1-11 Open Front View 1-11 Close Front View 1-13 Left View 1-14 Right View 1-15 Base View 1-16 Indicators 1-17 Touchpad Basics 1-18 Keyboard 1-18 Hotkeys 1-21 Special Keys 1-22 Specification Tables 1-25 CHAPTER 2 System Utilities BIOS Setup Utility...

Aspire 4560 Service Guide
Page 6
...Flash Utility 2-12 WinFlash Utility 2-12 Remove HDD/BIOS Password Utilities 2-13 Removing the HDD Password 2-13 Removing the BIOS Passwords 2-14 Clearing the BIOS Passwords 2-15 Using DMI Tools 2-16 LAN EEPROM Utility 2-16 CHAPTER 3 Machine Maintenance Machine Disassembly and Replacement 3-5 Recommended Equipment 3-5 Replacement Requirements 3-5 Pre-disassembly Instructions 3-6 Disassembly Process 3-7 External Module Disassembly Process 3-8 External Modules Disassembly Flowchart 3-8 Removing the Battery Pack 3-9 Remove the Dummy Card 3-10 Removing the ODD Module 3-11 Removing...
...Flash Utility 2-12 WinFlash Utility 2-12 Remove HDD/BIOS Password Utilities 2-13 Removing the HDD Password 2-13 Removing the BIOS Passwords 2-14 Clearing the BIOS Passwords 2-15 Using DMI Tools 2-16 LAN EEPROM Utility 2-16 CHAPTER 3 Machine Maintenance Machine Disassembly and Replacement 3-5 Recommended Equipment 3-5 Replacement Requirements 3-5 Pre-disassembly Instructions 3-6 Disassembly Process 3-7 External Module Disassembly Process 3-8 External Modules Disassembly Flowchart 3-8 Removing the Battery Pack 3-9 Remove the Dummy Card 3-10 Removing the ODD Module 3-11 Removing...

Aspire 4560 Service Guide
Page 12
Features 1-5 Operating System 1-5 Platform 1-5 System Memory 1-5 Display 1-5 Graphics 1-5 Storage Subsystem 1-6 Audio Subsystem 1-6 Communication 1-7 Privacy Control 1-7 Power Adapter and Battery 1-7 Keyboard and Pointing Device 1-8 I/O Ports 1-8 Software and Tools 1-8 Optional Items 1-10 Warranty 1-10 Dimensions and Weight 1-10 Environment 1-10 Notebook Tour 1-11 Open Front View 1-11 Close Front View 1-13 Left View 1-14 Right View 1-15 Base View 1-16 Indicators 1-17 Touchpad Basics 1-18 Keyboard 1-18 Hotkeys 1-21 Special Keys 1-22 Specification Tables...
Features 1-5 Operating System 1-5 Platform 1-5 System Memory 1-5 Display 1-5 Graphics 1-5 Storage Subsystem 1-6 Audio Subsystem 1-6 Communication 1-7 Privacy Control 1-7 Power Adapter and Battery 1-7 Keyboard and Pointing Device 1-8 I/O Ports 1-8 Software and Tools 1-8 Optional Items 1-10 Warranty 1-10 Dimensions and Weight 1-10 Environment 1-10 Notebook Tour 1-11 Open Front View 1-11 Close Front View 1-13 Left View 1-14 Right View 1-15 Base View 1-16 Indicators 1-17 Touchpad Basics 1-18 Keyboard 1-18 Hotkeys 1-21 Special Keys 1-22 Specification Tables...

Aspire 4560 Service Guide
Page 15
...;Two DIMM slots supports DDR3 1066/1333/1600 SO-DIMM 8 GB maximum memory capacity (using two 4 GB modules) Display 0 14-inch High Definition WXGA TFT LCD 1366×768 resolution, 16:9 aspect ratio 16.7 million colors, 220-nit brightness LED backlight, mercury-free, environment-friendly Graphics 0 Graphics controller: ...
...;Two DIMM slots supports DDR3 1066/1333/1600 SO-DIMM 8 GB maximum memory capacity (using two 4 GB modules) Display 0 14-inch High Definition WXGA TFT LCD 1366×768 resolution, 16:9 aspect ratio 16.7 million colors, 220-nit brightness LED backlight, mercury-free, environment-friendly Graphics 0 Graphics controller: ...

Aspire 4560 Service Guide
Page 18
...;Hotkeys for volume and brightness level, media playback, wireless and sleep functions, and display and touchpad toggle Windows® and Application keys Multilanguage support Touchpad 0 Multi-gesture touchpad pointing device, supporting two-finger scroll, pinch, rotate, and flip Touchpad lock hotkey Adjustable touchpad sensitivity function I/O Ports 0 Two USB 2.0 and one USB 2.0/3.0 ports HDMI® port External display (VGA) port Headphone-in jack...
...;Hotkeys for volume and brightness level, media playback, wireless and sleep functions, and display and touchpad toggle Windows® and Application keys Multilanguage support Touchpad 0 Multi-gesture touchpad pointing device, supporting two-finger scroll, pinch, rotate, and flip Touchpad lock hotkey Adjustable touchpad sensitivity function I/O Ports 0 Two USB 2.0 and one USB 2.0/3.0 ports HDMI® port External display (VGA) port Headphone-in jack...

Aspire 4560 Service Guide
Page 21
Hardware Specifications and Configurations 1-11 Open Front View No. 1 2 3 Icon Item Integrated webcam Display screen Power button Description Web camera for video communication (only for certain model). Also called Liquid-Crystal Display (LCD), displays computer output (Configuration may vary by models). Turns the computer on and off. 4 Keyboard For entering data into your computer. 5 Touchpad Touch-sensitive pointing device which functions like a computer mouse. Notebook Tour 0 This section provides an overview of the features and functions of the...
Hardware Specifications and Configurations 1-11 Open Front View No. 1 2 3 Icon Item Integrated webcam Display screen Power button Description Web camera for video communication (only for certain model). Also called Liquid-Crystal Display (LCD), displays computer output (Configuration may vary by models). Turns the computer on and off. 4 Keyboard For entering data into your computer. 5 Touchpad Touch-sensitive pointing device which functions like a computer mouse. Notebook Tour 0 This section provides an overview of the features and functions of the...
Aspire 4560 Service Guide
Page 22
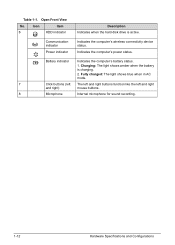
... Item 6 HDD indicator Description Indicates when the hard disk drive is charging. 2. Table 1-1. Communication indicator Power indicator Indicates the computer's wireless connectivity device status. Indicates the computer's power status. Fully charged: The light shows blue when in AC mode. 7 Click buttons (left The left and right buttons function like the left and right and right) mouse buttons. 8 Microphone Internal microphone for sound recording. 1-12 Hardware Specifications and Configurations Battery indicator Indicates the computer's battery status. 1. Open Front View...
... Item 6 HDD indicator Description Indicates when the hard disk drive is charging. 2. Table 1-1. Communication indicator Power indicator Indicates the computer's wireless connectivity device status. Indicates the computer's power status. Fully charged: The light shows blue when in AC mode. 7 Click buttons (left The left and right buttons function like the left and right and right) mouse buttons. 8 Microphone Internal microphone for sound recording. 1-12 Hardware Specifications and Configurations Battery indicator Indicates the computer's battery status. 1. Open Front View...
Aspire 4560 Service Guide
Page 23
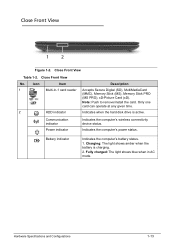
...-in AC mode. Indicates when the hard disk drive is charging. 2. Battery indicator Indicates the computer's battery status. 1. Charging: The light shows amber when the battery is active. Note: Push to remove/install the card. Close Front View Table 1-2. Hardware Specifications and Configurations 1-13 Fully charged: The light shows blue when in -1 card reader 2 HDD indicator Description Accepts Secure Digital (SD), MultiMediaCard (MMC), Memory Stick (MS), Memory Stick PRO (MS PRO), xD-Picture Card (xD). Only one card can operate at any given...
...-in AC mode. Indicates when the hard disk drive is charging. 2. Battery indicator Indicates the computer's battery status. 1. Charging: The light shows amber when the battery is active. Note: Push to remove/install the card. Close Front View Table 1-2. Hardware Specifications and Configurations 1-13 Fully charged: The light shows blue when in -1 card reader 2 HDD indicator Description Accepts Secure Digital (SD), MultiMediaCard (MMC), Memory Stick (MS), Memory Stick PRO (MS PRO), xD-Picture Card (xD). Only one card can operate at any given...
Aspire 4560 Service Guide
Page 24
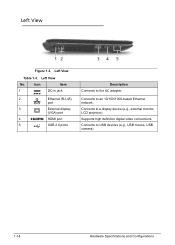
Left View Table 1-3. Left View No. Connects to USB devices (e.g., USB mouse, USB camera). 1-14 Hardware Specifications and Configurations Connects to a display device (e.g., external monitor, LCD projector). Connects to the AC adapter. Icon Item 1 DC-in jack 2 Ethernet (RJ-45) port 3 External display (VGA) port 4 HDMI port 5 USB 2.0 ports 34 5 Description Connects to an 10/100/1000-based Ethernet network. Supports high definition digital video connections. Left View 0 12 Figure 1-3.
Left View Table 1-3. Left View No. Connects to USB devices (e.g., USB mouse, USB camera). 1-14 Hardware Specifications and Configurations Connects to a display device (e.g., external monitor, LCD projector). Connects to the AC adapter. Icon Item 1 DC-in jack 2 Ethernet (RJ-45) port 3 External display (VGA) port 4 HDMI port 5 USB 2.0 ports 34 5 Description Connects to an 10/100/1000-based Ethernet network. Supports high definition digital video connections. Left View 0 12 Figure 1-3.

Aspire 4560 Service Guide
Page 25
... . Insert the lock into the notch and turn the key to audio line-out devices (e.g., speakers, headphone). Right View No. 1 Icon Item Headphones/speaker /line-out jack Microphone jack Description Connects to secure the lock. accepts CDs or DVDs. 4 ODD access indicator Lights up when the optical drive is active. 5 ODD eject button Ejects the optical disc from an external microphone. 2 USB 2.0/3.0* port Connects to a Kensington-compatible computer security lock. Some keyless models are also...
... . Insert the lock into the notch and turn the key to audio line-out devices (e.g., speakers, headphone). Right View No. 1 Icon Item Headphones/speaker /line-out jack Microphone jack Description Connects to secure the lock. accepts CDs or DVDs. 4 ODD access indicator Lights up when the optical drive is active. 5 ODD eject button Ejects the optical disc from an external microphone. 2 USB 2.0/3.0* port Connects to a Kensington-compatible computer security lock. Some keyless models are also...

Aspire 4560 Service Guide
Page 30
Figure 1-10. it opens the application's context menu. 1-20 Hardware Specifications and Configurations Windows-specific Keys Key Windows Logo key Application key Description Pressed alone, this key has the same effect as clicking the right mouse button; Functions supported by Windows XP: +Break: Display the System Properties dialog box +U: Open the Ease of functions. Windows-specific Keys Table 1-9. Windows Keys 0 The keyboard has two keys that perform Windows-specific functions. It can also be used with other keys to items on the...
Figure 1-10. it opens the application's context menu. 1-20 Hardware Specifications and Configurations Windows-specific Keys Key Windows Logo key Application key Description Pressed alone, this key has the same effect as clicking the right mouse button; Functions supported by Windows XP: +Break: Display the System Properties dialog box +U: Open the Ease of functions. Windows-specific Keys Table 1-9. Windows Keys 0 The keyboard has two keys that perform Windows-specific functions. It can also be used with other keys to items on the...

Aspire 4560 Service Guide
Page 39
... 2.1 BIOS Boot specification v1.01 Simple boot flag specification v2.1 System management bus specification v2.0 AHCI support Microsoft XP/Vista/Windows 7 logo program Microsoft SLP 1.0 support Microsoft OA 2.0 and 2.1 support Keyboard Item Specification Type AC4T flat keyboard Total number of keys 88 keys Windows logo key Yes Internal and external USB Yes keyboard work simultaneously? System BIOS Item BIOS vendor BIOS version BIOS ROM type BIOS ROM size Protocols supported Specification Phoenix v1.07 Hardware 4 MB...
... 2.1 BIOS Boot specification v1.01 Simple boot flag specification v2.1 System management bus specification v2.0 AHCI support Microsoft XP/Vista/Windows 7 logo program Microsoft SLP 1.0 support Microsoft OA 2.0 and 2.1 support Keyboard Item Specification Type AC4T flat keyboard Total number of keys 88 keys Windows logo key Yes Internal and external USB Yes keyboard work simultaneously? System BIOS Item BIOS vendor BIOS version BIOS ROM type BIOS ROM size Protocols supported Specification Phoenix v1.07 Hardware 4 MB...

Aspire 4560 Service Guide
Page 53
... of the screen before making changes to Enabled. The utility is pre-configured and optimized so most users do not need to be change the boot device without entering the BIOS Setup Utility, set the parameter to the parameter values. If configuration problems occur, the setup utility may need to select an item in the menu screen or in square brackets [ ] can vary depending on the bottom of the F12 Boot Menu is a hardware configuration program built...
... of the screen before making changes to Enabled. The utility is pre-configured and optimized so most users do not need to be change the boot device without entering the BIOS Setup Utility, set the parameter to the parameter values. If configuration problems occur, the setup utility may need to select an item in the menu screen or in square brackets [ ] can vary depending on the bottom of the F12 Boot Menu is a hardware configuration program built...
Aspire 4560 Service Guide
Page 68
... External Module Disassembly Process 3-8 External Modules Disassembly Flowchart 3-8 Removing the Battery Pack 3-9 Remove the Dummy Card 3-10 Removing the ODD Module 3-11 Removing the Base Door 3-13 Removing the HDD Module 3-14 Removing the WLAN Module 3-16 Removing the Memory Modules 3-17 Main Unit Disassembly Process 3-19 Main Unit Disassembly Flowchart 3-19 Removing the Keyboard 3-20 Removing the Palmrest Module/Upper Cover 3-23 Removing the Speakers 3-27 Removing the Power Button Board 3-29 Removing the Touchpad Board 3-31 Removing the USB Board 3-33 Removing the Bluetooth...
... External Module Disassembly Process 3-8 External Modules Disassembly Flowchart 3-8 Removing the Battery Pack 3-9 Remove the Dummy Card 3-10 Removing the ODD Module 3-11 Removing the Base Door 3-13 Removing the HDD Module 3-14 Removing the WLAN Module 3-16 Removing the Memory Modules 3-17 Main Unit Disassembly Process 3-19 Main Unit Disassembly Flowchart 3-19 Removing the Keyboard 3-20 Removing the Palmrest Module/Upper Cover 3-23 Removing the Speakers 3-27 Removing the Power Button Board 3-29 Removing the Touchpad Board 3-31 Removing the USB Board 3-33 Removing the Bluetooth...

Aspire 4560 Service Guide
Page 165
... about troubleshooting common problems associated with the computer. Troubleshooting Introduction 0 This chapter contains information about the problem. 2. Non-Acer products, prototype cards, or modified options can give false errors and invalid system responses. 1. Common Problems Symptoms (Verified) Power On Issues No Display Issues LCD Failure Keyboard Failure Touchpad Failure Internal Speaker Failure Microphone Failure USB Failure WLAN Failure Bluetooth Failure Card Reader Failure Thermal Unit Failure Other Functions Failure Intermittent Problems Undetermined Problems 4.
... about troubleshooting common problems associated with the computer. Troubleshooting Introduction 0 This chapter contains information about the problem. 2. Non-Acer products, prototype cards, or modified options can give false errors and invalid system responses. 1. Common Problems Symptoms (Verified) Power On Issues No Display Issues LCD Failure Keyboard Failure Touchpad Failure Internal Speaker Failure Microphone Failure USB Failure WLAN Failure Bluetooth Failure Card Reader Failure Thermal Unit Failure Other Functions Failure Intermittent Problems Undetermined Problems 4.
Aspire 4560 Service Guide
Page 168
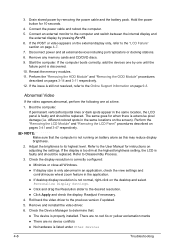
... and switch between the internal display and the external display by one at the highest brightness setting, the LCD is too dim at a time. 1. If the display is faulty and should be replaced. Roll back the video driver to its highest level. Connect the power cable and reboot the computer. 5. Perform the "Removing the HDD Module" and "Removing the ODD Module" procedures described on the screen). different colored spots in the same locations...
... and switch between the internal display and the external display by one at the highest brightness setting, the LCD is too dim at a time. 1. If the display is faulty and should be replaced. Roll back the video driver to its highest level. Connect the power cable and reboot the computer. 5. Perform the "Removing the HDD Module" and "Removing the ODD Module" procedures described on the screen). different colored spots in the same locations...
Aspire 4560 Service Guide
Page 181
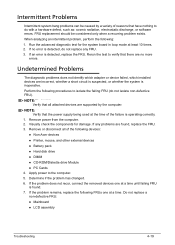
...;Non-Acer devices Printer, mouse, and other external devices Battery pack Hard disk drive DIMM CD-ROM/Diskette drive Module PC Cards 4. Remove power from the computer. 2. Apply power to isolate the failing FRU (do with a hardware defect, such as: cosmic radiation, electrostatic discharge, or software errors. Determine if the problem has changed. 6. If the problem remains, replace the following...
...;Non-Acer devices Printer, mouse, and other external devices Battery pack Hard disk drive DIMM CD-ROM/Diskette drive Module PC Cards 4. Remove power from the computer. 2. Apply power to isolate the failing FRU (do with a hardware defect, such as: cosmic radiation, electrostatic discharge, or software errors. Determine if the problem has changed. 6. If the problem remains, replace the following...
Aspire 4560 Service Guide
Page 184
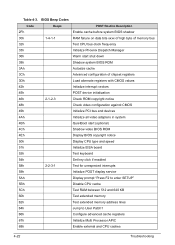
... ROM copyright notice 48h Check video configuration against CMOS 49h Initialize PCI bus and devices 4Ah Initialize all video adapters in system 4Bh QuietBoot start (optional) 4Ch Shadow video BIOS ROM 4Eh Display BIOS copyright notice 50h Display CPU type and speed 51h Initialize EISA board 52h Test keyboard 54h Set key click if enabled 58h 2-2-3-1 Test for unexpected interrupts 59h Initialize POST display service 5Ah Display prompt "Press F2 to enter SETUP" 5Bh Disable CPU cache 5Ch Test RAM...
... ROM copyright notice 48h Check video configuration against CMOS 49h Initialize PCI bus and devices 4Ah Initialize all video adapters in system 4Bh QuietBoot start (optional) 4Ch Shadow video BIOS ROM 4Eh Display BIOS copyright notice 50h Display CPU type and speed 51h Initialize EISA board 52h Test keyboard 54h Set key click if enabled 58h 2-2-3-1 Test for unexpected interrupts 59h Initialize POST display service 5Ah Display prompt "Press F2 to enter SETUP" 5Bh Disable CPU cache 5Ch Test RAM...

Aspire 4560 Service Guide
Page 188
... component (or driver) using the POSTCODE= option in the range 0x00-0xdf, then that code will be used with all POST Codes associated with that is assigned by the build process. Component Codes 0 The Component Code is a hexadecimal or decimal number, in the DSC file. The following tables describe the various ranges of POST codes: Progress Codes and Error Codes. Table 4-4. Error Codes are reserved...
... component (or driver) using the POSTCODE= option in the range 0x00-0xdf, then that code will be used with all POST Codes associated with that is assigned by the build process. Component Codes 0 The Component Code is a hexadecimal or decimal number, in the DSC file. The following tables describe the various ranges of POST codes: Progress Codes and Error Codes. Table 4-4. Error Codes are reserved...

Aspire 4560 Service Guide
Page 191
...-0xff Description These are not components, but rather represent Architectural Progress Codes or Error Codes detailing milestones in the system boot progress. POSTCODE_PC_PEI_ENTRY (0xe2) - POSTCODE_PC_IPL_RECOVERY (0xe7) - Entering DXE IPL's recovery boot path. No DXE IPL found at the end of DXE IPL. Couldn't find PPIs needed by DXE. Troubleshooting 4-29 POSTCODE_PC_SEC_ENTRY (0xe0) - Exiting PEI Dispatch. POSTCODE_PC_IPL_S3 (0xe5) - Leaving SEC...
...-0xff Description These are not components, but rather represent Architectural Progress Codes or Error Codes detailing milestones in the system boot progress. POSTCODE_PC_PEI_ENTRY (0xe2) - POSTCODE_PC_IPL_RECOVERY (0xe7) - Entering DXE IPL's recovery boot path. No DXE IPL found at the end of DXE IPL. Couldn't find PPIs needed by DXE. Troubleshooting 4-29 POSTCODE_PC_SEC_ENTRY (0xe0) - Exiting PEI Dispatch. POSTCODE_PC_IPL_S3 (0xe5) - Leaving SEC...


