Altos G320 User's Guide
Page 8
...module installation guidelines 37 Removing a DIMM 39 Installing a DIMM 39 Installing an expansion card 41 4 BIOS setup 43 BIOS setup 45 Entering BIOS setup 46 Main 48 Advanced 51 Boot Configuration 52 Peripheral Configuration 53 Drive Configuration 54 Floppy Configuration ...Hardware diagnostic testing 74 Verifying proper operation of key system lights 75 Specific problems and corrective actions 76 BIOS POST error beep codes 84 Troubleshooting BIOS POST error beep codes 84 Appendix A: System management utility 87 ASM 90 System requirements 90 System setup...
...module installation guidelines 37 Removing a DIMM 39 Installing a DIMM 39 Installing an expansion card 41 4 BIOS setup 43 BIOS setup 45 Entering BIOS setup 46 Main 48 Advanced 51 Boot Configuration 52 Peripheral Configuration 53 Drive Configuration 54 Floppy Configuration ...Hardware diagnostic testing 74 Verifying proper operation of key system lights 75 Specific problems and corrective actions 76 BIOS POST error beep codes 84 Troubleshooting BIOS POST error beep codes 84 Appendix A: System management utility 87 ASM 90 System requirements 90 System setup...

Altos G320 User's Guide
Page 23
Pin no. 13 Jumper settings Maintenance mode jumper The J9H3 jumper provides a total of 2-pin jumper blocks that are used when the BIOS becomes corrupted. Pin function Description 1-2 1 Normal boot (default) Allows normal system operation. 2-3 Config (Maintenance) Maintenance mode overrides incorrect BIOS settings 1 If the jumper block is typically used to recover the BIOS by loading the BIOS code into the flash device from a disk. This is removed, the system will attempt to perform system maintenance mode options. The table below lists each jumper option.
Pin no. 13 Jumper settings Maintenance mode jumper The J9H3 jumper provides a total of 2-pin jumper blocks that are used when the BIOS becomes corrupted. Pin function Description 1-2 1 Normal boot (default) Allows normal system operation. 2-3 Config (Maintenance) Maintenance mode overrides incorrect BIOS settings 1 If the jumper block is typically used to recover the BIOS by loading the BIOS code into the flash device from a disk. This is removed, the system will attempt to perform system maintenance mode options. The table below lists each jumper option.

Altos G320 User's Guide
Page 24
CMOS settings will be cleared in the J9G3 jumper are used to perform clearing of NVRAM following POST. The table below lists each jumper option. Clear of NVRAM and system BIOS recovery options. Pin no. 1-2 2-3 Pin function Normal boot (default) Clear CMOS (NVRAM) Description Allows normal system operation. 14 1 System tour Clear CMOS jumper The 2-pin jumper blocks in on the next reset.
CMOS settings will be cleared in the J9G3 jumper are used to perform clearing of NVRAM following POST. The table below lists each jumper option. Clear of NVRAM and system BIOS recovery options. Pin no. 1-2 2-3 Pin function Normal boot (default) Clear CMOS (NVRAM) Description Allows normal system operation. 14 1 System tour Clear CMOS jumper The 2-pin jumper blocks in on the next reset.

Altos G320 User's Guide
Page 50
... is slotted to view the new value for total system memory and make a note of it incorrectly. Reverse the orientation of memory installed. Run the BIOS setup to ensure proper installation.
... is slotted to view the new value for total system memory and make a note of it incorrectly. Reverse the orientation of memory installed. Run the BIOS setup to ensure proper installation.

Altos G320 User's Guide
Page 52
42 9 Secure the card with the bracket lock (6). 3 System upgrade 10 Observe the post-installation instructions described on the system, the BIOS setup automatically detects and assigns resources to the new device (applicable only to plug-and-play expansion cards). Note: When you turn on page 26.
42 9 Secure the card with the bracket lock (6). 3 System upgrade 10 Observe the post-installation instructions described on the system, the BIOS setup automatically detects and assigns resources to the new device (applicable only to plug-and-play expansion cards). Note: When you turn on page 26.

Altos G320 User's Guide
Page 54
This chapter gives information about the system BIOS and discusses how to configure the system by changing the settings of the BIOS parameters.
This chapter gives information about the system BIOS and discusses how to configure the system by changing the settings of the BIOS parameters.

Altos G320 User's Guide
Page 55
...In this case, the system cannot retain configuration values in a battery-backed nonvolatile memory called CMOS RAM. You will need to the security setup BIOS setup loads the configuration values in CMOS. Ask a qualified technician for assistance. • When redefining the communication ports to prevent any conflicts &#... when power is not part of the system RAM which allows configuration data to the BIOS setup Note: If you repeatedly receive Run Setup messages, the battery may be bad. 45 BIOS setup BIOS setup is no need to run this utility under the following conditions: • When...
...In this case, the system cannot retain configuration values in a battery-backed nonvolatile memory called CMOS RAM. You will need to the security setup BIOS setup loads the configuration values in CMOS. Ask a qualified technician for assistance. • When redefining the communication ports to prevent any conflicts &#... when power is not part of the system RAM which allows configuration data to the BIOS setup Note: If you repeatedly receive Run Setup messages, the battery may be bad. 45 BIOS setup BIOS setup is no need to run this utility under the following conditions: • When...

Altos G320 User's Guide
Page 56
...During bootup, press F2 to select an option. This key does not work during any other time. keys to enter the BIOS setup screen. 46 4 BIOS setup Entering BIOS setup Power on the screens shown in this User's Guide display default system values. Note the following reminders when moving around the... arrow keys to display a submenu screen. Grayed-out items have fixed settings and are several tabs on the setup screen corresponding to the six major BIOS menus: • Main • Advanced • Security • Power • Boot • Exit The parameters on the server to start the...
...During bootup, press F2 to select an option. This key does not work during any other time. keys to enter the BIOS setup screen. 46 4 BIOS setup Entering BIOS setup Power on the screens shown in this User's Guide display default system values. Note the following reminders when moving around the... arrow keys to display a submenu screen. Grayed-out items have fixed settings and are several tabs on the setup screen corresponding to the six major BIOS menus: • Main • Advanced • Security • Power • Boot • Exit The parameters on the server to start the...

Altos G320 User's Guide
Page 57
Note: The BIOS screens shown in the following each of the screen illustrations, settings in boldface are the default and suggested parameter settings. In the descriptive table following pages may vary depending on using the BIOS setup. • Press F10 to save changes and close the BIOS setup. • Press Esc to close the BIOS setup. 47 • Press F1 for General Help on the system configuration.
Note: The BIOS screens shown in the following each of the screen illustrations, settings in boldface are the default and suggested parameter settings. In the descriptive table following pages may vary depending on using the BIOS setup. • Press F10 to save changes and close the BIOS setup. • Press Esc to close the BIOS setup. 47 • Press F1 for General Help on the system configuration.
Altos G320 User's Guide
Page 58
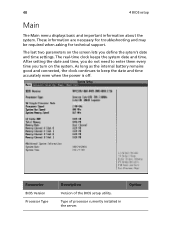
Type of the BIOS setup utility. After setting the date and time, you do not need to keep the date and time accurately even when the power is off. .... Option The real-time clock keeps the system date and time. The last two parameters on the screen lets you turn on the system. 48 4 BIOS setup Main The Main menu displays basic and important information about the system. Parameter...
Type of the BIOS setup utility. After setting the date and time, you do not need to keep the date and time accurately even when the power is off. .... Option The real-time clock keeps the system date and time. The last two parameters on the screen lets you turn on the system. 48 4 BIOS setup Main The Main menu displays basic and important information about the system. Parameter...

Altos G320 User's Guide
Page 60
50 Parameter System Time 4 BIOS setup Description Sets the time following the hourminute-second format. Valid values for hour, minute, and second are: Hour: 00 to 23 Minute: 00 to 59 Second: 00 to 59 Option
50 Parameter System Time 4 BIOS setup Description Sets the time following the hourminute-second format. Valid values for hour, minute, and second are: Hour: 00 to 23 Minute: 00 to 59 Second: 00 to 59 Option

Altos G320 User's Guide
Page 62
... Disable Lowest Fan Speed When set to Off, the fan will continue to Slow, the fan will turn off when system temperature is low. 52 4 BIOS setup Boot Configuration The Boot Configuration submenu lets you specify the preferred settings for system bootup. Enable Disable System Fan Control Enables or disables the...
... Disable Lowest Fan Speed When set to Off, the fan will continue to Slow, the fan will turn off when system temperature is low. 52 4 BIOS setup Boot Configuration The Boot Configuration submenu lets you specify the preferred settings for system bootup. Enable Disable System Fan Control Enables or disables the...

Altos G320 User's Guide
Page 63
Parameter Serial Port Description Enables or disables the onboard serial port. When this parameter is enabled, you define the parameter settings for the system's serial and LAN port. Option Enable Disable 53 Parameter Max CPUID Value Limit Display Setup Prompt Description This should be prompted to press F2 to boot legacy operating systems that cannot support CPUs with extended CPUID functions. Option Disable Enable On Off Peripheral Configuration The Peripheral Configuration submenu lets you will be enabled in order to run BIOS during boot up.
Parameter Serial Port Description Enables or disables the onboard serial port. When this parameter is enabled, you define the parameter settings for the system's serial and LAN port. Option Enable Disable 53 Parameter Max CPUID Value Limit Display Setup Prompt Description This should be prompted to press F2 to boot legacy operating systems that cannot support CPUs with extended CPUID functions. Option Disable Enable On Off Peripheral Configuration The Peripheral Configuration submenu lets you will be enabled in order to run BIOS during boot up.

Altos G320 User's Guide
Page 64
PCI On-board LAN Enables or disables the onboard LAN device. Parameter Use Automatic Mode Description N/A Option Enable Disable Option Enable Disable Enable Disable Drive Configuration The Drive Configuration submenu lets you define the parameter settings related to the hard disk/s. 54 4 BIOS setup Parameter PCI Express On-board LAN Description Enables or disables the PCI Express Gigabit Ethernet controller.
PCI On-board LAN Enables or disables the onboard LAN device. Parameter Use Automatic Mode Description N/A Option Enable Disable Option Enable Disable Enable Disable Drive Configuration The Drive Configuration submenu lets you define the parameter settings related to the hard disk/s. 54 4 BIOS setup Parameter PCI Express On-board LAN Description Enables or disables the PCI Express Gigabit Ethernet controller.
Altos G320 User's Guide
Page 66
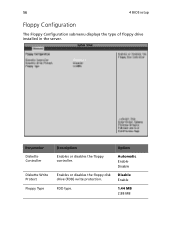
FDD type. Option Automatic Enable Disable Disable Enable 1.44 MB 2.88 MB 56 4 BIOS setup Floppy Configuration The Floppy Configuration submenu displays the type of floppy drive installed in the server. Enables or disables the floppy disk drive (FDD) write protection. Parameter Diskette Controller Diskette Write Protect Floppy Type Description Enables or disables the floppy controller.
FDD type. Option Automatic Enable Disable Disable Enable 1.44 MB 2.88 MB 56 4 BIOS setup Floppy Configuration The Floppy Configuration submenu displays the type of floppy drive installed in the server. Enables or disables the floppy disk drive (FDD) write protection. Parameter Diskette Controller Diskette Write Protect Floppy Type Description Enables or disables the floppy controller.

Altos G320 User's Guide
Page 68
Press Enter to the video adapter. Option Enable Disable Video Configuration The Video Configuration submenu lets you define the parameter settings related to mark all events in the Event log as Read Description Enables or disables the ECC (Error Correcting Code) event logging function of the system. Option Auto Ext PCIE Graphics (PEG) Ext PCI Graphics Parameter Primary Video Adaptor Description Select a parameter for the active video adapter when the system boots. 58 4 BIOS setup Parameter ECC Event Logging Mark Event as read.
Press Enter to the video adapter. Option Enable Disable Video Configuration The Video Configuration submenu lets you define the parameter settings related to mark all events in the Event log as Read Description Enables or disables the ECC (Error Correcting Code) event logging function of the system. Option Auto Ext PCIE Graphics (PEG) Ext PCI Graphics Parameter Primary Video Adaptor Description Select a parameter for the active video adapter when the system boots. 58 4 BIOS setup Parameter ECC Event Logging Mark Event as read.

Altos G320 User's Guide
Page 70
60 4 BIOS setup Chipset Configuration The Chipset Configuration submenu lets you set the memory interleave and node interleave settings, specify settings that are related to the onboard controllers. Specify settings that are related to the onboard controllers Parameter Memory Configuration PCI Express Configuration Description Offers memory correction and memory timing adjustments. Option It also provides information about the DIMMs installed in DIMM slots 1A, 1B, 2A, and 2B.
60 4 BIOS setup Chipset Configuration The Chipset Configuration submenu lets you set the memory interleave and node interleave settings, specify settings that are related to the onboard controllers. Specify settings that are related to the onboard controllers Parameter Memory Configuration PCI Express Configuration Description Offers memory correction and memory timing adjustments. Option It also provides information about the DIMMs installed in DIMM slots 1A, 1B, 2A, and 2B.

Altos G320 User's Guide
Page 72
Parameter USB 2.0 Description Option Enables the USB 2.0 controller. 62 4 BIOS setup USB Configuration The USB Configuration submenu lets you specify settings for USB devices. When set to Disable, other USB options will be grayed out. Enable Disable
Parameter USB 2.0 Description Option Enables the USB 2.0 controller. 62 4 BIOS setup USB Configuration The USB Configuration submenu lets you specify settings for USB devices. When set to Disable, other USB options will be grayed out. Enable Disable

Altos G320 User's Guide
Page 73
... a Supervisor password is set this password, you have to type it whenever you to change the User password. Set User Password Press Enter to the BIOS setup utility. 63 Security The Security menu allows you boot the system. Parameter Description Option Supervisor Password Prevents unauthorized access to change the Administrator Password...
... a Supervisor password is set this password, you have to type it whenever you to change the User password. Set User Password Press Enter to the BIOS setup utility. 63 Security The Security menu allows you boot the system. Parameter Description Option Supervisor Password Prevents unauthorized access to change the Administrator Password...

Altos G320 User's Guide
Page 74
64 4 BIOS setup Parameter Expansion Card Text Chassis Intrusion XD Technology Description N/A Enables or disables the system to Not Installed. A password box will appear. 2 Type a password then ...
64 4 BIOS setup Parameter Expansion Card Text Chassis Intrusion XD Technology Description N/A Enables or disables the system to Not Installed. A password box will appear. 2 Type a password then ...


