
Altos G320 User's Guide
Page 7
... Maintenance mode jumper 13 Clear CMOS jumper 14 2 System setup 15 Setting up the system 17 Pre-installation requirements 17 Connecting peripherals 18 Turning on the system 19 Power-on problems 20 Turning off the system 21 3 System upgrade 23 Installation precautions 25 ESD precautions 25 Pre-installation instructions 25 Post-installation instructions 26 Opening the server 27 Removing the left-side panel 27 Unlocking the front bezel 28 Removing the front bezel 28 Installing and removing storage devices 29 Installing and removing hard disk...
... Maintenance mode jumper 13 Clear CMOS jumper 14 2 System setup 15 Setting up the system 17 Pre-installation requirements 17 Connecting peripherals 18 Turning on the system 19 Power-on problems 20 Turning off the system 21 3 System upgrade 23 Installation precautions 25 ESD precautions 25 Pre-installation instructions 25 Post-installation instructions 26 Opening the server 27 Removing the left-side panel 27 Unlocking the front bezel 28 Removing the front bezel 28 Installing and removing storage devices 29 Installing and removing hard disk...
Altos G320 User's Guide
Page 8
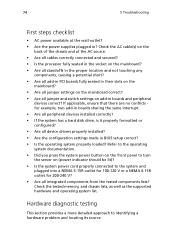
...63 Setting the Supervisor/User password 64 Power 65 Boot 67 Exit 69 5 Troubleshooting 71 Troubleshooting 73 Resetting the system 73 Problems following initial system installation 73 First steps checklist 74 Hardware diagnostic testing 74 Verifying proper operation of key system lights 75 Specific problems and corrective actions 76 BIOS POST error beep codes 84 Troubleshooting BIOS POST error beep codes 84 Appendix A: System management utility 87 ASM 90 System requirements 90 System setup 91 RAID configuration utility 93 SATA RAID configuration utility 93
...63 Setting the Supervisor/User password 64 Power 65 Boot 67 Exit 69 5 Troubleshooting 71 Troubleshooting 73 Resetting the system 73 Problems following initial system installation 73 First steps checklist 74 Hardware diagnostic testing 74 Verifying proper operation of key system lights 75 Specific problems and corrective actions 76 BIOS POST error beep codes 84 Troubleshooting BIOS POST error beep codes 84 Appendix A: System management utility 87 ASM 90 System requirements 90 System setup 91 RAID configuration utility 93 SATA RAID configuration utility 93
Altos G320 User's Guide
Page 13
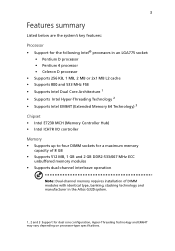
... four DIMM sockets for a maximum memory capacity of 8 GB • Supports 512 MB, 1 GB and 2 GB DDR2-533/667 MHz ECC unbuffered memory modules • Supports dual-channel interleave operation Note: Dual-channel memory requires installation of DIMM modules with identical type, banking, stacking technology and manufacturer in the Altos G320 system. 1 , 2 and 3 Support for dual core configuration, Hyper-Threading Technology and EM64T may vary depending on processor-type specifications.
... four DIMM sockets for a maximum memory capacity of 8 GB • Supports 512 MB, 1 GB and 2 GB DDR2-533/667 MHz ECC unbuffered memory modules • Supports dual-channel interleave operation Note: Dual-channel memory requires installation of DIMM modules with identical type, banking, stacking technology and manufacturer in the Altos G320 system. 1 , 2 and 3 Support for dual core configuration, Hyper-Threading Technology and EM64T may vary depending on processor-type specifications.

Altos G320 User's Guide
Page 14
... device bays for add-on options: • DAT72 tape drive • AIT tape drive Optional media storage • Supports up to four SATA or SCSI hard disk drives SATA controller • Onboard SATA: Intel ICH7R I/O controller supports four SATA ports that offer data transfer rates of up to 3.0 Gbps • Supports software RAID 0, 1, and 10 for onboard SATA ports Networking • LAN 1: Intel 82541Pl Gigabit Ethernet controller • LAN 2: Intel 82573V Gigabit Ethernet controller PCI I/O • Five PCI bus slots with three separate bus...
... device bays for add-on options: • DAT72 tape drive • AIT tape drive Optional media storage • Supports up to four SATA or SCSI hard disk drives SATA controller • Onboard SATA: Intel ICH7R I/O controller supports four SATA ports that offer data transfer rates of up to 3.0 Gbps • Supports software RAID 0, 1, and 10 for onboard SATA ports Networking • LAN 1: Intel 82541Pl Gigabit Ethernet controller • LAN 2: Intel 82573V Gigabit Ethernet controller PCI I/O • Five PCI bus slots with three separate bus...

Altos G320 User's Guide
Page 15
...; Two LAN ports (RJ-45) Operating system and software • Microsoft® Windows® Server 2003, X64 edition • Microsoft Windows Server 2003 • Novell® NetWare® 6.5 • Red Hat Enterprise Linux 4.0, EM64T • Red Hat Enterprise Linux 4.0 • SCO Openserver™ 5.0.7 • SCO Unixware® 7.1.4 • SUSE® Linux Enterprise Server 9.0 • SUSE Linux Enterprise Server 9.0 EM64T • ASM (Acer Server Manager) • EasyBUILD (includes SATA/SCSI RAID Configuration Utility) Power supply...
...; Two LAN ports (RJ-45) Operating system and software • Microsoft® Windows® Server 2003, X64 edition • Microsoft Windows Server 2003 • Novell® NetWare® 6.5 • Red Hat Enterprise Linux 4.0, EM64T • Red Hat Enterprise Linux 4.0 • SCO Openserver™ 5.0.7 • SCO Unixware® 7.1.4 • SUSE® Linux Enterprise Server 9.0 • SUSE Linux Enterprise Server 9.0 EM64T • ASM (Acer Server Manager) • EasyBUILD (includes SATA/SCSI RAID Configuration Utility) Power supply...

Altos G320 User's Guide
Page 59
... amount of memory on DIMM 1A, 1B, 2A or 2B slots. Valid values for maximum performance. It is the speed at which a microprocessor executes instructions. Indicates the memory mode. Indicates the system bus speed. 49 Parameter SW Single Processor Mode Processor Speed System Bus Speed System Memory Speed L2 cache RAM Total Memory Memory Mode Memory Channel A/B slot 0 or 1 Additional System Information System Date Description Option Enables or disables the dual-core processor support. Sets the date...
... amount of memory on DIMM 1A, 1B, 2A or 2B slots. Valid values for maximum performance. It is the speed at which a microprocessor executes instructions. Indicates the memory mode. Indicates the system bus speed. 49 Parameter SW Single Processor Mode Processor Speed System Bus Speed System Memory Speed L2 cache RAM Total Memory Memory Mode Memory Channel A/B slot 0 or 1 Additional System Information System Date Description Option Enables or disables the dual-core processor support. Sets the date...

Altos G320 User's Guide
Page 62
..., the fan will turn off when system temperature is low. Off CPU Fan Control Enables or disables the CPU fan control function. Slow Off Enable Disable Lowest Fan Speed When set to run at a slow speed when system temperature is low. 52 4 BIOS setup Boot Configuration The Boot Configuration submenu lets you specify the preferred settings for system bootup. Parameter Description Option Num-Lock Activates the Numeric Lock function upon On booting. Enable Disable System Fan Control Enables or disables the system fan control function.
..., the fan will turn off when system temperature is low. Off CPU Fan Control Enables or disables the CPU fan control function. Slow Off Enable Disable Lowest Fan Speed When set to run at a slow speed when system temperature is low. 52 4 BIOS setup Boot Configuration The Boot Configuration submenu lets you specify the preferred settings for system bootup. Parameter Description Option Num-Lock Activates the Numeric Lock function upon On booting. Enable Disable System Fan Control Enables or disables the system fan control function.

Altos G320 User's Guide
Page 64
Option Enable Disable Enable Disable Drive Configuration The Drive Configuration submenu lets you define the parameter settings related to the hard disk/s. PCI On-board LAN Enables or disables the onboard LAN device. Parameter Use Automatic Mode Description N/A Option Enable Disable 54 4 BIOS setup Parameter PCI Express On-board LAN Description Enables or disables the PCI Express Gigabit Ethernet controller.
Option Enable Disable Enable Disable Drive Configuration The Drive Configuration submenu lets you define the parameter settings related to the hard disk/s. PCI On-board LAN Enables or disables the onboard LAN device. Parameter Use Automatic Mode Description N/A Option Enable Disable 54 4 BIOS setup Parameter PCI Express On-board LAN Description Enables or disables the PCI Express Gigabit Ethernet controller.

Altos G320 User's Guide
Page 78
68 4 BIOS setup Parameter Description Option Boot to Optical Devices Enables or disables the system to boot from a USB device. Enable Disable USB Boot Enables or disables the system to boot from an optical device. Enable Disable Boot to Removable Devices Enables or disables the system to invoke the boot ROM of the onboard network chip. Enable Disable Boot to Network Enables or disables the system to boot from a removable device installed in the system. Enable Disable ZIP Emulation Sets the emulation type for USB mass Type storage devices. Floppy Hard Disk
68 4 BIOS setup Parameter Description Option Boot to Optical Devices Enables or disables the system to boot from a USB device. Enable Disable USB Boot Enables or disables the system to boot from an optical device. Enable Disable Boot to Removable Devices Enables or disables the system to invoke the boot ROM of the onboard network chip. Enable Disable Boot to Network Enables or disables the system to boot from a removable device installed in the system. Enable Disable ZIP Emulation Sets the emulation type for USB mass Type storage devices. Floppy Hard Disk
Altos G320 User's Guide
Page 83
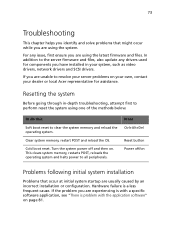
Turn the system power off /on . Hardware failure is problem with the application software" on your own, contact your system, such as video drivers, network drivers and SCSI drivers. In addition to clear the system memory and reload the operating system. To do this Soft boot reset to the server firmware and files, also update any issue, first ensure you are experiencing is with a specific software application, see "There is a less frequent cause...
Turn the system power off /on . Hardware failure is problem with the application software" on your own, contact your system, such as video drivers, network drivers and SCSI drivers. In addition to clear the system memory and reload the operating system. To do this Soft boot reset to the server firmware and files, also update any issue, first ensure you are experiencing is with a specific software application, see "There is a less frequent cause...
Altos G320 User's Guide
Page 84
... all add-in PCI boards fully seated in their slots on the mainboard? • Are all jumper settings on the mainboard correct? • Are all device drivers properly installed? • Are the configuration settings made in BIOS setup correct? • Is the operating system properly loaded? Refer to the operating system documentation. • Did you press the system power button on the front panel to turn the server on (power indicator should...
... all add-in PCI boards fully seated in their slots on the mainboard? • Are all jumper settings on the mainboard correct? • Are all device drivers properly installed? • Are the configuration settings made in BIOS setup correct? • Is the operating system properly loaded? Refer to the operating system documentation. • Did you press the system power button on the front panel to turn the server on (power indicator should...
Altos G320 User's Guide
Page 86
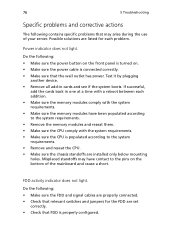
... not light. 76 5 Troubleshooting Specific problems and corrective actions The following contains specific problems that may have been populated according to the system requirements. • Remove the memory modules and reseat them. • Make sure the CPU comply with the system requirements. • Make sure the CPU is populated according to the pins on . • Make sure the power cable is properly configured. If successful, add the cards...
... not light. 76 5 Troubleshooting Specific problems and corrective actions The following contains specific problems that may have been populated according to the system requirements. • Remove the memory modules and reseat them. • Make sure the CPU comply with the system requirements. • Make sure the CPU is populated according to the pins on . • Make sure the power cable is properly configured. If successful, add the cards...
Altos G320 User's Guide
Page 87
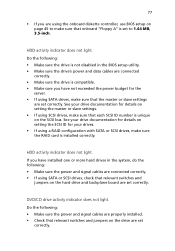
... cables are properly installed. • Check that each SCSI ID number is unique on the hard drive and backplane board are set correctly. Do the following : • Make sure the power and signal cables are connected correctly. • If using a RAID configuration with SATA or SCSI drives, make sure that relevant switches and jumpers on the SCSI bus. HDD activity indicator does not light. DVD/CD drive activity indicator does not light. See your drives. • If using SATA or SCSI drives, check...
... cables are properly installed. • Check that each SCSI ID number is unique on the hard drive and backplane board are set correctly. Do the following : • Make sure the power and signal cables are connected correctly. • If using a RAID configuration with SATA or SCSI drives, make sure that relevant switches and jumpers on the SCSI bus. HDD activity indicator does not light. DVD/CD drive activity indicator does not light. See your drives. • If using SATA or SCSI drives, check...

Altos G320 User's Guide
Page 108
...; Support to disable/enable BIOS state Driver features • Special interface for configuration information, configuration changes, and manageability • Optimized disk access • Support for RAID levels 0, 1, and 10 • Support for Stand-by and Hibernation Note: The following items require Spy Service to be running in order to work. • Error logging in the operating system event log and on disks • Support for online mirror rebuilding • Support for check consistency for mirrored disks • Bootable RAID...
...; Support to disable/enable BIOS state Driver features • Special interface for configuration information, configuration changes, and manageability • Optimized disk access • Support for RAID levels 0, 1, and 10 • Support for Stand-by and Hibernation Note: The following items require Spy Service to be running in order to work. • Error logging in the operating system event log and on disks • Support for online mirror rebuilding • Support for check consistency for mirrored disks • Bootable RAID...

Altos G320 User's Guide
Page 112
... window appears. With the CU you can: • Configure physical arrays and logical drives • Initialize logical drives • Rebuild failed drives • Check data consistency Using the RAID configuration utility Starting RAID CU 1 Before attempting to RAID. The CU resides in the BIOS setup to use the RAID configuration utility, make sure you set the SATA channels as parameter in the BIOS and is independent of the OS. 102 Appendix B: SATA RAID configuration RAID configuration utility The RAID CU configures disk arrays and logical drives...
... window appears. With the CU you can: • Configure physical arrays and logical drives • Initialize logical drives • Rebuild failed drives • Check data consistency Using the RAID configuration utility Starting RAID CU 1 Before attempting to RAID. The CU resides in the BIOS setup to use the RAID configuration utility, make sure you set the SATA channels as parameter in the BIOS and is independent of the OS. 102 Appendix B: SATA RAID configuration RAID configuration utility The RAID CU configures disk arrays and logical drives...
Altos G320 User's Guide
Page 117
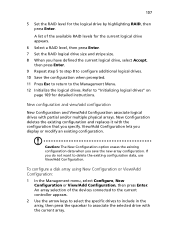
...Set the RAID level for detailed instructions. A list of the devices connected to the current controller appears. 2 Use the arrow keys to select the specific drives to include in the array, then press the spacebar to delete the existing configuration data, use View/Add Configuration. Refer to the Management Menu. 12 Initialize the logical drives. To configure a disk array using New Configuration or View/Add Configuration: 1 In the Management menu, select Configure, New Configuration or View/Add Configuration, then press Enter. New configuration and view/add configuration New Configuration...
...Set the RAID level for detailed instructions. A list of the devices connected to the current controller appears. 2 Use the arrow keys to select the specific drives to include in the array, then press the spacebar to delete the existing configuration data, use View/Add Configuration. Refer to the Management Menu. 12 Initialize the logical drives. To configure a disk array using New Configuration or View/Add Configuration: 1 In the Management menu, select Configure, New Configuration or View/Add Configuration, then press Enter. New configuration and view/add configuration New Configuration...
Altos G320 User's Guide
Page 123
... "Boot" on page 67 for detailed instructions. 2 Select a configuration method to the drives are connected properly. • Change the cables. • If everything fails, change the drive(s). An error occurs while reading the configuration data on . • Reconnect, replace, or rebuild any of the drives connected to be replaced. See "Start the RAID configuration utility" on any drive that you might encounter while using the CU, along with suggested solutions The following : 1 Run the RAID configuration utility...
... "Boot" on page 67 for detailed instructions. 2 Select a configuration method to the drives are connected properly. • Change the cables. • If everything fails, change the drive(s). An error occurs while reading the configuration data on . • Reconnect, replace, or rebuild any of the drives connected to be replaced. See "Start the RAID configuration utility" on any drive that you might encounter while using the CU, along with suggested solutions The following : 1 Run the RAID configuration utility...
Altos G320 User's Guide
Page 129
... array 1. 5 Add two drives to the current array, then press Enter. 6 Press F10 to set the drive as a hot spare disk. An array selection window displays the devices connected to the current controller. 4 Use the arrow keys to select a specific drive, then press the spacebar to enter the MegaRAID configuration utility. When prompted, press Ctrl+M to associate the selected drive with the current array. Loading the RAID card default setting 1 In the Management menu, select Objects, then select Adapter...
... array 1. 5 Add two drives to the current array, then press Enter. 6 Press F10 to set the drive as a hot spare disk. An array selection window displays the devices connected to the current controller. 4 Use the arrow keys to select a specific drive, then press the spacebar to enter the MegaRAID configuration utility. When prompted, press Ctrl+M to associate the selected drive with the current array. Loading the RAID card default setting 1 In the Management menu, select Objects, then select Adapter...

Altos G320 User's Guide
Page 131
... Hardware 59 PCI 62 Peripheral 53 USB 62 Video 58 Boot 67 entering 46 Exit 69 Main 48 Power 65 Security 63 Administrator password 63 removing password 64 User password 63 C Check data consistency 112 configuring drives 106 easy configuration 106 new configuration 107 view/add configuration 107 CPU 33 installing 34 removing 34 D DIMM population guidelines 37 E easy configuration 106 embedded server RAID technology 97 features 97 BIOS 97 driver 98 manageability/disk console 98 expansion card 41 installing 41 F front panel 6 LED indicators 7 H hard disk 31 installing 31 removing...
... Hardware 59 PCI 62 Peripheral 53 USB 62 Video 58 Boot 67 entering 46 Exit 69 Main 48 Power 65 Security 63 Administrator password 63 removing password 64 User password 63 C Check data consistency 112 configuring drives 106 easy configuration 106 new configuration 107 view/add configuration 107 CPU 33 installing 34 removing 34 D DIMM population guidelines 37 E easy configuration 106 embedded server RAID technology 97 features 97 BIOS 97 driver 98 manageability/disk console 98 expansion card 41 installing 41 F front panel 6 LED indicators 7 H hard disk 31 installing 31 removing...
Altos G320 User's Guide
Page 132
... ports 4 media storage 4 memory subsystem 3 networking 4 OS 5 PCI I/O 4 power supply 5 processor 3 SATA controller 4 SCSI controller 4 storage device 29 install 30 remove 29 stripe size 104 system management utility 90 Acer Server Manager (ASM) 90 RAID configuration utility 93 SATA 93 SCSI 93 system memory 40 reconfiguring 40 system upgrade 23 ESD precautions 25 installation precautions 25 post-installation instructions 26 pre-installation instructions 25 T troubleshooting 71 confirming loading of the OS 75 hardware diagnostic testing 74 POST error codes 84 problems 76 add-in adapter stopped...
... ports 4 media storage 4 memory subsystem 3 networking 4 OS 5 PCI I/O 4 power supply 5 processor 3 SATA controller 4 SCSI controller 4 storage device 29 install 30 remove 29 stripe size 104 system management utility 90 Acer Server Manager (ASM) 90 RAID configuration utility 93 SATA 93 SCSI 93 system memory 40 reconfiguring 40 system upgrade 23 ESD precautions 25 installation precautions 25 post-installation instructions 26 pre-installation instructions 25 T troubleshooting 71 confirming loading of the OS 75 hardware diagnostic testing 74 POST error codes 84 problems 76 add-in adapter stopped...


