
Power ST User Guide
Page 6
... service. 12 Replace the battery with the same type as opening or removing covers may expose you to dangerous voltage points or other controls may result in damage and will often require extensive work by the operating instructions since improper adjustment of fire or explosion. Laser compliance statement The CD or DVD drive in this product from children and dispose of used batteries promptly. 14 Use...
... service. 12 Replace the battery with the same type as opening or removing covers may expose you to dangerous voltage points or other controls may result in damage and will often require extensive work by the operating instructions since improper adjustment of fire or explosion. Laser compliance statement The CD or DVD drive in this product from children and dispose of used batteries promptly. 14 Use...
Power ST User Guide
Page 7
... viewing comfort, set up your monitor at eye level. Discard used batteries according to set up your new AcerPower system. Open the box carefully, ensuring that the surface is incorrectly replaced. vii Lithium battery statement CAUTION Danger of explosion if battery is stable, level and clean. Replace only with the top third of the screen at arm's length from your mouse and keyboard side by...
... viewing comfort, set up your monitor at eye level. Discard used batteries according to set up your new AcerPower system. Open the box carefully, ensuring that the surface is incorrectly replaced. vii Lithium battery statement CAUTION Danger of explosion if battery is stable, level and clean. Replace only with the top third of the screen at arm's length from your mouse and keyboard side by...
Power ST User Guide
Page 9
... Front View 4 Computer Rear View 6 System Components 8 Disk drives 8 Floppy drive 8 CD-ROM/DVD-ROM/CD-RW drive 8 Hard disk 9 Mouse 10 Keyboard 10 Speaker (Optional) 10 Monitor (Optional) 11 Modem Card (Optional) 11 Setting up your system 12 Arranging a comfortable work area 12 Adjusting your chair 12 Positioning your PC 12 Positioning your monitor 13 Positioning your keyboard 13 Positioning your mouse 13 Connecting peripherals 14 Mouse 14 Keyboard 14 Monitor 14 Power cable 14 Turning on your computer...
... Front View 4 Computer Rear View 6 System Components 8 Disk drives 8 Floppy drive 8 CD-ROM/DVD-ROM/CD-RW drive 8 Hard disk 9 Mouse 10 Keyboard 10 Speaker (Optional) 10 Monitor (Optional) 11 Modem Card (Optional) 11 Setting up your system 12 Arranging a comfortable work area 12 Adjusting your chair 12 Positioning your PC 12 Positioning your monitor 13 Positioning your keyboard 13 Positioning your mouse 13 Connecting peripherals 14 Mouse 14 Keyboard 14 Monitor 14 Power cable 14 Turning on your computer...
Power ST User Guide
Page 11
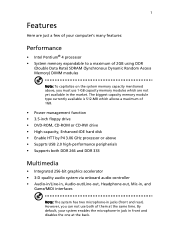
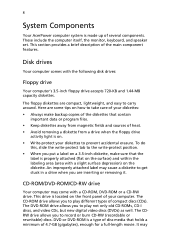
... floppy drive • DVD-ROM, CD-ROM or CD-RW drive • High-capacity, Enhanced-IDE hard disk • Enable HTT by P4 3.06 GHz processor or above , you must use both of 2GB using DDR (Double Data Rate) SDRAM (Synchronous Dynamic Random Access Memory) DIMM modules Note: To capitalize on the system memory capacity mentioned above • Supprts USB 2.0 high-performance peripherials • Supports both...
... floppy drive • DVD-ROM, CD-ROM or CD-RW drive • High-capacity, Enhanced-IDE hard disk • Enable HTT by P4 3.06 GHz processor or above , you must use both of 2GB using DDR (Double Data Rate) SDRAM (Synchronous Dynamic Random Access Memory) DIMM modules Note: To capitalize on the system memory capacity mentioned above • Supprts USB 2.0 high-performance peripherials • Supports both...

Power ST User Guide
Page 12
2 Connectivity • Two PS/2 interfaces for mouse and keyboard • One serial and one parallel interfaces • One VGA port • Four Universal Serial Bus (USB) ports (two on the front and two on the rear panel) • High-speed fax/data PCI modem (optional) • 10Base-T/100Base-TX network support with remote wake-up function
2 Connectivity • Two PS/2 interfaces for mouse and keyboard • One serial and one parallel interfaces • One VGA port • Four Universal Serial Bus (USB) ports (two on the front and two on the rear panel) • High-speed fax/data PCI modem (optional) • 10Base-T/100Base-TX network support with remote wake-up function
Power ST User Guide
Page 17
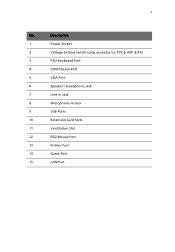
7 No. Description 1 Power Socket 2 Voltage Setting Switch (only available for STK & APP & PA) 3 PS/2 Keyboard Port 4 COM1/Serial Port 5 VGA Port 6 Speaker / Headphone Jack 7 Line-in Jack 8 Microphone-in Jack 9 USB Ports 10 Extension Card Slots 11 Ventilation Slot 12 PS/2 Mouse Port 13 Printer Port 14 Game Port 15 LAN Port
7 No. Description 1 Power Socket 2 Voltage Setting Switch (only available for STK & APP & PA) 3 PS/2 Keyboard Port 4 COM1/Serial Port 5 VGA Port 6 Speaker / Headphone Jack 7 Line-in Jack 8 Microphone-in Jack 9 USB Ports 10 Extension Card Slots 11 Ventilation Slot 12 PS/2 Mouse Port 13 Printer Port 14 Game Port 15 LAN Port
Power ST User Guide
Page 18
... position. • When you to carry around. This drive is on the front panel of heat. • Avoid removing a diskette from a drive when the floppy drive activity light is located on . • Write-protect your computer. DVD or DVD-ROM is made up of the main component features. An improperly attached label may These include the computer itself, the monitor, keyboard, and speaker set.
... position. • When you to carry around. This drive is on the front panel of heat. • Avoid removing a diskette from a drive when the floppy drive activity light is located on . • Write-protect your computer. DVD or DVD-ROM is made up of the main component features. An improperly attached label may These include the computer itself, the monitor, keyboard, and speaker set.
Power ST User Guide
Page 19
... on the disc, impair the disc lens reader on the front panel. 2 When the disc tray slides open, insert the CD or DVD. Make sure that the label or title side of the disc is preinstalled with extra care. You may refer to the Cleaning kit for support. Hard disk Your computer is facing upward. If you want to replace your hard disk or upgrade it...
... on the disc, impair the disc lens reader on the front panel. 2 When the disc tray slides open, insert the CD or DVD. Make sure that the label or title side of the disc is preinstalled with extra care. You may refer to the Cleaning kit for support. Hard disk Your computer is facing upward. If you want to replace your hard disk or upgrade it...

Power ST User Guide
Page 20
... your enjoyment of the computer's PS2 ports. Keyboard Your AcerPower computer system includes a corded keyboard, you should connect the cord to the included manual. Connect the cord to maximize your computer. For more information on the models, your speaker set into the speaker-out port at the back of the computer before starting Windows. 10 Mouse Your mouse features standard controls: two buttons and a scroll wheel for convenient...
... your enjoyment of the computer's PS2 ports. Keyboard Your AcerPower computer system includes a corded keyboard, you should connect the cord to the included manual. Connect the cord to maximize your computer. For more information on the models, your speaker set into the speaker-out port at the back of the computer before starting Windows. 10 Mouse Your mouse features standard controls: two buttons and a scroll wheel for convenient...
Power ST User Guide
Page 21
... enjoy the following features: • Link to send and receive data through telephone line. The modem card helps to the Internet, and surf online. • Send and receive faxes. • Send and receive E-mails. Plug your computer. The size and type of monitor included in the rear panel of your monitor into the VGA port at the back of the PCI slot.
... enjoy the following features: • Link to send and receive data through telephone line. The modem card helps to the Internet, and surf online. • Send and receive faxes. • Send and receive E-mails. Plug your computer. The size and type of monitor included in the rear panel of your monitor into the VGA port at the back of the PCI slot.
Power ST User Guide
Page 24
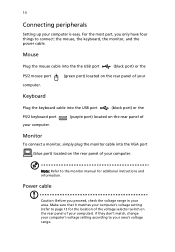
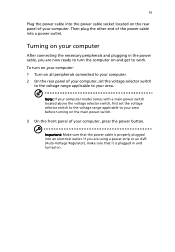
... switch on the rear panel of your computer is easy. Make sure that it matches your computer's voltage setting (refer to your computer. Mouse Plug the mouse cable into the the USB port (black port) or the PS/2 mouse port computer. (green port) located on the rear panel of your Keyboard Plug the keyboard cable into the VGA port (blue port) located on the rear panel of your area. 14 Connecting peripherals Setting up your computer. Monitor To connect a monitor, simply plug the monitor cable into the USB port (black port...
... switch on the rear panel of your computer is easy. Make sure that it matches your computer's voltage setting (refer to your computer. Mouse Plug the mouse cable into the the USB port (black port) or the PS/2 mouse port computer. (green port) located on the rear panel of your Keyboard Plug the keyboard cable into the VGA port (blue port) located on the rear panel of your area. 14 Connecting peripherals Setting up your computer. Monitor To connect a monitor, simply plug the monitor cable into the USB port (black port...
Power ST User Guide
Page 25
... you are using a power strip or an AVR (Auto-Voltage Regulator), make sure that the power cable is plugged in and turned on your computer. 15 Plug the power cable into the power cable socket located on the rear panel of the power cable into an electrical outlet. Turning on . Important: Make sure that it is properly plugged into a power outlet. Then plug the other end of your computer After connecting the necessary...
... you are using a power strip or an AVR (Auto-Voltage Regulator), make sure that the power cable is plugged in and turned on your computer. 15 Plug the power cable into the power cable socket located on the rear panel of the power cable into an electrical outlet. Turning on . Important: Make sure that it is properly plugged into a power outlet. Then plug the other end of your computer After connecting the necessary...

Power ST User Guide
Page 27
... recommend that block access to the DIMM sockets or component connector. 5 See the following sections for specific instructions on page 53. 3 Follow the ESD precautions described above before handling a computer component. 4 Remove any expansion boards or peripherals that you can upgrade existing components to install. ESD precautions Electrostatic discharge (ESD) can damage your AcerPower computer system by adding additional components...
... recommend that block access to the DIMM sockets or component connector. 5 See the following sections for specific instructions on page 53. 3 Follow the ESD precautions described above before handling a computer component. 4 Remove any expansion boards or peripherals that you can upgrade existing components to install. ESD precautions Electrostatic discharge (ESD) can damage your AcerPower computer system by adding additional components...
Power ST User Guide
Page 28
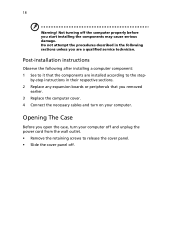
Post-installation instructions Observe the following sections unless you open the case, turn on your computer off and unplug the power cord from the wall outlet. • Remove the retaining screws to the step- Opening The Case Before you are installed according to release the cover panel. • Slide the cover panel off the computer properly before you removed earlier. 3 Replace the computer cover. 4 Connect the necessary cables and turn your...
Post-installation instructions Observe the following sections unless you open the case, turn on your computer off and unplug the power cord from the wall outlet. • Remove the retaining screws to the step- Opening The Case Before you are installed according to release the cover panel. • Slide the cover panel off the computer properly before you removed earlier. 3 Replace the computer cover. 4 Connect the necessary cables and turn your...

Power ST User Guide
Page 29
... of new components before you start to the documentation that are compatible with your new components before you only use components that comes with a DVD or CD-RW drive. • Install an add-on card, such as a fax/modem card, in one of the empty PCI slots. Possible upgrade options include the following: • Replace the HDD with a higher capacity model, or add a second HDD. • Install additional memory. • Install a graphics card as...
... of new components before you start to the documentation that are compatible with your new components before you only use components that comes with a DVD or CD-RW drive. • Install an add-on card, such as a fax/modem card, in one of the empty PCI slots. Possible upgrade options include the following: • Replace the HDD with a higher capacity model, or add a second HDD. • Install additional memory. • Install a graphics card as...

Power ST User Guide
Page 30
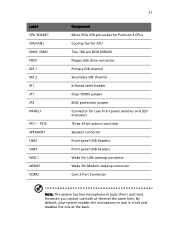
20 Mainboard Components RETENTION MODULE DDR1 DDR2 DIM1 DIM2 CPUFAN1 CPUFAN1 CPU SOCKET ATX1 ATX2 IDE2 IDE1 AUDIO1 CDIN2 ATX 1 AUDIO1 CDIN2 CDIN1 CDIN1 ATX2 IDE2 IDE1 A GP 1 AGP1 PCI1 PCI1 BAT1 JP1 ... PANEL1 COM2 SPEAKER1 CASFAN1 PANEL1 SPEAKER1 COM2 FDD1 CASFAN1 Label AGP1 ATX1 ATX2 AUDIO1 BAT1 CASFAN1 CDIN1 CDIN2 CNR1 Component Accelerated Graphics Port Power connector Standard 20-pin ATX power connector Front audio connector Three volt realtime clock battery Case fan connector 1 Primary CD-in connector Secondary CD-in connector Communications Networking Riser slot
20 Mainboard Components RETENTION MODULE DDR1 DDR2 DIM1 DIM2 CPUFAN1 CPUFAN1 CPU SOCKET ATX1 ATX2 IDE2 IDE1 AUDIO1 CDIN2 ATX 1 AUDIO1 CDIN2 CDIN1 CDIN1 ATX2 IDE2 IDE1 A GP 1 AGP1 PCI1 PCI1 BAT1 JP1 ... PANEL1 COM2 SPEAKER1 CASFAN1 PANEL1 SPEAKER1 COM2 FDD1 CASFAN1 Label AGP1 ATX1 ATX2 AUDIO1 BAT1 CASFAN1 CDIN1 CDIN2 CNR1 Component Accelerated Graphics Port Power connector Standard 20-pin ATX power connector Front audio connector Three volt realtime clock battery Case fan connector 1 Primary CD-in connector Secondary CD-in connector Communications Networking Riser slot
Power ST User Guide
Page 31
... for Pentium 4 CPUs Cooling fan for CPU Two 184-pin DDR SDRAM Floppy disk drive connector Primary IDE channel Secondary IDE channel Infrared cable header Clear CMOS jumper BIOS protection jumper Connector for case front panel switches and LED indicators Three 32-bit add-on card slots Speaker connector Front panel USB headers Front panel USB headers Wake On LAN wakeup connector Wake On Modem wakeup connector Com 2 Port Connector Note: The system has two microphone-in front and disables the one at the...
... for Pentium 4 CPUs Cooling fan for CPU Two 184-pin DDR SDRAM Floppy disk drive connector Primary IDE channel Secondary IDE channel Infrared cable header Clear CMOS jumper BIOS protection jumper Connector for case front panel switches and LED indicators Three 32-bit add-on card slots Speaker connector Front panel USB headers Front panel USB headers Wake On LAN wakeup connector Wake On Modem wakeup connector Com 2 Port Connector Note: The system has two microphone-in front and disables the one at the...
Power ST User Guide
Page 33
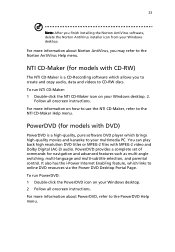
... may refer to the Norton AntiVirus Help menu. NTI CD-Maker (for models with MPEG-2 video and Dolby Digital (AC-3) audio. PowerDVD provides a complete set of commands for models with DVD) PowerDVD is a CD-Recording software which allows you finish installing the Norton AntiVirus software, delete the Norton AntiVirus installer icon from your Windows desktop. 2. To run NTI CD-Maker: 1 Double-click the NTI...
... may refer to the Norton AntiVirus Help menu. NTI CD-Maker (for models with MPEG-2 video and Dolby Digital (AC-3) audio. PowerDVD provides a complete set of commands for models with DVD) PowerDVD is a CD-Recording software which allows you finish installing the Norton AntiVirus software, delete the Norton AntiVirus installer icon from your Windows desktop. 2. To run NTI CD-Maker: 1 Double-click the NTI...
Power ST User Guide
Page 34
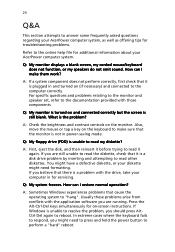
... a "hard" reboot. A: Sometimes Windows experiences problems that it again. Also, move the mouse or tap a key on the keyboard to make them work? How can I make sure that the monitor is a disk drive problem by inserting and attempting to read it is not in and turned on (if necessary) and connected to the computer correctly. Usually these problems arise from conflicts with those components. Q: My monitor displays a blank screen, my...
... a "hard" reboot. A: Sometimes Windows experiences problems that it again. Also, move the mouse or tap a key on the keyboard to make them work? How can I make sure that the monitor is a disk drive problem by inserting and attempting to read it is not in and turned on (if necessary) and connected to the computer correctly. Usually these problems arise from conflicts with those components. Q: My monitor displays a blank screen, my...
Power ST User Guide
Page 35
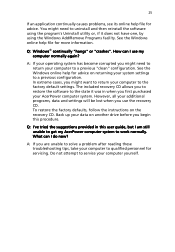
... this user guide, but I use the recovery CD. In extreme cases, you might need to uninstall and then reinstall the software using the program's Uninstall utility or, if it was in this procedure. To restore the factory defaults, follow the instructions on returning your system settings to the factory default settings. Back up your data on another drive before you are unable to solve a problem after reading these troubleshooting tips...
... this user guide, but I use the recovery CD. In extreme cases, you might need to uninstall and then reinstall the software using the program's Uninstall utility or, if it was in this procedure. To restore the factory defaults, follow the instructions on returning your system settings to the factory default settings. Back up your data on another drive before you are unable to solve a problem after reading these troubleshooting tips...


