Aspire T180 User's Guide EN
Page 3
...1 Front panel 1 Rear panel 1 System features 2 Performance 2 Multimedia 2 Connectivity 2 System peripherals 2 Mouse (PS/2 or USB, manufacturing option) 3 Keyboard (PS/2 or USB, manufacturing option) 3 Speakers 3 Setting up your computer 4 Necessary to know before setup 4 Selecting a location 4 Opening the package 4 Connecting peripherals 5 Starting your computer 5 Shutting down your computer 5 System upgrade 6 Opening the computer 6 Setting up new components 6 Troubleshooting 7 Taking care of your computer 9 Important tips 9 Cleaning and servicing...
...1 Front panel 1 Rear panel 1 System features 2 Performance 2 Multimedia 2 Connectivity 2 System peripherals 2 Mouse (PS/2 or USB, manufacturing option) 3 Keyboard (PS/2 or USB, manufacturing option) 3 Speakers 3 Setting up your computer 4 Necessary to know before setup 4 Selecting a location 4 Opening the package 4 Connecting peripherals 5 Starting your computer 5 Shutting down your computer 5 System upgrade 6 Opening the computer 6 Setting up new components 6 Troubleshooting 7 Taking care of your computer 9 Important tips 9 Cleaning and servicing...
Aspire T180 User's Guide EN
Page 5
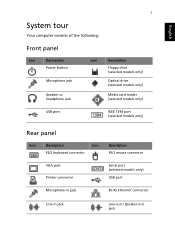
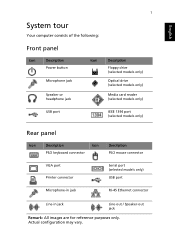
English 1 System tour Your computer consists of the following: Front panel Icon Description Power button Microphone jack Speaker or headphone jack Icon Description Floppy drive (selected models only) Optical drive (selected models only) Media card reader (selected models only) USB port IEEE 1394 port (selected models only) Rear panel Icon Description Icon PS/2 keyboard connector Description PS/2 mouse connector VGA port Printer connector Serial port (selected models only) USB port Microphone-in jack RJ-45 Ethernet connector Line-in jack Line-out / Speaker-out jack
English 1 System tour Your computer consists of the following: Front panel Icon Description Power button Microphone jack Speaker or headphone jack Icon Description Floppy drive (selected models only) Optical drive (selected models only) Media card reader (selected models only) USB port IEEE 1394 port (selected models only) Rear panel Icon Description Icon PS/2 keyboard connector Description PS/2 mouse connector VGA port Printer connector Serial port (selected models only) USB port Microphone-in jack RJ-45 Ethernet connector Line-in jack Line-out / Speaker-out jack

Aspire T180 User's Guide EN
Page 6
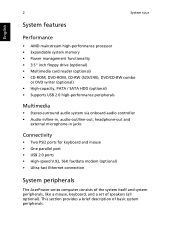
...; Power management functionality • 3.5" inch floppy drive (optional) • Multimedia card reader (optional) • CD-ROM, DVD-ROM, CD-RW (52X/24X), DVD/CD-RW combo or DVD writer (optional) • High-capacity, PATA / SATA HDD (optional) • Supports USB 2.0 high-performance peripherals Multimedia • Stereo-surround audio system via onboard audio controller • Audio-in/line-in, audio-out/line-out, headphone-out and external microphone-in jacks Connectivity • Two PS/2 ports for keyboard and mouse...
...; Power management functionality • 3.5" inch floppy drive (optional) • Multimedia card reader (optional) • CD-ROM, DVD-ROM, CD-RW (52X/24X), DVD/CD-RW combo or DVD writer (optional) • High-capacity, PATA / SATA HDD (optional) • Supports USB 2.0 high-performance peripherals Multimedia • Stereo-surround audio system via onboard audio controller • Audio-in/line-in, audio-out/line-out, headphone-out and external microphone-in jacks Connectivity • Two PS/2 ports for keyboard and mouse...
Aspire T180 User's Guide EN
Page 7
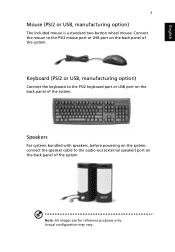
... panel of the system. Speakers For systems bundled with speakers, before powering on the system, connect the speaker cable to the PS/2 keyboard port or USB port on the back panel of the system. Actual configuration may vary. English 3 Mouse (PS/2 or USB, manufacturing option) The included mouse is a standard two-button wheel mouse. Keyboard (PS/2 or USB, manufacturing option) Connect the keyboard to the audio-out (external speaker) port on the back panel of the system. Note: All images...
... panel of the system. Speakers For systems bundled with speakers, before powering on the system, connect the speaker cable to the PS/2 keyboard port or USB port on the back panel of the system. Actual configuration may vary. English 3 Mouse (PS/2 or USB, manufacturing option) The included mouse is a standard two-button wheel mouse. Keyboard (PS/2 or USB, manufacturing option) Connect the keyboard to the audio-out (external speaker) port on the back panel of the system. Note: All images...

Aspire T180 User's Guide EN
Page 8
... included operating instructions. Setting up your computer The AcerPower series is excessively dusty or damp. Your system can accommodate extra peripheral equipment through these I /O (input/output) interfaces such as a parallel port, PS/2 keyboard and mouse ports, USB ports, two microphone ports and stereo line-out jacks (one in front and one on the rear panel) and a stereo line-in jack. English Note: Speakers are optional and...
... included operating instructions. Setting up your computer The AcerPower series is excessively dusty or damp. Your system can accommodate extra peripheral equipment through these I /O (input/output) interfaces such as a parallel port, PS/2 keyboard and mouse ports, USB ports, two microphone ports and stereo line-out jacks (one in front and one on the rear panel) and a stereo line-in jack. English Note: Speakers are optional and...

Aspire T180 User's Guide EN
Page 9
... steps below: 1 Turn on all peripheral devices. Once the start your computer From the "Start" menu, select "Shut Down" and click OK. Starting your computer After connecting all peripherals to use your dealer immediately: • AcerPower series • PS/2 or USB keyboard (manufacturing option) • PS/2 or USB mouse (manufacturing option) • Speakers (selected models only) • User's Guide and Starter poster Other user documentation and third-party software. In the event...
... steps below: 1 Turn on all peripheral devices. Once the start your computer From the "Start" menu, select "Shut Down" and click OK. Starting your computer After connecting all peripherals to use your dealer immediately: • AcerPower series • PS/2 or USB keyboard (manufacturing option) • PS/2 or USB mouse (manufacturing option) • Speakers (selected models only) • User's Guide and Starter poster Other user documentation and third-party software. In the event...

Aspire T180 User's Guide EN
Page 10
Opening the computer Before removing any panels or covers, please make sure to high-capacity HDD - Probable upgrades are: - Upgrade to shut off the computer and unplug the power cord from a CD-ROM drive to the instructions provided with AcerPower series computers. Before you choose new components, please ask your authorized Acer dealer whether the part will operate within your AcerPower series system quickly and easily by adding components. Upgrade from the outlet...
Opening the computer Before removing any panels or covers, please make sure to high-capacity HDD - Probable upgrades are: - Upgrade to shut off the computer and unplug the power cord from a CD-ROM drive to the instructions provided with AcerPower series computers. Before you choose new components, please ask your authorized Acer dealer whether the part will operate within your AcerPower series system quickly and easily by adding components. Upgrade from the outlet...
Aspire T180 User's Guide EN
Page 11
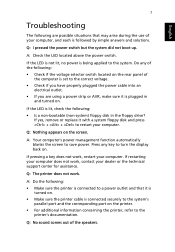
... boot up. A: Check the LED located above the power switch. Press any of the following : • Is a non-bootable (non-system) floppy disk in and turned on. Q: The printer does not work , contact your computer, and each is plugged in the floppy drive? Q: No sound comes out of your dealer or the technical support center for assistance. If yes, remove or replace it is turned on. • Make...
... boot up. A: Check the LED located above the power switch. Press any of the following : • Is a non-bootable (non-system) floppy disk in and turned on. Q: The printer does not work , contact your computer, and each is plugged in the floppy drive? Q: No sound comes out of your dealer or the technical support center for assistance. If yes, remove or replace it is turned on. • Make...
Aspire T180 User's Guide EN
Page 12
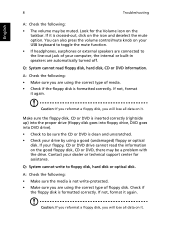
... clean and unscratched. • Check your drive by using the correct type of your USB keyboard to toggle the mute function. • If headphones, earphones or external speakers are connected to floppy disk, hard disk or optical disk. Contact your floppy, CD or DVD drive cannot read floppy disk, hard disk, CD or DVD information. Q: System cannot write to the line-out jack of media. • Check if the floppy...
... clean and unscratched. • Check your drive by using the correct type of your USB keyboard to toggle the mute function. • If headphones, earphones or external speakers are connected to floppy disk, hard disk or optical disk. Contact your floppy, CD or DVD drive cannot read floppy disk, hard disk, CD or DVD information. Q: System cannot write to the line-out jack of media. • Check if the floppy...

Aspire T180 User's Guide EN
Page 16
... not locate this product where people will often require extensive work by a qualified technician to restore the product to qualified service personnel under the following conditions: a When the power cord or plug is provided. 6 This product should be blocked or covered. d If the product does not operate normally when the operating instructions are not sure of the type of power supply cord set (provided...
... not locate this product where people will often require extensive work by a qualified technician to restore the product to qualified service personnel under the following conditions: a When the power cord or plug is provided. 6 This product should be blocked or covered. d If the product does not operate normally when the operating instructions are not sure of the type of power supply cord set (provided...

User Manual
Page 3
...1 Front panel 1 Rear panel 1 System features 2 Performance 2 Multimedia 2 Connectivity 2 System peripherals 2 Mouse (PS/2 or USB, manufacturing option) 3 Keyboard (PS/2 or USB, manufacturing option) 3 Speakers 3 Setting up your computer 4 Necessary to know before setup 4 Selecting a location 4 Opening the package 4 Connecting peripherals 5 Starting your computer 5 Shutting down your computer 5 System upgrade 6 Opening the computer 6 Setting up new components 6 Troubleshooting 7 Taking care of your computer 9 Important tips 9 Cleaning and servicing...
...1 Front panel 1 Rear panel 1 System features 2 Performance 2 Multimedia 2 Connectivity 2 System peripherals 2 Mouse (PS/2 or USB, manufacturing option) 3 Keyboard (PS/2 or USB, manufacturing option) 3 Speakers 3 Setting up your computer 4 Necessary to know before setup 4 Selecting a location 4 Opening the package 4 Connecting peripherals 5 Starting your computer 5 Shutting down your computer 5 System upgrade 6 Opening the computer 6 Setting up new components 6 Troubleshooting 7 Taking care of your computer 9 Important tips 9 Cleaning and servicing...
User Manual
Page 5
... the following: Front panel Icon Description Power button Microphone jack Speaker or headphone jack Icon Description Floppy drive (selected models only) Optical drive (selected models only) Media card reader (selected models only) USB port IEEE 1394 port (selected models only) Rear panel Icon Description Icon PS/2 keyboard connector Description PS/2 mouse connector VGA port Printer connector Serial port (selected models only) USB port Microphone-in jack RJ-45 Ethernet connector Line-in jack Line-out / Speaker-out jack Remark: All images are for reference purposes...
... the following: Front panel Icon Description Power button Microphone jack Speaker or headphone jack Icon Description Floppy drive (selected models only) Optical drive (selected models only) Media card reader (selected models only) USB port IEEE 1394 port (selected models only) Rear panel Icon Description Icon PS/2 keyboard connector Description PS/2 mouse connector VGA port Printer connector Serial port (selected models only) USB port Microphone-in jack RJ-45 Ethernet connector Line-in jack Line-out / Speaker-out jack Remark: All images are for reference purposes...
User Manual
Page 6
...; Power management functionality • 3.5" inch floppy drive (optional) • Multimedia card reader (optional) • CD-ROM, DVD-ROM, CD-RW (52X/24X), DVD/CD-RW combo or DVD writer (optional) • High-capacity, PATA / SATA HDD (optional) • Supports USB 2.0 high-performance peripherals Multimedia • Stereo-surround audio system via onboard audio controller • Audio-in/line-in, audio-out/line-out, headphone-out and external microphone-in jacks Connectivity • Two PS/2 ports for keyboard and mouse...
...; Power management functionality • 3.5" inch floppy drive (optional) • Multimedia card reader (optional) • CD-ROM, DVD-ROM, CD-RW (52X/24X), DVD/CD-RW combo or DVD writer (optional) • High-capacity, PATA / SATA HDD (optional) • Supports USB 2.0 high-performance peripherals Multimedia • Stereo-surround audio system via onboard audio controller • Audio-in/line-in, audio-out/line-out, headphone-out and external microphone-in jacks Connectivity • Two PS/2 ports for keyboard and mouse...

User Manual
Page 7
.... Keyboard (PS/2 or USB, manufacturing option) Connect the keyboard to the PS/2 keyboard port or USB port on the back panel of the system. English 3 Mouse (PS/2 or USB, manufacturing option) The included mouse is a standard two-button wheel mouse. Speakers For systems bundled with speakers, before powering on the system, connect the speaker cable to the PS/2 mouse port or USB port on the back panel of the system. Actual configuration may vary. Connect the mouse to the audio-out (external speaker) port...
.... Keyboard (PS/2 or USB, manufacturing option) Connect the keyboard to the PS/2 keyboard port or USB port on the back panel of the system. English 3 Mouse (PS/2 or USB, manufacturing option) The included mouse is a standard two-button wheel mouse. Speakers For systems bundled with speakers, before powering on the system, connect the speaker cable to the PS/2 mouse port or USB port on the back panel of the system. Actual configuration may vary. Connect the mouse to the audio-out (external speaker) port...
User Manual
Page 8
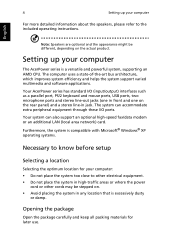
... system support varied multimedia and software applications. Furthermore, the system is compatible with Microsoft® Windows® XP operating systems. Necessary to the included operating instructions. Setting up your computer For more detailed information about the speakers, please refer to know before setup Selecting a location Selecting the optimum location for later use. 4 Setting up your computer The AcerPower series is a versatile and powerful system, supporting an AMD CPU.
... system support varied multimedia and software applications. Furthermore, the system is compatible with Microsoft® Windows® XP operating systems. Necessary to the included operating instructions. Setting up your computer For more detailed information about the speakers, please refer to know before setup Selecting a location Selecting the optimum location for later use. 4 Setting up your computer The AcerPower series is a versatile and powerful system, supporting an AMD CPU.
User Manual
Page 9
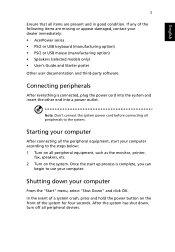
... in good condition. Note: Don't connect the system power cord before connecting all peripherals to the steps below: 1 Turn on all peripheral devices. Once the start your dealer immediately: • AcerPower series • PS/2 or USB keyboard (manufacturing option) • PS/2 or USB mouse (manufacturing option) • Speakers (selected models only) • User's Guide and Starter poster Other user documentation and third-party software. If any of the system for...
... in good condition. Note: Don't connect the system power cord before connecting all peripherals to the steps below: 1 Turn on all peripheral devices. Once the start your dealer immediately: • AcerPower series • PS/2 or USB keyboard (manufacturing option) • PS/2 or USB mouse (manufacturing option) • Speakers (selected models only) • User's Guide and Starter poster Other user documentation and third-party software. If any of the system for...
User Manual
Page 10
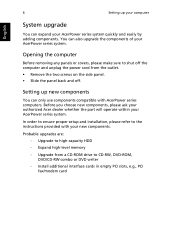
...-RW, DVD-ROM, DVD/CD-RW combo or DVD writer - Upgrade to shut off . Opening the computer Before removing any panels or covers, please make sure to high-capacity HDD - Setting up your computer English System upgrade You can only use components compatible with your new components. Expand high-level memory - Before you choose new components, please ask your authorized Acer dealer whether the part will operate within your AcerPower series system...
...-RW, DVD-ROM, DVD/CD-RW combo or DVD writer - Upgrade to shut off . Opening the computer Before removing any panels or covers, please make sure to high-capacity HDD - Setting up your computer English System upgrade You can only use components compatible with your new components. Expand high-level memory - Before you choose new components, please ask your authorized Acer dealer whether the part will operate within your AcerPower series system...

User Manual
Page 11
..., remove or replace it is turned on. • Make sure the printer cable is connected securely to turn the display back on the screen. If pressing a key does not work . English 7 Troubleshooting The following are using a power strip or AVR, make sure it is plugged in the floppy drive? A: Check the LED located above the power switch. Press any of the speakers. Q: Nothing appears on . Q: I pressed the power switch but the system did not boot...
..., remove or replace it is turned on. • Make sure the printer cable is connected securely to turn the display back on the screen. If pressing a key does not work . English 7 Troubleshooting The following are using a power strip or AVR, make sure it is plugged in the floppy drive? A: Check the LED located above the power switch. Press any of the speakers. Q: Nothing appears on . Q: I pressed the power switch but the system did not boot...

User Manual
Page 12
... press the volume control/mute knob on your USB keyboard to the line-out jack of media. • Check if the floppy disk is formatted correctly. Q: System cannot read the information on the good floppy disk, CD or DVD, there may be sure the CD or DVD is clean and unscratched. • Check your dealer or technical support center for the...
... press the volume control/mute knob on your USB keyboard to the line-out jack of media. • Check if the floppy disk is formatted correctly. Q: System cannot read the information on the good floppy disk, CD or DVD, there may be sure the CD or DVD is clean and unscratched. • Check your dealer or technical support center for the...

User Manual
Page 16
... qualified service personnel under the following conditions: a When the power cord or plug is used with this product, make sure that are covered by the operating instructions, since improper adjustment of the equipment plugged into this product where people will often require extensive work by placing the product on the power cord. e If the product has been dropped or the case has...
... qualified service personnel under the following conditions: a When the power cord or plug is used with this product, make sure that are covered by the operating instructions, since improper adjustment of the equipment plugged into this product where people will often require extensive work by placing the product on the power cord. e If the product has been dropped or the case has...


