

Acer AT110 F2 Service Guide
Page 4
... boards or other static-sensitive devices. Unplug the power cord from the power supply to disconnect power to the equipment. Operating the server in this manner results in their containers. Plug the power cord into a grounded (earthed) electrical outlet that can be properly grounded...and the internal system components to follow when setting up the system or handling parts. Safety, Care and Regulatory Information Before installing a server, be walked on or pinched by items placed against it. Plug the power cord into a grounded (earthed) electrical outlet that you...
... boards or other static-sensitive devices. Unplug the power cord from the power supply to disconnect power to the equipment. Operating the server in this manner results in their containers. Plug the power cord into a grounded (earthed) electrical outlet that can be properly grounded...and the internal system components to follow when setting up the system or handling parts. Safety, Care and Regulatory Information Before installing a server, be walked on or pinched by items placed against it. Plug the power cord into a grounded (earthed) electrical outlet that you...

Acer AT110 F2 Service Guide
Page 5
Table of Contents PREFACE REVISION HISTORY COPYRIGHT DISCLAIMER CONVENTIONS SAFETY, CARE AND REGULATORY INFORMATION PREVENTING ELECTROSTATIC DISCHARGE SERVER WARNINGS AND CAUTIONS TABLE OF CONTENTS MECHANICAL COMPONENTS SYSTEM FRU LIST SYSTEM COMPONENTS SYSTEM SPECIFICATIONS Hardware specification Environmental specification Mechanical specification Power supply specification I I I I II III III III 1 4 6 9 10 10 12 13 14 APPEARANCE OF SYSTEM Front view Rear view Internal Component Switch and LED Indicators Introduction 1 16 16 17 18 19
Table of Contents PREFACE REVISION HISTORY COPYRIGHT DISCLAIMER CONVENTIONS SAFETY, CARE AND REGULATORY INFORMATION PREVENTING ELECTROSTATIC DISCHARGE SERVER WARNINGS AND CAUTIONS TABLE OF CONTENTS MECHANICAL COMPONENTS SYSTEM FRU LIST SYSTEM COMPONENTS SYSTEM SPECIFICATIONS Hardware specification Environmental specification Mechanical specification Power supply specification I I I I II III III III 1 4 6 9 10 10 12 13 14 APPEARANCE OF SYSTEM Front view Rear view Internal Component Switch and LED Indicators Introduction 1 16 16 17 18 19

Acer AT110 F2 Service Guide
Page 7
Console Redirection Hardware Monitor Security Menu Setting a System Password Changing a System Password Removing a System Password Server Management Menu System Information Event Log Configuration Boot Option Menu Boot Manager Menu Exit Menu 50 52 53 54 54 54 55 56 57 59 60 61 TROUBLESHOOTING Error Symptoms List 62 62 BIOS BEEP CODES BIOS Beep Codes Table PEI Beep Codes DXE Beep Codes BIOS Recovery Instruction 65 65 65 65 65 BIOS POST ERROR MESSAGES LIST BIOS POST error message list PEI Phase DXE Phase 68 68 68 69 UNDETERMINED PROBLEMS 71 3
Console Redirection Hardware Monitor Security Menu Setting a System Password Changing a System Password Removing a System Password Server Management Menu System Information Event Log Configuration Boot Option Menu Boot Manager Menu Exit Menu 50 52 53 54 54 54 55 56 57 59 60 61 TROUBLESHOOTING Error Symptoms List 62 62 BIOS BEEP CODES BIOS Beep Codes Table PEI Beep Codes DXE Beep Codes BIOS Recovery Instruction 65 65 65 65 65 BIOS POST ERROR MESSAGES LIST BIOS POST error message list PEI Phase DXE Phase 68 68 68 69 UNDETERMINED PROBLEMS 71 3
Acer AT110 F2 Service Guide
Page 17
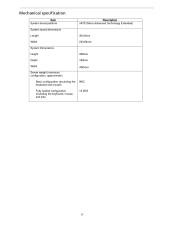
Mechanical specification Item System board platform System board dimensions Length Width System Dimensions Height Depth Width Server weight (maximum configuration, approximate) Basic configuration (excluding the keyboard and mouse) Fully loaded configuration (including the keyboard, mouse, and kits) 8KG 358mm 180mm 450mm 304.8mm 243.84mm Description uATX (Micro Advanced Technology Extended) 12.2KG 13
Mechanical specification Item System board platform System board dimensions Length Width System Dimensions Height Depth Width Server weight (maximum configuration, approximate) Basic configuration (excluding the keyboard and mouse) Fully loaded configuration (including the keyboard, mouse, and kits) 8KG 358mm 180mm 450mm 304.8mm 243.84mm Description uATX (Micro Advanced Technology Extended) 12.2KG 13

Acer AT110 F2 Service Guide
Page 29
To disassemble the Acer AT110 F2 Server, please pay attention to avoid mismatch when putting back the components. 25 Installing/Removing System Hardware This chapter contains step-by-step procedures on how to disassemble the server system for the different components vary in size. During the disassembly process, group the screws with the corresponding components to each section's instruction and tools needed. NOTE: The screws for maintenance and troubleshooting.
To disassemble the Acer AT110 F2 Server, please pay attention to avoid mismatch when putting back the components. 25 Installing/Removing System Hardware This chapter contains step-by-step procedures on how to disassemble the server system for the different components vary in size. During the disassembly process, group the screws with the corresponding components to each section's instruction and tools needed. NOTE: The screws for maintenance and troubleshooting.

Acer AT110 F2 Service Guide
Page 39
...- Display the BIOS setup General Help panel. F9 - Save changes made the Setup and close all open applications, then restart the server. 2. During POST, press F2 If you fail to choose from a pop-up menu, closes the pop-up menu. BIOS Setup Navigation Keys Use the following each...selections on the menu bar. Up and Down arrow keys - NOTE: Availability of a multiple page menu. + and - Press these keys repeatedly to restart the server. NOTE: Grayed-out fields are making selections from a pop-up without making a selection. • • • F1 - If you are not user-...
...- Display the BIOS setup General Help panel. F9 - Save changes made the Setup and close all open applications, then restart the server. 2. During POST, press F2 If you fail to choose from a pop-up menu, closes the pop-up menu. BIOS Setup Navigation Keys Use the following each...selections on the menu bar. Up and Down arrow keys - NOTE: Availability of a multiple page menu. + and - Press these keys repeatedly to restart the server. NOTE: Grayed-out fields are making selections from a pop-up without making a selection. • • • F1 - If you are not user-...
Acer AT110 F2 Service Guide
Page 52
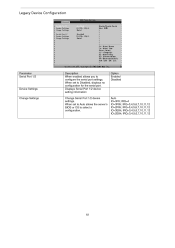
Legacy Device Configuration Parameter Serial Port 1/2 Device Settings Description When enabled allows you to Disabled, displays no configuration for the serial port. IRQ=3,4,5,6,7,10,11,12 IO=3E8h; IRQ=3,4,5,6,7,10,11,12 48 Option Enabled Disabled Change Settings Auto IO=3F8; Displays Serial Port 1/2 device setting information Change Serial Port 1/2 device settings. When set to Auto allows the server's BIOS or OS to select a configuration. IRQ=3,4,5,6,7,10,11,12 IO=2F8h; IRQ=3,4,5,6,7,10,11,12 IO=2E8h; IRQ=4 IO=3F8h; When set to configure the serial port settings.
Legacy Device Configuration Parameter Serial Port 1/2 Device Settings Description When enabled allows you to Disabled, displays no configuration for the serial port. IRQ=3,4,5,6,7,10,11,12 IO=3E8h; IRQ=3,4,5,6,7,10,11,12 48 Option Enabled Disabled Change Settings Auto IO=3F8; Displays Serial Port 1/2 device setting information Change Serial Port 1/2 device settings. When set to Auto allows the server's BIOS or OS to select a configuration. IRQ=3,4,5,6,7,10,11,12 IO=2F8h; IRQ=3,4,5,6,7,10,11,12 IO=2E8h; IRQ=4 IO=3F8h; When set to configure the serial port settings.

Acer AT110 F2 Service Guide
Page 57
... to the Setup menus. There are three types of passwords that you to safeguard and protect the system from unauthorized use by setting up the server.
... to the Setup menus. There are three types of passwords that you to safeguard and protect the system from unauthorized use by setting up the server.
Acer AT110 F2 Service Guide
Page 59
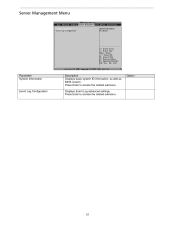
Displays Event Log advanced settings. Option Event Log Configuration 55 Server Management Menu Parameter System Information Description Displays basic system ID information, as well as BIOS version. Press Enter to access the related submenu. Press Enter to access the related submenu.
Displays Event Log advanced settings. Option Event Log Configuration 55 Server Management Menu Parameter System Information Description Displays basic system ID information, as well as BIOS version. Press Enter to access the related submenu. Press Enter to access the related submenu.
Acer AT110 F2 Service Guide
Page 63
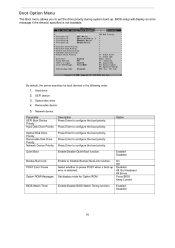
... menu allows you to configure the boot priority. Press Enter to configure the boot priority. Press Enter to configure the boot priority. By default, the server searches for Option ROM. Optical disc drive 4. Removable device 5. Press Enter to configure the boot priority. Enabled Disabled On Off Disabled All, But Keyboard All...
... menu allows you to configure the boot priority. Press Enter to configure the boot priority. Press Enter to configure the boot priority. By default, the server searches for Option ROM. Optical disc drive 4. Removable device 5. Press Enter to configure the boot priority. Enabled Disabled On Off Disabled All, But Keyboard All...


