
User Manual
Page 2
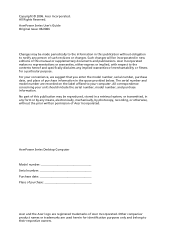
... in new editions of this publication without the prior written permission of this publication may be reproduced, stored in a retrieval system, or transmitted, in the space provided below. No part of Acer Incorporated. AcerPower Series Desktop Computer Model number Serial number Purchase date Place of purchase Acer and the Acer logo are recorded on the label affixed to their respective owners. Acer Incorporated...
... in new editions of this publication without the prior written permission of this publication may be reproduced, stored in a retrieval system, or transmitted, in the space provided below. No part of Acer Incorporated. AcerPower Series Desktop Computer Model number Serial number Purchase date Place of purchase Acer and the Acer logo are recorded on the label affixed to their respective owners. Acer Incorporated...

User Manual
Page 3
... or short-out parts that could be seriously damaged. • Slots and openings are not sure of the type of power indicated on the marking label. Never spill liquid of any kind into the product. • To avoid damage of internal components and to protect it could result in too many devices. Follow all products plugged into the...
... or short-out parts that could be seriously damaged. • Slots and openings are not sure of the type of power indicated on the marking label. Never spill liquid of any kind into the product. • To avoid damage of internal components and to protect it could result in too many devices. Follow all products plugged into the...
User Manual
Page 4
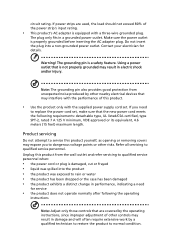
... require extensive work by the operating instructions, since improper adjustment of the power strip's input rating. • This product's AC adapter is properly grounded before inserting the AC adapter plug. Refer all servicing to dangerous voltage points or other controls may result in a grounded power outlet. If power strips are covered by a qualified technician to restore the product to replace the power cord set . Using a power outlet that...
... require extensive work by the operating instructions, since improper adjustment of the power strip's input rating. • This product's AC adapter is properly grounded before inserting the AC adapter plug. Refer all servicing to dangerous voltage points or other controls may result in a grounded power outlet. If power strips are covered by a qualified technician to restore the product to replace the power cord set . Using a power outlet that...
User Manual
Page 5
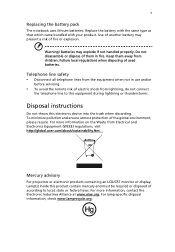
... in use and/or before servicing. • To avoid the remote risk of them away from Electrical and Electronics Equipment (WEEE) regulations, visit http://global.acer.com/about/sustainability.htm. For lamp-specific disposal information, check www.lamprecycle.org. Mercury advisory For projectors or electronic products containing an LCD/CRT monitor or display: Lamp(s) inside this electronic device into...
... in use and/or before servicing. • To avoid the remote risk of them away from Electrical and Electronics Equipment (WEEE) regulations, visit http://global.acer.com/about/sustainability.htm. For lamp-specific disposal information, check www.lamprecycle.org. Mercury advisory For projectors or electronic products containing an LCD/CRT monitor or display: Lamp(s) inside this electronic device into...

User Manual
Page 6
... eyestrain and headaches after long hours of working conditions, personal health and other musculoskeletal disorders. Observe the following symptoms may lead to carpal tunnel syndrome, tendonitis, tenosynovitis or other factors greatly increase the risk of the monitor, using a footrest, or raising your shoulders • install the external display, keyboard and mouse properly and within comfortable reach • if...
... eyestrain and headaches after long hours of working conditions, personal health and other musculoskeletal disorders. Observe the following symptoms may lead to carpal tunnel syndrome, tendonitis, tenosynovitis or other factors greatly increase the risk of the monitor, using a footrest, or raising your shoulders • install the external display, keyboard and mouse properly and within comfortable reach • if...
User Manual
Page 9
... 3 Accessing the User's Guide 4 Front and rear panels 5 Keyboard 6 Optical drive (for selected models) 7 Taking care of your CDs and DVDs 7 2 Setting up your computer 9 Arranging a comfortable work area 11 Adjusting your chair 11 Positioning your PC 11 Positioning your monitor 13 Positioning your keyboard 13 Positioning your mouse 13 Connecting peripherals 14 Connecting your mouse and keyboard 14 Connecting a monitor 15 Connecting the power cable 16 Taking care of your AC adapter 16 Turning on...
... 3 Accessing the User's Guide 4 Front and rear panels 5 Keyboard 6 Optical drive (for selected models) 7 Taking care of your CDs and DVDs 7 2 Setting up your computer 9 Arranging a comfortable work area 11 Adjusting your chair 11 Positioning your PC 11 Positioning your monitor 13 Positioning your keyboard 13 Positioning your mouse 13 Connecting peripherals 14 Connecting your mouse and keyboard 14 Connecting a monitor 15 Connecting the power cable 16 Taking care of your AC adapter 16 Turning on...
User Manual
Page 13
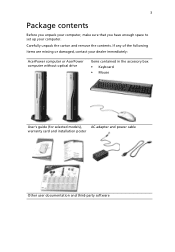
3 Package contents Before you unpack your computer, make sure that you have enough space to set up your dealer immediately: AcerPower computer or AcerPower computer without optical drive Items contained in the accessory box • Keyboard • Mouse User's guide (for selected models), AC adapter and power cable warranty card and installation poster Other user documentation and third-party software If any of the following items are missing or damaged, contact your computer. Carefully unpack the carton and remove the contents.
3 Package contents Before you unpack your computer, make sure that you have enough space to set up your dealer immediately: AcerPower computer or AcerPower computer without optical drive Items contained in the accessory box • Keyboard • Mouse User's guide (for selected models), AC adapter and power cable warranty card and installation poster Other user documentation and third-party software If any of the following items are missing or damaged, contact your computer. Carefully unpack the carton and remove the contents.
User Manual
Page 15
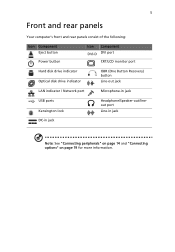
5 Front and rear panels Your computer's front and rear panels consist of the following: Icon Component Eject button Icon Component DVI port Power button CRT/LCD monitor port Hard disk drive indicator Optical disk drive indicator OBR (One Button Recovery) button Line-out jack LAN indicator / Network port Microphone-in jack USB ports Kensington lock DC-in jack Headphone/Speaker-out/lineout port Line-in jack Note: See "Connecting peripherals" on page 14 and "Connecting options" on page 19 for more information.
5 Front and rear panels Your computer's front and rear panels consist of the following: Icon Component Eject button Icon Component DVI port Power button CRT/LCD monitor port Hard disk drive indicator Optical disk drive indicator OBR (One Button Recovery) button Line-out jack LAN indicator / Network port Microphone-in jack USB ports Kensington lock DC-in jack Headphone/Speaker-out/lineout port Line-in jack Note: See "Connecting peripherals" on page 14 and "Connecting options" on page 19 for more information.
User Manual
Page 17
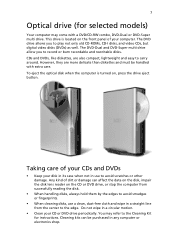
.... This drive is turned on the front panel of dirt or damage can be handled with a DVD/CD-RW combo, DVD-Dual or DVD-Super multi drive. Do not wipe in any computer or electronics shop. To eject the optical disk when the computer is located on , press the drive eject button. Any kind of your CD or DVD drive periodically. 7 Optical drive (for instructions. The DVD drive allows you...
.... This drive is turned on the front panel of dirt or damage can be handled with a DVD/CD-RW combo, DVD-Dual or DVD-Super multi drive. Do not wipe in any computer or electronics shop. To eject the optical disk when the computer is located on , press the drive eject button. Any kind of your CD or DVD drive periodically. 7 Optical drive (for instructions. The DVD drive allows you...
User Manual
Page 24
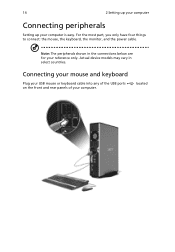
Note: The peripherals shown in select countries. Actual device models may vary in the connections below are for your computer is easy. For the most part, you only have four things to connect: the mouse, the keyboard, the monitor, and the power cable. 14 2 Setting up your computer Connecting peripherals Setting up your reference only. Connecting your mouse and keyboard Plug your USB mouse or keyboard cable into any of the USB ports on the front and rear panels of your computer. located
Note: The peripherals shown in select countries. Actual device models may vary in the connections below are for your computer is easy. For the most part, you only have four things to connect: the mouse, the keyboard, the monitor, and the power cable. 14 2 Setting up your computer Connecting peripherals Setting up your reference only. Connecting your mouse and keyboard Plug your USB mouse or keyboard cable into any of the USB ports on the front and rear panels of your computer. located

User Manual
Page 27
To turn the computer on and get to your computer, such as the monitor, printer, speakers, etc. 2 On the front panel of your computer, press the Power button. If you are using a power strip or an AVR (Auto-Voltage Regulator), make sure that the power cable is plugged in the power cable, you are now ready to turn on your computer: 1 Turn on all peripherals connected to work. Important: Make sure that it is properly plugged into an electrical outlet. 17 Turning on your computer After connecting the necessary peripherals and plugging in and turned on.
To turn the computer on and get to your computer, such as the monitor, printer, speakers, etc. 2 On the front panel of your computer, press the Power button. If you are using a power strip or an AVR (Auto-Voltage Regulator), make sure that the power cable is plugged in the power cable, you are now ready to turn on your computer: 1 Turn on all peripherals connected to work. Important: Make sure that it is properly plugged into an electrical outlet. 17 Turning on your computer After connecting the necessary peripherals and plugging in and turned on.
User Manual
Page 29
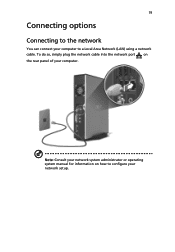
To do so, simply plug the network cable into the network port on how to a Local Area Network (LAN) using a network cable. Note: Consult your network system administrator or operating system manual for information on the rear panel of your network setup. 19 Connecting options Connecting to the network You can connect your computer to configure your computer.
To do so, simply plug the network cable into the network port on how to a Local Area Network (LAN) using a network cable. Note: Consult your network system administrator or operating system manual for information on the rear panel of your network setup. 19 Connecting options Connecting to the network You can connect your computer to configure your computer.
User Manual
Page 30
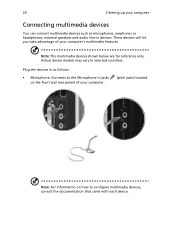
... jacks on the front and rear panels of your computer's multimedia features. Actual device models may vary in devices. Plug the devices in as microphones, earphones or headphones, external speakers and audio line-in selected countries. These devices will let you take advantage of your computer Connecting multimedia devices You can connect multimedia devices such as follows: • Microphone: Connects to configure multimedia devices, consult the documentation that...
... jacks on the front and rear panels of your computer's multimedia features. Actual device models may vary in devices. Plug the devices in as microphones, earphones or headphones, external speakers and audio line-in selected countries. These devices will let you take advantage of your computer Connecting multimedia devices You can connect multimedia devices such as follows: • Microphone: Connects to configure multimedia devices, consult the documentation that...
User Manual
Page 31
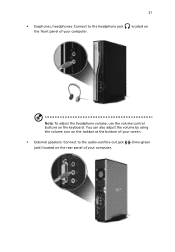
21 • Earphones, headphones: Connect to the audio-out/line-out jack jack) located on the rear panel of your computer. (lime-green You can also adjust the volume by using the volume icon on the keyboard. located on Note: To adjust the headphone volume, use the volume control buttons on the taskbar at the bottom of your screen. • External speakers: Connect to the headphone jack the front panel of your computer.
21 • Earphones, headphones: Connect to the audio-out/line-out jack jack) located on the rear panel of your computer. (lime-green You can also adjust the volume by using the volume icon on the keyboard. located on Note: To adjust the headphone volume, use the volume control buttons on the taskbar at the bottom of your screen. • External speakers: Connect to the headphone jack the front panel of your computer.

User Manual
Page 32
22 2 Setting up your computer • Audio line-in device: Connects to the audio-in/line-in jack jack) located on the rear panel of your computer (light blue
22 2 Setting up your computer • Audio line-in device: Connects to the audio-in/line-in jack jack) located on the rear panel of your computer (light blue

User Manual
Page 36
... will erase all onscreen instructions. Running the Recovery operation will restore your system's original factory default settings or last system backup. 1 Your AcerPower series computer includes an OBR (see page5"Front and rear panels") button, a feature that makes restoring your system quick and easy. 2 After the POST runs, Press Alt + F10 combine key during BIOS to back up your local vendor or authorised Acer representative immediately. Note : This...
... will erase all onscreen instructions. Running the Recovery operation will restore your system's original factory default settings or last system backup. 1 Your AcerPower series computer includes an OBR (see page5"Front and rear panels") button, a feature that makes restoring your system quick and easy. 2 After the POST runs, Press Alt + F10 combine key during BIOS to back up your local vendor or authorised Acer representative immediately. Note : This...

User Manual
Page 39
... and turned on. Your computer's power management function automatically blanks the screen to turn the display back on the icon and deselect the Mute option. If it is being applied to the system. You can restart your dealer or technical support center for the Volume icon on the screen. I pressed the power switch but the system did not boot up. If pressing a key does not work .
... and turned on. Your computer's power management function automatically blanks the screen to turn the display back on the icon and deselect the Mute option. If it is being applied to the system. You can restart your dealer or technical support center for the Volume icon on the screen. I pressed the power switch but the system did not boot up. If pressing a key does not work .
User Manual
Page 40
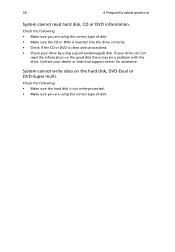
... correct type of disk. Check the following : • Make sure the hard disk is clean and unscratched. • Check your dealer or technical support center for assistance. If your drive can not read hard disk, CD or DVD information. System cannot write data on the good disk there may be a problem with the drive. Check the following : • Make sure you are using the correct type of disk. • Make...
... correct type of disk. Check the following : • Make sure the hard disk is clean and unscratched. • Check your dealer or technical support center for assistance. If your drive can not read hard disk, CD or DVD information. System cannot write data on the good disk there may be a problem with the drive. Check the following : • Make sure you are using the correct type of disk. • Make...
User Manual
Page 45
... with all of correct operation at the higher speeds for compliance with Telecom's Telepermit requirements are dependent on local power, is available for compliance with Telecom's Specifications: a There shall be set to operate within any 30 minute period for any single manual call to another device connected to the same number within the following limits for emergency use. Please ensure that...
... with all of correct operation at the higher speeds for compliance with Telecom's Telepermit requirements are dependent on local power, is available for compliance with Telecom's Specifications: a There shall be set to operate within any 30 minute period for any single manual call to another device connected to the same number within the following limits for emergency use. Please ensure that...

User Manual
Page 51
41 Index A accessing the online User's Guide 4 C connecting options multimedia devices 20 audio line-in device 22 earphones/headphones 21 external speakers 20 microphone 20 network 19 serial mouse 19 D disk drives CD-ROM/DVD-ROM/CD-RW drive inserting CDs/DVDs 7 taking care CDs/DVDs 7 F Frequently-asked questions 29 blank screen 29 no audio 29 no sound 29 printer not working 29 system cannot read disk 30 system cannot write to disk 30 system did not boot up...
41 Index A accessing the online User's Guide 4 C connecting options multimedia devices 20 audio line-in device 22 earphones/headphones 21 external speakers 20 microphone 20 network 19 serial mouse 19 D disk drives CD-ROM/DVD-ROM/CD-RW drive inserting CDs/DVDs 7 taking care CDs/DVDs 7 F Frequently-asked questions 29 blank screen 29 no audio 29 no sound 29 printer not working 29 system cannot read disk 30 system cannot write to disk 30 system did not boot up...


