
Aspire One AOD257 and Happy 2 Netbook Service Guide
Page 5
... Battery 1-8 Input and Controls 1-8 I/O Ports 1-8 Optional Items 1-8 Warranty 1-9 Eco-compliance 1-9 Environment 1-9 Software 1-10 Notebook Tour 1-11 Touchpad Basics 1-18 Using the Keyboard 1-19 Windows Keys 1-21 Hotkeys 1-22 Using the communication key 1-23 Specification Tables 1-25 Computer specifications 1-25 Processor 1-26 Processor Specifications 1-26 CPU Fan True Value Table (DC Mode 1-28 CPU Fan True Value Table (AC Mode 1-29 System Memory 1-29 Memory Combinations 1-30 Video Interface 1-30 BIOS 1-30 LAN Interface 1-31 Keyboard 1-31 Hard Disk Drive...
... Battery 1-8 Input and Controls 1-8 I/O Ports 1-8 Optional Items 1-8 Warranty 1-9 Eco-compliance 1-9 Environment 1-9 Software 1-10 Notebook Tour 1-11 Touchpad Basics 1-18 Using the Keyboard 1-19 Windows Keys 1-21 Hotkeys 1-22 Using the communication key 1-23 Specification Tables 1-25 Computer specifications 1-25 Processor 1-26 Processor Specifications 1-26 CPU Fan True Value Table (DC Mode 1-28 CPU Fan True Value Table (AC Mode 1-29 System Memory 1-29 Memory Combinations 1-30 Video Interface 1-30 BIOS 1-30 LAN Interface 1-31 Keyboard 1-31 Hard Disk Drive...
Aspire One AOD257 and Happy 2 Netbook Service Guide
Page 6
...1-34 Mini Card 1-35 3G Card (not available in this model 1-35 Audio Codec and Amplifier 1-36 Audio Interface 1-38 Battery 1-38 VRAM 1-38 USB Port 1-39 AC Adapter 1-39 System Power Management 1-40 Card Reader 1-40 System LED Indicator 1-41 System DMA Specification 1-41 CHAPTER 2 System Utilities BIOS Setup Utility 2-3 Navigating the BIOS Utility 2-3 BIOS 2-4 Information 2-4 Main 2-6 Security 2-8 Boot 2-12 Exit 2-13 BIOS Flash Utilities 2-14 DOS Flash Utility 2-15 WinFlash Utility 2-16 Clearing BIOS Passwords 2-17 Removing BIOS Passwords 2-18 Removing Insyde HDD Password...
...1-34 Mini Card 1-35 3G Card (not available in this model 1-35 Audio Codec and Amplifier 1-36 Audio Interface 1-38 Battery 1-38 VRAM 1-38 USB Port 1-39 AC Adapter 1-39 System Power Management 1-40 Card Reader 1-40 System LED Indicator 1-41 System DMA Specification 1-41 CHAPTER 2 System Utilities BIOS Setup Utility 2-3 Navigating the BIOS Utility 2-3 BIOS 2-4 Information 2-4 Main 2-6 Security 2-8 Boot 2-12 Exit 2-13 BIOS Flash Utilities 2-14 DOS Flash Utility 2-15 WinFlash Utility 2-16 Clearing BIOS Passwords 2-17 Removing BIOS Passwords 2-18 Removing Insyde HDD Password...
Aspire One AOD257 and Happy 2 Netbook Service Guide
Page 8
... Camera Module Installation 3-40 CHAPTER 4 Troubleshooting Introduction 4-3 General Information 4-3 Power On Issues 4-4 No Display Issues 4-5 LCD Failure 4-8 Keyboard Failure 4-9 Touchpad Failure 4-10 Internal Speaker Failure 4-11 Microphone Failure 4-13 USB Failure 4-14 Other Functions Failure 4-15 Intermittent Problems 4-16 Undetermined Problems 4-16 Post Codes 4-17 CHAPTER 5 Jumper and Connector Locations Mainboard Jumper and Connector Locations 5-3 Clearing Password Check and BIOS Recovery 5-5 Clearing Password Check 5-5 Clear CMOS Jumper 5-6 BIOS Recovery by Crisis Disk...
... Camera Module Installation 3-40 CHAPTER 4 Troubleshooting Introduction 4-3 General Information 4-3 Power On Issues 4-4 No Display Issues 4-5 LCD Failure 4-8 Keyboard Failure 4-9 Touchpad Failure 4-10 Internal Speaker Failure 4-11 Microphone Failure 4-13 USB Failure 4-14 Other Functions Failure 4-15 Intermittent Problems 4-16 Undetermined Problems 4-16 Post Codes 4-17 CHAPTER 5 Jumper and Connector Locations Mainboard Jumper and Connector Locations 5-3 Clearing Password Check and BIOS Recovery 5-5 Clearing Password Check 5-5 Clear CMOS Jumper 5-6 BIOS Recovery by Crisis Disk...
Aspire One AOD257 and Happy 2 Netbook Service Guide
Page 12
... Battery 1-8 Input and Controls 1-8 I/O Ports 1-8 Optional Items 1-8 Warranty 1-9 Eco-compliance 1-9 Environment 1-9 Software 1-10 Notebook Tour 1-11 Touchpad Basics 1-18 Using the Keyboard 1-19 Windows Keys 1-21 Hotkeys 1-22 Using the communication key 1-23 Specification Tables 1-25 Computer specifications 1-25 Processor 1-26 Processor Specifications 1-26 CPU Fan True Value Table (DC Mode 1-28 CPU Fan True Value Table (AC Mode 1-29 System Memory 1-29 Memory Combinations 1-30 Video Interface 1-30 BIOS 1-30 LAN Interface 1-31 Keyboard 1-31 Hard Disk Drive...
... Battery 1-8 Input and Controls 1-8 I/O Ports 1-8 Optional Items 1-8 Warranty 1-9 Eco-compliance 1-9 Environment 1-9 Software 1-10 Notebook Tour 1-11 Touchpad Basics 1-18 Using the Keyboard 1-19 Windows Keys 1-21 Hotkeys 1-22 Using the communication key 1-23 Specification Tables 1-25 Computer specifications 1-25 Processor 1-26 Processor Specifications 1-26 CPU Fan True Value Table (DC Mode 1-28 CPU Fan True Value Table (AC Mode 1-29 System Memory 1-29 Memory Combinations 1-30 Video Interface 1-30 BIOS 1-30 LAN Interface 1-31 Keyboard 1-31 Hard Disk Drive...
Aspire One AOD257 and Happy 2 Netbook Service Guide
Page 17
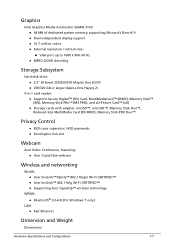
... (Aspire One Happy 2) 5-in-1 card reader: Supports Secure Digital™ (SD) Card, MultiMediaCard™ (MMC), Memory Stick™ (MS), Memory Stick PRo™ (MS PRO), and xD-Picture Card™ (xD) Storage cards with adapter: miniSD™, microSD™, Memory Stick Duo™, Reduced-Size MultiMedia Card (RS-MMC), Memory Stick PRO Duo™ Privacy Control 0 BIOS user, supervisor, HDD passwords Kensington lock slot Webcam 0 Acer Video Conference, featuring: Acer Crystal Eye webcam Wireless and networking 0 WLAN: Acer InviLink...
... (Aspire One Happy 2) 5-in-1 card reader: Supports Secure Digital™ (SD) Card, MultiMediaCard™ (MMC), Memory Stick™ (MS), Memory Stick PRo™ (MS PRO), and xD-Picture Card™ (xD) Storage cards with adapter: miniSD™, microSD™, Memory Stick Duo™, Reduced-Size MultiMedia Card (RS-MMC), Memory Stick PRO Duo™ Privacy Control 0 BIOS user, supervisor, HDD passwords Kensington lock slot Webcam 0 Acer Video Conference, featuring: Acer Crystal Eye webcam Wireless and networking 0 WLAN: Acer InviLink...
Aspire One AOD257 and Happy 2 Netbook Service Guide
Page 21
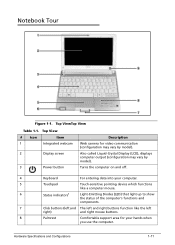
Top ViewTop View Table 1-1. Hardware Specifications and Configurations 1-11 Top View # Icon Item Description 1 Integrated webcam Web camera for video communication (configuration may vary by model). 2 Display screen Also called Liquid-Crystal Display (LCD), displays computer output (configuration may vary by model). 3 Power button Turns the computer on and off. 4 Keyboard For entering data into your computer. 5 Touchpad Touch-sensitive pointing device which functions like a computer mouse. 6 Status indicators1 Light-Emitting Diodes (LED) that light up to show the...
Top ViewTop View Table 1-1. Hardware Specifications and Configurations 1-11 Top View # Icon Item Description 1 Integrated webcam Web camera for video communication (configuration may vary by model). 2 Display screen Also called Liquid-Crystal Display (LCD), displays computer output (configuration may vary by model). 3 Power button Turns the computer on and off. 4 Keyboard For entering data into your computer. 5 Touchpad Touch-sensitive pointing device which functions like a computer mouse. 6 Status indicators1 Light-Emitting Diodes (LED) that light up to show the...
Aspire One AOD257 and Happy 2 Netbook Service Guide
Page 33
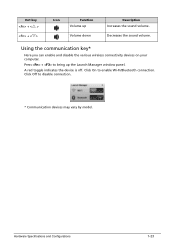
Press + to bring up Volume down Description Increases the sound volume. Hot key + + Icon Function Volume up the Launch Manager window panel. Decreases the sound volume. Click Off to enable Wi-Fi/Bluetooth connection. Using the communication key* 0 Here you can enable and disable the various wireless connectivity devices on your computer. A red toggle indicates the device is off. Click On to disable connection. * Communication devices may vary by model. Hardware Specifications and Configurations 1-23
Press + to bring up Volume down Description Increases the sound volume. Hot key + + Icon Function Volume up the Launch Manager window panel. Decreases the sound volume. Click Off to enable Wi-Fi/Bluetooth connection. Using the communication key* 0 Here you can enable and disable the various wireless connectivity devices on your computer. A red toggle indicates the device is off. Click On to disable connection. * Communication devices may vary by model. Hardware Specifications and Configurations 1-23
Aspire One AOD257 and Happy 2 Netbook Service Guide
Page 39
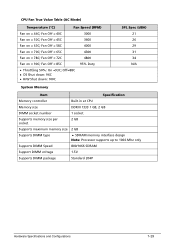
... Memory Item Specification Memory controller Built in at CPU Memory size DDRIII 1333 1 GB, 2 GB DIMM socket number 1 socket Supports memory size per socket 2 GB Supports maximum memory size 2 GB Supports DIMM type SDRAM memory interface design Note: Processor supports up to 1066 Mhz only Supports DIMM Speed 800/1066 SDRAM Support DIMM voltage 1.5V Supports DIMM package Standard 204P Hardware Specifications and Configurations 1-29 CPU Fan True Value Table (AC Mode...
... Memory Item Specification Memory controller Built in at CPU Memory size DDRIII 1333 1 GB, 2 GB DIMM socket number 1 socket Supports memory size per socket 2 GB Supports maximum memory size 2 GB Supports DIMM type SDRAM memory interface design Note: Processor supports up to 1066 Mhz only Supports DIMM Speed 800/1066 SDRAM Support DIMM voltage 1.5V Supports DIMM package Standard 204P Hardware Specifications and Configurations 1-29 CPU Fan True Value Table (AC Mode...

Aspire One AOD257 and Happy 2 Netbook Service Guide
Page 50
... disc prior to Disk (S4) Specification Al devices in this state. Card Reader Item Chipset Package Maximum supported size Features Specification CM7R-052 LQFP 48P 16G 5 in the system are turned off completely. Individual devices such as the CPU and hard disc may be power managed in the system are turned off completely. CPU set power down VGA Suspend Audio Power Down Hard Disk Power Down Super I/O Low Power mode Also called Hibernation...
... disc prior to Disk (S4) Specification Al devices in this state. Card Reader Item Chipset Package Maximum supported size Features Specification CM7R-052 LQFP 48P 16G 5 in the system are turned off completely. Individual devices such as the CPU and hard disc may be power managed in the system are turned off completely. CPU set power down VGA Suspend Audio Power Down Hard Disk Power Down Super I/O Low Power mode Also called Hibernation...
Aspire One AOD257 and Happy 2 Netbook Service Guide
Page 51
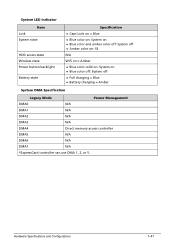
System LED Indicator Item Lock System state HDD access state Wireless state Power button backlight Battery state Specification Caps Lock on = Blue Blue color on: System on Blue color and amber color off: System off Amber color on: S3 N/A Wifi on = Amber Blue color solid on: System on Blue color off: System off Full charging = Blue Battery charging = Amber System DMA Specification Legacy Mode Power Management DMA0...
System LED Indicator Item Lock System state HDD access state Wireless state Power button backlight Battery state Specification Caps Lock on = Blue Blue color on: System on Blue color and amber color off: System off Amber color on: S3 N/A Wifi on = Amber Blue color solid on: System on Blue color off: System off Full charging = Blue Battery charging = Amber System DMA Specification Legacy Mode Power Management DMA0...
Aspire One AOD257 and Happy 2 Netbook Service Guide
Page 57
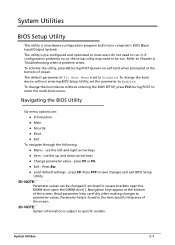
... Specific Help area of screen. Refer to specific models. If configuration problems occur, the setup utility may need to run . To change the boot device without entering BIOS Setup Utility, set to enter the multi-boot menu. Navigating the BIOS Utility 0 Six menu options are: Information Main Security Boot Exit To navigate through the following: Menu - Navigation keys appear at the bottom of the screen. The default parameter of the screen. Read parameter help is found in square brackets open the DIMM door open...
... Specific Help area of screen. Refer to specific models. If configuration problems occur, the setup utility may need to run . To change the boot device without entering BIOS Setup Utility, set to enter the multi-boot menu. Navigating the BIOS Utility 0 Six menu options are: Information Main Security Boot Exit To navigate through the following: Menu - Navigation keys appear at the bottom of the screen. The default parameter of the screen. Read parameter help is found in square brackets open the DIMM door open...

Aspire One AOD257 and Happy 2 Netbook Service Guide
Page 64
... save changes and exit the BIOS Setup Utility. Type new password in Enter Current Password field and press Enter. 3. NOTE: NOTE: Password on Boot must be set Supervisor Password parameter to activate the password feature. 5. Setup Notice The password setting is OK, the screen will set to Enabled to Clear. 4. Press Enter. Set Supervisor Password 2. Computer sets Supervisor Password parameter to highlight Set Supervisor Password and press Enter. If the verification is complete after the user presses Enter. Type current password in Enter Current Password field...
... save changes and exit the BIOS Setup Utility. Type new password in Enter Current Password field and press Enter. 3. NOTE: NOTE: Password on Boot must be set Supervisor Password parameter to activate the password feature. 5. Setup Notice The password setting is OK, the screen will set to Enabled to Clear. 4. Press Enter. Set Supervisor Password 2. Computer sets Supervisor Password parameter to highlight Set Supervisor Password and press Enter. If the verification is complete after the user presses Enter. Type current password in Enter Current Password field...
Aspire One AOD257 and Happy 2 Netbook Service Guide
Page 71
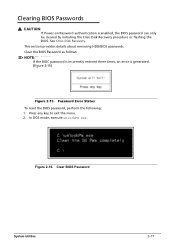
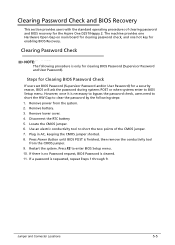
... To reset the BIOS password, perform the following: 1. In DOS mode, execute unlockPw.exe. 76776356 Figure 2-16. Clear the BIOS Password as follows: NOTE: NOTE: If the BIOC password is incorrectly entered three times, an error is enabled, the BIOS password can only be cleared by initiating the Crisis Disk Recovery procedure or flashing the BIOS. Clear BIOS Password System Utilities 2-17 This section provides details about removing HDD/BIOS passwords. See Crisis Disk Recovery. Clearing BIOS Passwords 0 ! Press any key to exit the menu. 2.
... To reset the BIOS password, perform the following: 1. In DOS mode, execute unlockPw.exe. 76776356 Figure 2-16. Clear the BIOS Password as follows: NOTE: NOTE: If the BIOC password is incorrectly entered three times, an error is enabled, the BIOS password can only be cleared by initiating the Crisis Disk Recovery procedure or flashing the BIOS. Clear BIOS Password System Utilities 2-17 This section provides details about removing HDD/BIOS passwords. See Crisis Disk Recovery. Clearing BIOS Passwords 0 ! Press any key to exit the menu. 2.

Aspire One AOD257 and Happy 2 Netbook Service Guide
Page 106
... thermal module is sufficient to mainboard connector (B). Connect thermal module cable (A) to spread grease evenly over CPU top. 3. Remove all heat pads are approved for use : Eapus XR-PE 1. NOTE: NOTE: Force used during installation of thermal grease to the mainboard. Refer to mainboard. CAUTION: Use caution when applying thermal grease. Install and secure two (2) non-captive screws (C) in numerical order from CPU using a lint-free cloth...
... thermal module is sufficient to mainboard connector (B). Connect thermal module cable (A) to spread grease evenly over CPU top. 3. Remove all heat pads are approved for use : Eapus XR-PE 1. NOTE: NOTE: Force used during installation of thermal grease to the mainboard. Refer to mainboard. CAUTION: Use caution when applying thermal grease. Install and secure two (2) non-captive screws (C) in numerical order from CPU using a lint-free cloth...

Aspire One AOD257 and Happy 2 Netbook Service Guide
Page 124
... Intermittently 0 If the system powers off at intervals, perform the following : Figure 4-1. Plug the computer directly into a known serviceable electrical outlet. 4. Remove all external and non-essential hardware connected to the failure point. 6. Remove any recently installed software. 7. Makes sure the power cable is still not resolved, refer to the computer and the electrical outlet. 2. Remove all extension cables between the computer and the...
... Intermittently 0 If the system powers off at intervals, perform the following : Figure 4-1. Plug the computer directly into a known serviceable electrical outlet. 4. Remove all external and non-essential hardware connected to the failure point. 6. Remove any recently installed software. 7. Makes sure the power cable is still not resolved, refer to the computer and the electrical outlet. 2. Remove all extension cables between the computer and the...
Aspire One AOD257 and Happy 2 Netbook Service Guide
Page 126
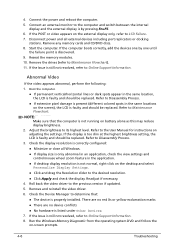
... LCD is faulty and should be replaced. Boot the computer. Click Apply and check the display. 4. Connect the power and reboot the computer. 5. Connect an external monitor to the computer and switch between the internal display and the external display is still not resolved, refer to Online Support Information. 8. Start the computer. NOTE: NOTE: Make sure that : The device is faulty and should be replaced. Readjust if necessary. 4. Run the Windows Memory...
... LCD is faulty and should be replaced. Boot the computer. Click Apply and check the display. 4. Connect the power and reboot the computer. 5. Connect an external monitor to the computer and switch between the internal display and the external display is still not resolved, refer to Online Support Information. 8. Start the computer. NOTE: NOTE: Make sure that : The device is faulty and should be replaced. Readjust if necessary. 4. Run the Windows Memory...
Aspire One AOD257 and Happy 2 Netbook Service Guide
Page 132
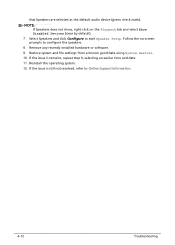
... date. 11. Restore system and file settings from a known good date using System Restore. 10. Remove any recently installed hardware or software. 9. Reinstall the operating system. 12. NOTE: NOTE: If Speakers does not show, right-click on -screen prompts to configure the speakers. 8. that Speakers are selected as the default audio device (green check mark). Follow the on the Playback tab and select Show Disabled Devices (clear by default). 7.
... date. 11. Restore system and file settings from a known good date using System Restore. 10. Remove any recently installed hardware or software. 9. Reinstall the operating system. 12. NOTE: NOTE: If Speakers does not show, right-click on -screen prompts to configure the speakers. 8. that Speakers are selected as the default audio device (green check mark). Follow the on the Playback tab and select Show Disabled Devices (clear by default). 7.
Aspire One AOD257 and Happy 2 Netbook Service Guide
Page 136
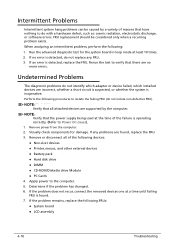
... the following devices: Non-Acer devices Printer, mouse, and other external devices Battery pack Hard disk drive DIMM CD-ROM/Diskette drive Module PC Cards 4. If the problem does not recur, connect the removed devices one at least 10 times. 2. If no more errors. Rerun the test to Power On Issues). 1. Undetermined Problems 0 The diagnostic problems do with a hardware defect, such as: cosmic radiation, electrostatic discharge, or software errors. Remove power from the computer. 2. Remove or disconnect...
... the following devices: Non-Acer devices Printer, mouse, and other external devices Battery pack Hard disk drive DIMM CD-ROM/Diskette drive Module PC Cards 4. If the problem does not recur, connect the removed devices one at least 10 times. 2. If no more errors. Rerun the test to Power On Issues). 1. Undetermined Problems 0 The diagnostic problems do with a hardware defect, such as: cosmic radiation, electrostatic discharge, or software errors. Remove power from the computer. 2. Remove or disconnect...
Aspire One AOD257 and Happy 2 Netbook Service Guide
Page 141
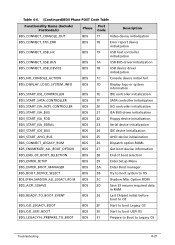
... Post Code Description BDS_CONNECT_CONSOLE_OUT BDS 17 Video device initialization BDS_CONNECT_STD_ERR BDS 18 Error report device initialization BDS_CONNECT_USB_HC BDS 19 USB host controller initialization BDS_CONNECT_USB_BUS BDS 1A USB BUS driver initialization BDS_CONNECT_USB_DEVICE BDS 1B USB device driver initialization BDS_NO_CONSOLE_ACTION BDS 1C Console device initial fail BDS_DISPLAY_LOGO_SYSTEM_INFO BDS_START_IDE_CONTROLLER BDS 1D BDS 1E Display logo or system information IDE controller initialization BDS_START_SATA_CONTROLLER BDS 1F SATA controller...
... Post Code Description BDS_CONNECT_CONSOLE_OUT BDS 17 Video device initialization BDS_CONNECT_STD_ERR BDS 18 Error report device initialization BDS_CONNECT_USB_HC BDS 19 USB host controller initialization BDS_CONNECT_USB_BUS BDS 1A USB BUS driver initialization BDS_CONNECT_USB_DEVICE BDS 1B USB device driver initialization BDS_NO_CONSOLE_ACTION BDS 1C Console device initial fail BDS_DISPLAY_LOGO_SYSTEM_INFO BDS_START_IDE_CONTROLLER BDS 1D BDS 1E Display logo or system information IDE controller initialization BDS_START_SATA_CONTROLLER BDS 1F SATA controller...
Aspire One AOD257 and Happy 2 Netbook Service Guide
Page 149
... D257/Happy 2. Remove battery. 3. Restart the system. Press F2 to short the two points of clearing password and BIOS recovery for enabling BIOS Recovery. Jumper and Connector Locations 5-5 Plug in AC, keeping the CMOS jumper shorted. 8. Press Power Button until BIOS POST is requested, repeat Steps 1 through 9. If a password is finished, then remove the conductivity tool from the system. 2. Remove power from the CMOS jumper. 9. Use an electric conductivity tool to enter BIOS Setup menu. 10. Clearing Password Check 0 NOTE...
... D257/Happy 2. Remove battery. 3. Restart the system. Press F2 to short the two points of clearing password and BIOS recovery for enabling BIOS Recovery. Jumper and Connector Locations 5-5 Plug in AC, keeping the CMOS jumper shorted. 8. Press Power Button until BIOS POST is requested, repeat Steps 1 through 9. If a password is finished, then remove the conductivity tool from the system. 2. Remove power from the CMOS jumper. 9. Use an electric conductivity tool to enter BIOS Setup menu. 10. Clearing Password Check 0 NOTE...


