AL718 User Guide
Page 1
...When cleaning this does not resolve the problem do not attempt to repair the monitor by yourself; it from the display screen, including sprays. English Table of Contents Precautions ...1 Package contents...2 Installation instructions 2 Assembling the Monitor 2 Detaching the Monitor 2 Adjusting the Viewing Angle 3 Connecting the Devices 3 Switching the Power ...3 Adjusting display settings 4 External Controls ...4 OSD options ...5 OSD Menu ...5 Brightness & Contrast 5 Tracking ...5 Position ...6 Color ...6 Other Controls...6 Troubleshooting ...7 General specifications...8 Precautions...
...When cleaning this does not resolve the problem do not attempt to repair the monitor by yourself; it from the display screen, including sprays. English Table of Contents Precautions ...1 Package contents...2 Installation instructions 2 Assembling the Monitor 2 Detaching the Monitor 2 Adjusting the Viewing Angle 3 Connecting the Devices 3 Switching the Power ...3 Adjusting display settings 4 External Controls ...4 OSD options ...5 OSD Menu ...5 Brightness & Contrast 5 Tracking ...5 Position ...6 Color ...6 Other Controls...6 Troubleshooting ...7 General specifications...8 Precautions...

AL718 User Guide
Page 2
Place a clean dry cloth under the monitor to place the monitor after removing it further. Pull the monitor slightly up and away from the stand. Connect the stand into the neck of the stand. 2. Detaching the Monitor Important First, find a clean, flat surface to protect it from the stand. 2 English LCD Monitor Package contents Power Cord Audio Cable User Manual Installation instructions Assembling the Monitor 1. Position the monitor on top of the monitor along the track.
Place a clean dry cloth under the monitor to place the monitor after removing it further. Pull the monitor slightly up and away from the stand. Connect the stand into the neck of the stand. 2. Detaching the Monitor Important First, find a clean, flat surface to protect it from the stand. 2 English LCD Monitor Package contents Power Cord Audio Cable User Manual Installation instructions Assembling the Monitor 1. Position the monitor on top of the monitor along the track.
AL718 User Guide
Page 3
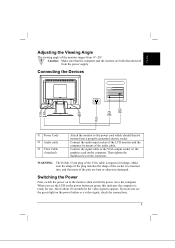
... the video signal to the computer. WARNING: The D-Sub 15 pin plug of the VGA cable is inserted into a properly grounded electric socket. Switching the Power First, switch the power on to the monitor, then switch the power on the computer. Connect the audio input socket of the LCD monitor and the computer by means of the graphics card on to appear. English Adjusting the Viewing Angle The viewing angle of the monitor ranges...
... the video signal to the computer. WARNING: The D-Sub 15 pin plug of the VGA cable is inserted into a properly grounded electric socket. Switching the Power First, switch the power on to the monitor, then switch the power on the computer. Connect the audio input socket of the LCD monitor and the computer by means of the graphics card on to appear. English Adjusting the Viewing Angle The viewing angle of the monitor ranges...

AL718 User Guide
Page 4
... exit. Press to enter a selection in sleep mode If OSD is active, press to select or adjust OSD options. If OSD is inactive, press once, then press the buttons marked < or > to adjust the volume. 4 If OSD is active, press to view OSD. Press again to adjust the volume. If OSD is inactive, press and the monitor will automatically optimize the position, clock and phase of your display. English Adjusting display settings External Controls 1.
... exit. Press to enter a selection in sleep mode If OSD is active, press to select or adjust OSD options. If OSD is inactive, press once, then press the buttons marked < or > to adjust the volume. 4 If OSD is active, press to view OSD. Press again to adjust the volume. If OSD is inactive, press and the monitor will automatically optimize the position, clock and phase of your display. English Adjusting display settings External Controls 1.
AL718 User Guide
Page 5
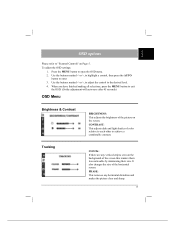
... "External Controls" on the screen. Use the buttons marked < or >, to highlight a control, then press the AUTO button to open the OSD menu. 2. Press the MENU button to enter 3. PHASE: This removes any vertical stripes seen on the background of the horizontal screen. To adjust the OSD settings: 1. When you have finished making all selections, press the MENU button to exit the OSD. (Or the adjustment will auto-save after 45 seconds.) OSD Menu Brightness & Contrast BRIGHTNESS: This adjusts the brightness of color relative...
... "External Controls" on the screen. Use the buttons marked < or >, to highlight a control, then press the AUTO button to open the OSD menu. 2. Press the MENU button to enter 3. PHASE: This removes any vertical stripes seen on the background of the horizontal screen. To adjust the OSD settings: 1. When you have finished making all selections, press the MENU button to exit the OSD. (Or the adjustment will auto-save after 45 seconds.) OSD Menu Brightness & Contrast BRIGHTNESS: This adjusts the brightness of color relative...
AL718 User Guide
Page 6
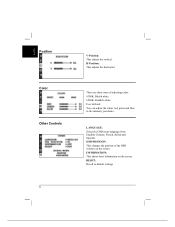
OSD POSITION: This changes the position of adjusting color: 9300K: Bluish white 6500K: Reddish white User defined: You can adjust the colors red, green and blue to default settings LANGUAGE: Select the OSD menu language from English, German, French, Italian and Spanish. H-Position: This adjusts the horizontal. RESET: Recall to the intensity you desire. There are three ways of the OSD window on the screen INFORMATION: This shows brief information on the screen. English Position Color Other Controls 6 V-Position: This adjusts the vertical.
OSD POSITION: This changes the position of adjusting color: 9300K: Bluish white 6500K: Reddish white User defined: You can adjust the colors red, green and blue to default settings LANGUAGE: Select the OSD menu language from English, German, French, Italian and Spanish. H-Position: This adjusts the horizontal. RESET: Recall to the intensity you desire. There are three ways of the OSD window on the screen INFORMATION: This shows brief information on the screen. English Position Color Other Controls 6 V-Position: This adjusts the vertical.

AL718 User Guide
Page 7
... your display. • See "Position adjustment". Image is not sized or centered properly • Press select/auto key and the monitor will automatically optimize the position of the pins are bent. Picture bounces or a wave pattern is • Move or switch off " mode. Please refer all servicing to select color temperature. English Troubleshooting Problems Possible Solutions Power LED is not ON • Check to see if the power switch is in "Troubleshooting" section...
... your display. • See "Position adjustment". Image is not sized or centered properly • Press select/auto key and the monitor will automatically optimize the position of the pins are bent. Picture bounces or a wave pattern is • Move or switch off " mode. Please refer all servicing to select color temperature. English Troubleshooting Problems Possible Solutions Power LED is not ON • Check to see if the power switch is in "Troubleshooting" section...
AL718 User Guide
Page 8
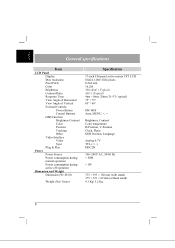
English General specifications Item LCD Panel Display Max resolution Pixel Pitch Color Brightness Contrast Ratio Response Time View Angle of Horizontal View Angle of Vertical External Controls Power Button Control Buttons OSD Function Brightness Contrast Color Position Tracking Other Video Interface Video Sync Plug & Play Power Power Source Power consumption during normal operation Power consumption during active off operation Dimension and Weight Dimension (W×H×D) Weight (Net/ Gross) Specification 17-inch Flat panel active-matrix TFT LCD SXGA 1280×1024 pixels 0.264 mm 16.2M ...
English General specifications Item LCD Panel Display Max resolution Pixel Pitch Color Brightness Contrast Ratio Response Time View Angle of Horizontal View Angle of Vertical External Controls Power Button Control Buttons OSD Function Brightness Contrast Color Position Tracking Other Video Interface Video Sync Plug & Play Power Power Source Power consumption during normal operation Power consumption during active off operation Dimension and Weight Dimension (W×H×D) Weight (Net/ Gross) Specification 17-inch Flat panel active-matrix TFT LCD SXGA 1280×1024 pixels 0.264 mm 16.2M ...


