

AL2002 Service Guide
Page 1
... 09. Exploded Diagram 19 11. Electrica Related Information 03 04. Optical Characteristics 14 06. General Requirement 02 03. Packing Drawing 18 10. ACER_LCD_AL2002W_SM061206V0 LCD Color Monitor: T20BNUW-G1 Model Name: ACER AL2002W-Dual Service Manual Table of Contents Important Safety Notice 01 01. Product Overview 02 02.
... 09. Exploded Diagram 19 11. Electrica Related Information 03 04. Optical Characteristics 14 06. General Requirement 02 03. Packing Drawing 18 10. ACER_LCD_AL2002W_SM061206V0 LCD Color Monitor: T20BNUW-G1 Model Name: ACER AL2002W-Dual Service Manual Table of Contents Important Safety Notice 01 01. Product Overview 02 02.
AL2002 Service Guide
Page 19
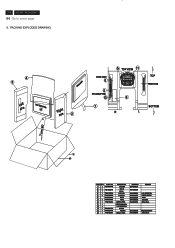
PACKING EXPLODED DRAWING: 4 3 Left EPS LCD MONITOR 10 REAR SIDE Right EPS 2 SIGNAL CABLE 8 12 TOP VIEW 11 STAND 5 DVI CABLE(OPTION) 13 9 7 R L TOP POWER CODE BOTTOM Turn 90 0 1 6 ITEM QT'Y ... 1 7749002220P0A 13 1 7740100200 DESCRIPTON CARTON EPS-R EPS-L P.E. BAG TAPE TAPE WIRING TIES USER'S MANUAL LCD MONITOR STAND PE-BAG WIRING TIES DRAW NO 8340004337 8340005384 8340002824 8440000038 8440004457 8440004216 8440000046 REMARK LCD MONITOR SIGNAL CABLE 914M 25mm(W) 250x2.5mm 8440005039 8440000046 300x300x0.05mm 250x2.5mm 18 ACER AL2002W Go to cover page 9. BAG P.E.
PACKING EXPLODED DRAWING: 4 3 Left EPS LCD MONITOR 10 REAR SIDE Right EPS 2 SIGNAL CABLE 8 12 TOP VIEW 11 STAND 5 DVI CABLE(OPTION) 13 9 7 R L TOP POWER CODE BOTTOM Turn 90 0 1 6 ITEM QT'Y ... 1 7749002220P0A 13 1 7740100200 DESCRIPTON CARTON EPS-R EPS-L P.E. BAG TAPE TAPE WIRING TIES USER'S MANUAL LCD MONITOR STAND PE-BAG WIRING TIES DRAW NO 8340004337 8340005384 8340002824 8440000038 8440004457 8440004216 8440000046 REMARK LCD MONITOR SIGNAL CABLE 914M 25mm(W) 250x2.5mm 8440005039 8440000046 300x300x0.05mm 250x2.5mm 18 ACER AL2002W Go to cover page 9. BAG P.E.

AL2002 User's Guide
Page 3
... this product. mandates that manufactures provide Material Content Declarations for hours. To view the JIS C 0950 material declaration for hours. Visit http://global.acer.com/about/sustainability.htm E-1 Turn off the Power Switch for this case, the screen is displayed for certain categories of the previous screen may... find slightly uneven brightness on the screen depending on the desktop pattern you use . AL2002W SPECIAL NOTES ON LCD MONITORS The following symptoms are normal with LCD monitor and do not indicate a problem.
... this product. mandates that manufactures provide Material Content Declarations for hours. To view the JIS C 0950 material declaration for hours. Visit http://global.acer.com/about/sustainability.htm E-1 Turn off the Power Switch for this case, the screen is displayed for certain categories of the previous screen may... find slightly uneven brightness on the screen depending on the desktop pattern you use . AL2002W SPECIAL NOTES ON LCD MONITORS The following symptoms are normal with LCD monitor and do not indicate a problem.
AL2002 User's Guide
Page 4
...frequency mode, the microprocessor-based circuitry allows the monitor to function at optional resolutions. The LCD monitor is capable of the LCD monitor. AL2002W INTRODUCTION Congratulations for purchasing model AL2002W , a high performance 20-inch color TFT LCD monitor. Through this scheme, no environmental harmful substances... or software because of your desk space and makes your desk look neat and tidy. · The monitor complies with TCO99 guidelines. The AL2002W monitor provides flicker-free and color images at the precision-of a fixed frequency. · The resident memory...
...frequency mode, the microprocessor-based circuitry allows the monitor to function at optional resolutions. The LCD monitor is capable of the LCD monitor. AL2002W INTRODUCTION Congratulations for purchasing model AL2002W , a high performance 20-inch color TFT LCD monitor. Through this scheme, no environmental harmful substances... or software because of your desk space and makes your desk look neat and tidy. · The monitor complies with TCO99 guidelines. The AL2002W monitor provides flicker-free and color images at the precision-of a fixed frequency. · The resident memory...

AL2002 User's Guide
Page 5
AL2002W UNPACKING Please check the following items are present when you unpack the box, and save the packing materials in case you will need to ship or transport the monitor in future. · LCD Monitor · AC Power · DVICable (Only Dual-Input Model) · DSUBCable · User Manual · Quick Start Guide Quick Start Guide E-3
AL2002W UNPACKING Please check the following items are present when you unpack the box, and save the packing materials in case you will need to ship or transport the monitor in future. · LCD Monitor · AC Power · DVICable (Only Dual-Input Model) · DSUBCable · User Manual · Quick Start Guide Quick Start Guide E-3

AL2002 User's Guide
Page 6
SCREEN POSITION ADJUSTMENT In oder to optimize the best viewing position, you can be adjusted to 20 degrees up or 5 degrees down as shown in the figure below . 5 0 20 0 E-4 Remove: Depress the hook as indicated first before removing the base and follow the arrow direction to hold the edges of the monitor as indicated by using both of your hands to remove it. The monitor can adjust the tilt of the base. AL2002W Attaching / Removing the Base Install: Align the four hooks on the bottom of the monitor with the corresponding slots on the bottom of the monitor by arrow below .
SCREEN POSITION ADJUSTMENT In oder to optimize the best viewing position, you can be adjusted to 20 degrees up or 5 degrees down as shown in the figure below . 5 0 20 0 E-4 Remove: Depress the hook as indicated first before removing the base and follow the arrow direction to hold the edges of the monitor as indicated by using both of your hands to remove it. The monitor can adjust the tilt of the base. AL2002W Attaching / Removing the Base Install: Align the four hooks on the bottom of the monitor with the corresponding slots on the bottom of the monitor by arrow below .

AL2002 User's Guide
Page 7
AL2002W CONNECTING THE POWER CORD · Check first to the screen, as screen is fragile. SAFETY PRECAUTION · Avoid placing the monitor, or any other light sources may reflect on the power cord to prevent it from giving shock or scratch to make sure that ... a bright background or where sunlight or other heavy object, on the face of the monitor for proper heat dissipation. E-5 Place the monitor just below guidelines when cleaning the monitor. · Always unplug the monitor before cleaning. · Use a soft cloth to a proper AC outlet. · For unit using at 120 V AC: Use a...
AL2002W CONNECTING THE POWER CORD · Check first to the screen, as screen is fragile. SAFETY PRECAUTION · Avoid placing the monitor, or any other light sources may reflect on the power cord to prevent it from giving shock or scratch to make sure that ... a bright background or where sunlight or other heavy object, on the face of the monitor for proper heat dissipation. E-5 Place the monitor just below guidelines when cleaning the monitor. · Always unplug the monitor before cleaning. · Use a soft cloth to a proper AC outlet. · For unit using at 120 V AC: Use a...

AL2002 User's Guide
Page 8
...Polarity HV E-6 The only condition to store as given in the table below. The monitor is the new display information must have 1 KHz difference for horizontal frequency or 1 Hz for different modes, the monitor has default setting modes that are different from the default modes. For optimum adjustment, ... When none of storing up to perform the Auto Setup under Windows "Full Screen" pattern or using the pattern in the user modes. AL2002W PRESET MODES To reduce the need for adjustment for vertical frequency or the sync signal polarities are most commonly used as a user mode is...
...Polarity HV E-6 The only condition to store as given in the table below. The monitor is the new display information must have 1 KHz difference for horizontal frequency or 1 Hz for different modes, the monitor has default setting modes that are different from the default modes. For optimum adjustment, ... When none of storing up to perform the Auto Setup under Windows "Full Screen" pattern or using the pattern in the user modes. AL2002W PRESET MODES To reduce the need for adjustment for vertical frequency or the sync signal polarities are most commonly used as a user mode is...

AL2002 User's Guide
Page 9
AL2002W POWER SAVING The monitor will be driven into "Power Saving" mode by the control signal from the display controller, as indicated by the amber-color power LED. State ON Power Saving Mode Power Consumption Normal
AL2002W POWER SAVING The monitor will be driven into "Power Saving" mode by the control signal from the display controller, as indicated by the amber-color power LED. State ON Power Saving Mode Power Consumption Normal

AL2002 User's Guide
Page 10
... are powered-OFF. Connect power cord Connect the power cord to the monitor, then to your host system, please follow the steps as given below: Steps 1. 1-1 Connect Video Cable a. AL2002W INSTALLATION To install the monitor to a properly grounded AC outlet. 3. b. If the monitor still does not function properly, please refer to the troubleshooting section...
... are powered-OFF. Connect power cord Connect the power cord to the monitor, then to your host system, please follow the steps as given below: Steps 1. 1-1 Connect Video Cable a. AL2002W INSTALLATION To install the monitor to a properly grounded AC outlet. 3. b. If the monitor still does not function properly, please refer to the troubleshooting section...

AL2002 User's Guide
Page 14
...the screen. When the "+" key is pressed, the OSD control menu will move to the lower side. · Information Indicates the current resolution and V-Frequency. AL2002W · Auto Adjust Press "+" to turn -off time. · OSD Left / Right To move to the right side of the screen. The Auto-...-Phase, the whole process takes about 5 seconds. · Language Select among English, French, Italian, German, Spanish, , and . · Factory Reset To return the monitor to its default settings. · OSD TimeOut To adjust the period of OSD auto turn on the screen.
...the screen. When the "+" key is pressed, the OSD control menu will move to the lower side. · Information Indicates the current resolution and V-Frequency. AL2002W · Auto Adjust Press "+" to turn -off time. · OSD Left / Right To move to the right side of the screen. The Auto-...-Phase, the whole process takes about 5 seconds. · Language Select among English, French, Italian, German, Spanish, , and . · Factory Reset To return the monitor to its default settings. · OSD TimeOut To adjust the period of OSD auto turn on the screen.
AL2002 User's Guide
Page 15
... E-13 Unstable Picture · Check if the specification of the image before changing or disconnecting the signal cable or powering OFF the monitor. Display is ON. No Picture · Check if AC power cord is in case of missing full-screen image, please select ..., adjust brightness and contrast to maximum or reset to the monitor. LED OFF · Check the power switch. AL2002W TROUBLESHOOTING Before sending your LCD monitor for a few seconds after adjusting the size of graphics adapter and monitor is properly connected to their default settings. Abnormal small or...
... E-13 Unstable Picture · Check if the specification of the image before changing or disconnecting the signal cable or powering OFF the monitor. Display is ON. No Picture · Check if AC power cord is in case of missing full-screen image, please select ..., adjust brightness and contrast to maximum or reset to the monitor. LED OFF · Check the power switch. AL2002W TROUBLESHOOTING Before sending your LCD monitor for a few seconds after adjusting the size of graphics adapter and monitor is properly connected to their default settings. Abnormal small or...

AL2002 User's Guide
Page 16
(DVI Mode) Problems Current Status LED ON No Picture LED OFF LED displays amber color AL2002W Remedy · Using OSD, adjust brightness and contrast to maximum or reset to their default settings. · Check the power switch. · Check if AC power cord is properly connected to the monitor. · Check if video signal cable is properly connected at the back of monitor. · Check if the power of computer system is ON. E-14
(DVI Mode) Problems Current Status LED ON No Picture LED OFF LED displays amber color AL2002W Remedy · Using OSD, adjust brightness and contrast to maximum or reset to their default settings. · Check the power switch. · Check if AC power cord is properly connected to the monitor. · Check if video signal cable is properly connected at the back of monitor. · Check if the power of computer system is ON. E-14


