
AL1922R User's Guide
Page 1
. TABLE OF CONTENTS FOR YOUR SAFETY 1 SAFETY PRECAUTIONS 2 SPECIAL NOTES ON LCD MONITORS 3 BEFORE YOU OPERATE THE MONITOR 3 FEATURES 3 PACKING LIST 3 INSTALLATION INSTRUCTIONS 4 CONTROLS AND CONNECTORS 5 ADJUSTING THE VIEWING ANGLE 6 OPERATING INSTRUCTIONS 7 GENERAL INSTRUCTIONS 7 HOW TO ADJUST A SETTING 9 ADJUSTING THE PICTURE 10-11 PLUG AND PLAY 12 TECHNICAL SUPPORT(FAQ 13-14 ERROR MESSAGE & POSSIBLE SOLUTION ------- 15 APPENDIX 16 SPECIFICATIONS 16-17 FACTORY PRESET TIMING TABLE 18 CONNECTOR PIN ASSIGNMENT 19
. TABLE OF CONTENTS FOR YOUR SAFETY 1 SAFETY PRECAUTIONS 2 SPECIAL NOTES ON LCD MONITORS 3 BEFORE YOU OPERATE THE MONITOR 3 FEATURES 3 PACKING LIST 3 INSTALLATION INSTRUCTIONS 4 CONTROLS AND CONNECTORS 5 ADJUSTING THE VIEWING ANGLE 6 OPERATING INSTRUCTIONS 7 GENERAL INSTRUCTIONS 7 HOW TO ADJUST A SETTING 9 ADJUSTING THE PICTURE 10-11 PLUG AND PLAY 12 TECHNICAL SUPPORT(FAQ 13-14 ERROR MESSAGE & POSSIBLE SOLUTION ------- 15 APPENDIX 16 SPECIFICATIONS 16-17 FACTORY PRESET TIMING TABLE 18 CONNECTOR PIN ASSIGNMENT 19
AL1922R User's Guide
Page 2
..., and if not installed and used in a residential installation. WARNING: To prevent fire or shock hazard, do not expose the monitor to qualified personnel only. 1 Before operating the monitor, please read this product meets the ENERGY STAR guidelines for energy efficiency. These limits are present inside the... monitor. Reorient or relocate the receiving antenna. 2. Consult the dealer or an experienced radio/TV technician for a Class B digital device, pursuant to ...
..., and if not installed and used in a residential installation. WARNING: To prevent fire or shock hazard, do not expose the monitor to qualified personnel only. 1 Before operating the monitor, please read this product meets the ENERGY STAR guidelines for energy efficiency. These limits are present inside the... monitor. Reorient or relocate the receiving antenna. 2. Consult the dealer or an experienced radio/TV technician for a Class B digital device, pursuant to ...

AL1922R User's Guide
Page 3
... in a bookcase or cabinet unless proper ventilation is equipped with a three-pronged grounded plug, a plug with a third (grounding) pin. z The monitor should be sure these openings are provided for long period of the grounded plug. Use only a cart or stand recommended by yourself; Do not place... the monitor on the monitor. z To ensure satisfactory operation, use the monitor near the equipment and shall be used for ventilation. Overloading can expose you are not sure of the type ...
... in a bookcase or cabinet unless proper ventilation is equipped with a three-pronged grounded plug, a plug with a third (grounding) pin. z The monitor should be sure these openings are provided for long period of the grounded plug. Use only a cart or stand recommended by yourself; Do not place... the monitor on the monitor. z To ensure satisfactory operation, use the monitor near the equipment and shall be used for ventilation. Overloading can expose you are not sure of the type ...

AL1922R User's Guide
Page 4
In this case, the screen is displayed for hours. Pivot Software (Only AL1922 r) 8. It may include blemishes of 0.01% or less such as a missing pixel or a pixel lit all of the time. • Due to the nature of ... Approved) • Space Saving, Compact Case Design CHECKING THE CONTENTS OF THE PACKAGE The product package should include the following symptoms are normal with LCD monitor and do not indicate a problem. DVI Cable (Only dual-input model) 6. NOTES • Due to make sure the flicker disappears. • You may find slightly...
In this case, the screen is displayed for hours. Pivot Software (Only AL1922 r) 8. It may include blemishes of 0.01% or less such as a missing pixel or a pixel lit all of the time. • Due to the nature of ... Approved) • Space Saving, Compact Case Design CHECKING THE CONTENTS OF THE PACKAGE The product package should include the following symptoms are normal with LCD monitor and do not indicate a problem. DVI Cable (Only dual-input model) 6. NOTES • Due to make sure the flicker disappears. • You may find slightly...

AL1922R User's Guide
Page 5
...3. NOTES A certified power supply cord has to IEC 60245 (designation H05RR-F 3G 0.75mm2) shall be used . 4 INSTALLATION INSTRUCTIONS (only AL1922 h/AL1922 r) Support Frame Do not perform a pulling or plugging action when the display is under slanting status to prevent the display from ejecting. This LCD...to prevent the top part of synthetic rubber according to be used with your PC, depending on your LCD monitor. Note that allows operation in your LCD monitor's DC-power-input. Alternative a flexible cord be considered. Pull out the pin from the display support frame...
...3. NOTES A certified power supply cord has to IEC 60245 (designation H05RR-F 3G 0.75mm2) shall be used . 4 INSTALLATION INSTRUCTIONS (only AL1922 h/AL1922 r) Support Frame Do not perform a pulling or plugging action when the display is under slanting status to prevent the display from ejecting. This LCD...to prevent the top part of synthetic rubber according to be used with your PC, depending on your LCD monitor. Note that allows operation in your LCD monitor's DC-power-input. Alternative a flexible cord be considered. Pull out the pin from the display support frame...
AL1922R User's Guide
Page 6
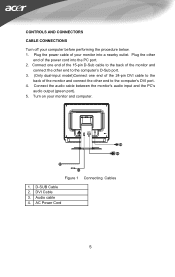
... input and the PC's audio output (green port). 5. Turn on your monitor into the PC port. 2. Audio cable 4. DVI Cable 3. Connect one end of the 15-pin D-Sub cable to the back of the monitor and connect the other end to the computer's D-Sub port. 3. (Only dual-input model)Connect one ...end of the 24-pin DVI cable to the back of the monitor and connect the other end of your monitor and computer. Figure 1 Connecting Cables 1. AC Power Cord 5 D-SUB Cable 2. Plug the power cable of the power cord into a nearby ...
... input and the PC's audio output (green port). 5. Turn on your monitor into the PC port. 2. Audio cable 4. DVI Cable 3. Connect one end of the 15-pin D-Sub cable to the back of the monitor and connect the other end to the computer's D-Sub port. 3. (Only dual-input model)Connect one ...end of the 24-pin DVI cable to the back of the monitor and connect the other end of your monitor and computer. Figure 1 Connecting Cables 1. AC Power Cord 5 D-SUB Cable 2. Plug the power cable of the power cord into a nearby ...

AL1922R User's Guide
Page 7
...8226; Hold the stand so you do not topple the monitor when you change the monitor's angle. • You are able to adjust the monitor's angle from -6° to 15°. 15 -6 ADJUSTING THE VIEWING ANGLE (Only AL1922 h) Your monitor features a multi-adjustable stand that will enable it move ...it is recommended to look at the full face of the monitor, then adjust the monitor's angle to your own position. ADJUSTING THE VIEWING ANGLE (Only AL1922) • For optimal viewing it...
...8226; Hold the stand so you do not topple the monitor when you change the monitor's angle. • You are able to adjust the monitor's angle from -6° to 15°. 15 -6 ADJUSTING THE VIEWING ANGLE (Only AL1922 h) Your monitor features a multi-adjustable stand that will enable it move ...it is recommended to look at the full face of the monitor, then adjust the monitor's angle to your own position. ADJUSTING THE VIEWING ANGLE (Only AL1922) • For optimal viewing it...

AL1922R User's Guide
Page 8
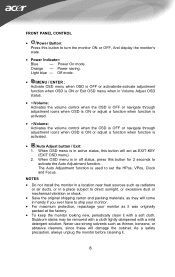
OPERATING INSTRUCTIONS GENERAL INSTRUCTIONS Press the power button to turn the monitor on the monitor position. By changing these settings, the picture can be adjusted to your personal preferences. • The power cord should be connected. • Connect the video cable from the monitor to the video card. • Press the power button to turn on or off. Figure 3 External Control Button EXTERNAL CONTROLS 1. >/ Volume 2. The other control buttons are located at front panel of the monitor (See Figure 3). The power indicator will light up.
OPERATING INSTRUCTIONS GENERAL INSTRUCTIONS Press the power button to turn the monitor on the monitor position. By changing these settings, the picture can be adjusted to your personal preferences. • The power cord should be connected. • Connect the video cable from the monitor to the video card. • Press the power button to turn on or off. Figure 3 External Control Button EXTERNAL CONTROLS 1. >/ Volume 2. The other control buttons are located at front panel of the monitor (See Figure 3). The power indicator will light up.
AL1922R User's Guide
Page 9
...cleaning it with a mild detergent solution. The Auto Adjustment function is in handy if you ever have to ship your monitor. • For maximum protection, repackage your monitor as they will come in active status, this button to activate the Auto Adjustment function. When OSD menu is used...shock. • Save the original shipping carton and packing materials, as it was originally packed at the factory. • To keep the monitor looking new, periodically clean it . 8 Stubborn stains may be removed with a cloth lightly dampened with a soft cloth. NOTES • Do not ...
...cleaning it with a mild detergent solution. The Auto Adjustment function is in handy if you ever have to ship your monitor. • For maximum protection, repackage your monitor as they will come in active status, this button to activate the Auto Adjustment function. When OSD menu is used...shock. • Save the original shipping carton and packing materials, as it was originally packed at the factory. • To keep the monitor looking new, periodically clean it . 8 Stubborn stains may be removed with a cloth lightly dampened with a soft cloth. NOTES • Do not ...

AL1922R User's Guide
Page 13
... an OFF mode. After the video input signal is restored, full power is restored and the display is automatically redrawn. This reduces the monitor's internal power supply consumption. One end terminates with NEMA 5-15 style and is UL listed and CSA labeled. This feature is designed to use ...a cord set by reducing power consumption when there is no video input signal this monitor, following a time-out period, will automatically switch to inform the host system of a minimum No. 18 AWG, type SJT or SVT three conductors ...
... an OFF mode. After the video input signal is restored, full power is restored and the display is automatically redrawn. This reduces the monitor's internal power supply consumption. One end terminates with NEMA 5-15 style and is UL listed and CSA labeled. This feature is designed to use ...a cord set by reducing power consumption when there is no video input signal this monitor, following a time-out period, will automatically switch to inform the host system of a minimum No. 18 AWG, type SJT or SVT three conductors ...

AL1922R User's Guide
Page 14
... is not on No Plug & Play Picture is fuzzy Picture bounces or a wave pattern is present in its slot *Make sure monitor's video cable is properly connected to the computer. *Inspect monitor's video cable and make sure that none of the pins are bent. *Make sure computer is ON (light blue) but.... The LED should be in the ON position. *Computer Video Card should either turn ON or OFF after hitting the CAPS LOCK key. *Inspect the monitor's video cable and make sure none of the pins are bent. 13
... is not on No Plug & Play Picture is fuzzy Picture bounces or a wave pattern is present in its slot *Make sure monitor's video cable is properly connected to the computer. *Inspect monitor's video cable and make sure that none of the pins are bent. *Make sure computer is ON (light blue) but.... The LED should be in the ON position. *Computer Video Card should either turn ON or OFF after hitting the CAPS LOCK key. *Inspect the monitor's video cable and make sure none of the pins are bent. 13


