AL1922R User's Guide
Page 1
. TABLE OF CONTENTS FOR YOUR SAFETY 1 SAFETY PRECAUTIONS 2 SPECIAL NOTES ON LCD MONITORS 3 BEFORE YOU OPERATE THE MONITOR 3 FEATURES 3 PACKING LIST 3 INSTALLATION INSTRUCTIONS 4 CONTROLS AND CONNECTORS 5 ADJUSTING THE VIEWING ANGLE 6 OPERATING INSTRUCTIONS 7 GENERAL INSTRUCTIONS 7 HOW TO ADJUST A SETTING 9 ADJUSTING THE PICTURE 10-11 PLUG AND PLAY 12 TECHNICAL SUPPORT(FAQ 13-14 ERROR MESSAGE & POSSIBLE SOLUTION ------- 15 APPENDIX 16 SPECIFICATIONS 16-17 FACTORY PRESET TIMING TABLE 18 CONNECTOR PIN ASSIGNMENT 19
. TABLE OF CONTENTS FOR YOUR SAFETY 1 SAFETY PRECAUTIONS 2 SPECIAL NOTES ON LCD MONITORS 3 BEFORE YOU OPERATE THE MONITOR 3 FEATURES 3 PACKING LIST 3 INSTALLATION INSTRUCTIONS 4 CONTROLS AND CONNECTORS 5 ADJUSTING THE VIEWING ANGLE 6 OPERATING INSTRUCTIONS 7 GENERAL INSTRUCTIONS 7 HOW TO ADJUST A SETTING 9 ADJUSTING THE PICTURE 10-11 PLUG AND PLAY 12 TECHNICAL SUPPORT(FAQ 13-14 ERROR MESSAGE & POSSIBLE SOLUTION ------- 15 APPENDIX 16 SPECIFICATIONS 16-17 FACTORY PRESET TIMING TABLE 18 CONNECTOR PIN ASSIGNMENT 19
AL1922R User's Guide
Page 2
... is connected. 4. Do not open the cabinet. Refer servicing to comply with the emission limits. 3. This manual should be used in order to qualified personnel only. 1 Shielded interface cables and AC power cord, if any radio or TV interference caused by one or more of the user to operate the equipment. 2. This equipment generates, uses and can be determined by turning...
... is connected. 4. Do not open the cabinet. Refer servicing to comply with the emission limits. 3. This manual should be used in order to qualified personnel only. 1 Shielded interface cables and AC power cord, if any radio or TV interference caused by one or more of the user to operate the equipment. 2. This equipment generates, uses and can be determined by turning...
AL1922R User's Guide
Page 3
... label. Never spill liquids on the monitor cabinet. opening or removing covers can injure a person and cause serious damage to dangerous voltages and other hazards. To ensure reliable operation of power source indicated on a wall or shelf, use a mounting kit approved by yourself; Do not place the monitor in fire or electric shock. This plug will fit only into the slot...
... label. Never spill liquids on the monitor cabinet. opening or removing covers can injure a person and cause serious damage to dangerous voltages and other hazards. To ensure reliable operation of power source indicated on a wall or shelf, use a mounting kit approved by yourself; Do not place the monitor in fire or electric shock. This plug will fit only into the slot...
AL1922R User's Guide
Page 4
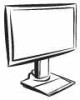
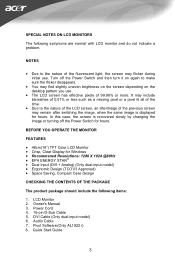
.... Owner's Manual 3. Audio Cable 7. Pivot Software (Only AL1922 r) 8. Quick Start Guide 3 In this case, the screen is displayed for hours. BEFORE YOU OPERATE THE MONITOR FEATURES • 48cm(19") TFT Color LCD Monitor • Crisp, Clear Display for hours. Turn off the Power Switch for Windows • Recommened Resolutions: 1280 X 1024 @60Hz • EPA ENERGY STAR® • Dual Input (DVI + Analog) (Only dual-input model) • Ergonomic Design (TCO'03 Approved) • Space Saving, Compact Case Design CHECKING...
.... Owner's Manual 3. Audio Cable 7. Pivot Software (Only AL1922 r) 8. Quick Start Guide 3 In this case, the screen is displayed for hours. BEFORE YOU OPERATE THE MONITOR FEATURES • 48cm(19") TFT Color LCD Monitor • Crisp, Clear Display for hours. Turn off the Power Switch for Windows • Recommened Resolutions: 1280 X 1024 @60Hz • EPA ENERGY STAR® • Dual Input (DVI + Analog) (Only dual-input model) • Ergonomic Design (TCO'03 Approved) • Space Saving, Compact Case Design CHECKING...

AL1922R User's Guide
Page 5
... a flexible cord be connected to either 100/120V AC or 220/240V AC voltage area (No user adjustment is required.) 3. POWERCORD Power Source: 1. This LCD monitor has an External universal power supply that allows operation in your LCD monitor's DC-power-input. NOTES A certified power supply cord has to be used . Pull out the pin from ejecting. INSTALLATION INSTRUCTIONS (only AL1922 h/AL1922 r) Support Frame Do not perform a pulling or plugging action when the display is...
... a flexible cord be connected to either 100/120V AC or 220/240V AC voltage area (No user adjustment is required.) 3. POWERCORD Power Source: 1. This LCD monitor has an External universal power supply that allows operation in your LCD monitor's DC-power-input. NOTES A certified power supply cord has to be used . Pull out the pin from ejecting. INSTALLATION INSTRUCTIONS (only AL1922 h/AL1922 r) Support Frame Do not perform a pulling or plugging action when the display is...
AL1922R User's Guide
Page 6
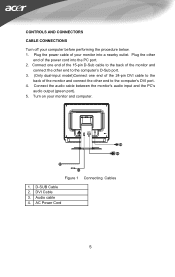
...-pin DVI cable to the back of the monitor and connect the other end of your monitor into the PC port. 2. AC Power Cord 5 Plug the other end to the computer's DVI port. 4. Turn on your computer before performing the procedure below. 1. D-SUB Cable 2. Audio cable 4. DVI Cable 3. CONTROLS AND CONNECTORS CABLE CONNECTIONS Turn off your monitor and computer. Plug the power cable of the power cord into a nearby outlet. Connect the audio cable between the monitor's audio input and the PC's audio output (green port). 5. Figure 1 Connecting Cables 1.
...-pin DVI cable to the back of the monitor and connect the other end of your monitor into the PC port. 2. AC Power Cord 5 Plug the other end to the computer's DVI port. 4. Turn on your computer before performing the procedure below. 1. D-SUB Cable 2. Audio cable 4. DVI Cable 3. CONTROLS AND CONNECTORS CABLE CONNECTIONS Turn off your monitor and computer. Plug the power cable of the power cord into a nearby outlet. Connect the audio cable between the monitor's audio input and the PC's audio output (green port). 5. Figure 1 Connecting Cables 1.

AL1922R User's Guide
Page 7
..., adjust the screen height to suit your own position. Before adjusting the height, be installed. © Portrait Displays, Inc. NOTES • Do not touch the LCD screen when you change the monitor's angle. • You are able to adjust the monitor's angle from -6° to 15°. 15 -6 ADJUSTING THE VIEWING ANGLE (Only AL1922 h) Your monitor features a multi-adjustable stand that will enable it move it to the desired position. To make an adjustment...
..., adjust the screen height to suit your own position. Before adjusting the height, be installed. © Portrait Displays, Inc. NOTES • Do not touch the LCD screen when you change the monitor's angle. • You are able to adjust the monitor's angle from -6° to 15°. 15 -6 ADJUSTING THE VIEWING ANGLE (Only AL1922 h) Your monitor features a multi-adjustable stand that will enable it move it to the desired position. To make an adjustment...

AL1922R User's Guide
Page 8
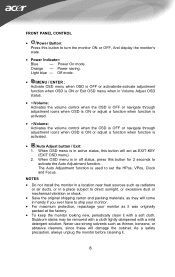
Figure 3 External Control Button EXTERNAL CONTROLS 1. >/ Volume 2. OPERATING INSTRUCTIONS GENERAL INSTRUCTIONS Press the power button to turn the monitor on the monitor position. The power indicator will light up. The other control buttons are located at front panel of the monitor (See Figure 3). By changing these settings, the picture can be adjusted to your personal preferences. • The power cord should be connected. • Connect the video cable from the monitor to the video card. • Press the power button to turn on or off.
Figure 3 External Control Button EXTERNAL CONTROLS 1. >/ Volume 2. OPERATING INSTRUCTIONS GENERAL INSTRUCTIONS Press the power button to turn the monitor on the monitor position. The power indicator will light up. The other control buttons are located at front panel of the monitor (See Figure 3). By changing these settings, the picture can be adjusted to your personal preferences. • The power cord should be connected. • Connect the video cable from the monitor to the video card. • Press the power button to turn on or off.
AL1922R User's Guide
Page 9
... it was originally packed at the factory. • To keep the monitor looking new, periodically clean it . 8 FRONT PANEL CONTROL • /Power Button: Press this button will act as EXIT-KEY (EXIT OSD menu). 2. Orange - When OSD menu is in handy if you ever have to activate the Auto Adjustment function. NOTES • Do not install the monitor in a location near heat sources such as radiators or air...
... it was originally packed at the factory. • To keep the monitor looking new, periodically clean it . 8 FRONT PANEL CONTROL • /Power Button: Press this button will act as EXIT-KEY (EXIT OSD menu). 2. Orange - When OSD menu is in handy if you ever have to activate the Auto Adjustment function. NOTES • Do not install the monitor in a location near heat sources such as radiators or air...
AL1922R User's Guide
Page 10
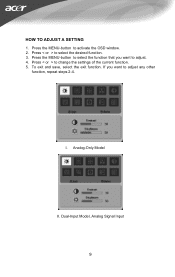
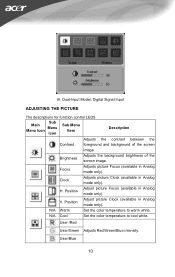
Press the MENU-button to select the desired function. 3. To exit and save, select the exit function. I. Press < or > to activate the OSD window. 2. HOW TO ADJUST A SETTING 1. Press < or > to adjust any other function, repeat steps 2-4. Dual-Input Model, Analog Signal Input 9 Analog-Only Model II. If you want to change the settings of the current function. 5. Press the MENU-button to select the function that you want to adjust. 4.
Press the MENU-button to select the desired function. 3. To exit and save, select the exit function. I. Press < or > to activate the OSD window. 2. HOW TO ADJUST A SETTING 1. Press < or > to adjust any other function, repeat steps 2-4. Dual-Input Model, Analog Signal Input 9 Analog-Only Model II. If you want to change the settings of the current function. 5. Press the MENU-button to select the function that you want to adjust. 4.
AL1922R User's Guide
Page 11
...screen image. Adjusts picture Focus (available in Analog mode only). Adjust picture Clock (available in Analog mode only). Position V. User/Blue 10 Set the color temperature to cool white. III. Adjust picture Focus (available in Analog mode only). User /Red User/Green Adjusts Red/Green/Blue intensity. Adjusts picture Clock (available in Analog mode only). Dual-Input Model, Digital Signal Input ADJUSTING THE PICTURE The descriptions for function control LEDS Sub Main Menu Menu Icon Icon Sub Menu Item Description Contrast Brightness Focus Clock H. Set the color...
...screen image. Adjusts picture Focus (available in Analog mode only). Adjust picture Clock (available in Analog mode only). Position V. User/Blue 10 Set the color temperature to cool white. III. Adjust picture Focus (available in Analog mode only). User /Red User/Green Adjusts Red/Green/Blue intensity. Adjusts picture Clock (available in Analog mode only). Dual-Input Model, Digital Signal Input ADJUSTING THE PICTURE The descriptions for function control LEDS Sub Main Menu Menu Icon Icon Sub Menu Item Description Contrast Brightness Focus Clock H. Set the color...
AL1922R User's Guide
Page 12
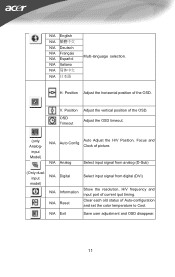
... Digital N/A Information N/A Reset Select input signal from digital (DVI) Show the resolution, H/V frequency and input port of the OSD. N/A English N/A N/A Deutsch N/A Français N/A Español N/A Italiano N/A N/A 日本語 Multi-language selection. H. V. N/A Exit Save user adjustment and OSD disappear. 11 Adjust the OSD timeout. (only Analog- Position Adjust the horizontal position of picture. input Model) Auto Adjust the H/V Position, Focus and N/A Auto Config Clock of the OSD. Clear each old status of Auto-configuration and set the color...
... Digital N/A Information N/A Reset Select input signal from digital (DVI) Show the resolution, H/V frequency and input port of the OSD. N/A English N/A N/A Deutsch N/A Français N/A Español N/A Italiano N/A N/A 日本語 Multi-language selection. H. V. N/A Exit Save user adjustment and OSD disappear. 11 Adjust the OSD timeout. (only Analog- Position Adjust the horizontal position of picture. input Model) Auto Adjust the H/V Position, Focus and N/A Auto Config Clock of the OSD. Clear each old status of Auto-configuration and set the color...
AL1922R User's Guide
Page 13
... and is a bidirectional data channel based on the keyboard, or clicking the mouse. After the video input signal is restored, full power is restored and the display is completely off. USING THE RIGHT POWER CORD : The accessory power cord for the power cord shall be 125 volts AC. It allows the monitor to use a cord set by the Video Electronics Standards Association (VESA) and/or the United States Environmental...
... and is a bidirectional data channel based on the keyboard, or clicking the mouse. After the video input signal is restored, full power is restored and the display is completely off. USING THE RIGHT POWER CORD : The accessory power cord for the power cord shall be 125 volts AC. It allows the monitor to use a cord set by the Video Electronics Standards Association (VESA) and/or the United States Environmental...

AL1922R User's Guide
Page 14
Missing one of the primary colors (RED, GREEN, or BLUE) Possible Solution *Check if the Power Switch is in the ON position *Power Cord should be connected *Check if the PC system is Plug & Play compatible *Check if the Video Card is Plug & Play compatible *Check if the D-15 plug pin of Video Cable is bent *Adjust the Contrast and Brightness Controls. *Move electrical devices that none of the pins are bent. *Make sure computer is operational by hitting...
Missing one of the primary colors (RED, GREEN, or BLUE) Possible Solution *Check if the Power Switch is in the ON position *Power Cord should be connected *Check if the PC system is Plug & Play compatible *Check if the Video Card is Plug & Play compatible *Check if the D-15 plug pin of Video Cable is bent *Adjust the Contrast and Brightness Controls. *Move electrical devices that none of the pins are bent. *Make sure computer is operational by hitting...

AL1922R User's Guide
Page 15
... (AUTO-key). CLOCK (pixel frequency) controls the number of the pixel clock signal. FOCUS or press hot-key (AUTO) Picture has color defects *Adjust RGB color or select color (white does not look white) temperature Horizontal or vertical disturbances on *Use win 95/98 shut-down mode pattern. 14 With a wrong phase adjustment the picture has horizontal disturbances in light picture. If the frequency is not centered or sized *Adjust pixel frequency (CLOCK) and properly. Screen image is not correct, the screen shows vertical...
... (AUTO-key). CLOCK (pixel frequency) controls the number of the pixel clock signal. FOCUS or press hot-key (AUTO) Picture has color defects *Adjust RGB color or select color (white does not look white) temperature Horizontal or vertical disturbances on *Use win 95/98 shut-down mode pattern. 14 With a wrong phase adjustment the picture has horizontal disturbances in light picture. If the frequency is not centered or sized *Adjust pixel frequency (CLOCK) and properly. Screen image is not correct, the screen shows vertical...

AL1922R User's Guide
Page 16
Check that the signal-cable is properly connected , If the connector is loose, tighten the connector's screws. 2. INPUT NOT SUPPORT : Your computer has been set to unsuitable display mode ,set the computer to display mode given in the following table(See page 18). 15 ERROR MESSAGE & POSSIBLE SOLUTION CABLE NOT CONNECTED : 1. Check the signal -cable connection pins for damage.
Check that the signal-cable is properly connected , If the connector is loose, tighten the connector's screws. 2. INPUT NOT SUPPORT : Your computer has been set to unsuitable display mode ,set the computer to display mode given in the following table(See page 18). 15 ERROR MESSAGE & POSSIBLE SOLUTION CABLE NOT CONNECTED : 1. Check the signal -cable connection pins for damage.
AL1922R User's Guide
Page 17
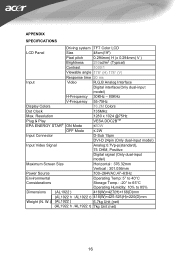
Resolution 1280 x 1024 @75Hz Plug & Play VESA DDC2BTM EPA ENERGY STAR® ON Mode ≤60W OFF Mode ≤ 2W Input Connector D-Sub 15pin DVI-D 24pin (Only dual-input model) Input Video Signal Analog:0.7Vp-p(standard), 75 OHM, Positive Digital signal (Only dual-input model) Maximum Screen Size Horizontal : 376.32mm Vertical : 301.056mm Power Source 100~264VAC,47~63Hz Environmental Operating Temp: 5° to 40°C Considerations Storage Temp.: -20° to 85% (AL1922 ) 418(W)×...
Resolution 1280 x 1024 @75Hz Plug & Play VESA DDC2BTM EPA ENERGY STAR® ON Mode ≤60W OFF Mode ≤ 2W Input Connector D-Sub 15pin DVI-D 24pin (Only dual-input model) Input Video Signal Analog:0.7Vp-p(standard), 75 OHM, Positive Digital signal (Only dual-input model) Maximum Screen Size Horizontal : 376.32mm Vertical : 301.056mm Power Source 100~264VAC,47~63Hz Environmental Operating Temp: 5° to 40°C Considerations Storage Temp.: -20° to 85% (AL1922 ) 418(W)×...

AL1922R User's Guide
Page 18
..., FCC, VCCI, CCC, MPR II, CE, TÜV/GS, TCO'03, UL, ISO13406-2 17 Switch External Controls: Functions Power Consumption ( Maximum ) Audio Output Regulatory Compliance • Auto Adjust Key • / Volume • Power Button • MENU/ENTER • Contrast • Brightness • Focus • Clock • H.Position • V.Position • Input signal Selection (Only dual-input model) • Language • Auto configuration (only Analog-input Model) • (Warm) Color • (Cool)Color • RGB Color temperature • Reset • OSD position .
..., FCC, VCCI, CCC, MPR II, CE, TÜV/GS, TCO'03, UL, ISO13406-2 17 Switch External Controls: Functions Power Consumption ( Maximum ) Audio Output Regulatory Compliance • Auto Adjust Key • / Volume • Power Button • MENU/ENTER • Contrast • Brightness • Focus • Clock • H.Position • V.Position • Input signal Selection (Only dual-input model) • Language • Auto configuration (only Analog-input Model) • (Warm) Color • (Cool)Color • RGB Color temperature • Reset • OSD position .

