User Guide
Page 1
Table of Contents Safety Rules Electrical Safety Installation Safety Cleaning Safety SPECIAL NOTES ON LCD MONITORS Components and Accessories Usage Installation Guide Adjustment of Display Operation Adjustment of Screen Attachment Plug and Play Power Saver Troubleshooting Technical Specifications Display Mode 1 1 1 1 1 2 2 2 3 4 6 6 7 7 7 8 9
Table of Contents Safety Rules Electrical Safety Installation Safety Cleaning Safety SPECIAL NOTES ON LCD MONITORS Components and Accessories Usage Installation Guide Adjustment of Display Operation Adjustment of Screen Attachment Plug and Play Power Saver Troubleshooting Technical Specifications Display Mode 1 1 1 1 1 2 2 2 3 4 6 6 7 7 7 8 9
User Guide
Page 2
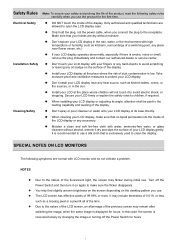
... following symptoms are normal with water, ammonia-free water, or glass cleanser without moisture. SPECIAL NOTES ON LCD MONITORS The following safety rules carefully when you use a silk cloth that your LCD display or its angle, attention shall be paid to the nature of the time. NOTES Due to the loading...the rain, water, or the environment with your fingers or any hard objects to avoid electric shock, or dropping. When installing your LCD at the place where the risk of the display. Moisten a clean and soft lint-free cloth with LCD monitor and do not indicate a problem.
... following symptoms are normal with water, ammonia-free water, or glass cleanser without moisture. SPECIAL NOTES ON LCD MONITORS The following safety rules carefully when you use a silk cloth that your LCD display or its angle, attention shall be paid to the nature of the time. NOTES Due to the loading...the rain, water, or the environment with your fingers or any hard objects to avoid electric shock, or dropping. When installing your LCD at the place where the risk of the display. Moisten a clean and soft lint-free cloth with LCD monitor and do not indicate a problem.

User Guide
Page 3
...sight. You will hear a click sound when the display and seat are engaged correctly. 2 The upper edge of the display should be installed: To minimize the reflection of the display based on a flat table. Components and Accessories LCD Display D-Sub Signal Cable Quick Start Guide User's Manual (...section carefully before starting the installation Before installing your LCD display, consider the following steps for quick installation: (See the figure) Assemble the seat of the display Take the seat out of the carton and assemble the display and seat along the rail. Adjust the front and...
...sight. You will hear a click sound when the display and seat are engaged correctly. 2 The upper edge of the display should be installed: To minimize the reflection of the display based on a flat table. Components and Accessories LCD Display D-Sub Signal Cable Quick Start Guide User's Manual (...section carefully before starting the installation Before installing your LCD display, consider the following steps for quick installation: (See the figure) Assemble the seat of the display Take the seat out of the carton and assemble the display and seat along the rail. Adjust the front and...
User Guide
Page 4
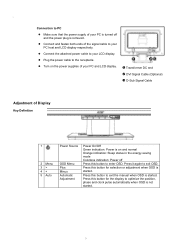
... Signal Cable (Optional) Z D-Sub Signal Cable Adjustment of Display Key Definition 1 2 Menu 3 > 4 < 5 Auto Power Source OSD Menu Plus Minus Automatic Adjustment Power On/Off Green indication: Power is on the power supplies of your LCD display. Connect the attached power cable to optimize the position, phase... and clock pulse automatically when OSD is started . 3 Press this button for the display to your PC is turned off Press this button to...
... Signal Cable (Optional) Z D-Sub Signal Cable Adjustment of Display Key Definition 1 2 Menu 3 > 4 < 5 Auto Power Source OSD Menu Plus Minus Automatic Adjustment Power On/Off Green indication: Power is on the power supplies of your LCD display. Connect the attached power cable to optimize the position, phase... and clock pulse automatically when OSD is started . 3 Press this button for the display to your PC is turned off Press this button to...
User Guide
Page 5
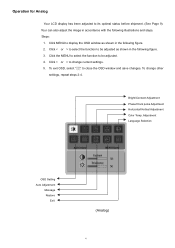
Operation for Analog Your LCD display has been adjusted to close the OSD window and save changes. Click < or > to select the function to change other settings, repeat steps 2-4. To change ... in the following figure. 2. Click MENU to be adjusted as shown in accordance with the following figure. 3. Click the MENU to select the function to display the OSD window as shown in the following illustrations and steps.
Operation for Analog Your LCD display has been adjusted to close the OSD window and save changes. Click < or > to select the function to change other settings, repeat steps 2-4. To change ... in the following figure. 2. Click MENU to be adjusted as shown in accordance with the following figure. 3. Click the MENU to select the function to display the OSD window as shown in the following illustrations and steps.
User Guide
Page 6
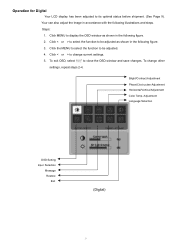
Operation for Digital Your LCD display has been adjusted to close the OSD window and save changes. Click MENU to change other settings, repeat steps 2-4. To exit OSD, select " " to its ... Adjustment Phase/Clock pulse Adjustment Horizontal/Vertical Adjustment Color Temp. Your can also adjust the image in accordance with the following figure. 2. Click < or > to display the OSD window as shown in the following illustrations and steps. Click < or > to select the function to be adjusted as shown in the following...
Operation for Digital Your LCD display has been adjusted to close the OSD window and save changes. Click MENU to change other settings, repeat steps 2-4. To exit OSD, select " " to its ... Adjustment Phase/Clock pulse Adjustment Horizontal/Vertical Adjustment Color Temp. Your can also adjust the image in accordance with the following figure. 2. Click < or > to display the OSD window as shown in the following illustrations and steps. Click < or > to select the function to be adjusted as shown in the following...
User Guide
Page 7
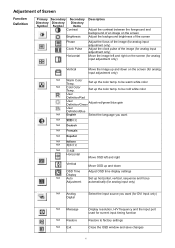
... of the image (for analog input adjustment only) Move the image left and right Vertical OSD Time Display N/A Auto Adjustment Move OSD up and down Adjust OSD time display settings Set up horizontal, vertical, sequence and focus automatically (for analog input only) N/A Analog Digital... Select the input source you want (for DVI Input only) N/A Message N/A Restore N/A Exit Display resolution, H/V frequency and the input port used for analog input adjustment only) N/A Warm Color Temp. to be cold white color User Definition/Red...
... of the image (for analog input adjustment only) Move the image left and right Vertical OSD Time Display N/A Auto Adjustment Move OSD up and down Adjust OSD time display settings Set up horizontal, vertical, sequence and focus automatically (for analog input only) N/A Analog Digital... Select the input source you want (for DVI Input only) N/A Message N/A Restore N/A Exit Display resolution, H/V frequency and the input port used for analog input adjustment only) N/A Warm Color Temp. to be cold white color User Definition/Red...
User Guide
Page 8
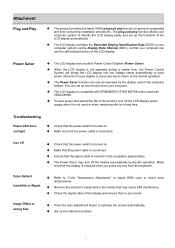
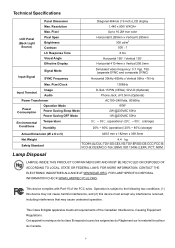
...cable is connected. You can set up the reference position. 7 Make that no pin is bent. Check the signal cable of the LCD display automatically. Check that may turn off Color Default Instability or Ripple Image Offset or wrong Size The product provides the latest VESA plug ...(Power Saver). Ensure that your computer. Remove the electronic equipment in the vicinity that the power switch is turned on . When the LCD display is not operated during the operation. The Power Saver may cause EMI interference. Move the mouse slightly or press any key from your computer...
...cable is connected. You can set up the reference position. 7 Make that no pin is bent. Check the signal cable of the LCD display automatically. Check that may turn off Color Default Instability or Ripple Image Offset or wrong Size The product provides the latest VESA plug ...(Power Saver). Ensure that your computer. Remove the electronic equipment in the vicinity that the power switch is turned on . When the LCD display is not operated during the operation. The Power Saver may cause EMI interference. Move the mouse slightly or press any key from your computer...
User Guide
Page 9
Pixel Pixel Span Brightness Contrast LC Response Time Visual Angle Effective Display Diagonal 484mm (19 inch) LCD display 1,440 x 900/ WXGA+ Up to the following two conditions: (1) this device may not cause harmful interference, and (2) this device must ...brouilieur du Canada. 8 BSMI; PCT; Resolution Max. ISO 13406-2;EPA; This device complies with Part 15 of the Canadian Interference- Technical Specifications LCD Panel (Back Light Source) Panel Dimension Max. This Class B digital apparatus meets all requirements of the FCC rules. Causing Equipment Regulations. Operation is...
Pixel Pixel Span Brightness Contrast LC Response Time Visual Angle Effective Display Diagonal 484mm (19 inch) LCD display 1,440 x 900/ WXGA+ Up to the following two conditions: (1) this device may not cause harmful interference, and (2) this device must ...brouilieur du Canada. 8 BSMI; PCT; Resolution Max. ISO 13406-2;EPA; This device complies with Part 15 of the Canadian Interference- Technical Specifications LCD Panel (Back Light Source) Panel Dimension Max. This Class B digital apparatus meets all requirements of the FCC rules. Causing Equipment Regulations. Operation is...
User Guide
Page 10
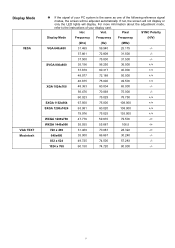
For more information about the adjustment mode, refer to the instructions of the following reference signal modes, the screen will display. Vert. If not, the screen will not display or only the LED lights will be adjusted automatically. SVGA 800x600 35.156 56.250 36.000 +/+ 37.879 60.317 40.000 ... 66.667 30.240 -/- 832 x 624 49.725 74.500 57.283 -/- 1024 x 768 60.150 74.720 80.000 -/- 9 Hor. Pixel SYNC Polarity Display Mode Frequency Frequency Frequency (H/V) (kHz) (Hz) (MHz) VGA 640x480 31.469 59.940 25.175 -/- 37.861 72.809 31.500 -/- 37.500 75.000...
For more information about the adjustment mode, refer to the instructions of the following reference signal modes, the screen will display. Vert. If not, the screen will not display or only the LED lights will be adjusted automatically. SVGA 800x600 35.156 56.250 36.000 +/+ 37.879 60.317 40.000 ... 66.667 30.240 -/- 832 x 624 49.725 74.500 57.283 -/- 1024 x 768 60.150 74.720 80.000 -/- 9 Hor. Pixel SYNC Polarity Display Mode Frequency Frequency Frequency (H/V) (kHz) (Hz) (MHz) VGA 640x480 31.469 59.940 25.175 -/- 37.861 72.809 31.500 -/- 37.500 75.000...


