
AL1916e Service Guide
Page 5
... antenna. 2. Connect the equipment into an outlet on a circuit different from that to which the receiver is not responsible for any , must be determined by turning the equipment off and on, the user is encouraged to try to correct the interference by the party responsible for compliance could void the user...
... antenna. 2. Connect the equipment into an outlet on a circuit different from that to which the receiver is not responsible for any , must be determined by turning the equipment off and on, the user is encouraged to try to correct the interference by the party responsible for compliance could void the user...
AL1916e Service Guide
Page 7
... Switch for hours. l You may remain after switching the image, when the same image is recovered slowly by changing the image or turning off the Power Switch and then turn it on the desktop pattern you use . l The LCD screen has effective pixels of the time. It may flicker during initial use...
... Switch for hours. l You may remain after switching the image, when the same image is recovered slowly by changing the image or turning off the Power Switch and then turn it on the desktop pattern you use . l The LCD screen has effective pixels of the time. It may flicker during initial use...

AL1916e Service Guide
Page 26
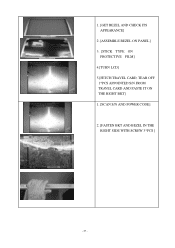
1.[UNCOVER PANEL PROTECTIVE FILM AND INSPECT IF PANEL IS DIRTY OR SCRATCHED] 2.[PASTE TYPE ON THE PROTECTIVE FILM TO FASTEN IT] 3.[TURN LCD,TEAR OFF INCOMING TYPE] 1.[GET LEFT BKT , LOCK 2*PCS SCREW TO FASTEN IT ON THE PANEL] 1.[GET RIGHT BKT , LOCK 2*PCS SCREW TO FASTEN IT ON THE PANEL] - 26 -
1.[UNCOVER PANEL PROTECTIVE FILM AND INSPECT IF PANEL IS DIRTY OR SCRATCHED] 2.[PASTE TYPE ON THE PROTECTIVE FILM TO FASTEN IT] 3.[TURN LCD,TEAR OFF INCOMING TYPE] 1.[GET LEFT BKT , LOCK 2*PCS SCREW TO FASTEN IT ON THE PANEL] 1.[GET RIGHT BKT , LOCK 2*PCS SCREW TO FASTEN IT ON THE PANEL] - 26 -
AL1916e Service Guide
Page 27
1. [GET BEZEL AND CHECK ITS APPEARANCE] 2 .[ASSEMBLE BEZEL ON PANEL] 3. [STICK TYPE ON PROTECTIVE FILM] 4.[TURN LCD] 5.[FETCH TRAVEL CARD, TEAR OFF 1*PCS APPOINTED S/N FROM TRAVEL CARD AND PASTE IT ON THE RIGHT BKT] 1. [SCAN S/N AND POWER CODE] 2. [FASTEN BKT AND BEZEL IN THE RIGHT SIDE WITH SCREW 3*PCS ] - 27 -
1. [GET BEZEL AND CHECK ITS APPEARANCE] 2 .[ASSEMBLE BEZEL ON PANEL] 3. [STICK TYPE ON PROTECTIVE FILM] 4.[TURN LCD] 5.[FETCH TRAVEL CARD, TEAR OFF 1*PCS APPOINTED S/N FROM TRAVEL CARD AND PASTE IT ON THE RIGHT BKT] 1. [SCAN S/N AND POWER CODE] 2. [FASTEN BKT AND BEZEL IN THE RIGHT SIDE WITH SCREW 3*PCS ] - 27 -

AL1916p Service Guide
Page 4
... or relocate the receiving antenna. 2. Do not open the cabinet. Refer servicing to rain or moisture. This equipment generates, uses and can be determined by turning the equipment off and on a circuit different from that changes or modifications not expressly approved by one or more of the FCC Rules. Increase the...
... or relocate the receiving antenna. 2. Do not open the cabinet. Refer servicing to rain or moisture. This equipment generates, uses and can be determined by turning the equipment off and on a circuit different from that changes or modifications not expressly approved by one or more of the FCC Rules. Increase the...
AL1916p Service Guide
Page 6
z You may remain after switching the image, when the same image is recovered slowly by changing the image or turning off the Power Switch and then turn it on the desktop pattern you use . z Due to the nature of the LCD screen, an afterimage of the previous screen may find slightly ...are normal with LCD monitor and do not indicate a problem. It may flicker during initial use . z The LCD screen has effective pixels of the time. Turn off the Power Switch for hours. In this case, the screen is displayed for hours. - 6 - NOTES z Due to make sure the flicker disappears.
z You may remain after switching the image, when the same image is recovered slowly by changing the image or turning off the Power Switch and then turn it on the desktop pattern you use . z Due to the nature of the LCD screen, an afterimage of the previous screen may find slightly ...are normal with LCD monitor and do not indicate a problem. It may flicker during initial use . z The LCD screen has effective pixels of the time. Turn off the Power Switch for hours. In this case, the screen is displayed for hours. - 6 - NOTES z Due to make sure the flicker disappears.

AL1916p Service Guide
Page 15
... (Gbkg) and foreground (Gfg) levels to be maintained for the remainder of the test. ♦ One point only (the target) will be a pair of - 15 - Turn on the shadowing conditions, but typically Bsrc and Btgt will be measured. ♦ Test Point :Center point of the display area Note 8) Definition of Crosstalk...
... (Gbkg) and foreground (Gfg) levels to be maintained for the remainder of the test. ♦ One point only (the target) will be a pair of - 15 - Turn on the shadowing conditions, but typically Bsrc and Btgt will be measured. ♦ Test Point :Center point of the display area Note 8) Definition of Crosstalk...

AL1916p Service Guide
Page 16
... center of Btgt (without Btgt present.). In this case the LMD will be measured with the source box (Bsrc) turned on the source box Bsrc. It will be turned off for the actual measurement. ♦ The target box point (Btgt) will be displayed for alignment purpose only)...LMD to its proper level, measure the luminance (or color). Display Btgt determined in step 2 above. opposite boxes, A&C or B&D. Turn off . (Btgt is for aligning the LMD. Next,turn on then off Btgt. Panel Relative Humidity Input Signals Video input • Type • Input Impedance • Polarity • ...
... center of Btgt (without Btgt present.). In this case the LMD will be measured with the source box (Bsrc) turned on the source box Bsrc. It will be turned off for the actual measurement. ♦ The target box point (Btgt) will be displayed for alignment purpose only)...LMD to its proper level, measure the luminance (or color). Display Btgt determined in step 2 above. opposite boxes, A&C or B&D. Turn off . (Btgt is for aligning the LMD. Next,turn on then off Btgt. Panel Relative Humidity Input Signals Video input • Type • Input Impedance • Polarity • ...
AL1916p Service Guide
Page 28
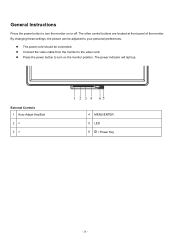
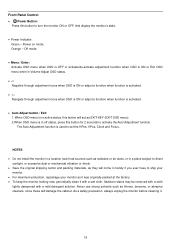
General Instructions Press the power button to turn on or off. z Press the power button to turn the monitor on the monitor position. External Controls 1 Auto Adjust Key/Exit 2 < 3 > 4 MENU/ENTER 5 LED 6 / Power Key - 28 - z Connect the video cable from the monitor to your personal preferences. The other control buttons are located at front panel of the monitor. z The power cord should be adjusted to the video card. The power indicator will light up. By changing these settings, the picture can be connected.
General Instructions Press the power button to turn on or off. z Press the power button to turn the monitor on the monitor position. External Controls 1 Auto Adjust Key/Exit 2 < 3 > 4 MENU/ENTER 5 LED 6 / Power Key - 28 - z Connect the video cable from the monitor to your personal preferences. The other control buttons are located at front panel of the monitor. z The power cord should be adjusted to the video card. The power indicator will light up. By changing these settings, the picture can be connected.
AL1916p Service Guide
Page 35
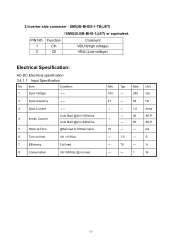
... Item Condition 1 Input Voltage ----- 2 Input requency ----- 3 Input Current 4 Inrush Current 5 Hold Up Time ----Cold Start @Vin=100Vrms Cold Start @Vin=240Vrms @full load & 100Vac input 6 Turn on time Vin =110Vac 7 Efficiency Full load 8 Consumption Vin=240Vac,@ no load Min. ms --- 1.0 --- Unit 100 --- 240 Vac 47 --- 63 Hz --- --- 1.0 Arms --- 30 A0-P --- --- 50...
... Item Condition 1 Input Voltage ----- 2 Input requency ----- 3 Input Current 4 Inrush Current 5 Hold Up Time ----Cold Start @Vin=100Vrms Cold Start @Vin=240Vrms @full load & 100Vac input 6 Turn on time Vin =110Vac 7 Efficiency Full load 8 Consumption Vin=240Vac,@ no load Min. ms --- 1.0 --- Unit 100 --- 240 Vac 47 --- 63 Hz --- --- 1.0 Arms --- 30 A0-P --- --- 50...
AL1916v Service Guide
Page 4
...better fit local market requirements and enhance product competitiveness, your Acer office may cause harmful interference to comply with the limits for Acer's "global" product offering. In such cases, please contact your regional Acer office to order FRU parts for any , must be... noted in order to radio communications. Warning: (For FCC Certified Models) Note: This equipment has been tested and found to correct the interference by one or more of customer machines. The changes or modifications not expressly approved by turning...
...better fit local market requirements and enhance product competitiveness, your Acer office may cause harmful interference to comply with the limits for Acer's "global" product offering. In such cases, please contact your regional Acer office to order FRU parts for any , must be... noted in order to radio communications. Warning: (For FCC Certified Models) Note: This equipment has been tested and found to correct the interference by one or more of customer machines. The changes or modifications not expressly approved by turning...
AL1916v Service Guide
Page 5
... parts causing a fire or electric shock. Do not attempt to the appliance. Please refer all of 0.01% or less such as a safety feature. Turn off the Power Switch for hours. Due to qualified service personnel To ensure satisfactory operation, use the monitor only with the monitor. In this case...the appliance safely. Slots and openings in a bookcase or cabinet unless proper ventilation is recovered slowly by changing the image or turning off the Power Switch and then turn it will protect the monitor from the type of the grounded plug. Do not place the monitor in the back and ...
... parts causing a fire or electric shock. Do not attempt to the appliance. Please refer all of 0.01% or less such as a safety feature. Turn off the Power Switch for hours. Due to qualified service personnel To ensure satisfactory operation, use the monitor only with the monitor. In this case...the appliance safely. Slots and openings in a bookcase or cabinet unless proper ventilation is recovered slowly by changing the image or turning off the Power Switch and then turn it will protect the monitor from the type of the grounded plug. Do not place the monitor in the back and ...
AL1916v Service Guide
Page 15
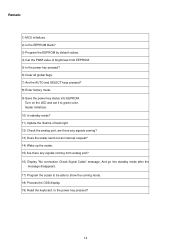
Is the power key pressed? 14 Turn on the LED and set it to show the coming from EEPROM. 5) Is the power key pressed? 6) Clear all global flags. 7) Are the AUTO and ...
Is the power key pressed? 14 Turn on the LED and set it to show the coming from EEPROM. 5) Is the power key pressed? 6) Clear all global flags. 7) Are the AUTO and ...
AL1916v Service Guide
Page 17
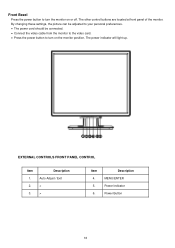
.... • The power cord should be connected. • Connect the video cable from the monitor to the video card. • Press the power button to turn on or off. Description MENU/ENTER Power Indicator Power Button 16 EXTERNAL CONTROLS FRONT PANEL CONTROL Item 1. 2. 3. Front Bezel Press the power button to...
.... • The power cord should be connected. • Connect the video cable from the monitor to the video card. • Press the power button to turn on or off. Description MENU/ENTER Power Indicator Power Button 16 EXTERNAL CONTROLS FRONT PANEL CONTROL Item 1. 2. 3. Front Bezel Press the power button to...

AL1916v Service Guide
Page 18
Turn on your computer before performing the procedure below. 1. Description Power Cable Signal Cable 17 Plug the power cable of the power cord into a nearby outlet. Connector one end of 15-pin D-SUB cable to the computer's D-DUB port. Plug the other end to the back of the monitor and connector the other end of your monitor into the PC port. 2. Item 1. 2. Rear Bezel Turn off your monitor and computer.
Turn on your computer before performing the procedure below. 1. Description Power Cable Signal Cable 17 Plug the power cable of the power cord into a nearby outlet. Connector one end of 15-pin D-SUB cable to the computer's D-DUB port. Plug the other end to the back of the monitor and connector the other end of your monitor into the PC port. 2. Item 1. 2. Rear Bezel Turn off your monitor and computer.
AL1916v Service Guide
Page 19
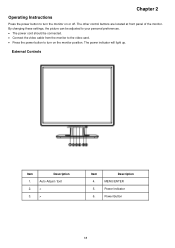
.... • The power cord should be connected. • Connect the video cable from the monitor to the video card. • Press the power button to turn on or off. The power indicator will light up. Description MENU/ENTER Power Indicator Power Button 18 Description Auto Adjust / Exit < > Item 4. 5. 6. Chapter 2 Operating Instructions...
.... • The power cord should be connected. • Connect the video cable from the monitor to the video card. • Press the power button to turn on or off. The power indicator will light up. Description MENU/ENTER Power Indicator Power Button 18 Description Auto Adjust / Exit < > Item 4. 5. 6. Chapter 2 Operating Instructions...
AL1916v Service Guide
Page 20
... • Do not install the monitor in a location near heat sources such as radiators or air ducts, or in handy if you ever have to turn the monitor ON or OFF. As a safety precaution, always unplug the monitor before cleaning it with a mild detergent solution. When OSD menu is in active...
... • Do not install the monitor in a location near heat sources such as radiators or air ducts, or in handy if you ever have to turn the monitor ON or OFF. As a safety precaution, always unplug the monitor before cleaning it with a mild detergent solution. When OSD menu is in active...
AL1916v Service Guide
Page 35
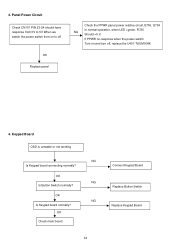
Panel Power Circuit Check CN101 PIN 23-24 should have response from 0V to 5V When we switch the power switch from on to off OK Replace panel Check the PPWR panel power relative circuit,Q706, Q704 In normal operation, when LED =green, R725 NG Should =5 V, If PPWR no-response when the power switch Turn on and turn off, replace the U401-TSUM16AK 4. OK NG Is Keypad board normally? OK Check main board 34 Connect Keypad Board Replace Button Switch Replace Keypad Board Keypad Board OSD is unstable or not working NG Is Keypad board connecting normally? 3. OK NG Is Button Switch normally?
Panel Power Circuit Check CN101 PIN 23-24 should have response from 0V to 5V When we switch the power switch from on to off OK Replace panel Check the PPWR panel power relative circuit,Q706, Q704 In normal operation, when LED =green, R725 NG Should =5 V, If PPWR no-response when the power switch Turn on and turn off, replace the U401-TSUM16AK 4. OK NG Is Keypad board normally? OK Check main board 34 Connect Keypad Board Replace Button Switch Replace Keypad Board Keypad Board OSD is unstable or not working NG Is Keypad board connecting normally? 3. OK NG Is Button Switch normally?
AL1916W Service Guide
Page 16
... Bright/Contract Adjustment Phase/Clock pulse Adjustment Horizontal/Vertical Adjustment Color Temp. Click < or > to display the OSD window as shown in the following figure. 3. Turning off the power should be adjusted as shown in the following figure. 2. Click < or > to select the function to be avoided while using the menu.
... Bright/Contract Adjustment Phase/Clock pulse Adjustment Horizontal/Vertical Adjustment Color Temp. Click < or > to display the OSD window as shown in the following figure. 3. Turning off the power should be adjusted as shown in the following figure. 2. Click < or > to select the function to be avoided while using the menu.
AL1916W Service Guide
Page 18
... the power of time, the system will return to save power, turn the monitor to low voltage mode to the original image. To save power. You can use the Plug and Play system without encountering usual installation ...
... the power of time, the system will return to save power, turn the monitor to low voltage mode to the original image. To save power. You can use the Plug and Play system without encountering usual installation ...


