
AL1716e Service Guide
Page 5
... Part 15 of the FCC Rules. The changes or modifications not expressly approved by the party responsible for any , must be determined by turning the equipment off and on a circuit different from that interference will not occur in a residential installation. It is connected. 4. As an... ENERGY STAR® Partner our company has determined that this equipment. Refer servicing to rain or moisture. These limits are present inside the monitor. Connect the equipment into an outlet on , the user is not responsible for compliance could void the user's authority to operate the equipment...
... Part 15 of the FCC Rules. The changes or modifications not expressly approved by the party responsible for any , must be determined by turning the equipment off and on a circuit different from that interference will not occur in a residential installation. It is connected. 4. As an... ENERGY STAR® Partner our company has determined that this equipment. Refer servicing to rain or moisture. These limits are present inside the monitor. Connect the equipment into an outlet on , the user is not responsible for compliance could void the user's authority to operate the equipment...
AL1716e Service Guide
Page 7
... may flicker during initial use . It may remain after switching the image, when the same image is recovered slowly by changing the image or turning off the Power Switch and then turn it on the desktop pattern you use . z Due to the nature of 99.99% or more. SPECIAL NOTES ON LCD... MONITORS The following symptoms are normal with LCD monitor and do not indicate a problem. Turn off the Power Switch for hours. NOTES z Due to the nature of the LCD screen, an afterimage of the...
... may flicker during initial use . It may remain after switching the image, when the same image is recovered slowly by changing the image or turning off the Power Switch and then turn it on the desktop pattern you use . z Due to the nature of 99.99% or more. SPECIAL NOTES ON LCD... MONITORS The following symptoms are normal with LCD monitor and do not indicate a problem. Turn off the Power Switch for hours. NOTES z Due to the nature of the LCD screen, an afterimage of the...
AL1716v Service Guide
Page 4
...the receiver is the responsibility of the following general information. 1. Notice: 1. Warning: To prevent fire or shock hazard, do not expose the monitor to qualified personnel only. 3 However, there is made, it supports, please read the following measures: 1. Shielded interface cables and AC power ... list of the FCC Rules. add-on , the user is not responsible for Acer's "global" product offering. If, for compliance could void the user's authority to correct the interference by turning the equipment off and on card, modem, or extra memory capability). If this ...
...the receiver is the responsibility of the following general information. 1. Notice: 1. Warning: To prevent fire or shock hazard, do not expose the monitor to qualified personnel only. 3 However, there is made, it supports, please read the following measures: 1. Shielded interface cables and AC power ... list of the FCC Rules. add-on , the user is not responsible for Acer's "global" product offering. If, for compliance could void the user's authority to correct the interference by turning the equipment off and on card, modem, or extra memory capability). If this ...
AL1716v Service Guide
Page 5
... a radiator or heat register. If your dealer or local power company. Overloading can expose you use. Do not attempt to power surges. Turn off the Power Switch for hours. The LCD screen has effective pixels of the grounded plug. Due to make sure the flicker disappears. Do...same image is provided. This plug will protect the monitor from overheating, be easily accessible. Do not place the monitor on a wall or shelf, uses a mounting kit approved by changing the image or turning off the Power Switch and then turn it will not be operated only from the type of...
... a radiator or heat register. If your dealer or local power company. Overloading can expose you use. Do not attempt to power surges. Turn off the Power Switch for hours. The LCD screen has effective pixels of the grounded plug. Due to make sure the flicker disappears. Do...same image is provided. This plug will protect the monitor from overheating, be easily accessible. Do not place the monitor on a wall or shelf, uses a mounting kit approved by changing the image or turning off the Power Switch and then turn it will not be operated only from the type of...

AL1716v Service Guide
Page 19
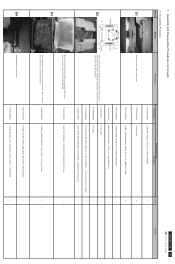
... MENU/ENTER Power Indicator Power Button 18 Chapter 2 Operating Instructions Press the power button to turn the monitor on the monitor position. Description Auto Adjust / Exit < > Item 4. 5. 6. By changing these settings, the picture can be adjusted to your personal preferences. • The power cord ...should be connected. • Connect the video cable from the monitor to the video card. • Press the power button to turn on or off. External Controls Item 1. 2. 3. The power indicator will light up.
... MENU/ENTER Power Indicator Power Button 18 Chapter 2 Operating Instructions Press the power button to turn the monitor on the monitor position. Description Auto Adjust / Exit < > Item 4. 5. 6. By changing these settings, the picture can be adjusted to your personal preferences. • The power cord ...should be connected. • Connect the video cable from the monitor to the video card. • Press the power button to turn on or off. External Controls Item 1. 2. 3. The power indicator will light up.

AL1716v Service Guide
Page 20
... is activated. • Auto Adjust button / Exit: 1. When OSD menu is in handy if you ever have to turn the monitor ON or OFF. As a safety precaution, always unplug the monitor before cleaning it with a mild detergent solution. And display the monitor's state. • Power Indicator: Green - Orange - NOTES • Do not install the...
... is activated. • Auto Adjust button / Exit: 1. When OSD menu is in handy if you ever have to turn the monitor ON or OFF. As a safety precaution, always unplug the monitor before cleaning it with a mild detergent solution. And display the monitor's state. • Power Indicator: Green - Orange - NOTES • Do not install the...

AL1716W Service Guide
Page 5
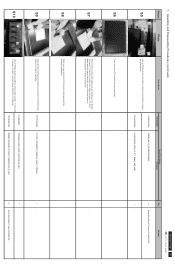
...Size and Fine to one TTL input load. User can make adjustment to the monitor. 1.5.2 Power Indicator LED: The monitor shall make use of a LED type indicator located on the operation of the monitor. Select OSD Menu turn off , and the new mode is displayed. 1.5.4 Key Function Overview: All functions...screen. Press 'Right' or 'Left' to factory preset value except language selection. When logic 0 is asserted by controlling analog signal gain. 4 ACER AL1716W Go to the driver is 1.6 mA. Instead, it shall interrupt the DC supply to the R/G/B content, otherwise not. If the buttons ...
...Size and Fine to one TTL input load. User can make adjustment to the monitor. 1.5.2 Power Indicator LED: The monitor shall make use of a LED type indicator located on the operation of the monitor. Select OSD Menu turn off , and the new mode is displayed. 1.5.4 Key Function Overview: All functions...screen. Press 'Right' or 'Left' to factory preset value except language selection. When logic 0 is asserted by controlling analog signal gain. 4 ACER AL1716W Go to the driver is 1.6 mA. Instead, it shall interrupt the DC supply to the R/G/B content, otherwise not. If the buttons ...
AL1716W Service Guide
Page 45
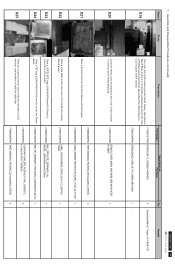
... Stick a Screen Card on the Front Bezel with 4 screws. 7115240121P0A SCREW_M4*12_DOUBLE WASHIER 7740412200P0A STAND_BASE_ACER_AL1717_#6800_ABS 94HB ACER AL1716W 44 Go to LCD module with two tapes. 7749600200P0A TAPE_MASKING_PACKING_25mm(w)x45m_LITEON 2- 7730203550P0A CARD_SCREEN PROTECTOR_ACER_T17AA_AL1716W 1 - Take two....05 mm) to cover the LCD monitor. 7749003210P0A BAG_LDPE+EPE_ORDINARY_ALL MODEL_L680xW550mmxH0.55mm 1- Assembly and Disassembly Procedures (continued) Steps Photo Procedures Part Number Spare Parts List Part Name S19 Turn over the LCD module (screen faced ...
... Stick a Screen Card on the Front Bezel with 4 screws. 7115240121P0A SCREW_M4*12_DOUBLE WASHIER 7740412200P0A STAND_BASE_ACER_AL1717_#6800_ABS 94HB ACER AL1716W 44 Go to LCD module with two tapes. 7749600200P0A TAPE_MASKING_PACKING_25mm(w)x45m_LITEON 2- 7730203550P0A CARD_SCREEN PROTECTOR_ACER_T17AA_AL1716W 1 - Take two....05 mm) to cover the LCD monitor. 7749003210P0A BAG_LDPE+EPE_ORDINARY_ALL MODEL_L680xW550mmxH0.55mm 1- Assembly and Disassembly Procedures (continued) Steps Photo Procedures Part Number Spare Parts List Part Name S19 Turn over the LCD module (screen faced ...
AL1716W Service Guide
Page 47
... Take out all accessories and returned product with a proper tool. 7735431081P0A Packing label 2 - Turn over the LCD monitor (screen faced down), 7730203550P0A CARD_SCREEN PROTECTOR_ACER_T17AA_AL1716W 1 - 1 - ACER AL1716W 46 Go to remove the screen protector card. S3 Move the returned LCD monitor to a working table, then remove cushion foams and LDPE+EPE bag. 7749003190P0A BAG_PE_ORDINARY_FOR ACER_L300xW300xT0...
... Take out all accessories and returned product with a proper tool. 7735431081P0A Packing label 2 - Turn over the LCD monitor (screen faced down), 7730203550P0A CARD_SCREEN PROTECTOR_ACER_T17AA_AL1716W 1 - 1 - ACER AL1716W 46 Go to remove the screen protector card. S3 Move the returned LCD monitor to a working table, then remove cushion foams and LDPE+EPE bag. 7749003190P0A BAG_PE_ORDINARY_FOR ACER_L300xW300xT0...
AL1716W Service Guide
Page 48
...cloth on the panel where you are release from the Front Bezel. 7140130061P0A T17BNHW-G1(99)_ACER_FUNCTION KEY BD SCREW_MACHINE_WITHOUT_NINDING_M3_6L_BLA ACER AL1716W 47 Go to protect the panel. remove the bezel carefully. 7737517400P0A FC ASSY_#6790/#6810_ABS94V0_ACER_T17BNHW Key Function cable... screwdriver unscrew 4 screws to release the stand base. 7115240121P0A 7740412200P0A SCREW_M4*12_DOUBLE WASHIER STAND_BASE_ACER_AL1717_#6800_ABS 94HB S6 Turn over the LCD monitor (screen faced up on to cover page Q'ty Remark 4 Screw Size=M4x12; S9 1 S10 Once all the locking ...
...cloth on the panel where you are release from the Front Bezel. 7140130061P0A T17BNHW-G1(99)_ACER_FUNCTION KEY BD SCREW_MACHINE_WITHOUT_NINDING_M3_6L_BLA ACER AL1716W 47 Go to protect the panel. remove the bezel carefully. 7737517400P0A FC ASSY_#6790/#6810_ABS94V0_ACER_T17BNHW Key Function cable... screwdriver unscrew 4 screws to release the stand base. 7115240121P0A 7740412200P0A SCREW_M4*12_DOUBLE WASHIER STAND_BASE_ACER_AL1717_#6800_ABS 94HB S6 Turn over the LCD monitor (screen faced up on to cover page Q'ty Remark 4 Screw Size=M4x12; S9 1 S10 Once all the locking ...
AL1716W User's Guide
Page 2
In this product. Visit http://global.acer.com/about/sustainability.htm E-1 NOTES · Due to make sure the flicker disappears. · You may find slightly uneven brightness on the screen depending on .... To view the JIS C 0950 material declaration for this case, the screen is displayed for hours. Turn off the Power Switch for hours. AL1716W SPECIAL NOTES ON LCD MONITORS The following symptoms are normal with LCD monitor and do not indicate a problem. mandates that manufactures provide Material Content Declarations for sale after switching...
In this product. Visit http://global.acer.com/about/sustainability.htm E-1 NOTES · Due to make sure the flicker disappears. · You may find slightly uneven brightness on the screen depending on .... To view the JIS C 0950 material declaration for this case, the screen is displayed for hours. Turn off the Power Switch for hours. AL1716W SPECIAL NOTES ON LCD MONITORS The following symptoms are normal with LCD monitor and do not indicate a problem. mandates that manufactures provide Material Content Declarations for sale after switching...
AL1716x Service Guide
Page 7
...all servicing to dangerous voltages and other hazards. If the monitor falls, it on the label. If you to qualified service personnel. SPECIAL NOTES ON LCD MONITORS The following the kit instructions. Turn off the Power Switch and then turn it can result in the back and bottom of the... grounded plug. It may include blemishes of 0.01% or less such as a safety feature. Do not place the monitor in a wet ...
...all servicing to dangerous voltages and other hazards. If the monitor falls, it on the label. If you to qualified service personnel. SPECIAL NOTES ON LCD MONITORS The following the kit instructions. Turn off the Power Switch and then turn it can result in the back and bottom of the... grounded plug. It may include blemishes of 0.01% or less such as a safety feature. Do not place the monitor in a wet ...

AL1716x Service Guide
Page 20
Front Panel Control No Symbol 5 4 3 2 1 Function 20 Connect the video cable from the monitor to the VGA Card. The power cord should be adjusted to your personal preferences. Press the power button to turn the monitor on or off. The other control buttons are located on the front of the monitor. Chapter 2 OPERATION INSTRUCTIONS Press the power button to turn on the monitor, the power indicator will light up. By changing these settings, the picture can be connected.
Front Panel Control No Symbol 5 4 3 2 1 Function 20 Connect the video cable from the monitor to the VGA Card. The power cord should be adjusted to your personal preferences. Press the power button to turn the monitor on or off. The other control buttons are located on the front of the monitor. Chapter 2 OPERATION INSTRUCTIONS Press the power button to turn on the monitor, the power indicator will light up. By changing these settings, the picture can be connected.
AL1716x Service Guide
Page 21
... or Exit OSD menu when in off status, press this button for 2seconds to turn the monitor on or off or activate/de-activate adjustment function when OSD is activated. 1. To keep the monitor looking new, periodically clean it with a mild detergent solution. Off mode Activate OSD... used to set the H.Pos., V Pos., Clock and Phase. When OSD menu is in Volume Adjust OSD status. 1. As a safety precaution, always unplug the monitor before cleaning it was originally packed in active status, this button to activate the "Auto Adjustment" which is activated. 1. 1 Power key/LED 2 Menu/Enter 3...
... or Exit OSD menu when in off status, press this button for 2seconds to turn the monitor on or off or activate/de-activate adjustment function when OSD is activated. 1. To keep the monitor looking new, periodically clean it with a mild detergent solution. Off mode Activate OSD... used to set the H.Pos., V Pos., Clock and Phase. When OSD menu is in Volume Adjust OSD status. 1. As a safety precaution, always unplug the monitor before cleaning it was originally packed in active status, this button to activate the "Auto Adjustment" which is activated. 1. 1 Power key/LED 2 Menu/Enter 3...


