

AL1713 Service Guide
Page 5
... rain or moisture. Notice: 1. The manufacturer is encouraged to try to operate the equipment. 2. WARNING: To prevent fire or shock hazard, do not expose the monitor to comply with the emission limits. 3. Connect the equipment into an outlet on , the user is not responsible for any radio or TV interference caused.... 2. Consult the dealer or an experienced radio/TV technician for help. Do not open the cabinet. If this equipment. These limits are present inside the monitor.
... rain or moisture. Notice: 1. The manufacturer is encouraged to try to operate the equipment. 2. WARNING: To prevent fire or shock hazard, do not expose the monitor to comply with the emission limits. 3. Connect the equipment into an outlet on , the user is not responsible for any radio or TV interference caused.... 2. Consult the dealer or an experienced radio/TV technician for help. Do not open the cabinet. If this equipment. These limits are present inside the monitor.
AL1713 Service Guide
Page 6
...the time. In this case, the screen is equipped with a three-pronged grounded plug, a plug with the monitor. Do not place the monitor on the monitor. Do not place the monitor in fire or electric shock. Do not defeat the safety purpose of 99.99% or more. Overloading can ...opening or removing covers can result in a bookcase or cabinet unless proper ventilation is displayed for hours. To ensure satisfactory operation, use the monitor only with UL listed computers which have an electrician install the correct outlet, or use a mounting kit approved by the manufacturer or sold ...
...the time. In this case, the screen is equipped with a three-pronged grounded plug, a plug with the monitor. Do not place the monitor on the monitor. Do not place the monitor in fire or electric shock. Do not defeat the safety purpose of 99.99% or more. Overloading can ...opening or removing covers can result in a bookcase or cabinet unless proper ventilation is displayed for hours. To ensure satisfactory operation, use the monitor only with UL listed computers which have an electrician install the correct outlet, or use a mounting kit approved by the manufacturer or sold ...
AL1713 Service Guide
Page 7
Table of Contents Monitor Features ...7 FACTORY PRESET TIMING TABLE 8 Monitor Block Diagram 9 MAIN BOARD DIAGRAM 10 Software Flow Chart 11 MONITOR INTERFACE BOARD PCB LAYOUT 12 FRONT BEZEL ...14 BACK VIEW...15 OPERATION INSTRUCTIONS 16 ADJUSTING THE MONITOR 18 MACHINE ASSEMBLY 22 TROUTROUBLESHOOTING 26 FRU (Field Replaceable Unit) LIST 33 SHEMATIC DIAGRAM 38 6
Table of Contents Monitor Features ...7 FACTORY PRESET TIMING TABLE 8 Monitor Block Diagram 9 MAIN BOARD DIAGRAM 10 Software Flow Chart 11 MONITOR INTERFACE BOARD PCB LAYOUT 12 FRONT BEZEL ...14 BACK VIEW...15 OPERATION INSTRUCTIONS 16 ADJUSTING THE MONITOR 18 MACHINE ASSEMBLY 22 TROUTROUBLESHOOTING 26 FRU (Field Replaceable Unit) LIST 33 SHEMATIC DIAGRAM 38 6
AL1713 Service Guide
Page 8
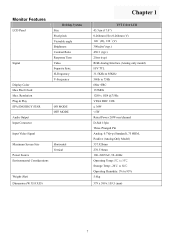
... (typ.) RGB Analog Interface (Analog only model) H/V TTL 31.5KHz to 85KHz 56Hz to 75Hz 6bits+FRC 135MHz 1280 x 1024 @75Hz VESA DDC 1/2B < 36W Monitor Features LCD Panel Signal Display Color Max Pixel Clock Max. Resolution Plug & Play EPA ENGERGY STAR Audio Output Input Connector Driving System Size Pixel pitch...
... (typ.) RGB Analog Interface (Analog only model) H/V TTL 31.5KHz to 85KHz 56Hz to 75Hz 6bits+FRC 135MHz 1280 x 1024 @75Hz VESA DDC 1/2B < 36W Monitor Features LCD Panel Signal Display Color Max Pixel Clock Max. Resolution Plug & Play EPA ENGERGY STAR Audio Output Input Connector Driving System Size Pixel pitch...

AL1713 Service Guide
Page 10
In Inverter/power board, power section supplies +12V & +5V for debug used . The inverter section drives the backlight of panel and the DC-DC conversion. Inverter/power board (Including: AC/DC Power supply and inverter) Flat Panel and CCFL Backlight Interface board RS232 Connector for Inverter and Interface board used AC-IN 90V~264V Keypad board Host Computer Video signal, DDC 9 Monitor Block Diagram The LCD Monitor contains an interface board, and inverter/power board, keypad board and flat panel.
In Inverter/power board, power section supplies +12V & +5V for debug used . The inverter section drives the backlight of panel and the DC-DC conversion. Inverter/power board (Including: AC/DC Power supply and inverter) Flat Panel and CCFL Backlight Interface board RS232 Connector for Inverter and Interface board used AC-IN 90V~264V Keypad board Host Computer Video signal, DDC 9 Monitor Block Diagram The LCD Monitor contains an interface board, and inverter/power board, keypad board and flat panel.
AL1713 Service Guide
Page 13
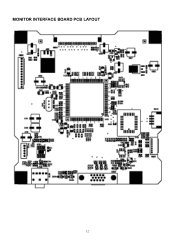
MONITOR INTERFACE BOARD PCB LAYOUT 12
MONITOR INTERFACE BOARD PCB LAYOUT 12
AL1713 Service Guide
Page 17
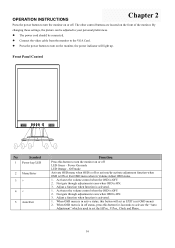
...Activates the volume control when the OSD is ON. 3. Navigate through adjustments icons when OSD is OFF. 2. The other control buttons are located on the monitor, the power indicator will act as EXIT (exit OSD menu) 2. Adjust a function when function is ON. 3. When OSD menu is used to set... and Phase. 16 Power On mode LED Orange - OPERATION INSTRUCTIONS Chapter 2 Press the power button to turn the monitor on or off LED Green - Connect the video cable from the monitor to turn the monitor on or off. Front Panel Control No Symbol 1 Power key/LED 2 Menu/Enter 3 > 4 < 5 ...
...Activates the volume control when the OSD is ON. 3. Navigate through adjustments icons when OSD is OFF. 2. The other control buttons are located on the monitor, the power indicator will act as EXIT (exit OSD menu) 2. Adjust a function when function is ON. 3. When OSD menu is used to set... and Phase. 16 Power On mode LED Orange - OPERATION INSTRUCTIONS Chapter 2 Press the power button to turn the monitor on or off LED Green - Connect the video cable from the monitor to turn the monitor on or off. Front Panel Control No Symbol 1 Power key/LED 2 Menu/Enter 3 > 4 < 5 ...

AL1713 Service Guide
Page 18
Stubborn stains may be removed with a cloth lightly dampened with a soft cloth. To keep the monitor looking new, periodically clean it with a mild detergent solution. Save the original shipping carton and packing materials, as they will damage the cabinet. ... benzene, or abrasive cleaners, since these will come in the factory. As a safety precaution, always unplug the monitor before cleaning it. 17 For maximum protection, repackage your monitor. NOTES Do not install the monitor in a location near heat sources such as radiators or air ducts, or in a place subject to ship your...
Stubborn stains may be removed with a cloth lightly dampened with a soft cloth. To keep the monitor looking new, periodically clean it with a mild detergent solution. Save the original shipping carton and packing materials, as they will damage the cabinet. ... benzene, or abrasive cleaners, since these will come in the factory. As a safety precaution, always unplug the monitor before cleaning it. 17 For maximum protection, repackage your monitor. NOTES Do not install the monitor in a location near heat sources such as radiators or air ducts, or in a place subject to ship your...
AL1713 Service Guide
Page 19
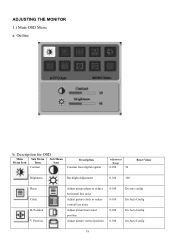
Description for OSD Main Sub Menu Sub Menu Menu Icon Item Icon Contrast Description Contrast from digital register Adjustment Range 0-100 50 Reset Value Brightness Backlight Adjustment 0-100 100 Phase Clock H. ADJUSTING THE MONITOR 1.) Main OSD Menu a. Outline b. Position Adjust picture phase to reduce horizontal line noise Adjust picture clock to reduce vertical line noise Adjust picture horizontal position Adjust picture vertical position 0-100 0-100 0-100 0-100 Do auto config Do Auto Config Do Auto Config Do Auto Config 18 Position V.
Description for OSD Main Sub Menu Sub Menu Menu Icon Item Icon Contrast Description Contrast from digital register Adjustment Range 0-100 50 Reset Value Brightness Backlight Adjustment 0-100 100 Phase Clock H. ADJUSTING THE MONITOR 1.) Main OSD Menu a. Outline b. Position Adjust picture phase to reduce horizontal line noise Adjust picture clock to reduce vertical line noise Adjust picture horizontal position Adjust picture vertical position 0-100 0-100 0-100 0-100 Do auto config Do Auto Config Do Auto Config Do Auto Config 18 Position V.
AL1713 Service Guide
Page 21
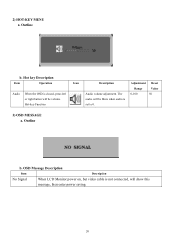
OSD Message Description Item Description No Signal When LCD Monitor power on, but video cable is not connected, will be Mute when audio is closed, press left Audio volume adjustment. Outline b. The 0-100 50 or right button will be volume audio will show this message, then enter power saving. 20 Outline b. Hot key Description Item Operation Icon Description Adjustment Reset Range Value Audio When the OSD is Hot-key Function set to 0. 3) OSD MESSAGE a. 2) HOT-KEY MENU a.
OSD Message Description Item Description No Signal When LCD Monitor power on, but video cable is not connected, will be Mute when audio is closed, press left Audio volume adjustment. Outline b. The 0-100 50 or right button will be volume audio will show this message, then enter power saving. 20 Outline b. Hot key Description Item Operation Icon Description Adjustment Reset Range Value Audio When the OSD is Hot-key Function set to 0. 3) OSD MESSAGE a. 2) HOT-KEY MENU a.

AL1713 Service Guide
Page 22
...a unidirectional data channel from the display to conserve electrical energy by reducing power consumption when there is no video input signal this monitor, following a time-out period, will automatically switch to the VESA DDC STANDARD. The voltage rating for the Northern American region is...INPUT SIGNAL. After the video input signal is restored, full power is restored and the display is automatically redrawn. This monitor meets the Green monitor standards as set by pressing a key on the level of DDC used, communicate additional information about its identity and, depending...
...a unidirectional data channel from the display to conserve electrical energy by reducing power consumption when there is no video input signal this monitor, following a time-out period, will automatically switch to the VESA DDC STANDARD. The voltage rating for the Northern American region is...INPUT SIGNAL. After the video input signal is restored, full power is restored and the display is automatically redrawn. This monitor meets the Green monitor standards as set by pressing a key on the level of DDC used, communicate additional information about its identity and, depending...
AL1713 Service Guide
Page 23
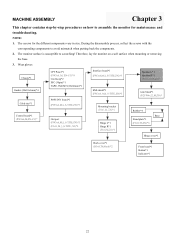
During the disassembly process, collect the screws with the corresponding components to scratching! Therefore, lay the monitor on how to assemble the monitor for the different components vary in size. NOTE: 1. The monitor surface is susceptible to avoid mismatch when putting back the components. 2. Wear gloves Chassis*1 Gasket (20x10x3mm)*4 Cable ties*1 Control board*1 (PW3x6...
During the disassembly process, collect the screws with the corresponding components to scratching! Therefore, lay the monitor on how to assemble the monitor for the different components vary in size. NOTE: 1. The monitor surface is susceptible to avoid mismatch when putting back the components. 2. Wear gloves Chassis*1 Gasket (20x10x3mm)*4 Cable ties*1 Control board*1 (PW3x6...


