Quick Start Guide
Page 1
... the monitor first. Connect the VGA video cable to a properly grounded AC outlet. 4. Connect the Audio Cable(Only Audio-Input Model)(Optional) 3. Connect power cord Connect the power cord to the monitor, then to the computer. 1-2 Connect digital Cable (Only Dual-Input Model) a. If the monitor still does not function properly, please refer to diagnose the problem. Troubleshooting Tips No Power - To prevent overheating, these openings should open the monitor's case. • Be sure to hold the plug, not the cable, when...
... the monitor first. Connect the VGA video cable to a properly grounded AC outlet. 4. Connect the Audio Cable(Only Audio-Input Model)(Optional) 3. Connect power cord Connect the power cord to the monitor, then to the computer. 1-2 Connect digital Cable (Only Dual-Input Model) a. If the monitor still does not function properly, please refer to diagnose the problem. Troubleshooting Tips No Power - To prevent overheating, these openings should open the monitor's case. • Be sure to hold the plug, not the cable, when...
Quick Start Guide
Page 2
...input/output devices, terminals, printers, etc.) certified to other household waste. Notice: Shielded cables All connections to comply with your waste equipment by turning the device off your household waste disposal service or the shop where you can drop off and on, the user... device and receiver. • Connect the device into an outlet on its packaging indicates that this product. This device generates, uses, and can be attached to a designated collection point for the setting of the FCC Rules. LCD Monitor Quick Setup Guide If this equipment. Operation with Canadian...
...input/output devices, terminals, printers, etc.) certified to other household waste. Notice: Shielded cables All connections to comply with your waste equipment by turning the device off your household waste disposal service or the shop where you can drop off and on, the user... device and receiver. • Connect the device into an outlet on its packaging indicates that this product. This device generates, uses, and can be attached to a designated collection point for the setting of the FCC Rules. LCD Monitor Quick Setup Guide If this equipment. Operation with Canadian...

User Manual
Page 1
TABLE OF CONTENTS Special notes on LCD monitors 1 Information for your safety and comfort 2 Unpacking 5 Attaching/Removing the base 6 Screen position adjustment 6 Connecting the power cord 7 Safety precaution 7 Cleaning your monitor 7 Power saving 8 DDC 8 Connector Pin Assignment 9 Standard Timing Table 11 Installation 12 User controls 13 Troubleshooting 19
TABLE OF CONTENTS Special notes on LCD monitors 1 Information for your safety and comfort 2 Unpacking 5 Attaching/Removing the base 6 Screen position adjustment 6 Connecting the power cord 7 Safety precaution 7 Cleaning your monitor 7 Power saving 8 DDC 8 Connector Pin Assignment 9 Standard Timing Table 11 Installation 12 User controls 13 Troubleshooting 19
User Manual
Page 2
... remain after switching the image, when the same image is displayed for hours. In this case, the screen is recovered slowly by changing the image or turning off the Power Switch and then turn it on again to the nature of the fluorescent light, the screen may flicker during initial use . • The LCD screen has effective pixels of the previous screen may find slightly uneven brightness on the screen depending...
... remain after switching the image, when the same image is displayed for hours. In this case, the screen is recovered slowly by changing the image or turning off the Power Switch and then turn it on again to the nature of the fluorescent light, the screen may flicker during initial use . • The LCD screen has effective pixels of the previous screen may find slightly uneven brightness on the screen depending...

User Manual
Page 3
...instructions carefully. CAUTION for accessibility Be sure that could be seriously damaged. • Slots and openings are provided for ventilation to ensure reliable operation of the product and to protect it afteryour ears adjust. • Limit the amount of time listening to music at high volume. • Avoid turning up the volume to unplug the power cord... in installation unless proper ventilation is easily accessible and located as close to the equipment operator as they may touch dangerous voltage points or short-out parts that the power outlet you plug the power cord into ...
...instructions carefully. CAUTION for accessibility Be sure that could be seriously damaged. • Slots and openings are provided for ventilation to ensure reliable operation of the product and to protect it afteryour ears adjust. • Limit the amount of time listening to music at high volume. • Avoid turning up the volume to unplug the power cord... in installation unless proper ventilation is easily accessible and located as close to the equipment operator as they may touch dangerous voltage points or short-out parts that the power outlet you plug the power cord into ...
User Manual
Page 4
... of physical injury after prolonged use . Observe the following the operating instructions Note: Adjust only those controls that are also at risk of physical injury. Unplug this product yourself, as black or red dots. Finding your comfort zone Find your comfort zone by adjusting the viewing angle of a computer. nel when: • the power cord or plug is produced with high...
... of physical injury after prolonged use . Observe the following the operating instructions Note: Adjust only those controls that are also at risk of physical injury. Unplug this product yourself, as black or red dots. Finding your comfort zone Find your comfort zone by adjusting the viewing angle of a computer. nel when: • the power cord or plug is produced with high...
User Manual
Page 5
... • using a task light • changing the display's viewing angle • using a glare-reduction filter • using the product on how to keep your computer use more relaxing and productive: • Take short breaks regularly and often. • Perform some stretching exercises. Developing good work habits to minimize neck strain Taking care of the display. • Adjust the display brightness and/or contrast to a comfortable...
... • using a task light • changing the display's viewing angle • using a glare-reduction filter • using the product on how to keep your computer use more relaxing and productive: • Take short breaks regularly and often. • Perform some stretching exercises. Developing good work habits to minimize neck strain Taking care of the display. • Adjust the display brightness and/or contrast to a comfortable...
User Manual
Page 6
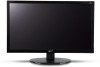
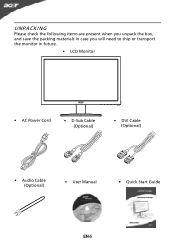
UNPACKING Please check the following items are present when you unpack the box, and save the packing materials in case you will need to ship or transport the monitor in future. • LCD Monitor • AC Power Cord • D-Sub Cable (Optional) • DVI Cable (Optional) • Audio Cable (Optional) • User Manual • Quick Start Guide EN-5
UNPACKING Please check the following items are present when you unpack the box, and save the packing materials in case you will need to ship or transport the monitor in future. • LCD Monitor • AC Power Cord • D-Sub Cable (Optional) • DVI Cable (Optional) • Audio Cable (Optional) • User Manual • Quick Start Guide EN-5

User Manual
Page 7
... to optimize the best viewing position, you can be adjusted to 15 degrees up or 5 degrees down on a stable surface -- The monitor can adjust the tilt of the monitor by arrow below . Carefully place the monitor face-down as indicated by using both of your hands to hold the edges of the monitor. EN-6 Attaching / Removing the Base Note: Remove the monitor and monitor base from its packaging. Install...
... to optimize the best viewing position, you can be adjusted to 15 degrees up or 5 degrees down on a stable surface -- The monitor can adjust the tilt of the monitor by arrow below . Carefully place the monitor face-down as indicated by using both of your hands to hold the edges of the monitor. EN-6 Attaching / Removing the Base Note: Remove the monitor and monitor base from its packaging. Install...

User Manual
Page 8
... A/125 V. • For unit using at 220/240 V AC (outside of U.S.): Use a Cord Set consisting of H05VV-F cord and plug rated 10 A, 250 V. CONNECTING THE POWER CORD • Check first to make sure that allows operation in either 100/120V AC or 220/240 V AC voltage area. No user-adjustment is the correct type required for the country in which the equipment will be installed.
... A/125 V. • For unit using at 220/240 V AC (outside of U.S.): Use a Cord Set consisting of H05VV-F cord and plug rated 10 A, 250 V. CONNECTING THE POWER CORD • Check first to make sure that allows operation in either 100/120V AC or 220/240 V AC voltage area. No user-adjustment is the correct type required for the country in which the equipment will be installed.
User Manual
Page 9
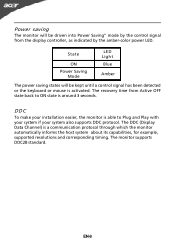
... the display controller, as indicated by the amber-color power LED. Power saving The monitor will be driven into Power Saving" mode by the control signal from Active OFF state back to Plug and Play with your system if your installation easier, the monitor is able to ON state is a communication protocol through which the monitor automatically informs the host system about its capabilities, for example, supported resolutions and...
... the display controller, as indicated by the amber-color power LED. Power saving The monitor will be driven into Power Saving" mode by the control signal from Active OFF state back to Plug and Play with your system if your installation easier, the monitor is able to ON state is a communication protocol through which the monitor automatically informs the host system about its capabilities, for example, supported resolutions and...

User Manual
Page 10
DESCRIPTION Red Green Blue Monitor Ground DDC-return R-Ground G-Ground B-Ground PIN NO. 9. 10. 11. 12. 13. 14. 15. CONNECTOR PIN ASSIGNMENT 15-Pin Color Display Signal Cable PIN NO. 1. 2. 3. 4. 5. 6. 7. 8. DESCRIPTION +5V Logic Ground Monitor Ground DDC-Serial Data H-Sync V-Sync DDC-Serial Clock EN-9
DESCRIPTION Red Green Blue Monitor Ground DDC-return R-Ground G-Ground B-Ground PIN NO. 9. 10. 11. 12. 13. 14. 15. CONNECTOR PIN ASSIGNMENT 15-Pin Color Display Signal Cable PIN NO. 1. 2. 3. 4. 5. 6. 7. 8. DESCRIPTION +5V Logic Ground Monitor Ground DDC-Serial Data H-Sync V-Sync DDC-Serial Clock EN-9

User Manual
Page 13
... 1. 1-1 Connect Video Cable a. Connect power cord Connect the power cord to the monitor, then to the computer. 1-2 Connect digital Cable (Only Dual-Input Model) a. Power-ON Monitor and Computer Power-ON the monitor first, then power-ON the computer. Connect the VGA video cable to a properly grounded AC outlet. 4. Make sure both the monitor and computer are powered-OFF. Connect one end of the 24-pin DVI cable to the back of the monitor and connect the other end to the computer's port. 2. b.
... 1. 1-1 Connect Video Cable a. Connect power cord Connect the power cord to the monitor, then to the computer. 1-2 Connect digital Cable (Only Dual-Input Model) a. Power-ON Monitor and Computer Power-ON the monitor first, then power-ON the computer. Connect the VGA video cable to a properly grounded AC outlet. 4. Make sure both the monitor and computer are powered-OFF. Connect one end of the 24-pin DVI cable to the back of the monitor and connect the other end to the computer's port. 2. b.
User Manual
Page 14
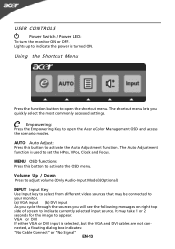
... OSD menu. USER CONTROLS Power Switch / Power LED: To turn the monitor ON or OFF. MENU OSD functions Press this button to appear. V olume Up / Down Press to adjust volume (Only Audio-Input Model)(Optional) INPUT Input Key Use Input key to select from different video sources that may take 1 or 2 seconds for the image to activate the Auto Adjustment function. VGA or DVI If either VGA or DVI input is selected ,but the VGA and DVI cables are not connected, a floating dialog box indicates: "No Cable Connect...
... OSD menu. USER CONTROLS Power Switch / Power LED: To turn the monitor ON or OFF. MENU OSD functions Press this button to appear. V olume Up / Down Press to adjust volume (Only Audio-Input Model)(Optional) INPUT Input Key Use Input key to select from different video sources that may take 1 or 2 seconds for the image to activate the Auto Adjustment function. VGA or DVI If either VGA or DVI input is selected ,but the VGA and DVI cables are not connected, a floating dialog box indicates: "No Cable Connect...
User Manual
Page 15
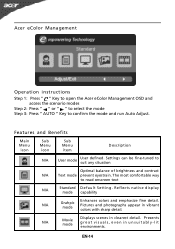
... lay mode capability N/A Grahpic mode Enhances colors and emphasize fine detail. EN-14 Pictures and photographs appear in clearest detail. Acer eColor Management Operation instructions Step 1: Press " " Key to open the Acer eColor Management OSD and access the scenario modes Step 2: Press " " or " " to select the mode Step 3: Press " AUTO " Key to suit any situation Optimal balance of brightness and contrast N/A Text mode prevent eyestrain. N/A Movie mode Displays...
... lay mode capability N/A Grahpic mode Enhances colors and emphasize fine detail. EN-14 Pictures and photographs appear in clearest detail. Acer eColor Management Operation instructions Step 1: Press " " Key to open the Acer eColor Management OSD and access the scenario modes Step 2: Press " " or " " to select the mode Step 3: Press " AUTO " Key to suit any situation Optimal balance of brightness and contrast N/A Text mode prevent eyestrain. N/A Movie mode Displays...
User Manual
Page 16
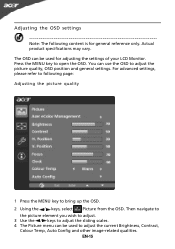
... to adjust the current Brightness, Contrast, Colour Temp, Auto Config and other image-related qualities. For advanced settings, please refer to following content is for adjusting the settings of your LCD Monitor. The OSD can be used for general reference only. Then navigate to the picture element you wish to adjust. 3 Use the / keys to adjust the sliding scales. 4 The Picture menu can use the OSD to open the OSD. Actual product specifications...
... to adjust the current Brightness, Contrast, Colour Temp, Auto Config and other image-related qualities. For advanced settings, please refer to following content is for adjusting the settings of your LCD Monitor. The OSD can be used for general reference only. Then navigate to the picture element you wish to adjust. 3 Use the / keys to adjust the sliding scales. 4 The Picture menu can use the OSD to open the OSD. Actual product specifications...

User Manual
Page 18
Adjusting the setting 1 Press the MENU key to adjust the screen Menu Language and other important settings. EN-17 Then navigate to the feature you wish to adjust. 3 The Setting menu can be used to bring up the OSD. 2 Using the / keys, select Setting from the OSD.
Adjusting the setting 1 Press the MENU key to adjust the screen Menu Language and other important settings. EN-17 Then navigate to the feature you wish to adjust. 3 The Setting menu can be used to bring up the OSD. 2 Using the / keys, select Setting from the OSD.
User Manual
Page 20
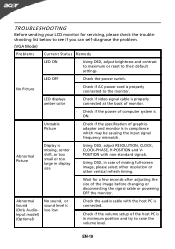
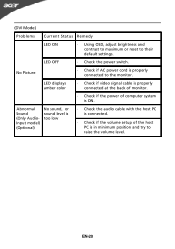
... see if you can self-diagnose the problem. (VGA Mode) Problems Current Status Remedy LED ON · Using OSD, adjust brightness and contrast to maximum or reset to the monitor. No Picture · Check if AC power cord is · Using OSD, adjust RESOLUTION, CLOCK, missing, center CLOCK-PHASE, H-POSITION and V- LED OFF · Check the power switch. TROUBLESHOOTING Before sending your LCD monitor for a few seconds after adjusting the size of the image before changing or disconnecting the signal cable or powering OFF the...
... see if you can self-diagnose the problem. (VGA Mode) Problems Current Status Remedy LED ON · Using OSD, adjust brightness and contrast to maximum or reset to the monitor. No Picture · Check if AC power cord is · Using OSD, adjust RESOLUTION, CLOCK, missing, center CLOCK-PHASE, H-POSITION and V- LED OFF · Check the power switch. TROUBLESHOOTING Before sending your LCD monitor for a few seconds after adjusting the size of the image before changing or disconnecting the signal cable or powering OFF the...
User Manual
Page 21
...; Using OSD, adjust brightness and contrast to maximum or reset to the monitor. LED OFF · Check the power switch. Abnormal Sound (Only AudioInput model) (Optional) No sound, or sound level is too low · Check the audio cable with the host PC is connected. · Check if the volume setup of computer system is ON. No Picture · Check if AC power cord is in minimum position and try to raise the volume level. LED displays amber color · Check if video signal cable...
...; Using OSD, adjust brightness and contrast to maximum or reset to the monitor. LED OFF · Check the power switch. Abnormal Sound (Only AudioInput model) (Optional) No sound, or sound level is too low · Check the audio cable with the host PC is connected. · Check if the volume setup of computer system is ON. No Picture · Check if AC power cord is in minimum position and try to raise the volume level. LED displays amber color · Check if video signal cable...
User Manual
Page 22
..., Taipei Hsien 221, Taiwan Contact Person: Mr. Easy Lai, E-mail: easy_lai@acer.com.tw And, Acer Europe SA Via Cantonale, Centro Galleria 2 6928 Manno Switzerland Hereby declare that: Product: Trade Name: Model Number: SKU Number: LCD Monitor Acer A181HL;A191HQL A181HLxxxxxx;A191HQLxxxxxx("x" = 0~9, a ~ z, or A ~ Z) Is compliant...with regard to begin affixing CE marking 2010. EN61000-3-2, Class D -. Year to establishing a framework for the setting of certain Hazardous Substances in Electrical and Electronic Equipment: -. EMC Directive 2004/108/EC as attested by conformity ...
..., Taipei Hsien 221, Taiwan Contact Person: Mr. Easy Lai, E-mail: easy_lai@acer.com.tw And, Acer Europe SA Via Cantonale, Centro Galleria 2 6928 Manno Switzerland Hereby declare that: Product: Trade Name: Model Number: SKU Number: LCD Monitor Acer A181HL;A191HQL A181HLxxxxxx;A191HQLxxxxxx("x" = 0~9, a ~ z, or A ~ Z) Is compliant...with regard to begin affixing CE marking 2010. EN61000-3-2, Class D -. Year to establishing a framework for the setting of certain Hazardous Substances in Electrical and Electronic Equipment: -. EMC Directive 2004/108/EC as attested by conformity ...

