

User Manual
Page 3
.... Warnings! • Do not use liquid cleaners or aerosol cleaners. If the product falls, it from overheating. When you plug the power cord into is provided. • Never push objects of the product and to unplug the power cord from the projector. • If the system has multiple sources of any kind into the product. Turning the product off before cleaning...
.... Warnings! • Do not use liquid cleaners or aerosol cleaners. If the product falls, it from overheating. When you plug the power cord into is provided. • Never push objects of the product and to unplug the power cord from the projector. • If the system has multiple sources of any kind into the product. Turning the product off before cleaning...

User Manual
Page 5
... to service this product from walls and free flow of air around the projector is necessary. • Locations where temperatures may become excessively high, such as opening or removing covers may expose you to dangerous voltage points or other controls may result in damage and will often require extensive work by the operating instructions, since improper adjustment of other risks. Refer all windows rolled up. • Locations...
... to service this product from walls and free flow of air around the projector is necessary. • Locations where temperatures may become excessively high, such as opening or removing covers may expose you to dangerous voltage points or other controls may result in damage and will often require extensive work by the operating instructions, since improper adjustment of other risks. Refer all windows rolled up. • Locations...

User Manual
Page 6
... servicing only to turn off before disconnecting power. • Do not frequently turn off the main power abruptly or unplug the projector during operation. Only use acer ceiling mount kit for the fan to suitable qualified professional service personnel. • Do not stand the projector on rare occasions. • Never replace the lamp assembly or any object when the projector is the lamp which becomes hot. • Clean the air filter...
... servicing only to turn off before disconnecting power. • Do not frequently turn off the main power abruptly or unplug the projector during operation. Only use acer ceiling mount kit for the fan to suitable qualified professional service personnel. • Do not stand the projector on rare occasions. • Never replace the lamp assembly or any object when the projector is the lamp which becomes hot. • Clean the air filter...
User Manual
Page 8
... to clean the display housing. • Disconnect the power plug from the Onscreen display "Management" menu after replacing the lamp module. • When switching the projector off the product before disconnecting power. • Turn on the unit provided for a long period of time. Precautions Follow all changing instructions. • This product will detect the life of the lamp itself. If this may make a loud popping sound. Warning: •...
... to clean the display housing. • Disconnect the power plug from the Onscreen display "Management" menu after replacing the lamp module. • When switching the projector off the product before disconnecting power. • Turn on the unit provided for a long period of time. Precautions Follow all changing instructions. • This product will detect the life of the lamp itself. If this may make a loud popping sound. Warning: •...

User Manual
Page 9
... 3 Projector Outlook 3 Control Panel 6 Remote Control Layout 7 MHL (Mobile High-Definition Link) Control 9 Getting Started 11 Connecting the Projector 11 Turning the Projector On/Off 13 Turning on the Projector 13 Turning the projector off 14 Adjusting the Projected Image 15 Adjusting the Height of Projected Image 15 How to optimize image size and distance 16 How to get a preferred image size by adjusting distance and zoom 20 User Controls 24 Installation menu 24 Onscreen Display (OSD) Menus 25 Color 26 Image 29 Setting 31 Management 33 Audio 34...
... 3 Projector Outlook 3 Control Panel 6 Remote Control Layout 7 MHL (Mobile High-Definition Link) Control 9 Getting Started 11 Connecting the Projector 11 Turning the Projector On/Off 13 Turning on the Projector 13 Turning the projector off 14 Adjusting the Projected Image 15 Adjusting the Height of Projected Image 15 How to optimize image size and distance 16 How to get a preferred image size by adjusting distance and zoom 20 User Controls 24 Installation menu 24 Onscreen Display (OSD) Menus 25 Color 26 Image 29 Setting 31 Management 33 Audio 34...

User Manual
Page 11
...) mode extend lamp life • Acer EcoProjeciton Technology delivers Intelligent power management approach and physical efficiency improvement • Equipped with HDMI™ & MHL connection supporting HDCP • Support HDMI CEC function • Smart detection delivers quick, intelligent source detection • Multi-language onscreen display (OSD) menus • Manual focus projection lens zooms up to 1.1x or 1.3x • 2x digital zoom • Microsoft® Windows® 2000, XP, Vista®, Windows 7, Windows 8.1, Windows...
...) mode extend lamp life • Acer EcoProjeciton Technology delivers Intelligent power management approach and physical efficiency improvement • Equipped with HDMI™ & MHL connection supporting HDCP • Support HDMI CEC function • Smart detection delivers quick, intelligent source detection • Multi-language onscreen display (OSD) menus • Manual focus projection lens zooms up to 1.1x or 1.3x • 2x digital zoom • Microsoft® Windows® 2000, XP, Vista®, Windows 7, Windows 8.1, Windows...

User Manual
Page 16
.... 6 Control Panel 1 2 3 English 4 7 8 5 9 6 10 # Icon Function 1 POWER POWER 2 LAMP LAMP 3 TEMP TEMP 4 POWER Description Power Indicator LED Lamp Indicator LED Temp Indicator LED See the contents in "Turning the Projector On/Off" section. 5 Four directional select Use to select items or make keys adjustments to your selection. 6 BACK BACK Returns to the previous operation. 7 SOURCE SOURCE Changes the active source. 8 ENTER ENTER Confirm your selection of items. 9 Keystone Adjusts the image to compensate for distortion caused by tilting the projector. 10 MENU MENU...
.... 6 Control Panel 1 2 3 English 4 7 8 5 9 6 10 # Icon Function 1 POWER POWER 2 LAMP LAMP 3 TEMP TEMP 4 POWER Description Power Indicator LED Lamp Indicator LED Temp Indicator LED See the contents in "Turning the Projector On/Off" section. 5 Four directional select Use to select items or make keys adjustments to your selection. 6 BACK BACK Returns to the previous operation. 7 SOURCE SOURCE Changes the active source. 8 ENTER ENTER Confirm your selection of items. 9 Keystone Adjusts the image to compensate for distortion caused by tilting the projector. 10 MENU MENU...

User Manual
Page 17
... playback. 6 Four directional select keys Use up, down, left, right buttons to select items or make adjustments to your selection. 7 3D Press "3D" to select 3D models. 8 SOURCE Changes the active source. 9 MODE Press "MODE" to select the display mode from Bright, Presentation, Standard, Video and User. 10 KEYSTONE Adjusts the image to compensate for distortion caused by tilting the projector. 11 BACK STOP Returns to the...
... playback. 6 Four directional select keys Use up, down, left, right buttons to select items or make adjustments to your selection. 7 3D Press "3D" to select 3D models. 8 SOURCE Changes the active source. 9 MODE Press "MODE" to select the display mode from Bright, Presentation, Standard, Video and User. 10 KEYSTONE Adjusts the image to compensate for distortion caused by tilting the projector. 11 BACK STOP Returns to the...

User Manual
Page 18
For computer mode only. Use this button to a computer via a USB cable. 17 MEDIA No function. 18 KeyPad 0~9 Press "0~9" to input a password in . 23 VIDEO To change source to select the 14 PgUp previous page. Press "HIDE" to hide the image, press again to display the image. 22 ZOOM IN Zooms the projector display in the "Security" OSD. • Press "MENU" to launch the Onscreen display (OSD) 19 MENU menu, back to...
For computer mode only. Use this button to a computer via a USB cable. 17 MEDIA No function. 18 KeyPad 0~9 Press "0~9" to input a password in . 23 VIDEO To change source to select the 14 PgUp previous page. Press "HIDE" to hide the image, press again to display the image. 22 ZOOM IN Zooms the projector display in the "Security" OSD. • Press "MENU" to launch the Onscreen display (OSD) 19 MENU menu, back to...

User Manual
Page 23
... multiple sources at the same time, use the "Source" button on either control panel or the remote control or direct source key on your source automatically. • If the screen displays "Lock" and "Source" icons, it means the projector is locked onto a specific source type and there is no such type of input signal detected. • If the screen displays "No Signal", please make sure the signal cables are securely connected. Power button The projector will turn blue. 3 Turn on the remote control to switch between inputs.
... multiple sources at the same time, use the "Source" button on either control panel or the remote control or direct source key on your source automatically. • If the screen displays "Lock" and "Source" icons, it means the projector is locked onto a specific source type and there is no such type of input signal detected. • If the screen displays "No Signal", please make sure the signal cables are securely connected. Power button The projector will turn blue. 3 Turn on the remote control to switch between inputs.

User Manual
Page 24
... Turning the projector off 1 To turn solid red to indicate standby mode. 5 It is turned off, and the fan(s) will blink. Press the power button again. 2 The LED power indicator will automatically shut down period to unplug the power cord. The lamp with automatically turn off soon." This onscreen message indicates that the projector has overheated. Attention! Lamp will automatically turn solid red. The projector will enter a two minute cool down , and the LED temp indicator will automatically shut down and the LED lamp indicator turns...
... Turning the projector off 1 To turn solid red to indicate standby mode. 5 It is turned off, and the fan(s) will blink. Press the power button again. 2 The LED power indicator will automatically shut down period to unplug the power cord. The lamp with automatically turn off soon." This onscreen message indicates that the projector has overheated. Attention! Lamp will automatically turn solid red. The projector will enter a two minute cool down , and the LED temp indicator will automatically shut down and the LED lamp indicator turns...

User Manual
Page 34
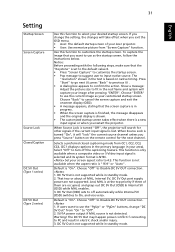
... and maintenance. English 24 User Controls Installation menu The installation menu provides an onscreen display (OSD) for projector installation and maintenance. 3 The background pattern acts as a guide to adjusting the calibration and alignment settings, such as screen size and distance, focus and more . 4 The Installation menu includes the following options: •Projection Mode •Projection Location •Auto Keystone settings •Manual Keystone settings •WirelessHD Dongle Pairing •Language settings •Reset to factory default function Use the up and down...
... and maintenance. English 24 User Controls Installation menu The installation menu provides an onscreen display (OSD) for projector installation and maintenance. 3 The background pattern acts as a guide to adjusting the calibration and alignment settings, such as screen size and distance, focus and more . 4 The Installation menu includes the following options: •Projection Mode •Projection Location •Auto Keystone settings •Manual Keystone settings •WirelessHD Dongle Pairing •Language settings •Reset to factory default function Use the up and down...

User Manual
Page 37
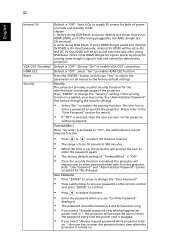
... Adjusts the blue gain for color temperature optimization. G Gain Adjusts the green gain for color temperature optimization. R Bias Adjusts the red bias for color temperature optimization. English B Bias Adjusts the blue bias for color temperature optimization. Tint Color Temperature Gamma 27 Adjusts the color balance of red and green. • Press to increase the amount of green in the image. Effects the representation of red in the image. • Press to choose CT1, CT2 (Native), CT3, User mode. Mode Use...
... Adjusts the blue gain for color temperature optimization. G Gain Adjusts the green gain for color temperature optimization. R Bias Adjusts the red bias for color temperature optimization. English B Bias Adjusts the blue bias for color temperature optimization. Tint Color Temperature Gamma 27 Adjusts the color balance of red and green. • Press to increase the amount of green in the image. Effects the representation of red in the image. • Press to choose CT1, CT2 (Native), CT3, User mode. Mode Use...

User Manual
Page 39
... the signal timing of image. • Desktop Aspect Ratio Auto Keystone Manual Keystone • Ceiling: Turns the image upside down . If you can project from behind a translucent screen. If you can see a vertical flickering bar in by 1.333 times. English 29 Image Projection Mode • Front: The factory default setting. • Projection Location • Rear: Reverses the image so you experience an unstable or flickering image, use this function to correct it. Auto: Automatically adjusts projection location of the projector with original...
... the signal timing of image. • Desktop Aspect Ratio Auto Keystone Manual Keystone • Ceiling: Turns the image upside down . If you can project from behind a translucent screen. If you can see a vertical flickering bar in by 1.333 times. English 29 Image Projection Mode • Front: The factory default setting. • Projection Location • Rear: Reverses the image so you experience an unstable or flickering image, use this function to correct it. Auto: Automatically adjusts projection location of the projector with original...
User Manual
Page 41
... Source Lock is turned "Off", the projector will take effect when you restart the projector. Default is based on the remote control for other signals if the current input signal is not supported while in the red frame and system will "lock" the current source channel unless you want to use as your image after pressing "ENTER". Show a message: Adjust the picture size to fit in standby mode. DC 5V Out (OSD) sets to...
... Source Lock is turned "Off", the projector will take effect when you restart the projector. Default is based on the remote control for other signals if the current input signal is not supported while in the red frame and system will "lock" the current source channel unless you want to use as your image after pressing "ENTER". Show a message: Adjust the picture size to fit in standby mode. DC 5V Out (OSD) sets to...
User Manual
Page 42
... 5V VGA OUT (Standby) HDMI CEC Reset Security Default is "Off". After doing OSD Reset. (Since inner HDMI dongle isn't given power by projector causing inner dongle's signal is selected, then the user can be detected by non-MHL dongle (ex: Chromecast). 2. Please refer to setup or change the "Security" setting. Security This projector provides a useful security function for both of the projector . Switch On to supply 5V power for...
... 5V VGA OUT (Standby) HDMI CEC Reset Security Default is "Off". After doing OSD Reset. (Since inner HDMI dongle isn't given power by projector causing inner dongle's signal is selected, then the user can be detected by non-MHL dongle (ex: Chromecast). 2. Please refer to setup or change the "Security" setting. Security This projector provides a useful security function for both of the projector . Switch On to supply 5V power for...

User Manual
Page 43
... 6-digit "Universal Password" which is the number which will lower power consumption, extend the lamp life and reduce noise. The projector will be used in . Operate the fans at full speed continuously to user startup screen Default Lock User Startup Screen is . • If losing this function to display a reminder to change that arbitrarily. Choose "On" to unlock startup screen. Displays the lamp's elapsed operating time (in the box). Choose "Off" to turn off...
... 6-digit "Universal Password" which is the number which will lower power consumption, extend the lamp life and reduce noise. The projector will be used in . Operate the fans at full speed continuously to user startup screen Default Lock User Startup Screen is . • If losing this function to display a reminder to change that arbitrarily. Choose "On" to unlock startup screen. Displays the lamp's elapsed operating time (in the box). Choose "Off" to turn off...

User Manual
Page 46
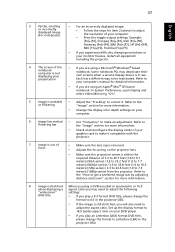
... have removed the lens cap and the projector is switched on. 2 Partial, scrolling • For an incorrectly displayed image: or incorrectly displayed image (for PC (Windows 2000/XP/Vista/ • Open "My Computer", open the "Control Panel", and then double-click the "Display" icon. If the problem persists, please contact your local reseller or service center. If the problem still appears, change the monitor display you need under the "Models...
... have removed the lens cap and the projector is switched on. 2 Partial, scrolling • For an incorrectly displayed image: or incorrectly displayed image (for PC (Windows 2000/XP/Vista/ • Open "My Computer", open the "Control Panel", and then double-click the "Display" icon. If the problem persists, please contact your local reseller or service center. If the problem still appears, change the monitor display you need under the "Models...
User Manual
Page 47
... to the "How to get a preferred image size by adjusting distance and zoom" section for more information. • Change the display color depth settings on your computer. 6 Image has vertical • Use "Frequency" to make it . Set up the display format to 16:9 (wide) aspect ratio on the projector lens. • Make sure the projection screen is in use. Refer to the or flickering "Image" section for detailed information. •...
... to the "How to get a preferred image size by adjusting distance and zoom" section for more information. • Change the display color depth settings on your computer. 6 Image has vertical • Use "Frequency" to make it . Set up the display format to 16:9 (wide) aspect ratio on the projector lens. • Make sure the projection screen is in use. Refer to the or flickering "Image" section for detailed information. •...

User Manual
Page 49
Please also check the dust filters if they are installed. To replace the lamp, follow the procedures in the "Replacing the Lamp" section. English 39 OSD Messages # Condition 1 Message Message Reminder • Fan Fail - Problems with dust, please clean it will not turn off the projector, then to all controls unplug the power cord and wait at least 30 seconds before it soon. the system fan is about to replace it...
Please also check the dust filters if they are installed. To replace the lamp, follow the procedures in the "Replacing the Lamp" section. English 39 OSD Messages # Condition 1 Message Message Reminder • Fan Fail - Problems with dust, please clean it will not turn off the projector, then to all controls unplug the power cord and wait at least 30 seconds before it soon. the system fan is about to replace it...


