

User Guide
Page 3
..., this User's guide is not installed on the screen to use your TravelMate, we enjoyed making the TravelMate series of guides: First off, the Just for your mobile computing needs. For instructions on how to complete the installation. Note: Viewing the file requires Adobe Acrobat Reader installed. For more productive. Your guides To help you use Adobe Acrobat Reader, access the Help menu. If you will run the Acrobat Reader setup program...
..., this User's guide is not installed on the screen to use your TravelMate, we enjoyed making the TravelMate series of guides: First off, the Just for your mobile computing needs. For instructions on how to complete the installation. Note: Viewing the file requires Adobe Acrobat Reader installed. For more productive. Your guides To help you use Adobe Acrobat Reader, access the Help menu. If you will run the Acrobat Reader setup program...
User Guide
Page 7
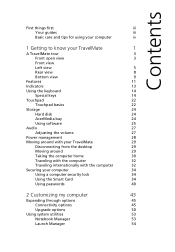
... Adjusting the volume 27 Power management 28 Moving around with your TravelMate 29 Disconnecting from the desktop 29 Moving around 29 Taking the computer home 30 Traveling with the computer 32 Traveling internationally with the computer 32 Securing your computer 34 Using a computer security lock 34 Using the Smart Card 34 Using passwords 40 2 Customizing my computer 43 Expanding through options 45 Connectivity options 45 Upgrade options...
... Adjusting the volume 27 Power management 28 Moving around with your TravelMate 29 Disconnecting from the desktop 29 Moving around 29 Taking the computer home 30 Traveling with the computer 32 Traveling internationally with the computer 32 Securing your computer 34 Using a computer security lock 34 Using the Smart Card 34 Using passwords 40 2 Customizing my computer 43 Expanding through options 45 Connectivity options 45 Upgrade options...

User Guide
Page 13
... Battery indicator Lights orange when the battery is in standby mode. Lights green when the battery is full. 9 Power status indicator Lights green when the power is on and orange when the computer is charging. 5 Front view English # Item Description 1 Speaker Outputs sound. 2 Bluetooth button Starts (optional) Bluetooth functionality. 3 Bluetooth indicator Indicates that (optional) Bluetooth is enabled. 4 InviLink button Opens (optional) wireless connectivity. 5 InviLink indicator Indicates status of (optional) wireless communication. 6 Latch 7 Infrared port...
... Battery indicator Lights orange when the battery is in standby mode. Lights green when the battery is full. 9 Power status indicator Lights green when the power is on and orange when the computer is charging. 5 Front view English # Item Description 1 Speaker Outputs sound. 2 Bluetooth button Starts (optional) Bluetooth functionality. 3 Bluetooth indicator Indicates that (optional) Bluetooth is enabled. 4 InviLink button Opens (optional) wireless connectivity. 5 InviLink indicator Indicates status of (optional) wireless communication. 6 Latch 7 Infrared port...

User Guide
Page 15
... optical drive module installed. See page 58 for more details. 5 Power jack Connects to an AC adapter. English # Item 8 PC Card slot Right view 7 Description Accepts one Type II 16-bit PC Card or 32bit CardBus PC Card. # Item Description 1 AcerMedia drive Houses a removable media drive module. 2 AcerMedia indicator Lights up when the AcerMedia drive is active. 3 Eject button Ejects the drive tray. 4 Emergency eject slot Ejects the drive tray when the computer is turned off...
... optical drive module installed. See page 58 for more details. 5 Power jack Connects to an AC adapter. English # Item 8 PC Card slot Right view 7 Description Accepts one Type II 16-bit PC Card or 32bit CardBus PC Card. # Item Description 1 AcerMedia drive Houses a removable media drive module. 2 AcerMedia indicator Lights up when the AcerMedia drive is active. 3 Eject button Ejects the drive tray. 4 Emergency eject slot Ejects the drive tray when the computer is turned off...

User Guide
Page 16
8 Rear view 1 Getting to know your TravelMate English # Item 1 Modem jack Description Connects to a phone line. 2 Network jack Connects to an Ethernet 10/100-based network. 3 Expansion port Connects to I/O port replicator or EasyPort expansion devices. 4 Parallel port Connects to a parallel device (e.g., parallel printer). 5 External display Connects to a display device (e.g., external port monitor, LCD projector). 6 S-video Connects to a television or display device with S-video input. 7 Security keylock Connects to a Kensington-compatible computer security lock.
8 Rear view 1 Getting to know your TravelMate English # Item 1 Modem jack Description Connects to a phone line. 2 Network jack Connects to an Ethernet 10/100-based network. 3 Expansion port Connects to I/O port replicator or EasyPort expansion devices. 4 Parallel port Connects to a parallel device (e.g., parallel printer). 5 External display Connects to a display device (e.g., external port monitor, LCD projector). 6 S-video Connects to a television or display device with S-video input. 7 Security keylock Connects to a Kensington-compatible computer security lock.

User Guide
Page 19
...; Pentium® M Processor with 1024 KB level 2 cache featuring the new Enhanced Intel® SpeedStep™ technology • Memory expandable up to 2 GB • Internal removable optical drive (AcerMedia bay) • High-capacity, Enhanced-IDE hard disk • Li-Ion main battery pack • Power management system with ACPI (Advanced Configuration Power Interface) • Smart Card interface with pre-boot authentication system for added security Display...
...; Pentium® M Processor with 1024 KB level 2 cache featuring the new Enhanced Intel® SpeedStep™ technology • Memory expandable up to 2 GB • Internal removable optical drive (AcerMedia bay) • High-capacity, Enhanced-IDE hard disk • Li-Ion main battery pack • Power management system with ACPI (Advanced Configuration Power Interface) • Smart Card interface with pre-boot authentication system for added security Display...
User Guide
Page 22
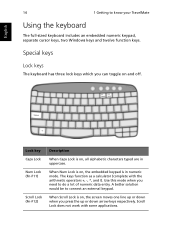
... is on and off. The keys function as a calculator (complete with some applications. Scroll Lock does not work with the arithmetic operators +, -, *, and /). Use this mode when you press the up or down arrow keys respectively. Special keys Lock keys The keyboard has three lock keys which you can toggle on , the screen moves one line up or down when you need to do a lot of numeric...
... is on and off. The keys function as a calculator (complete with some applications. Scroll Lock does not work with the arithmetic operators +, -, *, and /). Use this mode when you press the up or down arrow keys respectively. Special keys Lock keys The keyboard has three lock keys which you can toggle on , the screen moves one line up or down when you need to do a lot of numeric...

User Guide
Page 24
English Key Description Windows logo key Start button. dialog box) Application key Opens a context menu (same as a right-click). Below are a few examples: + Tab (Activates next taskbar button) + E (Explores My Computer) + F (Finds Document) + M (Minimizes All) Shift + + M (Undoes Minimize All) + R (Displays the Run... 16 1 Getting to know your TravelMate Windows keys The keyboard has two keys that perform Windows-specific functions. Combinations with this key perform shortcut functions.
English Key Description Windows logo key Start button. dialog box) Application key Opens a context menu (same as a right-click). Below are a few examples: + Tab (Activates next taskbar button) + E (Explores My Computer) + F (Finds Document) + M (Minimizes All) Shift + + M (Undoes Minimize All) + R (Displays the Run... 16 1 Getting to know your TravelMate Windows keys The keyboard has two keys that perform Windows-specific functions. Combinations with this key perform shortcut functions.

User Guide
Page 25
... screen brightness, volume output and the BIOS Utility. See "Power management" on page 28. Fn-F2 Fn-F3 Fn-F4 Setup Power management scheme toggle Sleep Accesses the computer's configuration utility. See "Power management" on page 28. To activate hot keys, press and hold the Fn key before pressing the other key in Sleep mode. Puts the computer in the hot key combination. Switches the power management scheme used by the computer (function available if supported by operating system). Hot key Fn-F1 Icon Function Hot key...
... screen brightness, volume output and the BIOS Utility. See "Power management" on page 28. Fn-F2 Fn-F3 Fn-F4 Setup Power management scheme toggle Sleep Accesses the computer's configuration utility. See "Power management" on page 28. To activate hot keys, press and hold the Fn key before pressing the other key in Sleep mode. Puts the computer in the hot key combination. Switches the power management scheme used by the computer (function available if supported by operating system). Hot key Fn-F1 Icon Function Hot key...

User Guide
Page 26
... display screen backlight off to know your TravelMate Hot key Fn-F5 Fn-F6 Fn-F7 Fn-F8 Icon Function Display toggle Screen blank Touchpad toggle Speaker toggle Description Switches display output between the display screen, external monitor (if connected) and both the display screen and external monitor. Fn-↑ Volume up Increases the screen brightness. Brightness up Increases the speaker volume. Turns the internal touchpad on and off . Fn-↓ Fn-→ Fn-← Volume down Decreases the screen brightness. Turns...
... display screen backlight off to know your TravelMate Hot key Fn-F5 Fn-F6 Fn-F7 Fn-F8 Icon Function Display toggle Screen blank Touchpad toggle Speaker toggle Description Switches display output between the display screen, external monitor (if connected) and both the display screen and external monitor. Fn-↑ Volume up Increases the screen brightness. Brightness up Increases the speaker volume. Turns the internal touchpad on and off . Fn-↓ Fn-→ Fn-← Volume down Decreases the screen brightness. Turns...

User Guide
Page 37
...: 1 Click on OK, or select Turn Off (Windows XP). then slide and release the power switch. To bring the computer out of Sleep mode, open the display; or Turn off Computer (Windows XP). 2 Select Shut down the computer. 4 Close the display cover. 5 Disconnect the cord from the AC adapter. 6 Disconnect the keyboard, pointing device, printer, external monitor, and other external devices. 7 Disconnect the Kensington lock if you are just moving...
...: 1 Click on OK, or select Turn Off (Windows XP). then slide and release the power switch. To bring the computer out of Sleep mode, open the display; or Turn off Computer (Windows XP). 2 Select Shut down the computer. 4 Close the display cover. 5 Disconnect the cord from the AC adapter. 6 Disconnect the keyboard, pointing device, printer, external monitor, and other external devices. 7 Disconnect the Kensington lock if you are just moving...
User Guide
Page 44
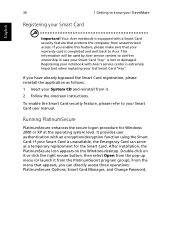
... or click the right mouse button, then select Open from the pop-up menu (or launch it . 2 Follow the onscreen instructions. From the menu that appears, you enable this feature, please make sure that protects the computer from it from the PlatinumSecret program group). Your Acer notebook is unavailable, the Emergency Card can directly access three operations: PlatinumSecure Options, Smart Card Manager, and Change Password. If you have...
... or click the right mouse button, then select Open from the pop-up menu (or launch it . 2 Follow the onscreen instructions. From the menu that appears, you enable this feature, please make sure that protects the computer from it from the PlatinumSecret program group). Your Acer notebook is unavailable, the Emergency Card can directly access three operations: PlatinumSecure Options, Smart Card Manager, and Change Password. If you have...
User Guide
Page 49
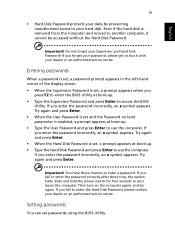
... by preventing unauthorized access to your Supervisor and Hard Disk Password! Important! If you fail to access the BIOS Utility. If you forget your password, please get in the left-hand corner of the display screen. • When the Supervisor Password is enabled, a prompt appears at boot-up . • Type the Supervisor Password and press Enter to enter the Hard Disk Password, please contact your dealer or an authorized service center.
... by preventing unauthorized access to your Supervisor and Hard Disk Password! Important! If you fail to access the BIOS Utility. If you forget your password, please get in the left-hand corner of the display screen. • When the Supervisor Password is enabled, a prompt appears at boot-up . • Type the Supervisor Password and press Enter to enter the Hard Disk Password, please contact your dealer or an authorized service center.

User Guide
Page 53
... Expanding through options Your TravelMate offers you would with digital phone lines. Connectivity options Ports allow you to connect peripheral devices to your computer as you a complete mobile computing experience. Warning! To use the fax/data modem port, connect a phone cable from the modem port to the computer, see your communications software program. For instructions on how to connect different external devices to a telephone jack. This modem port is...
... Expanding through options Your TravelMate offers you would with digital phone lines. Connectivity options Ports allow you to connect peripheral devices to your computer as you a complete mobile computing experience. Warning! To use the fax/data modem port, connect a phone cable from the modem port to the computer, see your communications software program. For instructions on how to connect different external devices to a telephone jack. This modem port is...

User Guide
Page 58
... computer over to install memory: 1 Turn off the computer, unplug the AC adapter (if connected) and remove the battery pack. The computer supports DDR (Double Data Rate) RAM. There are available for your authorized dealer if you need increased performance. Memory upgrade Memory is occupied by installing a memory module into the one quick step. English 50 2 Customizing my computer Port expansion devices Two types of expansion devices are two memory slots on your...
... computer over to install memory: 1 Turn off the computer, unplug the AC adapter (if connected) and remove the battery pack. The computer supports DDR (Double Data Rate) RAM. There are available for your authorized dealer if you need increased performance. Memory upgrade Memory is occupied by installing a memory module into the one quick step. English 50 2 Customizing my computer Port expansion devices Two types of expansion devices are two memory slots on your...
User Guide
Page 65
... on battery power, it is not lit, no power is a list of your system and make necessary fixes. Insert the startup disk you are provided for each one. Slide and release the power switch to an external monitor. I slid the power switch and opened the display, but the computer does not start or boot-up. Press Fn-→ (increase) and Fn-← (decrease) to adjust the brightness level. • The display device...
... on battery power, it is not lit, no power is a list of your system and make necessary fixes. Insert the startup disk you are provided for each one. Slide and release the power switch to an external monitor. I slid the power switch and opened the display, but the computer does not start or boot-up. Press Fn-→ (increase) and Fn-← (decrease) to adjust the brightness level. • The display device...

User Guide
Page 66
... the optical drive tray. I want to the line-out port on the computer's rear panel, the internal speakers automatically turn the speakers on the power. Then click on your Windows desktop and select Properties to eject the tray. No audio is not full-screen. In Windows, look at the volume control (speaker) icon on the taskbar. You can also use the volume control buttons to fill...
... the optical drive tray. I want to the line-out port on the computer's rear panel, the internal speakers automatically turn the speakers on the power. Then click on your Windows desktop and select Properties to eject the tray. No audio is not full-screen. In Windows, look at the volume control (speaker) icon on the taskbar. You can also use the volume control buttons to fill...
User Guide
Page 67
... enabled. • Make sure both devices (for file transfers) or you need to set up your location: 1 Click on Start, Settings, Control Panel. 2 Double-click on Modems. 3 Click on the printer. • During POST, press F2 to access the BIOS Utility and verify that the parallel port is connected to a power outlet and that the printer is enabled. If it is turned on. • Make sure that the printer cable...
... enabled. • Make sure both devices (for file transfers) or you need to set up your location: 1 Click on Start, Settings, Control Panel. 2 Double-click on Modems. 3 Click on the printer. • During POST, press F2 to access the BIOS Utility and verify that the parallel port is connected to a power outlet and that the printer is enabled. If it is turned on. • Make sure that the printer cable...
User Guide
Page 87
See warranty K keyboard 14 embedded numeric keypad 15 hotkeys 17 lock keys 14 troubleshooting 59 Windows keys 16 L LEDs 13 M memory English Index A AC adapter caring for v AcerMedia drive 24 audio 27 adjusting the volume 27 troubleshooting 58 B battery pack caring for v BIOS utility 54 brightness hotkeys 18 C caps lock 14 on indicator 13 care AC adapter v battery pack v computer iv CD-ROM ejecting 25 ejecting manually 58 troubleshooting 58 cleaning computer v computer bringing to meetings 30 caring...
See warranty K keyboard 14 embedded numeric keypad 15 hotkeys 17 lock keys 14 troubleshooting 59 Windows keys 16 L LEDs 13 M memory English Index A AC adapter caring for v AcerMedia drive 24 audio 27 adjusting the volume 27 troubleshooting 58 B battery pack caring for v BIOS utility 54 brightness hotkeys 18 C caps lock 14 on indicator 13 care AC adapter v battery pack v computer iv CD-ROM ejecting 25 ejecting manually 58 troubleshooting 58 cleaning computer v computer bringing to meetings 30 caring...
User Guide
Page 88
... N network 46 Notebook Manager 53 hotkey 17 notice DVD copyright protection 77 num lock 14 on indicator 13 numeric keypad num lock 15 O online services 62 options memory upgrade 50 P password 40 types 40 PC Card 48 ejecting 49 inserting 49 ports 45 POST (power-on self-test) 54 printer troubleshooting 59 problems 57 CD-ROM 58 display 57, 58 keyboard 59 printer 59 startup 57 troubleshooting 56 Q questions setting location for modem use 59 S safety CD-ROM...
... N network 46 Notebook Manager 53 hotkey 17 notice DVD copyright protection 77 num lock 14 on indicator 13 numeric keypad num lock 15 O online services 62 options memory upgrade 50 P password 40 types 40 PC Card 48 ejecting 49 inserting 49 ports 45 POST (power-on self-test) 54 printer troubleshooting 59 problems 57 CD-ROM 58 display 57, 58 keyboard 59 printer 59 startup 57 troubleshooting 56 Q questions setting location for modem use 59 S safety CD-ROM...


