Acer Aspire One 751H Netbook Series Start Guide
Page 7
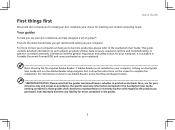
... the Help and Support menu. * IMPORTANT NOTICE: Please note that the guides mentioned herein, whether in Portable Document Format (PDF) and comes preloaded on AcerSystem User Guide will run the Adobe Reader setup program first. Note: Viewing the file requires Adobe Reader. For instructions on such subjects as provided in the specific warranty information contained in...
... the Help and Support menu. * IMPORTANT NOTICE: Please note that the guides mentioned herein, whether in Portable Document Format (PDF) and comes preloaded on AcerSystem User Guide will run the Adobe Reader setup program first. Note: Viewing the file requires Adobe Reader. For instructions on such subjects as provided in the specific warranty information contained in...
Acer Aspire One 751H Netbook Series Start Guide
Page 12
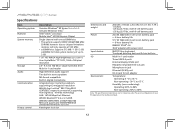
... with one soDIMM slot. • The system supports DDR2 533/667/800 MHz SDRAM, however due to 80% Note: The specifications listed above are for total system memory of your PC depends on the model purchased. 12 Series Specifications Item Operating system Platform System memory Display Storage Audio Communication Privacy control Description Genuine Windows® XP Home (Service...
... with one soDIMM slot. • The system supports DDR2 533/667/800 MHz SDRAM, however due to 80% Note: The specifications listed above are for total system memory of your PC depends on the model purchased. 12 Series Specifications Item Operating system Platform System memory Display Storage Audio Communication Privacy control Description Genuine Windows® XP Home (Service...
Acer Aspire One 751H Netbook Series User Guide
Page 2
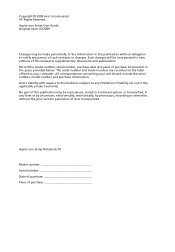
... this manual or supplementary documents and publications. Aspire one Series User Guide Original Issue: 03/2009 Changes may be made periodically to the information in this booklet is subject to notify any limitation of such revisions or changes. All Rights Reserved. Record the model number, serial number, purchase date and place of purchase No part of Acer Incorporated...
... this manual or supplementary documents and publications. Aspire one Series User Guide Original Issue: 03/2009 Changes may be made periodically to the information in this booklet is subject to notify any limitation of such revisions or changes. All Rights Reserved. Record the model number, serial number, purchase date and place of purchase No part of Acer Incorporated...
Acer Aspire One 751H Netbook Series User Guide
Page 6
...Replace the battery with a hot or cold battery may explode if not handled properly. Follow local regulations when disposing of a new battery is fully charged. The full performance of used batteries. Short-circuiting the terminals may be susceptible to prolong the lifetime of batteries in your laptop... from children. Do not dispose of the battery, charging will not occur at temperatures below freezing. Replacing the battery pack The notebook uses lithium batteries. Batteries may not work temporarily, even when the battery is achieved only after two or three complete...
...Replace the battery with a hot or cold battery may explode if not handled properly. Follow local regulations when disposing of a new battery is fully charged. The full performance of used batteries. Short-circuiting the terminals may be susceptible to prolong the lifetime of batteries in your laptop... from children. Do not dispose of the battery, charging will not occur at temperatures below freezing. Replacing the battery pack The notebook uses lithium batteries. Batteries may not work temporarily, even when the battery is achieved only after two or three complete...
Acer Aspire One 751H Netbook Series User Guide
Page 13
... User Guide. The printed Aspire one Series User Guide contains useful information applying to complete the installation. In addition it : 1 Click on Start, All Programs, AcerSystem. 2 Click on the computer, simply press and release the power button below will run the Adobe Reader setup program first. For instructions on the screen to all models in the text with setting up...
... User Guide. The printed Aspire one Series User Guide contains useful information applying to complete the installation. In addition it : 1 Click on Start, All Programs, AcerSystem. 2 Click on the computer, simply press and release the power button below will run the Adobe Reader setup program first. For instructions on the screen to all models in the text with setting up...

Acer Aspire One 751H Netbook Series User Guide
Page 15
...are some ways to take care of your battery pack: • Use only batteries of used batteries according to "Frequently asked questions" on page 10 . Recycle if possible. Keep them away from children. • Dispose of the same kind as replacements. If either of the following occurs: &#... the power off the computer and remove the battery pack. 2 Disconnect the AC adapter. 3 Use a soft, moist cloth. Do not use liquid or aerosol cleaners. Cleaning and servicing When cleaning the computer, follow these steps: 1 Turn off before removing or replacing batteries. • Do not tamper with...
...are some ways to take care of your battery pack: • Use only batteries of used batteries according to "Frequently asked questions" on page 10 . Recycle if possible. Keep them away from children. • Dispose of the same kind as replacements. If either of the following occurs: &#... the power off the computer and remove the battery pack. 2 Disconnect the AC adapter. 3 Use a soft, moist cloth. Do not use liquid or aerosol cleaners. Cleaning and servicing When cleaning the computer, follow these steps: 1 Turn off before removing or replacing batteries. • Do not tamper with...
Acer Aspire One 751H Netbook Series User Guide
Page 30
... to the onscreen instructions to perform system recovery. Place your proof-of-purchase in the flap located inside the front cover of beeps). Before you call Please have an Acer-authorized ITW service site, you can reduce the amount of service centers are required to receive the benefits from our support centers. You are there...
... to the onscreen instructions to perform system recovery. Place your proof-of-purchase in the flap located inside the front cover of beeps). Before you call Please have an Acer-authorized ITW service site, you can reduce the amount of service centers are required to receive the benefits from our support centers. You are there...
Service Guide
Page 7
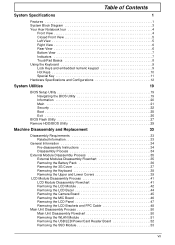
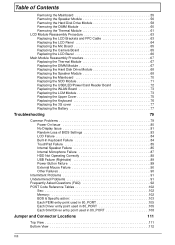
... Hardware Specifications and Configurations 12 System Utilities 19 BIOS Setup Utility 19 Navigating the BIOS Utility 19 Information 20 Main 21 Security 22 Boot 25 Exit 26 BIOS Flash Utility 27 Remove HDD/BIOS Utility 29 Machine Disassembly and Replacement 33 Disassembly Requirements 33 Related Information 33 General Information 34 Pre-disassembly Instructions 34...
... Hardware Specifications and Configurations 12 System Utilities 19 BIOS Setup Utility 19 Navigating the BIOS Utility 19 Information 20 Main 21 Security 22 Boot 25 Exit 26 BIOS Flash Utility 27 Remove HDD/BIOS Utility 29 Machine Disassembly and Replacement 33 Disassembly Requirements 33 Related Information 33 General Information 34 Pre-disassembly Instructions 34...
Service Guide
Page 8
...Reader Board 72 Replacing the WLAN Board 73 Replacing the LCM Module 73 Replacing the Upper Cover 75 Replacing the Keyboard 76 Replacing the 3G cover 77 Replacing the Battery 77 Troubleshooting 79 Common Problems 79 Power On Issue 80 No Display Issue 81 Random Loss of BIOS Settings 83 LCD ...Mouse Failure 90 Other Failures 90 Intermittent Problems 91 Undetermined Problems 91 Frequently Asked Questions (FAQ 92 POST Code Reference Tables 102 Sec 102 Memory 102 BDS & Specific action 103 Each PEIM entry point used in 80_PORT 105 Each Driver entry point used in 80_PORT 105 ...
...Reader Board 72 Replacing the WLAN Board 73 Replacing the LCM Module 73 Replacing the Upper Cover 75 Replacing the Keyboard 76 Replacing the 3G cover 77 Replacing the Battery 77 Troubleshooting 79 Common Problems 79 Power On Issue 80 No Display Issue 81 Random Loss of BIOS Settings 83 LCD ...Mouse Failure 90 Other Failures 90 Intermittent Problems 91 Undetermined Problems 91 Frequently Asked Questions (FAQ 92 POST Code Reference Tables 102 Sec 102 Memory 102 BDS & Specific action 103 Each PEIM entry point used in 80_PORT 105 Each Driver entry point used in 80_PORT 105 ...
Service Guide
Page 29
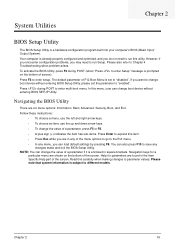
... boot device without entering BIOS Setup Utility, please set to parameter values. If you may need to enter Setup" message is prompted on the bottom of a parameter if it is enclosed in square brackets. Press during POST (when "Press to run Setup. Press F2 to Chapter 4 Troubleshooting when problem arises. Follow these instructions: • To choose a menu...
... boot device without entering BIOS Setup Utility, please set to parameter values. If you may need to enter Setup" message is prompted on the bottom of a parameter if it is enclosed in square brackets. Press during POST (when "Press to run Setup. Press F2 to Chapter 4 Troubleshooting when problem arises. Follow these instructions: • To choose a menu...
Service Guide
Page 33
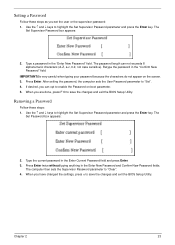
... password in the "Enter New Password" field. When you set the user or the supervisor password: 1. Chapter 2 23 The Set Supervisor Password box appears: 2. The Set Password box appears: 2. Setting a Password Follow these steps: 1. After setting the password, the computer sets the User Password parameter to save the changes and exit the BIOS Setup Utility. The computer then sets the Supervisor Password parameter to highlight the Set Supervisor Password...
... password in the "Enter New Password" field. When you set the user or the supervisor password: 1. Chapter 2 23 The Set Supervisor Password box appears: 2. The Set Password box appears: 2. Setting a Password Follow these steps: 1. After setting the password, the computer sets the User Password parameter to save the changes and exit the BIOS Setup Utility. The computer then sets the Supervisor Password parameter to highlight the Set Supervisor Password...
Service Guide
Page 37
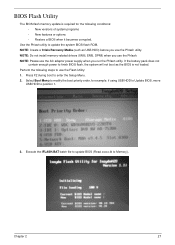
...as the BIOS is required for example, if using USB HDD to Update BIOS, move USB HDD to enter the Setup Menu. 2. Press F2 during boot to position 1. 3. BIOS Flash Utility The BIOS flash memory update is not loaded. NOTE: Please use the AC adaptor power supply ...when you use the Phlash. If the battery pack does not contain enough power to use the Phlash utility. NOTE: Do not install memory-related drivers...
...as the BIOS is required for example, if using USB HDD to Update BIOS, move USB HDD to enter the Setup Menu. 2. Press F2 during boot to position 1. 3. BIOS Flash Utility The BIOS flash memory update is not loaded. NOTE: Please use the AC adaptor power supply ...when you use the Phlash. If the battery pack does not contain enough power to use the Phlash utility. NOTE: Do not install memory-related drivers...
Service Guide
Page 89
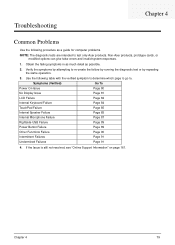
...resolved, see "Online Support Information" on page 161. Verify the symptoms by attempting to test only Acer products. Use the ... 91 4. Non-Acer products, prototype cards, or modified options can give false errors and invalid system responses. 1. Troubleshooting Chapter 4 Common Problems Use the following table... with the verified symptom to determine which page to go to. Chapter 4 79 Obtain the failing symptoms in as much detail as a guide for computer problems...
...resolved, see "Online Support Information" on page 161. Verify the symptoms by attempting to test only Acer products. Use the ... 91 4. Non-Acer products, prototype cards, or modified options can give false errors and invalid system responses. 1. Troubleshooting Chapter 4 Common Problems Use the following table... with the verified symptom to determine which page to go to. Chapter 4 79 Obtain the failing symptoms in as much detail as a guide for computer problems...
Service Guide
Page 93
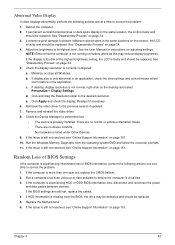
... following actions one year old, replace the CMOS battery. 2. See "Disassembly Process" on battery alone as this may be defective and should be replaced. b. Check the Device Manager to determine that the computer is properly installed. If the BIOS settings are no device conflicts. • No hardware is correctly configured: a. Remove and reinstall the video driver. 8. Replace the Motherboard...
... following actions one year old, replace the CMOS battery. 2. See "Disassembly Process" on battery alone as this may be defective and should be replaced. b. Check the Device Manager to determine that the computer is properly installed. If the BIOS settings are no device conflicts. • No hardware is correctly configured: a. Remove and reinstall the video driver. 8. Replace the Motherboard...
Service Guide
Page 96
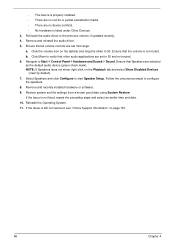
...Remove and reinstall the audio driver. 5. Ensure that all volume controls are set to 50 and not muted. 6. Follow the onscreen prompts to start Speaker Setup. Restore system and file settings from a known good date... are set mid range: a. Click Mixer to 50. Roll back the audio driver to Start´ Control Panel´ Hardware and Sound´ Sound. Navigate to the previous version, if updated recently.... resolved, see "Online Support Information" on the Playback tab and select Show Disabled Devices (clear by default). 7. Remove and recently installed hardware or software. 9.
...Remove and reinstall the audio driver. 5. Ensure that all volume controls are set to 50 and not muted. 6. Follow the onscreen prompts to start Speaker Setup. Restore system and file settings from a known good date... are set mid range: a. Click Mixer to 50. Roll back the audio driver to Start´ Control Panel´ Hardware and Sound´ Sound. Navigate to the previous version, if updated recently.... resolved, see "Online Support Information" on the Playback tab and select Show Disabled Devices (clear by default). 7. Remove and recently installed hardware or software. 9.
Service Guide
Page 98
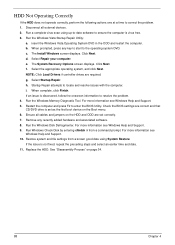
... Repair attempts to ensure the computer is not fixed, repeat the preceding steps and select an earlier time and date. 11. Restart the computer and press F2 to correct the problem. 1. The Install Windows screen displays. Restore system and file settings from a command prompt. Run the Windows Memory Diagnostic Tool. For more information see Windows Help and Support...
... Repair attempts to ensure the computer is not fixed, repeat the preceding steps and select an earlier time and date. 11. Restart the computer and press F2 to correct the problem. 1. The Install Windows screen displays. Restore system and file settings from a command prompt. Run the Windows Memory Diagnostic Tool. For more information see Windows Help and Support...
Service Guide
Page 100
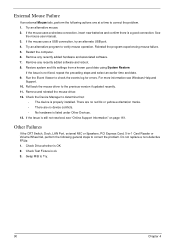
... not resolved, see Windows Help and Support. 10. Do not replace a non-defective FRUs: 1. See the mouse user manual. 3. Run the Event Viewer to verify mouse operation. Check Test Fixture is a good connection. If the mouse uses a wireless connection, insert new batteries and confirm there is... ok. 3. Try an alternative program to check the events log for errors. Restart the computer. 6. If the issue is listed under Other Devices. 13. Remove and reinstall the mouse driver. 12. Swap M/B to correct the problem. Restore system and file settings ...
... not resolved, see Windows Help and Support. 10. Do not replace a non-defective FRUs: 1. See the mouse user manual. 3. Run the Event Viewer to verify mouse operation. Check Test Fixture is a good connection. If the mouse uses a wireless connection, insert new batteries and confirm there is... ok. 3. Try an alternative program to check the events log for errors. Restart the computer. 6. If the issue is listed under Other Devices. 13. Remove and reinstall the mouse driver. 12. Swap M/B to correct the problem. Restore system and file settings ...
Service Guide
Page 101
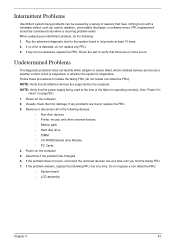
...: cosmic radiation, electrostatic discharge, or software errors. Intermittent Problems Intermittent system hang problems can be considered only when a recurring problem exists. If no more errors. If any FRU. 3. Determine if the problem has changed. 6. If the problem remains, replace the following devices: • Non-Acer devices • Printer, mouse, and other external devices • Battery pack • Hard disk drive...
...: cosmic radiation, electrostatic discharge, or software errors. Intermittent Problems Intermittent system hang problems can be considered only when a recurring problem exists. If no more errors. If any FRU. 3. Determine if the problem has changed. 6. If the problem remains, replace the following devices: • Non-Acer devices • Printer, mouse, and other external devices • Battery pack • Hard disk drive...

Service Guide
Page 128
Aspire one FRU List Category Adapter Battery Board Description ADAPTER LITE-ON 30W 1.7X5.5X11 BLACK PA-1300-04AC LF BATTERY SIMPLO UM-2008AW LI-ION 3S1P PANASONIC 3 CELL 2200MAH MAIN COMMON MACLES / WHITE BATTERY SIMPLO UM-2008A LI-ION 3S1P SAMSUNG 3 CELL 4400MAH MAIN COMMON MACLES BATTERY SIMPLO UM-2008A LI-ION 3S1P SAMSUNG 3 CELL 4800MAH MAIN COMMON MACLES...
Aspire one FRU List Category Adapter Battery Board Description ADAPTER LITE-ON 30W 1.7X5.5X11 BLACK PA-1300-04AC LF BATTERY SIMPLO UM-2008AW LI-ION 3S1P PANASONIC 3 CELL 2200MAH MAIN COMMON MACLES / WHITE BATTERY SIMPLO UM-2008A LI-ION 3S1P SAMSUNG 3 CELL 4400MAH MAIN COMMON MACLES BATTERY SIMPLO UM-2008A LI-ION 3S1P SAMSUNG 3 CELL 4800MAH MAIN COMMON MACLES...
Service Guide
Page 171
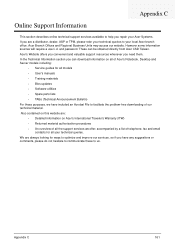
... and email contacts for all models • User's manuals • Training materials • Bios updates • Software utilities • Spare parts lists • TABs (Technical Announcement Bulletin) For these to us. Also contained on this website are: • Detailed information on all of Acer's Notebook, Desktop and Server models including: • Service guides for all your technical queries...
... and email contacts for all models • User's manuals • Training materials • Bios updates • Software utilities • Spare parts lists • TABs (Technical Announcement Bulletin) For these to us. Also contained on this website are: • Detailed information on all of Acer's Notebook, Desktop and Server models including: • Service guides for all your technical queries...


