
Acer Aspire 1410 and Aspire 1680 Service Guide
Page 8
... Touchpad Basics 23 Hardware Specifications and Configurations 25 Chapter 2 System Utilities 36 BIOS Setup Utility 36 Navigating the BIOS Utility 37 Information 38 Main 39 Advanced 41 Security 43 Boot 47 Exit 48 BIOS Flash Utility 49 Chapter 3 Machine Disassembly and Replacement 50 General Information 51 Before You Begin 51 Disassembly Procedure Flowchart 53 Removing the Battery Pack 55 Removing the HDD Module/the Memory and the Wireless LAN Card/the Thermal Module and the CPU/ODD Module and LCD Module...
... Touchpad Basics 23 Hardware Specifications and Configurations 25 Chapter 2 System Utilities 36 BIOS Setup Utility 36 Navigating the BIOS Utility 37 Information 38 Main 39 Advanced 41 Security 43 Boot 47 Exit 48 BIOS Flash Utility 49 Chapter 3 Machine Disassembly and Replacement 50 General Information 51 Before You Begin 51 Disassembly Procedure Flowchart 53 Removing the Battery Pack 55 Removing the HDD Module/the Memory and the Wireless LAN Card/the Thermal Module and the CPU/ODD Module and LCD Module...
Acer Aspire 1410 and Aspire 1680 Service Guide
Page 32
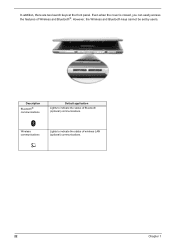
Even when the cover is closed, you can easily access the features of Bluetooth (optional) communications. Description Bluetooth® communications Default application Lights to indicate the status of wireless LAN (optional) communications. 22 Chapter 1 Wireless communications Lights to indicate the status of Wireless and Bluetooth®. However, the Wireless and Bluetooth keys cannot be set by users. In addition, there are two launch keys at the front panel.
Even when the cover is closed, you can easily access the features of Bluetooth (optional) communications. Description Bluetooth® communications Default application Lights to indicate the status of wireless LAN (optional) communications. 22 Chapter 1 Wireless communications Lights to indicate the status of Wireless and Bluetooth®. However, the Wireless and Bluetooth keys cannot be set by users. In addition, there are two launch keys at the front panel.
Acer Aspire 1410 and Aspire 1680 Service Guide
Page 35
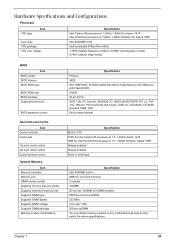
... Supports DIMM type Supports DIMM Speed Supports DIMM voltage Supports DIMM package Memory module combinations Specification Phneoix 3A03 SST 39SF040A, 512KX8 CMOS Boot Block Flash Memory (the difference with Flash ROM?) 512KB 32-pin PLCC ACPI 1.0b, PC Card 95, SM BIOS 2.3, IEEE1284-ECP/EPP, PCI 2.2, PnP 1.0a, DMI 2.0, PS/2 keyboard and mouse, USB 2.0, VGA BIOS, CD-ROM bootable, IEEE 1394 Set by setup manual Specification Built-in CPU 512K for Intel Celeron M processor at 1.3~1.4GHz-Aspire 1410...
... Supports DIMM type Supports DIMM Speed Supports DIMM voltage Supports DIMM package Memory module combinations Specification Phneoix 3A03 SST 39SF040A, 512KX8 CMOS Boot Block Flash Memory (the difference with Flash ROM?) 512KB 32-pin PLCC ACPI 1.0b, PC Card 95, SM BIOS 2.3, IEEE1284-ECP/EPP, PCI 2.2, PnP 1.0a, DMI 2.0, PS/2 keyboard and mouse, USB 2.0, VGA BIOS, CD-ROM bootable, IEEE 1394 Set by setup manual Specification Built-in CPU 512K for Intel Celeron M processor at 1.3~1.4GHz-Aspire 1410...

Acer Aspire 1410 and Aspire 1680 Service Guide
Page 50
...; Option: Enabled or Disabled Enables, disables Boot Menu during POST. Memory size is connected on display LCD Auto Dim Network Boot F12 Boot Menu D2D Recovery Description Format/Option Sets the system time. shows Summary Screen is not allowed to factory defaults. The system will support an automatic dimming of the LCD backlight when the AC power is NOT available (running on display will detect if any external display device is connected, the power on battery power). The function allows the user to create a hidden partition on hard disc drive...
...; Option: Enabled or Disabled Enables, disables Boot Menu during POST. Memory size is connected on display LCD Auto Dim Network Boot F12 Boot Menu D2D Recovery Description Format/Option Sets the system time. shows Summary Screen is not allowed to factory defaults. The system will support an automatic dimming of the LCD backlight when the AC power is NOT available (running on display will detect if any external display device is connected, the power on battery power). The function allows the user to create a hidden partition on hard disc drive...
Acer Aspire 1410 and Aspire 1680 Service Guide
Page 53
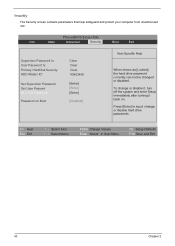
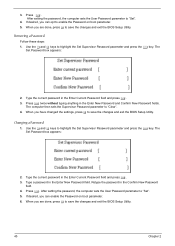
... Change Values Enter Select 4 Sub-Menu F9 Setup Defaults F10 Save and Exit 43 Chapter 2 Press [Enter] to input, change or disable it, turn off the system and enter Setup immediately after turning it back on Boot Clear Clear Clear 43883445 [Enter] [Enter] [Enter] [Disabled] Item Specific Help When shown as [Locked], the hard drive password currently can not be changed or disabled. Main Advanced Security Boot Exit Supervisor Password Is: User Password Is: Primary HardDisk Security: HDD Master ID: Set Supervisor Password Set User Passord Set HDD Password Password...
... Change Values Enter Select 4 Sub-Menu F9 Setup Defaults F10 Save and Exit 43 Chapter 2 Press [Enter] to input, change or disable it, turn off the system and enter Setup immediately after turning it back on Boot Clear Clear Clear 43883445 [Enter] [Enter] [Enter] [Disabled] Item Specific Help When shown as [Locked], the hard drive password currently can not be changed or disabled. Main Advanced Security Boot Exit Supervisor Password Is: User Password Is: Primary HardDisk Security: HDD Master ID: Set Supervisor Password Set User Passord Set HDD Password Password...

Acer Aspire 1410 and Aspire 1680 Service Guide
Page 54
... set , this password protects the BIOS Setup Utility from unauthorized access. When both Supervisor and user password are present, both passwords are prompted to enter a password, you are set. Option Clear or Set Clear or Set Disabled or Enabled Disabled or Enabled NOTE: When you have to return your notebook computer to your password, you set the user password. Use the w andy keys to set the user or the supervisor password: 1. Retype the password in boldface are all requires the Supervisor password for changes...
... set , this password protects the BIOS Setup Utility from unauthorized access. When both Supervisor and user password are present, both passwords are prompted to enter a password, you are set. Option Clear or Set Clear or Set Disabled or Enabled Disabled or Enabled NOTE: When you have to return your notebook computer to your password, you set the user password. Use the w andy keys to set the user or the supervisor password: 1. Retype the password in boldface are all requires the Supervisor password for changes...
Acer Aspire 1410 and Aspire 1680 Service Guide
Page 55
... setting the password, the computer sets the User Password parameter to save the changes and exit the BIOS Setup Utility. 45 Chapter 2 Removing a Password Follow these steps: 1. When you can opt to enable the Password on boot parameter. 6. After setting the password, the computer sets the User Password parameter to highlight the Set Supervisor Password parameter and press the e key. Press e twice without typing anything in the Enter New Password and Confirm New Password fields. Use the w and y keys to "Set...
... setting the password, the computer sets the User Password parameter to save the changes and exit the BIOS Setup Utility. 45 Chapter 2 Removing a Password Follow these steps: 1. When you can opt to enable the Password on boot parameter. 6. After setting the password, the computer sets the User Password parameter to highlight the Set Supervisor Password parameter and press the e key. Press e twice without typing anything in the Enter New Password and Confirm New Password fields. Use the w and y keys to "Set...
Acer Aspire 1410 and Aspire 1680 Service Guide
Page 57
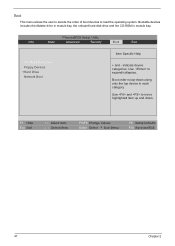
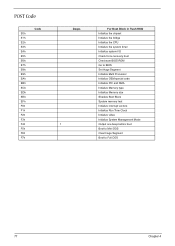
... Menu F5/F6 Change Values Enter Select 4 Sub-Menu F9 Setup Defaults F10 Save and Exit 47 Chapter 2 Bootable devices includes the distette drive in module bay, the onboard hard disk drive and the CD-ROM in each category. Boot This menu allows the user to decide the order of boot devices to expand/collapses. Use and to move highlighted item up and down using only the top device in module bay. PhoenixBIOS Setup Utility...
... Menu F5/F6 Change Values Enter Select 4 Sub-Menu F9 Setup Defaults F10 Save and Exit 47 Chapter 2 Bootable devices includes the distette drive in module bay, the onboard hard disk drive and the CD-ROM in each category. Boot This menu allows the user to decide the order of boot devices to expand/collapses. Use and to move highlighted item up and down using only the top device in module bay. PhoenixBIOS Setup Utility...
Acer Aspire 1410 and Aspire 1680 Service Guide
Page 58
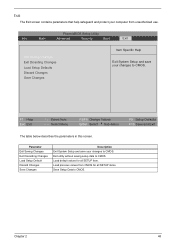
... values from unauthorized use. Main Advanced Security Boot Exit Exit Saving Changes Exit Dicarding Changes Load Setup Defaults Discard Changes Save Changes Item Specific Help Exit System Setup and save your changes to CMOS. PhoenixBIOS Setup Utility Info. Exit utility without saving setup data to CMOS. Parameter Exit Saving Changes Exit Discarding Changes Load Setup Default Discard Changes Save Changes Description Exit System Setup and save your changes to CMOS. Chapter 2 48 Load default values for all...
... values from unauthorized use. Main Advanced Security Boot Exit Exit Saving Changes Exit Dicarding Changes Load Setup Defaults Discard Changes Save Changes Item Specific Help Exit System Setup and save your changes to CMOS. PhoenixBIOS Setup Utility Info. Exit utility without saving setup data to CMOS. Parameter Exit Saving Changes Exit Discarding Changes Load Setup Default Discard Changes Save Changes Description Exit System Setup and save your changes to CMOS. Chapter 2 48 Load default values for all...

Acer Aspire 1410 and Aspire 1680 Service Guide
Page 63
Start Battery K*2 HDD Cover HDD Module E*2 RAM/Wireless Cover Wireless LAN Card Memory CPU *2 IO Bezel *2 Heatsink Cover *2 Thermal Module ODD Module *6 ODD Connector Board ODD Holder ODD Drive *3 Middle Cover *2 Keyboard *4 (right and left hinges) LCD Module *2 Switch Board *5 *18 Lower and Upper Case Assembly Lower Case Assembly Upper Case Assembly Touchpad *3 VGA Heatsink *2 *2 screw nuts Main Board 3-in that need to remove the system board, you want to be removed during servicing. Disassembly Procedure Flowchart The flowchart on the succeeding page gives...
Start Battery K*2 HDD Cover HDD Module E*2 RAM/Wireless Cover Wireless LAN Card Memory CPU *2 IO Bezel *2 Heatsink Cover *2 Thermal Module ODD Module *6 ODD Connector Board ODD Holder ODD Drive *3 Middle Cover *2 Keyboard *4 (right and left hinges) LCD Module *2 Switch Board *5 *18 Lower and Upper Case Assembly Lower Case Assembly Upper Case Assembly Touchpad *3 VGA Heatsink *2 *2 screw nuts Main Board 3-in that need to remove the system board, you want to be removed during servicing. Disassembly Procedure Flowchart The flowchart on the succeeding page gives...
Acer Aspire 1410 and Aspire 1680 Service Guide
Page 84
... in BIOS Setup Utility. Shadow RAM Failed at offset: nnnn BIOS ROM System board System RAM Failed at offset: nnnn DIMM System board Extended RAM Failed at xxxx:xxxx:xxxxh (R:xxxxh, W:xxxxh) Real Time Clock Error CMOS Battery Bad CMOS Checksum Error System disabled. "Load Default Settings" in Sequence Failure Fixed Disk Reconnect hard disk drive connector. Run Setup Run "Load Default Settings" in BIOS Setup Utility. System CMOS checksum bad - Incorrect password is dead - Hard disk drive System board Stuck Key see "Keyboard or Auxiliary Input Device...
... in BIOS Setup Utility. Shadow RAM Failed at offset: nnnn BIOS ROM System board System RAM Failed at offset: nnnn DIMM System board Extended RAM Failed at xxxx:xxxx:xxxxh (R:xxxxh, W:xxxxh) Real Time Clock Error CMOS Battery Bad CMOS Checksum Error System disabled. "Load Default Settings" in Sequence Failure Fixed Disk Reconnect hard disk drive connector. Run Setup Run "Load Default Settings" in BIOS Setup Utility. System CMOS checksum bad - Incorrect password is dead - Hard disk drive System board Stuck Key see "Keyboard or Auxiliary Input Device...
Acer Aspire 1410 and Aspire 1680 Service Guide
Page 87
... Initialize system I/O Check force recovery boot Checksum BIOS ROM Go to BIOS Set Huge Segment Initialize Multi Processor Initialize OEM special code Initialize PIC and DMA Initialize Memory type Initialize Memory size Shadow Boot Block System memory test Initialize interrupt vectors Initialize Run Time Clock Initialize video Initialize System Management Mode Output one beep before boot Boot to Mini DOS Clear Huge Segment Boot to Full DOS 77 Chapter...
... Initialize system I/O Check force recovery boot Checksum BIOS ROM Go to BIOS Set Huge Segment Initialize Multi Processor Initialize OEM special code Initialize PIC and DMA Initialize Memory type Initialize Memory size Shadow Boot Block System memory test Initialize interrupt vectors Initialize Run Time Clock Initialize video Initialize System Management Mode Output one beep before boot Boot to Mini DOS Clear Huge Segment Boot to Full DOS 77 Chapter...

Acer Aspire 1410 and Aspire 1680 Service Guide
Page 88
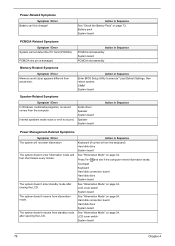
... Sequence Enter BIOS Utility to -FRU Error Message LCD-Related Symptoms Symptom / Error LCD backlight doesn't work ). Reconnect the LCD connectors. Hold and press the power switch for more than 4 seconds. Keyboard (if contrast and brightness function key doesn't work LCD is too dark LCD brightness cannot be adjusted LCD contrast cannot be adjusted Unreadable LCD screen Missing pels in Sequence Indicator incorrectly remains off . See "Power System Check" on . Action in Sequence Power source (battery pack and power adapter).
... Sequence Enter BIOS Utility to -FRU Error Message LCD-Related Symptoms Symptom / Error LCD backlight doesn't work ). Reconnect the LCD connectors. Hold and press the power switch for more than 4 seconds. Keyboard (if contrast and brightness function key doesn't work LCD is too dark LCD brightness cannot be adjusted LCD contrast cannot be adjusted Unreadable LCD screen Missing pels in Sequence Indicator incorrectly remains off . See "Power System Check" on . Action in Sequence Power source (battery pack and power adapter).
Acer Aspire 1410 and Aspire 1680 Service Guide
Page 89
... Enter BIOS Setup Utility to execute "Load Default Settings, then reboot system. LCD cover switch System board 79 Chapter 4 DIMM System board Speaker-Related Symptoms Symptom / Error In Windows, multimedia programs, no sound. The system doesn't enter standby mode after opening the LCD. Action in Sequence Keyboard (if control is damaged. Press Fn+oand see if the computer enters hibernation mode. LCD cover switch System board See "Hibernation Mode" on page 34. Hard disk connection board Hard disk drive System board See "Hibernation Mode" on page 34. Power...
... Enter BIOS Setup Utility to execute "Load Default Settings, then reboot system. LCD cover switch System board 79 Chapter 4 DIMM System board Speaker-Related Symptoms Symptom / Error In Windows, multimedia programs, no sound. The system doesn't enter standby mode after opening the LCD. Action in Sequence Keyboard (if control is damaged. Press Fn+oand see if the computer enters hibernation mode. LCD cover switch System board See "Hibernation Mode" on page 34. Hard disk connection board Hard disk drive System board See "Hibernation Mode" on page 34. Power...

Acer Aspire 1410 and Aspire 1680 Service Guide
Page 90
...Enter BIOS Setup Utility to execute "Load Default Settings", then reboot system. Keyboard System board Reconnect touchpad cable. Chapter 4 80 Battery pack System board System hangs intermittently. USB does not work correctly Print problems. Serial or parallel port device problems. Action in the Devices Configuration" of BIOS Setup Utility is set to Enabled. Power Management-Related Symptoms Symptom / Error Action in Sequence Battery fuel gauge in Sequence Reconnect the keyboard cable. Reconnect hard disk/CD-ROM drives. Action in Windows doesn't go higher than 90%. Remove...
...Enter BIOS Setup Utility to execute "Load Default Settings", then reboot system. Keyboard System board Reconnect touchpad cable. Chapter 4 80 Battery pack System board System hangs intermittently. USB does not work correctly Print problems. Serial or parallel port device problems. Action in the Devices Configuration" of BIOS Setup Utility is set to Enabled. Power Management-Related Symptoms Symptom / Error Action in Sequence Battery fuel gauge in Sequence Reconnect the keyboard cable. Reconnect hard disk/CD-ROM drives. Action in Windows doesn't go higher than 90%. Remove...
Acer Aspire 1410 and Aspire 1680 Service Guide
Page 91
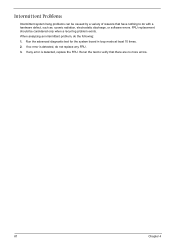
..., electrostatic discharge, or software errors. FRU replacement should be caused by a variety of reasons that have nothing to verify that there are no error is detected, do the following: 1. When analyzing an intermittent problem, do not replace any error is detected, replace the FRU. Run the advanced diagnostic test for the system board in loop mode at least 10 times...
..., electrostatic discharge, or software errors. FRU replacement should be caused by a variety of reasons that have nothing to verify that there are no error is detected, do the following: 1. When analyzing an intermittent problem, do not replace any error is detected, replace the FRU. Run the advanced diagnostic test for the system board in loop mode at least 10 times...
Aspire 1410 / 1680 User's Guide FR
Page 93
... different make automatic calls to its network. There is designed. The associated equipment shall be set to operate within the following limits for compliance with Telecom's specifications, the associated equipment shall be set to ensure that calls are dependent on local power, is available for emergency use. 7... is not capable, under all of Telecom's network services. 2 This equipment is DTMF tone dialing. Telecom will work correctly in such circumstances. 3 This device is connected to the same line as other equipment, may not operate. Above all, it provides no assurance that ...
... different make automatic calls to its network. There is designed. The associated equipment shall be set to operate within the following limits for compliance with Telecom's specifications, the associated equipment shall be set to ensure that calls are dependent on local power, is available for emergency use. 7... is not capable, under all of Telecom's network services. 2 This equipment is DTMF tone dialing. Telecom will work correctly in such circumstances. 3 This device is connected to the same line as other equipment, may not operate. Above all, it provides no assurance that ...
Aspire 1410/1680 User Guide
Page 3
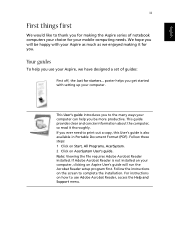
... Document Format (PDF). Follow the instructions on AcerSystem User's guide. English English iii First things first We would like to thank you for making the Aspire series of guides: First off, the Just for starters... We hope you will run the Acrobat Reader setup program first. poster helps you use Adobe Acrobat Reader, access the Help and Support menu. Your guides To help you be happy with setting...
... Document Format (PDF). Follow the instructions on AcerSystem User's guide. English English iii First things first We would like to thank you for making the Aspire series of guides: First off, the Just for starters... We hope you will run the Acrobat Reader setup program first. poster helps you use Adobe Acrobat Reader, access the Help and Support menu. Your guides To help you be happy with setting...

Aspire 1410/1680 User Guide
Page 35
... adjusting the speaker volume. System activity refers to any activity involving one or more information on the front panel of these devices in order to the USB ports, and video memory. Power management This computer has a built-in dual stereo speakers are audio ports on external audio devices. Windows handles all of the computer. English English 27 Audio The computer comes with 16-bit high-fidelity AC'97 stereo audio and microphone...
... adjusting the speaker volume. System activity refers to any activity involving one or more information on the front panel of these devices in order to the USB ports, and video memory. Power management This computer has a built-in dual stereo speakers are audio ports on external audio devices. Windows handles all of the computer. English English 27 Audio The computer comes with 16-bit high-fidelity AC'97 stereo audio and microphone...

Aspire 1410/1680 User Guide
Page 73
... make sure that the resolution is set to 1024x768. Press Fn-→ to increase the brightness level. • The display device might be too low. Resolutions lower than the specified resolution are provided for each one. Press any key or tap on your Windows desktop and select Properties to the computer. Connect the AC adapter to an external monitor. The computer's power management...
... make sure that the resolution is set to 1024x768. Press Fn-→ to increase the brightness level. • The display device might be too low. Resolutions lower than the specified resolution are provided for each one. Press any key or tap on your Windows desktop and select Properties to the computer. Connect the AC adapter to an external monitor. The computer's power management...


