
User Guide
Page 4
... OpenPhone 71/73/75: Extensions and accessories for system telephones 53 Power supply unit 53 Keypad extensions 53 Headset 56 Mounting the OpenCom X320 Rack InfoCom System 58 Safety Precautions 58 Technical Data 59 Mounting Interface Cards 59 Scope of Delivery 61 Installing interface cards (Example: Fax.../V.24 card 62 Configuration 64 Brief Guide to Initial Configuration 65 Configuring the OpenCom X320 67 Preparing the Configuration 67 Starting the Web Console 67 Loading the Online Help 69 Finishing the Configuration 69 ...
... OpenPhone 71/73/75: Extensions and accessories for system telephones 53 Power supply unit 53 Keypad extensions 53 Headset 56 Mounting the OpenCom X320 Rack InfoCom System 58 Safety Precautions 58 Technical Data 59 Mounting Interface Cards 59 Scope of Delivery 61 Installing interface cards (Example: Fax.../V.24 card 62 Configuration 64 Brief Guide to Initial Configuration 65 Configuring the OpenCom X320 67 Preparing the Configuration 67 Starting the Web Console 67 Loading the Online Help 69 Finishing the Configuration 69 ...

User Guide
Page 10
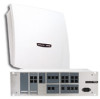
...or to be connected using an appropriate combination of the cards available in the section Interface cards starting on its smallest version, OpenCom X320 provides the following devices to OpenCom X320: ■ analogue terminals to a/b ports ■ Euro ISDN terminals in parallel. You will find an overview of two ...■ 3 DECT-enabled Upn-connections for system telephones or DECT base stations (pressure terminals) ■ 8 a/b-connections for installation in a 19" installation version ("Rack"). Features ■ The OpenCom X320 is also available in a 19" system cabinet.
...or to be connected using an appropriate combination of the cards available in the section Interface cards starting on its smallest version, OpenCom X320 provides the following devices to OpenCom X320: ■ analogue terminals to a/b ports ■ Euro ISDN terminals in parallel. You will find an overview of two ...■ 3 DECT-enabled Upn-connections for system telephones or DECT base stations (pressure terminals) ■ 8 a/b-connections for installation in a 19" installation version ("Rack"). Features ■ The OpenCom X320 is also available in a 19" system cabinet.

User Guide
Page 60
...Power Good LED, Activity LED, Factory Reset OpenCom X320 Rack Frame and Ports 5.1 Safety Precautions For the OpenCom X320 Rack infocom system the Safety precautions starting on page 23 are connected. Connecting a/b and Upn line outside of the OpenCom X320 Rack infocom system should only be connected before connecting.... Patch cables have to the power supply and protective earthing, should not exceed 45°C. Mounting the OpenCom X320 Rack InfoCom System The OpenCom X320 is allowed, if no internal S0 devices are generally valid. The system needs to the power supply. ...
...Power Good LED, Activity LED, Factory Reset OpenCom X320 Rack Frame and Ports 5.1 Safety Precautions For the OpenCom X320 Rack infocom system the Safety precautions starting on page 23 are connected. Connecting a/b and Upn line outside of the OpenCom X320 Rack infocom system should only be connected before connecting.... Patch cables have to the power supply and protective earthing, should not exceed 45°C. Mounting the OpenCom X320 Rack InfoCom System The OpenCom X320 is allowed, if no internal S0 devices are generally valid. The system needs to the power supply. ...

User Guide
Page 61
The fields are labelled "SLOT 1" and "SLOT 2". 59 Mounting the OpenCom X320 Rack InfoCom System Technical Data Please note: Before opening the device, pull out the plug. 5.2 Technical Data (only if different from the OpenCom X320) Dimensions: ■ Width: 19-inch panel with flange for mounting in one direction (internal or external). Using the port as...
The fields are labelled "SLOT 1" and "SLOT 2". 59 Mounting the OpenCom X320 Rack InfoCom System Technical Data Please note: Before opening the device, pull out the plug. 5.2 Technical Data (only if different from the OpenCom X320) Dimensions: ■ Width: 19-inch panel with flange for mounting in one direction (internal or external). Using the port as...

User Guide
Page 62
Besides the default screen, the following screens are available: [1] [2] [1] [2] [3] [4] [3] [4] [5] [6] [7] [8] [..] Analog, Upn 4-fold interface cards: M100-U4d M100-A4 V2 M100-AT4 [..] Analog, Upn 8-fold interface cards: M100-U8d M100-A8 V2 60 Mounting the OpenCom X320 Rack InfoCom System Mounting Interface Cards Depending on the type of interface card used in a slot, the correct metal screen has to be mounted.
Besides the default screen, the following screens are available: [1] [2] [1] [2] [3] [4] [3] [4] [5] [6] [7] [8] [..] Analog, Upn 4-fold interface cards: M100-U4d M100-A4 V2 M100-AT4 [..] Analog, Upn 8-fold interface cards: M100-U8d M100-A8 V2 60 Mounting the OpenCom X320 Rack InfoCom System Mounting Interface Cards Depending on the type of interface card used in a slot, the correct metal screen has to be mounted.

User Guide
Page 63
... labelled SLOT1 and SLOT2. An LED will blink, if an error condition was detected. 5.4 Scope of Delivery ■ One communications system OpenCom X320 Rack ■ One AC adapter with connection cable ■ Connection cable for the ISDN S0 port ■ V.24 patch cable (connects V.... the operating software has detected an interface card. An LED will show a constant light, if an interface card is a LED on page 31. Mounting the OpenCom X320 Rack InfoCom System Scope of Delivery S0 1 S0 2 S0 3 S0 4 S0 1 S0 2 [1] [2] [3] [4] [5] [6] S0 4-fold S0 interface card: M100-S4 S0...
... labelled SLOT1 and SLOT2. An LED will blink, if an error condition was detected. 5.4 Scope of Delivery ■ One communications system OpenCom X320 Rack ■ One AC adapter with connection cable ■ Connection cable for the ISDN S0 port ■ V.24 patch cable (connects V.... the operating software has detected an interface card. An LED will show a constant light, if an interface card is a LED on page 31. Mounting the OpenCom X320 Rack InfoCom System Scope of Delivery S0 1 S0 2 S0 3 S0 4 S0 1 S0 2 [1] [2] [3] [4] [5] [6] S0 4-fold S0 interface card: M100-S4 S0...

User Guide
Page 64
Mounting the OpenCom X320 Rack InfoCom System Installing interface cards (Example: ■ 1 CD Note: Note for the Aastra DeTeWe installer: Please download and install the latest released software from our Web site/ partnership area. 5.5 Installing interface cards (Example: Fax/V.24 card) ...provide potential equalisation between you and the system. 3. There is a label specifying the type on page 33. Take the top cover off the OpenCom X320 Rack and pull the plug out of its designated slot. Carefully plug the interface card into its packaging. Check that it is sitting firmly in these...
Mounting the OpenCom X320 Rack InfoCom System Installing interface cards (Example: ■ 1 CD Note: Note for the Aastra DeTeWe installer: Please download and install the latest released software from our Web site/ partnership area. 5.5 Installing interface cards (Example: Fax/V.24 card) ...provide potential equalisation between you and the system. 3. There is a label specifying the type on page 33. Take the top cover off the OpenCom X320 Rack and pull the plug out of its designated slot. Carefully plug the interface card into its packaging. Check that it is sitting firmly in these...

User Guide
Page 65
... System Installing interface cards (Example: 4. .Install the metal screen on the OpenCom X320 Rack. An overview of the provided serial cable with cable ties. No connections are required for the fax function. For pull relief, fasten the cable with ...: Slots. You will see a green tick in the Status column in the Web console once you want to the front panel. If you have restarted OpenCom X320 Rack. Connect the other end of both connectors. You can be found under Mounting Interface Cards starting on the card. Verify the tight connection of the...
... System Installing interface cards (Example: 4. .Install the metal screen on the OpenCom X320 Rack. An overview of the provided serial cable with cable ties. No connections are required for the fax function. For pull relief, fasten the cable with ...: Slots. You will see a green tick in the Status column in the Web console once you want to the front panel. If you have restarted OpenCom X320 Rack. Connect the other end of both connectors. You can be found under Mounting Interface Cards starting on the card. Verify the tight connection of the...

User Guide
Page 77
... to do so being after every change. To restore the OpenCom X320 basic settings, proceed as follows: 1. Switch off the OpenCom X320 by using a pointed tool (please refer to the front panel figure in the chapter Mounting the OpenCom X320 Rack InfoCom System starting on Restart with Defaults. 3. Click on ...note: If the factory settings are then lost . Confirm this is located on the front panel and can be lost . For the OpenCom X320 rack version note that the basic hardware setting switch is done, all individual settings and the user data are restored, all customer settings and ...
... to do so being after every change. To restore the OpenCom X320 basic settings, proceed as follows: 1. Switch off the OpenCom X320 by using a pointed tool (please refer to the front panel figure in the chapter Mounting the OpenCom X320 Rack InfoCom System starting on Restart with Defaults. 3. Click on ...note: If the factory settings are then lost . Confirm this is located on the front panel and can be lost . For the OpenCom X320 rack version note that the basic hardware setting switch is done, all individual settings and the user data are restored, all customer settings and ...