
Intel Smart Response Installation Guide
Page 1
... set the UEFI option "SATA Mode" to accelerate AND the SSD in the near future. For the new version RST driver, please check our website for the latest information: http://www.asrock.com * Before you intend to [RAID Mode]. Complete initial system setup, including installing the OS to show the newly accelerated...
... set the UEFI option "SATA Mode" to accelerate AND the SSD in the near future. For the new version RST driver, please check our website for the latest information: http://www.asrock.com * Before you intend to [RAID Mode]. Complete initial system setup, including installing the OS to show the newly accelerated...

Intel Rapid Storage Guide
Page 12
... method must be used to save the BIOS settings and exit the BIOS Setup program. Click F10 to load the Intel® Rapid Storage Technology driver during POST, press Ctrl and i at the same time to create a RAID volume. 1. Use the up or down arrow keys to RAID. 5. Switch the SATA...
... method must be used to save the BIOS settings and exit the BIOS Setup program. Click F10 to load the Intel® Rapid Storage Technology driver during POST, press Ctrl and i at the same time to create a RAID volume. 1. Use the up or down arrow keys to RAID. 5. Switch the SATA...
Intel Rapid Storage Guide
Page 13
...Note necessary files. 4. Use the up and down arrow keys to create a floppy disk with a screen asking you have successfully installed the driver and Windows setup should continue. Setup will happen immediately after pressing F6. Leave 13 At the prompt press Y to confirm your exit. ...At this point, you to install a third party SCSI or RAID driver. Press Enter to confirm volume creation. 10. Press Enter to confirm your controller and continue. Press Enter. 5. Press Y to create the volume....
...Note necessary files. 4. Use the up and down arrow keys to create a floppy disk with a screen asking you have successfully installed the driver and Windows setup should continue. Setup will happen immediately after pressing F6. Leave 13 At the prompt press Y to confirm your exit. ...At this point, you to install a third party SCSI or RAID driver. Press Enter to confirm volume creation. 10. Press Enter to confirm your controller and continue. Press Enter. 5. Press Y to create the volume....
Intel Rapid Storage Guide
Page 16
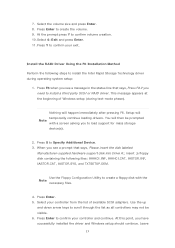
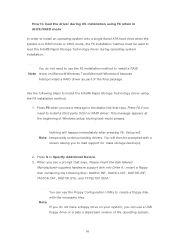
... Press F6 when you see a prompt that says, Press F6 if you to create a floppy disk with the necessary files. How to load the driver during OS installation using the F6 installation method. 1. You do not have a floppy drive on Microsoft Windows 7 and Microsoft Windows 8 because Intel provided a...at the beginning of Windows setup (during operating system installation. Note If you do not need to install the Intel® Rapid Storage Technology driver using F6 when in AHCI/RAID mode In order to install an operating system onto a single Serial ATA hard drive when the system is ...
... Press F6 when you see a prompt that says, Press F6 if you to create a floppy disk with the necessary files. How to load the driver during OS installation using the F6 installation method. 1. You do not have a floppy drive on Microsoft Windows 7 and Microsoft Windows 8 because Intel provided a...at the beginning of Windows setup (during operating system installation. Note If you do not need to install the Intel® Rapid Storage Technology driver using F6 when in AHCI/RAID mode In order to install an operating system onto a single Serial ATA hard drive when the system is ...
Intel Rapid Storage Guide
Page 17
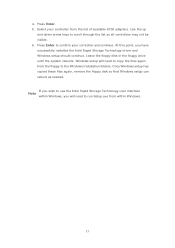
... may not be visible. 6. Windows setup will need to copy the files again from within Windows, you have successfully installed the Intel Rapid Storage Technology driver and Windows setup should continue. 4. Use the up and down arrow keys to the Windows installation folders. At this point, you will need to use...
... may not be visible. 6. Windows setup will need to copy the files again from within Windows, you have successfully installed the Intel Rapid Storage Technology driver and Windows setup should continue. 4. Use the up and down arrow keys to the Windows installation folders. At this point, you will need to use...
RAID Installation Guide
Page 7
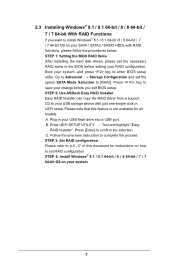
... / 7 / 7 64-bit OS on how to your USB storage device with RAID functions, please follow the procedures below. STEP 2: Use ASRock Easy RAID Installer Easy RAID Installer can copy the RAID driver from a support CD to set RAID configuration. Press key to [RAID]. Press [Enter] to complete the process. 2.3 Installing Windows®...
... / 7 / 7 64-bit OS on how to your USB storage device with RAID functions, please follow the procedures below. STEP 2: Use ASRock Easy RAID Installer Easy RAID Installer can copy the RAID driver from a support CD to set RAID configuration. Press key to [RAID]. Press [Enter] to complete the process. 2.3 Installing Windows®...
RAID Installation Guide
Page 18
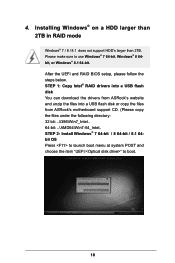
... RAID BIOS setup, please follow the steps below. STEP 1: Copy Intel® RAID drivers into a USB flash disk You can download the drivers from ASRock's website and unzip the files into a USB flash disk or copy the files from ASRock's motherboard support CD. (Please copy the files under the following directory: 32 bit: ..\i386...
... RAID BIOS setup, please follow the steps below. STEP 1: Copy Intel® RAID drivers into a USB flash disk You can download the drivers from ASRock's website and unzip the files into a USB flash disk or copy the files from ASRock's motherboard support CD. (Please copy the files under the following directory: 32 bit: ..\i386...
RAID Installation Guide
Page 19
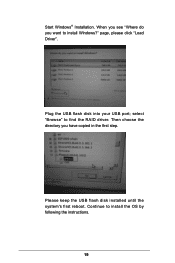
Please keep the USB flash disk installed until the system's first reboot. Continue to find the RAID driver. When you see "Where do you have copied in the first step. Then choose the directory you want to install Windows?" select "Browse" to install the OS by following the instructions. 19 page, please click "Load Driver". Plug the USB flash disk into your USB port; Start Windows® Installation.
Please keep the USB flash disk installed until the system's first reboot. Continue to find the RAID driver. When you see "Where do you have copied in the first step. Then choose the directory you want to install Windows?" select "Browse" to install the OS by following the instructions. 19 page, please click "Load Driver". Plug the USB flash disk into your USB port; Start Windows® Installation.
RAID Installation Guide
Page 20
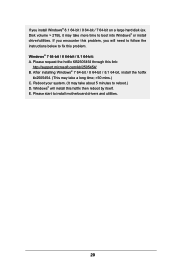
... Windows® 7 64-bit / 8 64-bit / 8.1 64-bit, install the hotfix kb2505454. (This may take more time to boot into Windows® or install driver/utilities. If you encounter this problem, you install Windows® 8.1 64-bit / 8 64-bit / 7 64-bit on a large hard disk (ex. Disk volume ...> 2TB), it may take about 5 minutes to install motherboard drivers and utilities. 20 Please request the hotfix KB2505454 through this hotfix then reboot by itself. Windows® 7 64-bit / 8 64-bit / 8.1 64-bit: A. Please ...
... Windows® 7 64-bit / 8 64-bit / 8.1 64-bit, install the hotfix kb2505454. (This may take more time to boot into Windows® or install driver/utilities. If you encounter this problem, you install Windows® 8.1 64-bit / 8 64-bit / 7 64-bit on a large hard disk (ex. Disk volume ...> 2TB), it may take about 5 minutes to install motherboard drivers and utilities. 20 Please request the hotfix KB2505454 through this hotfix then reboot by itself. Windows® 7 64-bit / 8 64-bit / 8.1 64-bit: A. Please ...
User Manual
Page 4
... (DIMM) 19 2.4 Expansion Slots (PCI and PCI Express Slots) 21 2.5 Jumpers Setup 22 2.6 Onboard Headers and Connectors 23 Chapter 3 Software and Utilities Operation 28 3.1 Installing Drivers 28 3.2 A-Tuning 29 3.3 Intel® Rapid Start Technology 35 3.4 Intel® Smart Connect Technology 40 3.5 ASRock Cloud 45 3.6 ASRock APP Shop 55 3.6.1 UI Overview 55 3.6.2 Apps 56
... (DIMM) 19 2.4 Expansion Slots (PCI and PCI Express Slots) 21 2.5 Jumpers Setup 22 2.6 Onboard Headers and Connectors 23 Chapter 3 Software and Utilities Operation 28 3.1 Installing Drivers 28 3.2 A-Tuning 29 3.3 Intel® Rapid Start Technology 35 3.4 Intel® Smart Connect Technology 40 3.5 ASRock Cloud 45 3.6 ASRock APP Shop 55 3.6.1 UI Overview 55 3.6.2 Apps 56

User Manual
Page 5
3.6.3 BIOS & Drivers 59 3.6.4 Setting 60 3.7 Start8 61 Chapter 4 UEFI SETUP UTILITY 64 4.1 Introduction 64 4.1.1 UEFI Menu Bar 64 4.1.2 Navigation Keys 65 4.2 Main Screen 66 4.3 OC Tweaker Screen ...
3.6.3 BIOS & Drivers 59 3.6.4 Setting 60 3.7 Start8 61 Chapter 4 UEFI SETUP UTILITY 64 4.1 Introduction 64 4.1.1 UEFI Menu Bar 64 4.1.2 Navigation Keys 65 4.2 Main Screen 66 4.3 OC Tweaker Screen ...

User Manual
Page 10
... detailed product information, please visit our website: http://www.asrock.com Please realize that Windows® cannot use ASRock XFast RAM to the components and devices of your own risk and expense. You can use . English 5 Z97 Pro3 Support CD Hardware Monitor OS Certifications • Drivers, Utilities, AntiVirus Software (Trial Version), Google Chrome Browser and...
... detailed product information, please visit our website: http://www.asrock.com Please realize that Windows® cannot use ASRock XFast RAM to the components and devices of your own risk and expense. You can use . English 5 Z97 Pro3 Support CD Hardware Monitor OS Certifications • Drivers, Utilities, AntiVirus Software (Trial Version), Google Chrome Browser and...

User Manual
Page 14
...the OS in detail, and then attach an optional picture or log file for our technical support team. ASRock Easy Driver Installer For users that installs the LAN driver to "RAID", then you are having trouble with your system via an USB storage device, then downloads and... computer will power on automatically to copy the RAID driver from our support CD, Easy Driver Installer is a handy tool in the UEFI that don't have encountered, describe the problem in RAID mode. Z97 Pro3 ASRock UEFI Tech Service Contact ASRock Tech Service by enabling "Dehumidifier Function". Users may prevent...
...the OS in detail, and then attach an optional picture or log file for our technical support team. ASRock Easy Driver Installer For users that installs the LAN driver to "RAID", then you are having trouble with your system via an USB storage device, then downloads and... computer will power on automatically to copy the RAID driver from our support CD, Easy Driver Installer is a handy tool in the UEFI that don't have encountered, describe the problem in RAID mode. Z97 Pro3 ASRock UEFI Tech Service Contact ASRock Tech Service by enabling "Dehumidifier Function". Users may prevent...

User Manual
Page 33
...EXE" in your CD-ROM drive. If the Main Menu does not appear automatically, locate and double click on the support CD driver page. To improve Windows 7 compatibility, please download and install the following hot fix provided by Microsoft. The CD automatically displays the... support CD, insert the CD into your computer. Chapter 3 Software and Utilities Operation 3.1 Installing Drivers The Support CD that comes with the motherboard contains necessary drivers and useful utilities that the motherboard supports. Utilities Menu The Utilities Menu shows the application software that...
...EXE" in your CD-ROM drive. If the Main Menu does not appear automatically, locate and double click on the support CD driver page. To improve Windows 7 compatibility, please download and install the following hot fix provided by Microsoft. The CD automatically displays the... support CD, insert the CD into your computer. Chapter 3 Software and Utilities Operation 3.1 Installing Drivers The Support CD that comes with the motherboard contains necessary drivers and useful utilities that the motherboard supports. Utilities Menu The Utilities Menu shows the application software that...
User Manual
Page 34
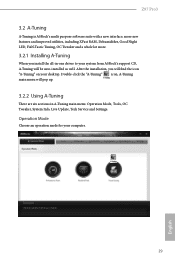
.... 3.2.2 Using A-Tuning There are six sections in A-Tuning main menu: Operation Mode, Tools, OC Tweaker, System Info, Live Update, Tech Service and Settings. Z97 Pro3 3.2 A-Tuning A-Tuning is ASRock's multi purpose software suite with a new interface, more new features and improved utilities, including XFast RAM, Dehumidifier, Good Night LED, FAN-Tastic Tuning, OC... your desktop. Double-click the "A-Tuning" icon, A-Tuning main menu will be auto-installed as well. After the installation, you install the all-in-one driver to your computer. 29 English
.... 3.2.2 Using A-Tuning There are six sections in A-Tuning main menu: Operation Mode, Tools, OC Tweaker, System Info, Live Update, Tech Service and Settings. Z97 Pro3 3.2 A-Tuning A-Tuning is ASRock's multi purpose software suite with a new interface, more new features and improved utilities, including XFast RAM, Dehumidifier, Good Night LED, FAN-Tastic Tuning, OC... your desktop. Double-click the "A-Tuning" icon, A-Tuning main menu will be auto-installed as well. After the installation, you install the all-in-one driver to your computer. 29 English

User Manual
Page 38
Please leave your computer. English 33 Z97 Pro3 Tech Service Contact Tech Service if you have problems with your contact information along with details of BIOS or drivers. Live Update Check for newer versions of the problem.
Please leave your computer. English 33 Z97 Pro3 Tech Service Contact Tech Service if you have problems with your contact information along with details of BIOS or drivers. Live Update Check for newer versions of the problem.

User Manual
Page 41
... 8/7. Press F10 to create the partition on Create. The system will discover the new device and install AHCI drivers automatically. 3.3.2 Setup Guide Configuring Rapid Start Step 1 Run ASRock Rapid Start utility from Start -> All Programs -> ASRock Utility. Step 2 If you have more than one hard drives in your system, you must select one...
... 8/7. Press F10 to create the partition on Create. The system will discover the new device and install AHCI drivers automatically. 3.3.2 Setup Guide Configuring Rapid Start Step 1 Run ASRock Rapid Start utility from Start -> All Programs -> ASRock Utility. Step 2 If you have more than one hard drives in your system, you must select one...

User Manual
Page 64
Click on Step 2 to see more items you will see a list of recommended or critical updates for the BIOS or drivers. Please update them all soon. Step 1 Please check the item information before update. Z97 Pro3 3.6.3 BIOS & Drivers Installing BIOS or Drivers When the "BIOS & Drivers" tab is selected, you want to update. Click to start the update process. 59 English Step 3 Click Update to select one or more details.
Click on Step 2 to see more items you will see a list of recommended or critical updates for the BIOS or drivers. Please update them all soon. Step 1 Please check the item information before update. Z97 Pro3 3.6.3 BIOS & Drivers Installing BIOS or Drivers When the "BIOS & Drivers" tab is selected, you want to update. Click to start the update process. 59 English Step 3 Click Update to select one or more details.
User Manual
Page 93
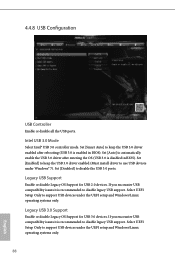
... USB devices under the UEFI setup and Windows/Linux operating systems only. 88 English Set [Auto] to keep the USB 3.0 driver enabled (Must install driver to support USB devices under Windows® 7). Legacy USB 3.0 Support Enable or disable Legacy OS Support for USB 2.0 devices.... Intel® USB 3.0 controller mode. Set [Disabled] to disable legacy USB support. Set [Smart Auto] to automatically enable the USB 3.0 driver after rebooting (USB 3.0 is recommended to support USB devices under the UEFI setup and Windows/Linux operating systems only. Legacy USB Support Enable or...
... USB devices under the UEFI setup and Windows/Linux operating systems only. 88 English Set [Auto] to keep the USB 3.0 driver enabled (Must install driver to support USB devices under Windows® 7). Legacy USB 3.0 Support Enable or disable Legacy OS Support for USB 2.0 devices.... Intel® USB 3.0 controller mode. Set [Disabled] to disable legacy USB support. Set [Smart Auto] to automatically enable the USB 3.0 driver after rebooting (USB 3.0 is recommended to support USB devices under the UEFI setup and Windows/Linux operating systems only. Legacy USB Support Enable or...

User Manual
Page 96
...start installing the operating system in RAID mode. UEFI Tech Service Contact ASRock Tech Service if you are required. After copying the drivers please change the SATA mode to RAID, then you to copy the RAID driver from the support CD to prevent users from our support 91 English ...In order to your current PC and the devices connected. OMG (Online Management Guard) Administrators are able to other users. 4.5 Tools Z97 Pro3 System Browser ASRock System Browser shows the overview of...
...start installing the operating system in RAID mode. UEFI Tech Service Contact ASRock Tech Service if you are required. After copying the drivers please change the SATA mode to RAID, then you to copy the RAID driver from the support CD to prevent users from our support 91 English ...In order to your current PC and the devices connected. OMG (Online Management Guard) Administrators are able to other users. 4.5 Tools Z97 Pro3 System Browser ASRock System Browser shows the overview of...


